- Chapter 28. Setting read-only permissions for the root file system
- 28.1. Files and directories that always retain write permissions
- 28.2. Configuring the root file system to mount with read-only permissions on boot
- Исправление Read-Only File System в Linux
- Ошибки файловой системы и опция remount-ro
- Read-only файловая система в виртуальных машинах
- How to Open a File in Read-Only Mode on Linux
- Option 1: Using the less command
- Option 2: Using the cat command
- Option 3: Using the view command
- Option 4: Using the chmod command
- Commands Mentioned:
- Conclusion:
- Dimitri Nek
- Как исправить read only file system в Linux
- Ошибка read only file system в Linux
Chapter 28. Setting read-only permissions for the root file system
Sometimes, you need to mount the root file system ( / ) with read-only permissions. Example use cases include enhancing security or ensuring data integrity after an unexpected system power-off.
28.1. Files and directories that always retain write permissions
For the system to function properly, some files and directories need to retain write permissions. When the root file system is mounted in read-only mode, these files are mounted in RAM using the tmpfs temporary file system.
The default set of such files and directories is read from the /etc/rwtab file. Note that the readonly-root package is required to have this file present in your system.
dirs /var/cache/man dirs /var/gdm empty /tmp empty /var/cache/foomatic files /etc/adjtime files /etc/ntp.conf
Entries in the /etc/rwtab file follow this format:
- Replace copy-method with one of the keywords specifying how the file or directory is copied to tmpfs.
- Replace path with the path to the file or directory.
The /etc/rwtab file recognizes the following ways in which a file or directory can be copied to tmpfs :
An empty path is copied to tmpfs . For example:
A directory tree is copied to tmpfs , empty. For example:
A file or a directory tree is copied to tmpfs intact. For example:
The same format applies when adding custom paths to /etc/rwtab.d/ .
28.2. Configuring the root file system to mount with read-only permissions on boot
With this procedure, the root file system is mounted read-only on all following boots.
- In the /etc/sysconfig/readonly-root file, set the READONLY option to yes :
# Set to 'yes' to mount the file systems as read-only. READONLY=yes
/dev/mapper/luks-c376919e. / xfs x-systemd.device-timeout=0,ro 1 1 # grubby --update-kernel=ALL --args="ro"
# grubby --update-kernel=ALL --remove-args="rw"
Troubleshooting
- If you mount the root file system with read-only permissions by mistake, you can remount it with read-and-write permissions again using the following command:
Исправление Read-Only File System в Linux

21.10.2022

itpro

CentOS, Linux, Ubuntu

Один комментарий
В некоторый случаях файловая система в Linux может перейти в состояние read-only, при котором вы можете только читать данные с диска, а при попытке записи любых изменение или создании нового файла появдляется ошибка Read-only file system.
Ошибки файловой системы и опция remount-ro
Проверьте параметры монтирования дисков при загрузке Linux. Настройки монтирования файловых систем при загрузке задаются в файле /etc/fstab.
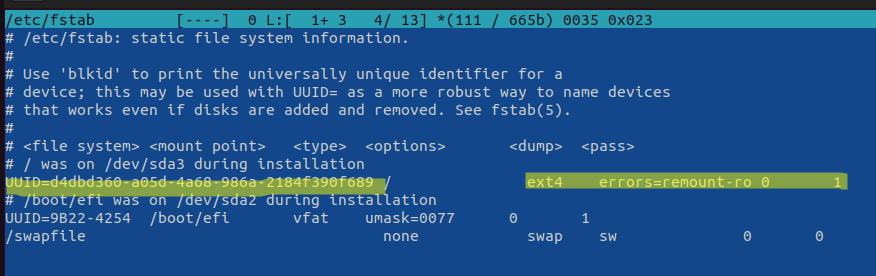
Обратите что в fstab есть строка монтирования корневой директории вида:
UUID=aaaaaaaaa-aaaa-aaaa-aaaa-aaaaaaaaa / ext4 errors=remount-ro 0 1
Параметр errors=remount-ro означает, что данная директория будет смонтирована в режиме чтения, если на файловой системе устройства обнаружены проблемы. В этом случае нужно выполнить проверку диска с помощью FSCK.
Обычные файловые системы такие как EXT4/BTRFS/XFS можно монтировать как в режиме записи, так и только для чтения (в отличии от файловых систем ISO или SquashFS, которые доступны только для чтения).
В случае обнаружения ошибок на диске вы можете использовать одну из трех опций errors=[continue|remount-ro|panic]
- continue – игнорировать ошибки,
- remount-ro – перемонтировать диск в режиме только для чтения
- panic – остановить загрузку системы
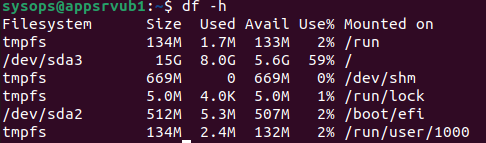
Вы можете вывести соответствие между UUID диска и именем устройства:
В данном примере вы получили, что вашему UUID соответствует устройство /dev/sda3.

Также можно имена устройства и точки монтирования с помощью команды:
Т.к. в данном примере ошибки обнаружены в корневой директории которая является точкой монтирования, вы сможете выполнить ее проверку только загрузившись с LiveCD. Для исправления ошибок файловой системы используется команда:
$ sudo fsck –y UUID=aaaaaaaaa-aaaa-aaaa-aaaa-aaaaaaaaa
Если вы не можете прямо сейчас выполнить проверку диска, и вы хотите немедленно вывести файловую систему из режима read-only, нужно выполниться команду:
Read-only файловая система в виртуальных машинах
Файловая система раздела Linux на виртуальной машине можете перейти в read-only в случае недоступность системы хранения данных (СХД). Самый простой способ восстановить работу ОС – выполнить сброс виртуальной машины (фактически перезапуск с параметрами по умолчанию).
Может оказаться, что ВМ с Linux вообще не загружается и вам доступна только командная строка initramfs с предупреждениями:
UNEXPECTED INCONSISTENCY: RUN fsck MANUALLY. Fsck exitrd with code 4. The root file system of /dev/sdx requires a manual fsck.
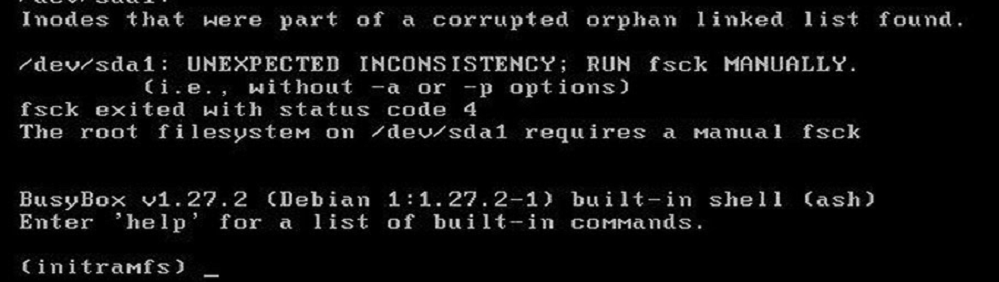
Initramfs это начальная файловая система в оперативной памяти, которая основана на tmpfs, которая содержит утилиты и скрипты, необходимые для работы с дисками, файловыми системами и тд. После запуска initramfs отобразится проблемная ситуация.
Если же ошибок нет – просто вводим exit. Иначе выполняем проверку диска:
Здесь указан том (в данной случае /dev/sda1), для которого требуется выполнить ручную проверку. С помощью следующей команды можно проверить все подключенные файловые системы:
После этого перезагрузите ВМ.
![]() Предыдущая статья Следующая статья
Предыдущая статья Следующая статья ![]()
How to Open a File in Read-Only Mode on Linux
In Linux, opening a file in read-only mode can be useful to prevent accidental modifications to the file contents. Read-only mode allows you to view the contents of the file, but you cannot make any changes to it. In this guide, we will show you how to open a file in read-only mode using various Linux commands.
Option 1: Using the less command
The less command is a powerful utility for viewing file contents on Linux. To open a file in read-only mode using less, simply use the “-R” option:
This will open the file in read-only mode, and you can view the contents of the file without the ability to modify it. To exit the less command, press the “q” key.
Option 2: Using the cat command
The cat command is another popular command for viewing file contents on Linux. To open a file in read-only mode using cat, simply use the “-v” and “-E” options:
This will display the contents of the file in read-only mode. The “-v” option will display non-printable characters, and the “-E” option will display a “$” character at the end of each line.
Option 3: Using the view command
The view command is a read-only version of the vi editor. To open a file in read-only mode using view, simply use the “-R” option:
This will open the file in read-only mode, and you can view the contents of the file without the ability to modify it. To exit the view command, press the “q” key.
Option 4: Using the chmod command
You can also use the chmod command to set the file permissions to read-only mode. To set the file permissions to read-only, use the following command:
This will set the file permissions to read-only mode, and you will not be able to modify the contents of the file. To revert the file permissions back to their original state, use the following command:
Commands Mentioned:
- less – displays file contents in a paginated manner
- cat – displays file contents
- view – opens a file in read-only mode using the vi editor
- chmod – changes file permissions
Conclusion:
In this guide, we have shown you how to open a file in read-only mode using various Linux commands. Opening a file in read-only mode can be useful to prevent accidental modifications to the file contents. The less, cat, and view commands allow you to view the contents of a file in read-only mode, while the chmod command allows you to set the file permissions to read-only mode.
Dimitri Nek
Dimitri is a Linux-wielding geek from Newport Beach and a server optimization guru with over 20 years of experience taming web hosting beasts. Equipped with an arsenal of programming languages and an insatiable thirst for knowledge, Dimitri conquers website challenges and scales hosting mountains with unmatched expertise. His vast knowledge of industry-leading hosting providers allows him to make well-informed recommendations tailored to each client’s unique needs.
Как исправить read only file system в Linux
Ошибка read only file system может возникнуть при загрузке с LiveCD диска или в режиме восстановления вашего дистрибутива. Она означает, что файловая система в которую вы пытаетесь вести запись примонтирована только для чтения. Этому может быть несколько причин. Есть файловые системы, которые доступны только для чтения это файловая система оптических дисков — ISO, а также файловая система образов SquashFS.
С такими файловыми системами вы сделать ничего не сможете. Для изменения данных в них, надо распаковать образ, изменить данные и запаковать его обратно. Но что касается обычных файловых систем, таких как EXT4, BTRFS, XFS, то их можно монтировать и для чтения и для записи.
Ошибка read only file system в Linux
В этой небольшой статье мы рассмотрим как исправить read only file system Linux перемонтировав файловую систему для записи. Первым делом надо определиться с точкой монтирования, для которой надо разрешить запись. Попытаемся создать файл в корневом каталоге:
Ошибка, файловая система корневого каталога доступна только для чтения. Чтобы посмотреть все точки монтирования доступные в системе выполните в терминале:
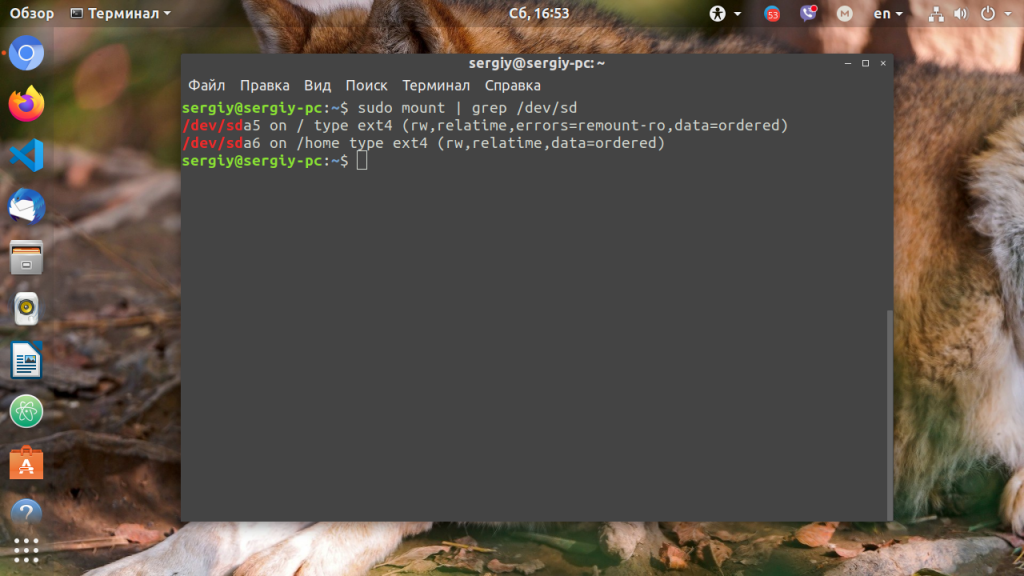
В данном случае, корневая файловая система и есть точкой монтирования. Но у вас, например, возникнут проблемы с созданием файла в домашней папке, то надо будет уже перемонтировать /home. Смотрите внимательно. Когда точка монтирования выбрана, осталось её примонтировать с правами на запись:
sudo mount -o remount,rw /home
После этого вы сможете создать файл без каких-либо проблем. После завершения работы, во избежание повреждения данных при перезагрузке, желательно перемонтировать файловую систему обратно в режим только для чтения:
Теперь вы знаете что означает эта ошибка и как с ею справится. Если у вас остались вопросы, спрашивайте в комментариях!
Обнаружили ошибку в тексте? Сообщите мне об этом. Выделите текст с ошибкой и нажмите Ctrl+Enter.