- Switch Debian from legacy to UEFI boot mode
- 1. Modify the hard-disk partitions
- 1.1. Boot a Debian live system
- 1.2. Identify Debian’s “/boot” partition
- 1.3. Create a GPT partition table
- 1.4. Create an UEFI partition
- 2. Mount the Debian filesystem
- 2.1. Mount a non-encrypted “root”-filesystem
- 2.2. Mount an encrypted “root”-filesystem
- 2.2.1. Find the device and partition of the to be mounted logical volume
- 2.2.2. Mount encrypted logical volume
- 2.2.3. Unmount encrypted logical volume
- 2.3. Mount the remaining filesystems
- How to Access UEFI Settings in Linux Systems
- Boot into UEFI settings from Linux
- Create a desktop shortcut to boot into UEFI settings (optional and for experts)
- Wrapping Up
Switch Debian from legacy to UEFI boot mode
This note explains how to switch a legacy boot Debian/Ubuntu system into a UEFI boot system. Typical use case:
- switch a legacy boot installation into an UEFI one,
- reinstall a broken UEFI boot loader on Debian 7, Debian 8, Debian 9 or Debian 10.
| This manual has been tested on Debian 7 Wheezy, Debian 8 Jessie, Debian 9 Stretch and Debian 10 Buster. |
Please help to keep this manual up to date. It is hosted on Github. There you can file issues and pull requests.
1. Modify the hard-disk partitions
1.1. Boot a Debian live system
1.2. Identify Debian’s “/boot” partition
My legacy boot system had a 243 MiB ext2 partition mounted on /boot. This partition is never encrypted. It is where the grub files and Linux kernels reside. Check by double clicking on the partition icon on the live-disk-desktop and have a look inside.
# ls -l total 21399 -rw-r--r-- 1 root root 155429 Sep 28 00:59 config-3.16-0.bpo.2-amd64 drwxr-xr-x 3 root root 7168 Nov 5 08:03 grub -rw-r--r-- 1 root root 15946275 Nov 5 16:28 initrd.img-3.16-0.bpo.2-amd64 drwx------ 2 root root 12288 Nov 24 2012 lost+found -rw-r--r-- 1 root root 2664392 Sep 28 00:59 System.map-3.16-0.bpo.2-amd64 -rw-r--r-- 1 root root 3126096 Sep 28 00:48 vmlinuz-3.16-0.bpo.2-amd64
# df -h Filesystem Size Used Avail Use% Mounted on . /dev/sdb1 234M 28M 206M 13% /boot
As you can see in the following partition table of the Debian legacy boot system my /boot partition is number 1 ( /dev/sdb1 ). On newer systems SSD-disks might be listed as /dev/nvme0n1p1 where p1 designates the first partition.
| The live system has identified this partition as /dev/sdb . The debian system on your hard-disk could reference it differently. |
# fdisk -l /dev/sdb Device Boot Start End Blocks Id System /dev/sdb1 * 2048 499711 44032 7 HPFS/NTFS/exFAT /dev/sdb5 501760 976771071 488134656 83 Linux
In legacy boot mode the /boot partition must have the boot -flag (*) set. This confirms our assumption: the /boot filesystem is on: /dev/sdb1 .
# gdisk -l /dev/sdb GPT fdisk (gdisk) version 0.8.5 Partition table scan: MBR: MBR only BSD: not present APM: not present GPT: not present . Number Start (sector) End (sector) Size Code Name 1 2048 499711 243.0 MiB 8300 Linux filesystem 5 501760 976771071 238.2 GiB 8300 Linux filesystem
1.3. Create a GPT partition table
Transform the partition table from MBR to GPT with
#gdisk /dev/sdb r recovery and transformation options (experts only) f load MBR and build fresh GPT from it
1.4. Create an UEFI partition
A good graphical tool is the Gnome Partition Editor gparted :
- Shrink the /boot partition to 200 MB in order to free 43 MB (see partition 1 below).
- Create a new 43 MB partition for efi using gparted with partition code EF00 (EFI system) [1] and flag it bootable. Format the partition with a fat32 [2] filesystem (see partition 2 below).
- Grub2 needs additionally a not formatted 1 MB partition to store its stage two files [3] . The partition is referred to as core.img [4] . 1 MB is more than enough. Tag the partition as type EF02 [5] .
Leave the other partitions untouched (see partition 5 below).
# gdisk -l /dev/sdb GPT fdisk (gdisk) version 0.8.5 Partition table scan: MBR: protective BSD: not present APM: not present GPT: present Found valid GPT with protective MBR; using GPT. Disk /dev/sdb: 976773168 sectors, 465.8 GiB . Number Start (sector) End (sector) Size Code Name 1 2048 411647 200.0 MiB 8300 Linux filesystem 2 411648 499711 43.0 MiB EF00 Efi partition 3 499712 501759 1024.0 KiB EF02 BIOS boot partition 5 501760 976771071 465.5 GiB 8300 Linux filesystem
If you haven’t changed the partition code to EF00 (or EF02 ) you can do it now within gdisk with the command t , followed by the partition number 2 (or 3 ) and the partition code EF00 (or EF02 ).
2. Mount the Debian filesystem
| The recovery mode of the Debian >= 9 Stretch installer disk automates all following subsections in this section. Try this first. |
- Reboot and enable UEFI in BIOS.
- Insert a Debian installation disk.
- Reboot again into the Debian installer disk and select Advanced options → Rescue mode
- Configure keyboard, hostname, domain and network.
- Unlock encrypted hard-disks.
- Chose device to use as root system, e.g. /dev/koobue1-vg/root (for hostname koobue1 , yours is different).
- Answer: Mount separate /boot partition? with yes .
- Choose Execute a shell in /dev/koobue1-vg/root .
- Jump directly to section Update Debian’s /etc/fstab hereafter in this manual.
If the above does not work work for you, follow the rest of this section.
The next step differs whether the root -filesystem is encrypted or not.
2.1. Mount a non-encrypted “root”-filesystem
2.2. Mount an encrypted “root”-filesystem
- For encrypted root file systems the mounting procedure can be a little tricky especially when the root filesystem resides inside a logical volume which is encrypted. This section shows how to mount and unmount an encrypted root -filesystem.
2.2.1. Find the device and partition of the to be mounted logical volume
root@host-system:~# tail -f /var/log/syslog sd 3:0:0:0: [sdb] 976773168 512-byte logical blocks: (500 GB/465 GiB) sd 3:0:0:0: [sdb] Write Protect is of manually. sd 3:0:0:0: [sdb] Mode Sense: 43 00 00 00 sd 3:0:0:0: [sdb] Write cache: enabled, read cache: enabled, doesn't support DPO or FUA sdb: sdb1 sdb2 sdb3 sdb5 sd 3:0:0:0: [sdb] Attached SCSI disk
root@host-system:~# gdisk -l /dev/sdb GPT fdisk (gdisk) version 0.8.5 . Number Start (sector) End (sector) Size Code Name 1 2048 411647 200.0 MiB 8300 Linux filesystem 2 411648 494821 43.0 MiB 0700 3 494822 501759 1024.0 KiB 8300 Linux filesystem 5 501760 976771071 465.5 GiB 8300 Linux filesystem
2.2.2. Mount encrypted logical volume
root@host-system:~# lvscan ACTIVE '/dev/host-system/root' [231.03 GiB] inherit ACTIVE '/dev/host-system/swap_1' [7.20 GiB] inherit
root@host-system:~# cryptsetup luksOpen /dev/sdb5 sdb5_crypt Enter passphrase for /dev/sdb5:
root@host-system:~# lvscan inactive '/dev/disk-system/root' [457.74 GiB] inherit inactive '/dev/disk-system/swap_1' [7.78 GiB] inherit ACTIVE '/dev/host-system/root' [231.03 GiB] inherit ACTIVE '/dev/host-system/swap_1' [7.20 GiB] inherit
Logical volume of disk-system`is registered now. It contains one `root partition (line 1) and one swap partition (line 2).
root@host-system:~# lvchange -a y disk-system
root@host-system:~# lvscan ACTIVE '/dev/disk-system/root' [457.74 GiB] inherit ACTIVE '/dev/disk-system/swap_1' [7.78 GiB] inherit ACTIVE '/dev/host-system/root' [231.03 GiB] inherit ACTIVE '/dev/host-system/swap_1' [7.20 GiB] inherit root@host-system:~# ls /dev/mapper control disksystem-root disksystem-swap_1 hostsystem-root hostsystem-swap_1 mymapper sdb5_crypt
root@host-system:~# mount -t ext4 /dev/mapper/disksystem-root /mnt
root@host-system:~# ls /mnt bin etc initrd.img.old lib64 mnt proc sbin sys var boot home lib lost+found mnt2 root selinux tmp vmlinuz dev initrd.img lib32 media opt run srv usr vmlinuz.old
2.2.3. Unmount encrypted logical volume
This subsection is only for completeness. Skip it.
root@host-system:~# umount /mnt root@host-system:~# lvscan ACTIVE '/dev/disk-system/root' [457.74 GiB] inherit ACTIVE '/dev/disk-system/swap_1' [7.78 GiB] inherit ACTIVE '/dev/host-system/root' [231.03 GiB] inherit ACTIVE '/dev/host-system/swap_1' [7.20 GiB] inherit root@host-system:~# lvchange -a n disk-system root@host-system:~# lvscan inactive '/dev/disk-system/root' [457.74 GiB] inherit inactive '/dev/disk-system/swap_1' [7.78 GiB] inherit ACTIVE '/dev/host-system/root' [231.03 GiB] inherit ACTIVE '/dev/host-system/swap_1' [7.20 GiB] inherit root@host-system:~# cryptsetup luksClose sdb5_crypt root@host-system:~# lvscan ACTIVE '/dev/host-system/root' [231.03 GiB] inherit ACTIVE '/dev/host-system/swap_1' [7.20 GiB] inherit
2.3. Mount the remaining filesystems
# mount /dev/sdb1 /mnt/boot # mkdir /mnt/boot/efi # mount /dev/sdb2 /mnt/boot/efi # for i in /dev/ /dev/pts /proc /sys ; do mount -B $i /mnt/$i ; done
or this way, both commands do the same…
# mount /dev/sdb1 /mnt/boot # mkdir /mnt/boot/efi # mount /dev/sdb2 /mnt/boot/efi # mount --bind /sys /mnt/sys # mount --bind /proc /mnt/proc # mount --bind /dev /mnt/dev # mount --bind /dev/pts /mnt/dev/pts
For internet access inside chroot:
# cp /etc/resolv.conf /mnt/etc/resolv.conf
How to Access UEFI Settings in Linux Systems
A simple beginner’s tutorial discussing various ways of accessing UEFI firmware settings in a Linux computer.
Want to check the boot order or the power settings at the firmware level? You can access the UEFI settings by pressing the F2, F10, or Del buttons when your system boots. The problem with this approach is that you may not know the exact key and must be alert about pressing those keys at the right time.
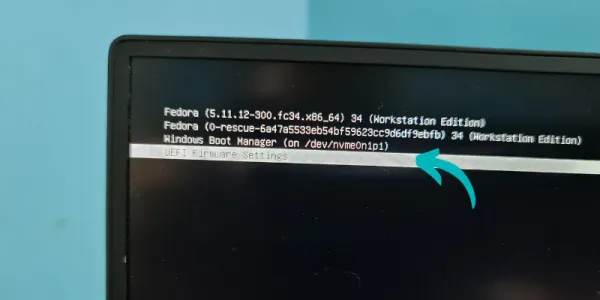
If you don’t want to feel like Mr. Bean in the above Gif, you can access the UEFI settings from the Grub bootloader screen in Linux. You see this screen when you turn on your Linux system. Most Linux distributions like Fedora and Ubuntu use Grub and they allow you to access the UEFI settings from the Grub screen like this. What if you don’t see this screen or your distro doesn’t use Grub? There are still ways to access UEFI settings from within Linux. Before you see how to do that, please ensure that your system uses UEFI.
Your system will reboot into UEFI settings. You cannot access and modify the firmware settings from within an operating system.
Boot into UEFI settings from Linux
This method will only work on Linux distros having systemd. This means this method will work on anything based on Ubuntu, Debian, Fedora, and any mainstream Arch-based distros, including Manjaro and EndeavourOS. It is still a good idea to ensure that your Linux distro uses systemd. Use the given command and if it returns systemd you are good to go:

Once you figure out that your distro is utilizing systemd, you can use the given command to boot into UEFI settings:
systemctl reboot --firmware-setup- reboot : As its name suggests, it will reboot your system.
- —firmware-setup : When this option is used along with ‘reboot’, it will indicate the system’s firmware to boot into the firmware setup interface.
Yup, that was it! A single command and you will be kicked into UEFI settings. I know Windows allows booting into UEFI firmware settings from within Windows. It’s good to see something similar in Linux as well.
Create a desktop shortcut to boot into UEFI settings (optional and for experts)
If you often find yourself booting into the UEFI settings and don’t always remember the command, you can make your life easier by creating a desktop shortcut. This will let you boot into UEFI by clicking on the desktop icon.
Now, this is unnecessary and not required for most Linux users. Do it only if you feel the need for it. The method requires editing files in the command line.
First, use the given command to create a desktop shortcut file for UEFI settings:
sudo nano /usr/share/applications/uefi-reboot.desktopAnd paste the following content in the file:
[Desktop Entry] Name=UEFI Firmware Setup (Reboot) Comment=Access the motherboard configuration utility Exec=systemctl reboot --firmware-setup Icon=system-restart Terminal=false Type=Application Categories=System;Settings;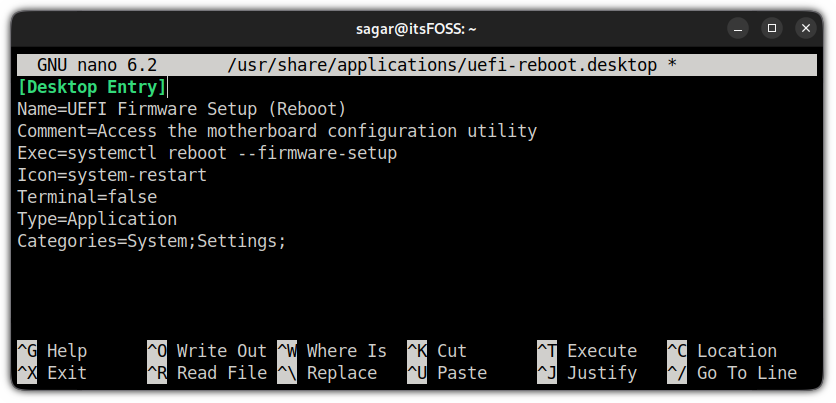
And now, you will find the shortcut for UEFI Firmware Setup in your system menu:

That’s it! A neat way to get into UEFI settings.
Wrapping Up
The classic ways of accessing the boot settings may be a little inconvenient for some people. The grub screen may not show the UEFI option for older versions.
And this is where the systemd method shines. I found this method a lifesaver when my system crashed and my function keys were not responding, which are necessary to boot into UEFI (that’s what I thought then!).
I hope you find it equally helpful.