- How to remount filesystem in the read-write mode under Linux
- How to check if file system is read only
- Re-mount file system in read-write mode
- Related stuff:
- How to Mount and Unmount Storage Devices from the Linux Terminal
- The Linux File System
- Interrogate Your File System With mount
- Interrogate Your File System With df
- Remounting All File Systems in fstab
- Mounting an ISO Image
- Exploring the ISO Image
- Unmounting the ISO Image
- Creating a Mount Point
- Binding a Mount Point
How to remount filesystem in the read-write mode under Linux
Most of the time on newly created file systems of NFS filesystems we see an error like below :
root@kerneltalks # touch file1 touch: cannot touch ‘file1’: Read-only file system
This is because the file system is mounted as read-only. In such a scenario you have to mount it in read-write mode. Before that, we will see how to check if the file system is mounted in read-only mode and then we will get to how to remount it as a read-write filesystem.
How to check if file system is read only
To confirm file system is mounted in read only mode use below command –
# cat /proc/mounts | grep datastore /dev/xvdf /datastore ext3 ro,seclabel,relatime,data=ordered 0 0
Grep your mount point in cat /proc/mounts and observer third column which shows all options which are used in the mounted file system. Here ro denotes file system is mounted read-only.
You can also get these details using mount -v command
root@kerneltalks # mount -v |grep datastore /dev/xvdf on /datastore type ext3 (ro,relatime,seclabel,data=ordered)
In this output. file system options are listed in braces at last column.
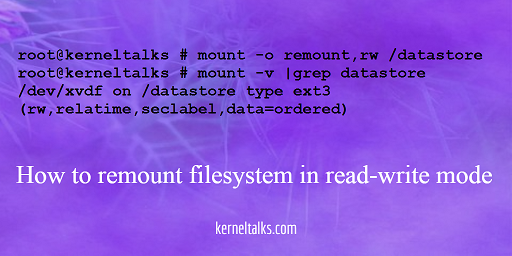
Re-mount file system in read-write mode
To remount file system in read-write mode use below command –
root@kerneltalks # mount -o remount,rw /datastore root@kerneltalks # mount -v |grep datastore /dev/xvdf on /datastore type ext3 (rw,relatime,seclabel,data=ordered)
Observe after re-mounting option ro changed to rw . Now, the file system is mounted as read-write and now you can write files in it.
Note : It is recommended to fsck file system before re mounting it.
You can check file system by running fsck on its volume.
root@kerneltalks # df -h /datastore Filesystem Size Used Avail Use% Mounted on /dev/xvda2 10G 881M 9.2G 9% / root@kerneltalks # fsck /dev/xvdf fsck from util-linux 2.23.2 e2fsck 1.42.9 (28-Dec-2013) /dev/xvdf: clean, 12/655360 files, 79696/2621440 blocks
Sometimes there are some corrections that need to be made on a file system that needs a reboot to make sure there are no processes are accessing the file system.
Related stuff:
- How to upgrade package using YUM in RHEL
- How to establish passwordless ssh between two servers
- How to move /tmp on a separate disk as a separate mount point
- Create nice text banner in HPUX
- How to identify current boot disk in HPUX
- Step by step procedure to take ignite tape backup in HPUX
- Troubleshooting AWS cross-account IAM role access
- 4 steps guide for SMTP configuration in HPUX
- Root disk mirroring in itanium HPUX
- How to configure nameserver in Linux
- How to save top command output in file
- How to safely remove disk from LVM
How to Mount and Unmount Storage Devices from the Linux Terminal

Dave McKay

Dave McKay
Writer
Dave McKay first used computers when punched paper tape was in vogue, and he has been programming ever since. After over 30 years in the IT industry, he is now a full-time technology journalist. During his career, he has worked as a freelance programmer, manager of an international software development team, an IT services project manager, and, most recently, as a Data Protection Officer. His writing has been published by howtogeek.com, cloudsavvyit.com, itenterpriser.com, and opensource.com. Dave is a Linux evangelist and open source advocate. Read more.

File systems in Linux and Unix-like operating systems like macOS can be mounted, unmounted, and remounted using the terminal. This is a powerful and versatile tool—here’s everything you need to know.
The Linux File System
The file systems in Linux, macOS, and other Unix-like operating systems don’t use separate volume identifiers for storage devices in the way that, say, Windows does. Windows assigns each volume a drive letter such as C: or D: and the file system for each volume is a tree of directories sitting below that drive letter. In Linux, the file system is an all-in-one directory tree. A mounted storage device has its file system grafted onto that tree so that it appears to be an integral part of one cohesive file system. The newly mounted file system will be accessible via the directory to which it is mounted. That directory is called the mount point for that file system.
Many file systems are auto-mounted at boot time or on-the-fly as storage volumes connected to the computer during runtime. Cautious system admins can turn off the runtime auto-mount features so that they can control connections to the system.
This means storage devices connected during runtime might not auto-mount and will require mounting manually. Mounting a file system manually lets you make decisions about that file system, such as where the mount point will be and whether the file system is going to be read-only or read-write.
Whether it is out of necessity or through choice, the mount , umount and remount commands give you the ability to take control of this important aspect of your Linux system.
Interrogate Your File System With mount

Mount has a great many options, but to list all of the mounted file systems on your computer requires no options at all. Simply type mount and hit Enter: mount will list all of the connected file systems in the terminal window.

It can be difficult to pick through that dump of data to find what you are looking for.
You can refine the output by asking mount to list only the file systems of interest to you. The -t (type) option tells mount what type of file system to report on.

As an example, we have asked mount to list only tmpfs file systems. We get a much more manageable output.
A tmpfs file system appears as though it were a regular, mounted file system but it is actually stored in volatile memory—the tmp stands for temporary—instead of on a persistent storage device.
- rw: The file system is readable and writable.
- relatime: The kernel is using an optimized scheme to record file access and modification meta-data.
- errors=remount -o: If a sufficiently serious error is detected, the file system will be remounted in read-only mode to allow diagnosis.
Interrogate Your File System With df
The df command can also be used to display which file systems are mounted and where their mount points are.
df used with no parameters gives you the same information overload problem as mount . As an example, in Ubuntu Linux, there is a squashfs pseudo-file system created for each and every application that has been installed using the snap command. Who wants to see all of those?
To force df to ignore them—or any other file system type— use the -x (exclude) option:

You can easily see the names of the file systems, their capacities, used and free space, and their mount points.
Remounting All File Systems in fstab
All of the file systems mounted at boot time have entries in a file called fstab , which is the file system table located within /etc .
You can use mount to force a “refresh” and remount all the file systems listed in fstab . Under normal operating conditions this is not required. It really comes into its own if you have issues with multiple file systems.
You’ll need to use sudo , so you’ll be prompted for your password.

Admittedly, on a correctly operating computer, it is a little underwhelming.
On a computer with file system issues, however, the remount might clear the problems. If that doesn’t happen, then at least you will get diagnostic messages on the screen and in the system logs that will guide you to seek out the cause of the problem.
Mounting an ISO Image
It is easy to mount an ISO image so that you can access its contents as part of the file system.
This will work with any ISO image. In this example, we happen to be using a Tiny Core Linux ISO because it is conveniently small and quick to download. (A tiny Linux distribution with a GUI, in 18 MB! You probably have .mp3 files bigger than that.)
In the same directory as the ISO image, issue this command. Substitute the name of the ISO file that you are mounting.
sudo mount -t iso9660 -o loop TinyCore-current.iso /mnt

Because we need to use sudo you’ll need to enter your password.
The -t (type) option tells mount what type of file system we are mounting. It is an ISO file, so we provide the iso9660 type specifier.
The -o (options) flag is used to pass extra parameters to mount . Our parameter is loop .
We’re using loop to force mount to use a loop device file to connect to our ISO image. A loop device file allows a file (like the ISO image) to be mounted and treated as though it were a storage device.
Device files are special files used as an interface so that connected devices appear as though they were a normal file system file. This is part of the everything in Linux is a file design philosophy.
There are many different types of device files. We saw one earlier when we noted that the only ext4 file system on this test machine was mounted on / and was called sda .
To be more accurate, that ext4 file system is on a storage device connected to the file system through the /dev/sda device file and the file system on that storage device mounted at / .
We have to provide the name of the ISO image of course, and we need to let mount know where we’d like the file system to be mounted. We have chosen /mnt .
The ISO image is mounted. A reminder that ISO images are always mounted in read-only mode appears in the terminal window.
Exploring the ISO Image
Now that it is mounted we can navigate the directories in the ISO image in the same way as any other part of the file system. Let’s list the files in the ISO image. It is mounted at /mnt remember.

Unmounting the ISO Image
To unmount a mounted file system, use the umount command. Note that there is no “n” between the “u” and the “m”—the command is umount and not “unmount.”
You must tell umount which file system you are unmounting. Do so by providing the file system’s mount point.

No news is good news. If there’s nothing to report, then all went well.
Creating a Mount Point
You can create and use your own mount points. We’re going to create one called isomnt and mount our ISO image on that. A mount point is just a directory. So we can use mkdir to create our new mount point.
sudo mkdir /media/dave/isomnt

Now we can use the same command format as before to mount our ISO image. This time we won’t mount it on /mnt , we’ll mount it on /media/dave/isomnt/ :
sudo mount -r -t iso9660 -o loop TinyCore-current.iso /media/dave/isomnt/

We can now access the mounted file system from our new mount point.
ls /media/dave/isomnt/cde/optional

But those pathways are getting very long. That’s quickly going to become tiresome. Let’s do something about that.
Binding a Mount Point
You can bind a mount point to another directory. The mounted file system can then be accessed either through the original mount point or through the directory that is bound to it.
Here’s a worked example. We’ll create a directory in our home directory called iso . Then we’ll bind the mount point of the ISO image /media/dave/isomnt to the new iso directory in our home directory.
We’ll be able to access the ISO image through the original mount point /media/dave/isomnt and through the new iso directory. The -B (bind) option requires the name of the mount point and the name of the directory to bind it to.
sudo mount -B /media/dave/isomnt/ iso