- How can I remove a package and its dependencies? [duplicate]
- How to Remove a Package and Its Dependencies with Pacman on Arch Linux
- Finding Out the Dependencies of a Certain Package
- Removing a Package and All the Dependencies with Pacman
- Removing Packages that Don’t Depend on Other Packages
- About the author
- Shahriar Shovon
- Using apt-get to remove packages and dependencies
- 4 Answers 4
How can I remove a package and its dependencies? [duplicate]
# apt-get -y install --no-install-recommends build-essential . The following additional packages will be installed: binutils cpp cpp-5 dpkg-dev g++ g++-5 gcc gcc-5 libasan2 libatomic1 libc-dev-bin libc6-dev libcilkrts5 libdpkg-perl libgcc-5-dev libgdbm3 libgomp1 libisl15 libitm1 liblsan0 libmpc3 libmpfr4 libmpx0 libperl5.22 libquadmath0 libstdc++-5-dev libtsan0 libubsan0 linux-libc-dev make patch perl perl-modules-5.22 xz-utils Suggested packages: binutils-doc cpp-doc gcc-5-locales debian-keyring g++-multilib g++-5-multilib gcc-5-doc libstdc++6-5-dbg gcc-multilib manpages-dev autoconf automake libtool flex bison gcc-doc gcc-5-multilib libgcc1-dbg libgomp1-dbg libitm1-dbg libatomic1-dbg libasan2-dbg liblsan0-dbg libtsan0-dbg libubsan0-dbg libcilkrts5-dbg libmpx0-dbg libquadmath0-dbg glibc-doc libstdc++-5-doc make-doc ed diffutils-doc perl-doc libterm-readline-gnu-perl | libterm-readline-perl-perl Recommended packages: fakeroot libalgorithm-merge-perl manpages manpages-dev libfile-fcntllock-perl rename The following NEW packages will be installed: binutils build-essential cpp cpp-5 dpkg-dev g++ g++-5 gcc gcc-5 libasan2 libatomic1 libc-dev-bin libc6-dev libcilkrts5 libdpkg-perl libgcc-5-dev libgdbm3 libgomp1 libisl15 libitm1 liblsan0 libmpc3 libmpfr4 libmpx0 libperl5.22 libquadmath0 libstdc++-5-dev libtsan0 libubsan0 linux-libc-dev make patch perl perl-modules-5.22 xz-utils # apt-get -y --purge --auto-remove remove build-essential . The following packages will be REMOVED: build-essential* # apt-get -y --purge autoremove . The following packages will be REMOVED: g++* g++-5* libstdc++-5-dev* How to Remove a Package and Its Dependencies with Pacman on Arch Linux
![]()
When you install packages on Arch Linux with Pacman package manager, some other packages are also installed with it. These packages are called the dependencies of the package that you tried to install. It’s all good that Pacman resolves all the dependencies and installs them for you. It saves you from manually installing them one by one, which obviously is boring and time consuming.But the problem comes in when you try to remove the package from your Arch Linux system. By default, Pacman package manager will only remove the package that you tell it to, leaving the dependencies of that package installed. The problem with that is the unnecessary packages takes extra space on the hard drive. Of course that doesn’t matter when you have a big hard drive on your local computer, but if it’s a server that you rented online, you will have limited disk space. So saving a few megabytes to a few hundreds of megabytes is still worth it.
In this article I will show you how to remove packages on Arch Linux along with their dependencies using Pacman package manager. Let’s get started.
Finding Out the Dependencies of a Certain Package
You can use pactree utility to find out the packages the package xyz depends on.
NOTE: You don’t need pactree to remove all the dependencies along with the package. But I find it interesting as it helps you understand how packages on your Arch Linux system are dependent on each other.
For example, you can check the dependency of the package filezilla with pactree as follows:

As you can see, pactree shows you a nicely formatted tree of dependencies of filezilla package.

You can pass -d N parameter to pactree to only print a certain depth of the tree. Here N = 1, 2, 3, …
When N=1, the direct dependency tree is printed.
You can run the following command to find out the direct dependencies of filezilla with pactree:

As you can see, the direct dependencies of filezilla is listed.

You can print the list in plain format (not the tree format) with the following command:

If you want, you can export the list to a file, let’s say filezilla.txt with the following command:

Removing a Package and All the Dependencies with Pacman
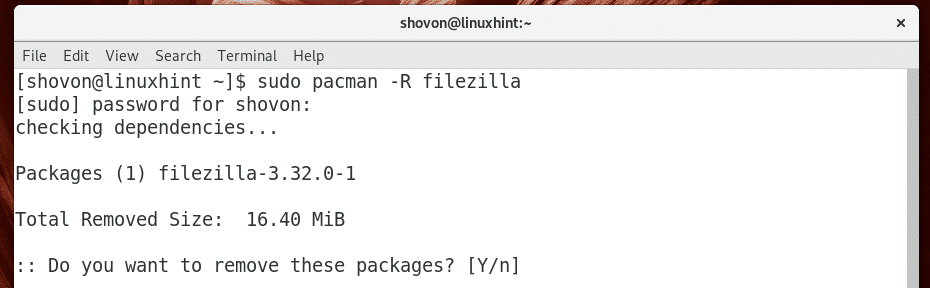
You can remove only a specific package, let’s say filezilla using Pacman with the following command:
As you can see in the screenshot below, that command would remove the package, but it would leave all the dependencies of filezilla package installed. This is what I was taking about earlier.
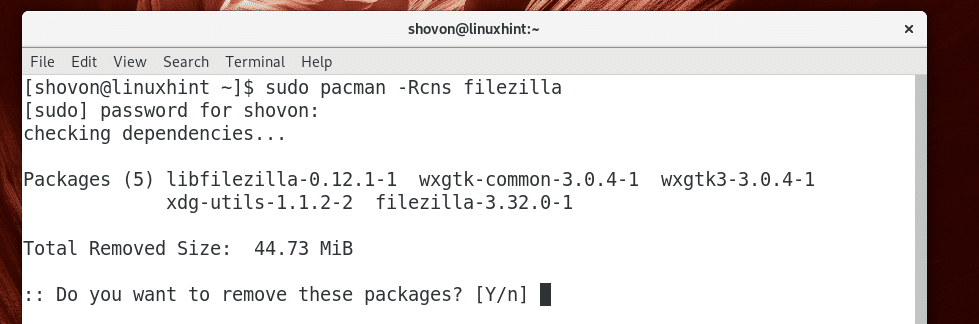
You can remove all the dependencies of filezilla as well with the following Pacman command:

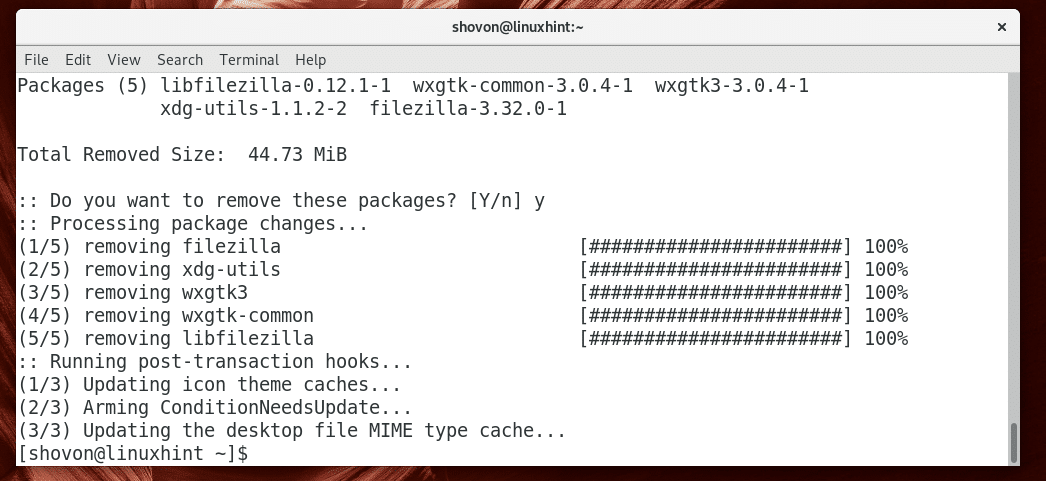
As you can see in the screenshot below, all the direct dependencies are going to be removed as well. Just press y and then press to remove all of these packages.
As you can see, all the packages are removed.
Removing Packages that Don’t Depend on Other Packages
If you didn’t know what I showed you earlier, and removed packages with sudo pacman -R command, then your Arch Linux system may have a lot of unnecessary packages still installed. But don’t regret yet. There is a way to remove these unwanted packages and save disk spaces.
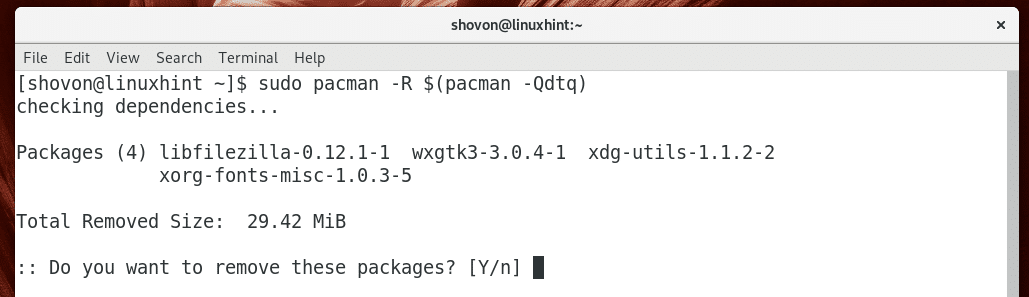
You can run the following command to find out all the unnecessary packages (packages that don’t depend on other packages):

As you can see, on my Arch Linux machine, four unnecessary packages are installed.

If your Arch Linux machine show a longer list, don’t be afraid as you don’t have to remove them one by one.
You can remove all of these unnecessary packages with the following command:

Press y and then press to continue.
As you can see, all the unnecessary packages are removed.

That’s how you remove packages along with its dependencies and remove all the unnecessary packages with Pacman package manager on Arch Linux. Thanks for reading this article.
About the author
Shahriar Shovon
Freelancer & Linux System Administrator. Also loves Web API development with Node.js and JavaScript. I was born in Bangladesh. I am currently studying Electronics and Communication Engineering at Khulna University of Engineering & Technology (KUET), one of the demanding public engineering universities of Bangladesh.
Using apt-get to remove packages and dependencies
I’ve recently been reading through a lot of questions/answers/opinions about removing packages and dependencies. There’s a lot of different ways to do it, some being overly convoluted and some being insufficient/incomplete. I want to ask here in one place what others think is the best ways to do go about clearing out a package and everything including configs, dependencies, and the dependencies’ configs. I’ll offer my method as well that came from a lot of trial and error and hair-pulling.
4 Answers 4
Warning: This can remove packages that you might still want. If this happens just reinstall them. But honestly when you’re installing/uninstalling something that’s gonna make big changes to your system. why not go ahead and backup first.
The most thorough, method I’ve ever come up with to completely remove a package PLUS its dependencies PLUS all configs including those configs of dependencies and do a little housecleaning is this where PACKAGENAME is the main package to be removed:
- Log out from the desktop and press Ctrl+Alt+F1 then login to TTY1 and run the following commands:
sudo apt-get purge sudo apt-get purge $(apt-cache depends | awk '< print $2 >' | tr '\n' ' ') sudo apt-get autoremove sudo apt-get update sudo apt-get check sudo apt-get -f install sudo apt-get autoclean So what’s going on in the second line? The pipes take the output from apt-cache depends and reformat it. The first pipe awk ‘< print $2 >‘ takes the output of apt-cache depends and prints, or «echoes», only the second column. Without it you’d also have in the list another column which is the dependency type, i.e. «depends», «recommends», etc. Then the second pipe tr ‘\n’ ‘ ‘ takes that result and removes, or truncates (hence tr), the newline(s) and replaces them with a space that separates the names. All of this returns a «space-delimited» list of the names of all dependency packages of PACKAGENAME that’s format-friendly for use with multiple package input to purge command-option.
This works especially well for meta packages. I run the last command «sudo apt-get -f install» at the end to check for possible broken packages and fix them after making so many changes all at once. I especially do this anytime I add a «DE» and want to go back. Just recently I used this after installing GNOME and it even fixed the fact that only purging Gnome with autoremove after still left my GRUB changed and left the login option in the DM. When I had tried out lubuntu-desktop it fixed some conflicts and removed the entries from the DM login that were left by purge and autoremove.
A similar method which works well, is probably safer, but still doesn’t always get everything is:
sudo apt-get --purge autoremove PACKAGENAME Which may or may not need to be followed up with:
sudo apt-get update sudo apt-get check sudo apt-get -f install sudo apt-get autoclean It looks like a great way to do it, I understand all but the last part of the 2nd line » awk ‘< print $2 >‘ | tr ‘\n’ ‘ ‘ ) » could you please elaborate on what those 2 pipes are doing?
Yes, there is a possibility of adverse side effects which I noted. I find myself using this method from time to time as a last ditch effort when remove PACKAGENAME, autoremove PACKAGENAME, —purge autoremove PACKAGENAME, etc, still doesn’t do the job. This happens usually with meta packages. I just pay attention to what’s listed to be removed before pressing «Y» and if something comes up that doesn’t look right I cancel and investigate. An addition of an extra pipe, before awk, with grep recommends, grep replaces, or grep conflicts, etc, can be used also if needed to step through slower.
I also use aptitude purge for that:
- removes the dependencies
- without removing the dependencies which are also dependencies of some other installed package,
- but i’m not sure if it removes the dependencies’ configs.
autoremove is probably what you want.
For example, with remove , only one package is to be removed:
$ sudo apt remove nvidia-cuda-toolkit Reading package lists. Done Building dependency tree Reading state information. Done The following packages were automatically installed and are no longer required: g++-8 javascript-common libaccinj64-10.1 libcublas10 libcublaslt10 libcudart10.1 libcufft10 libcufftw10 libcuinj64-10.1 libcupti-dev libcupti-doc libcupti10.1 libcurand10 libcusolver10 libcusolvermg10 libcusparse10 libegl-dev libgl-dev libgl1-mesa-dev libgles-dev libgles1 libglvnd-dev libglx-dev libjs-jquery libjs-underscore libncurses5 libnppc10 libnppial10 libnppicc10 libnppicom10 libnppidei10 libnppif10 libnppig10 libnppim10 libnppist10 libnppisu10 libnppitc10 libnpps10 libnvblas10 libnvgraph10 libnvidia-common-510 libnvidia-ml-dev libnvjpeg10 libnvrtc10.1 libnvtoolsext1 libnvvm3 libopengl-dev libpthread-stubs0-dev libstdc++-8-dev libthrust-dev libvdpau-dev libx11-dev libxau-dev libxcb1-dev libxdmcp-dev node-html5shiv nsight-compute nsight-systems nvidia-cuda-dev nvidia-cuda-doc nvidia-cuda-gdb nvidia-opencl-dev nvidia-profiler nvidia-visual-profiler ocl-icd-libopencl1 ocl-icd-opencl-dev opencl-c-headers openjdk-8-jre x11proto-core-dev x11proto-dev xorg-sgml-doctools xtrans-dev Use 'sudo apt autoremove' to remove them. The following packages will be REMOVED: nvidia-cuda-toolkit 0 upgraded, 0 newly installed, 1 to remove and 95 not upgraded. After this operation, 67.1 MB disk space will be freed. $ sudo apt autoremove nvidia-cuda-toolkit Reading package lists. Done Building dependency tree Reading state information. Done The following packages will be REMOVED: g++-8 javascript-common libaccinj64-10.1 libcublas10 libcublaslt10 libcudart10.1 libcufft10 libcufftw10 libcuinj64-10.1 libcupti-dev libcupti-doc libcupti10.1 libcurand10 libcusolver10 libcusolvermg10 libcusparse10 libegl-dev libgl-dev libgl1-mesa-dev libgles-dev libgles1 libglvnd-dev libglx-dev libjs-jquery libjs-underscore libncurses5 libnppc10 libnppial10 libnppicc10 libnppicom10 libnppidei10 libnppif10 libnppig10 libnppim10 libnppist10 libnppisu10 libnppitc10 libnpps10 libnvblas10 libnvgraph10 libnvidia-common-510 libnvidia-ml-dev libnvjpeg10 libnvrtc10.1 libnvtoolsext1 libnvvm3 libopengl-dev libpthread-stubs0-dev libstdc++-8-dev libthrust-dev libvdpau-dev libx11-dev libxau-dev libxcb1-dev libxdmcp-dev node-html5shiv nsight-compute nsight-systems nvidia-cuda-dev nvidia-cuda-doc nvidia-cuda-gdb nvidia-cuda-toolkit nvidia-opencl-dev nvidia-profiler nvidia-visual-profiler ocl-icd-libopencl1 ocl-icd-opencl-dev opencl-c-headers openjdk-8-jre x11proto-core-dev x11proto-dev xorg-sgml-doctools xtrans-dev 0 upgraded, 0 newly installed, 73 to remove and 95 not upgraded. After this operation, 3,654 MB disk space will be freed.