- 10+ parted command examples in Linux [Cheat Sheet]
- How to install parted in Linux
- Syntax for parted command
- Different examples to use parted command
- Interactive Mode
- 1. parted command to display the partition table
- 2. Select different hard disk with parted command
- 3. parted command to create a primary partition
- 4. parted command to create a logical partition
- 5. Resize disk partition with parted command
- 6. Change the FLAG on partition with parted command
- 7. parted command to toggle the state of FLAG on partition
- 8. parted command to delete the partition
- 9. Rescue a lost partition with parted command
- 10. Set the name of partition with parted command
- Non-Interactive Mode (One Liner parted commands)
- 11. parted command to list the partition layout on all block devices
- 12. parted command to create a primary partition
- 13. parted command to create a logical partition
- 14. parted command to remove a partition
- 15. parted command to set the flag on partition
- 16. parted command to create a partition without knowing disk size
- Conclusion
- What’s Next
- Further Reading
- 3 thoughts on “10+ parted command examples in Linux [Cheat Sheet]”
- Parted — управление разметкой и разделами дисков в Linux
- Установка parted в Linux
- Управление таблицей разделов в parted, разметка диска
- Создание нового раздела в parted
- Как расширить или уменьшить размер раздела диска с помощью parted
- Удаление раздела с помощью parted
- Восстановление случайно удаленных разделов с помощью rescue
10+ parted command examples in Linux [Cheat Sheet]
parted is a command-line tool in Linux for disk partitioning and partition resizing. You can create, destroy, resize, move and copy ext2, linux-swap, FAT, FAT32, and reiserfs partitions. It helps create space for new operating systems, reorganizing disk usage and copying data to new hard disks. You need to be careful when managing the disk partitions because the data can be overwritten or lost.
How to install parted in Linux
In most Linux distributions, parted is pre-installed in the system. However, if it is not present in the system, you can use the following command to install parted in the Linux system.
To install parted on CentOS, Fedora, and RHEL
To install parted on Ubuntu and Debian
$ sudo apt-get install parted Syntax for parted command
The syntax for the parted command is:
$ parted [options] [device [command [options. ]. ]]
Some options available in parted command are as follows.
- -l: to list partition layout on all block devices
- -m: to display machine parseable output
- -v: to display the version of the program
- -h: to display a help message
Different examples to use parted command
parted command can be used in two modes: interactive mode and command line mode. This tutorial will introduce both methods to use parted command.
Interactive Mode
When parted is used without any options, it displays the version of the parted program and opens the parted in interactive mode. You can use different parted commands in its interactive mode.
ubuntu@golinux:~$ sudo parted GNU Parted 3.3 Using /dev/sda Welcome to GNU Parted! Type 'help' to view a list of commands. (parted) To exit the parted shell, you can use the quit command.
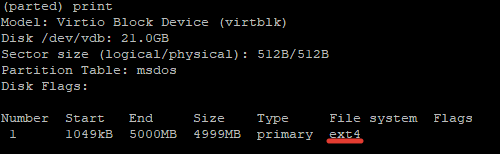
1. parted command to display the partition table
The print command is used to print the partition table. It also displays the hard disk model and sizes.
Sample Output:

2. Select different hard disk with parted command
If you have multiple hard disks in the system, you can easily switch between them using the select command. The selected disk will be used for partition and other purposes.
Sample Output:

3. parted command to create a primary partition
In interactive mode, the command mkpart is used to create a new partition. Before creating a new partition, you need to create a partition table. To create a partition table, you can use mklabel or mktable command followed by partition type. Here, we are creating an MBR partition table, msdos.
After that, you can create a new partition with the mkpart command.
Sample Output:
You need to provide partition type, file system type, start size, and end size as shown below.

As you can see above, the primary partition is created starting at 1000kB and ending at 20GB.
You can also provide all details in one command as shown below a primary partition from the command line.
(parted) mkpart primary ext2 1 20000 4. parted command to create a logical partition
Similarly, you can create a logical partition with the help of the mkpart command.
Sample Output:

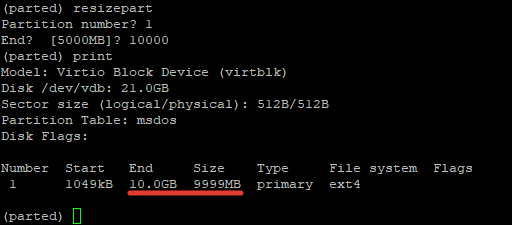
5. Resize disk partition with parted command
The resizepart command helps to resize disk partition in the Linux system. You need to provide the partition number and end size to resize the particular partition.
(parted) resizepart partition_number end Sample Output:

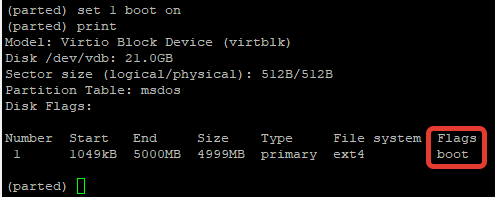
6. Change the FLAG on partition with parted command
You can change the flag on the partition using the set command. The supported flags are: «boot», «root», «swap», «hidden», «raid», «lvm», «lba», «legacy_boot» and «palo». The state should be either ‘on’ or ‘off’.
(parted) set partition_number flag state Sample Output:

7. parted command to toggle the state of FLAG on partition
You can toggle the state of the flag on the partition using toggle command.
Sample Output:
The state ‘on’ is changed to ‘off’.

8. parted command to delete the partition
Sometimes, you may need to remove the partition. You can use rm command to delete the disk partition in the Linux system.
(parted) rm partition_number Sample Output:
As you can see, partition number 2 is removed.

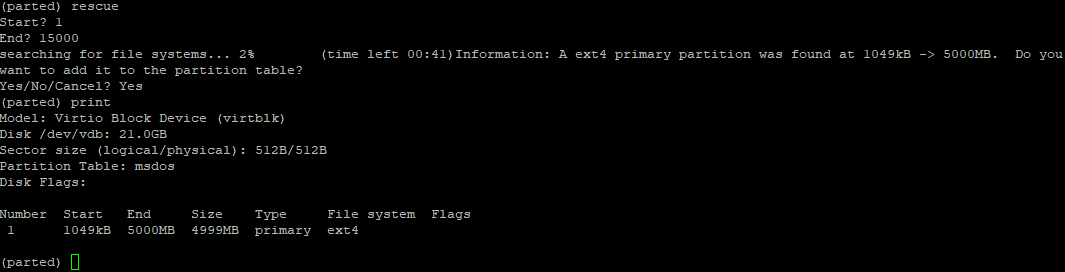
9. Rescue a lost partition with parted command
You can use the rescue command to recover a lost partition near start and end. If the partition is found between that range, parted will try to recover it.
Sample Output:

10. Set the name of partition with parted command
The name command can be used to set the name of the partition. This option works only on Mac, PC98, and GPT disklabels.
(parted) partition_number name Non-Interactive Mode (One Liner parted commands)
In the command line, you can use parted commands directly without entering the interactive shell.
11. parted command to list the partition layout on all block devices
You can use -l or —list option to view or list the partition layout on all block devices. It displays the model of the hard disk, disk size, disk flags, and partition table.
Sample Output:

12. parted command to create a primary partition
You can use the following command to create a primary partition in the disk.
$ sudo parted /dev/sda mkpart primary ext2 start end Sample Output:

13. parted command to create a logical partition
Similarly, you can create a logical partition in the disk by running the command below.
$ sudo parted /dev/sda mkpart extended start end Sample Output:

14. parted command to remove a partition
You can run the following command as shown below to remove a partition.
$ sudo parted /disk/name rm partition_number Sample Output:

15. parted command to set the flag on partition
You can change or set the flag on the partition using the set command.
$ sudo parted /dev/sda set partition_number Flag State Sample Output:

16. parted command to create a partition without knowing disk size
If you don’t know the start size while creating a partition, you can fill the disk to the end using 100%.
For example, to create a primary partition of 5GB, you can use the command below.
$ sudo parted /dev/sda mkpart primary 5000 100% Sample Output:
It asks you for the closest location parted can manage. If your answer is yes, it will create a partition.

Conclusion
This leads to the end of our tutorial on parted command in Linux. parted is a helpful and powerful tool for managing disk partitions in the Linux system. If you still have any confusion, please feel free to ask us in the comment section.
What’s Next
Further Reading
Didn’t find what you were looking for? Perform a quick search across GoLinuxCloud
If my articles on GoLinuxCloud has helped you, kindly consider buying me a coffee as a token of appreciation.

For any other feedbacks or questions you can either use the comments section or contact me form.
Thank You for your support!!
3 thoughts on “10+ parted command examples in Linux [Cheat Sheet]”
Nice BUT
after increasing the size of a used partition (unmounted yet – boot single) I have no idea how to format the new allocated space without erasing data (which is my home partition with lot of installed apps – and a poor land line).
The resize (of file system) function of parted was removed since v3 (ext).
And I cant use gparted (with verify) on a mounted partition.
So resize without extending formatage is in my case useless …
untill I have a solution. regards Reply
Parted — управление разметкой и разделами дисков в Linux

20.02.2021

VyacheslavK

CentOS, Linux, Ubuntu

Один комментарий
Parted – (сокращенно от PARTition EDitor) редактор дисковых разделов для Linux, предназначенный для управления разметкой, создания, удаления и изменения размеров разделов диска. Утилита проста в использовании и доступна для всех дистрибутивов Unix/Linux систем. Кроме того, доступна GUI версия — Gparted. В данной статье, мы покажем, как управлять разделами диска с помощью parted на примере CentOS 8 (в других дистрибутивах Linux все работает аналогично). В Windows аналогом команды parted является diskpart .
Установка parted в Linux
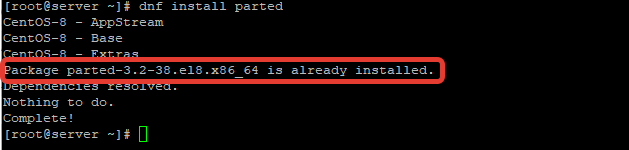
Обновите набор по на сервере и установите пакет parted с помощью менеджера пакетов вашего дистрибутива Linux. Для CentOS 8 с менеджером пакетов dnf (который заменил yum), можете установить parted из базового репозитория командой:
# dnf update -y
# dnf install parted -y
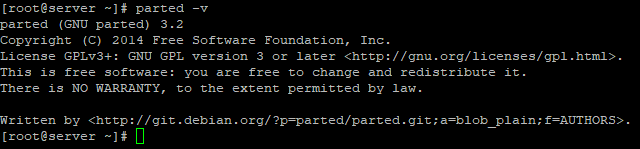
Чтобы проверить версию утилиты, выполните команду:
Чтобы попасть в саму оболочку, введите:
GNU Parted 3.2 Using /dev/vdb Welcome to GNU Parted! Type 'help' to view a list of commands.
Управление таблицей разделов в parted, разметка диска
Выведем список доступных дисков:
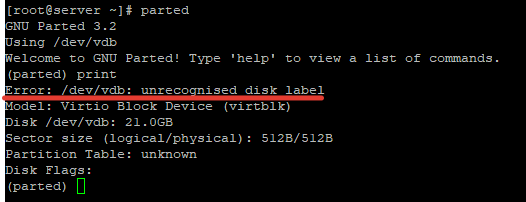
Доступен диск /dev/vdb размером 21 Гб, диску не присвоена метка (error /dev/vdb: unrecognized disk label), какая таблица разделов – не понятно.
Можно создать на диске разметку msdos (MBR)
Или таблицу разделов gpt ( GUIE partition table поддерживает размер раздела более 2 Тб) :
Обратите внимаени, что в parted в отличии от fdisk нет команды для записи изменений. Все изменения применяются немедленно.
Теперь parted показывает тип таблицы разделов (разметки) на диске:
Model: Virtio Block Device (virtblk) Disk /dev/vdb: 21.0GB Sector size (logical/physical): 512B/512B Partition Table: msdos Disk Flags: Number Start End Size Type File system Flags
Как вы видите, на диске уже есть таблица разделов MBR, но сами разделы еще не созданы.
Если у вас на сервере имеется несколько свободных дисков, то можно переключаться между ними с помощью команды:
Создание нового раздела в parted
Для создания раздела в parted, используется утилита mkpart . При вводе команды в интерактивном режиме будут появляться вопросы о параметрах нового раздела:
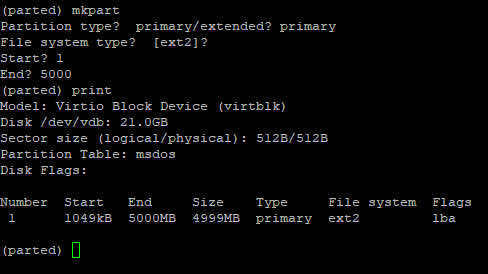
- Partition type — указываем тип раздела (primary / extended)
- File system type — файловая система, по умолчанию предлагается ext2 (в дальнейшем мы ее изменим);
- Start — начальный сектор раздела
- End — конечный сектор раздела (в мегабайтах). В нашем примере мы указали 5000, это значит, что будет создан раздел размером 5Гб.
Можно сразу создать раздел на весь диск:
# (parted) mkpart primary 0 0
или указать произвольный размер раздела так:
# (parted) mkpart primary 0 1GB
Также можно указывать размер диска в % и задать метку:
# (parted) mkpart «home part» ext4 2.5GiB 100%
Чтобы выйти из оболочки parted, выполните команду:
Отформатируем раздел в файловой системе ext4:
mke2fs 1.44.6 (5-Mar-2019) Creating filesystem with 1220352 4k blocks and 305216 inodes Filesystem UUID: 5c9daa97-c0f4-44bc-9cfa-f466ebd8895e Superblock backups stored on blocks: 32768, 98304, 163840, 229376, 294912, 819200, 884736 Allocating group tables: done Writing inode tables: done Creating journal (16384 blocks): done Writing superblocks and filesystem accounting information: done
Проверяем файловую систему раздела и видим, что она изменилась (обратите внимание что команда print выводит теперь список разделов на диске, их номера, тип, размер и файловую систему).
Можно создать раздел и отформатировать его, не входя в оболочку parted, например:
# parted -a opt /dev/vdb mkpart primary ext4 0% 100% && mkfs.ext4 /dev/vda1
Данной командой мы создадим раздел на диске vdb, под который отдадим всё пространство.
Таким образом вы можете упрощать себе работу или же добавлять подобные команды в какие-то скрипты или файлы кикстарта.
Как расширить или уменьшить размер раздела диска с помощью parted
Чтобы расширить или уменьшить размер раздела в partedиспользуется субкоманда resizepart Можно изменить размер раздела в интерактивном режиме. В оболочке parted введите команду:
Система запросит номер раздела (берется из вывода команды print) и конечный размер раздела. В этом примере размер разделе будет увеличен с 5 до 10 Гб:
Partition number? 1 End? [5000MB]? 10000
Сначала увеличьте размер раздела, а потом растяните файловую систему на нем. Если вы уменьшаете размер раздела – сначала нужно сжать размер файловой системы, и только после этого уменьшать размер раздела. Иначе потеряете данные.
Для уменьшения размер файловой системы используются следующие команды. Для файловых систем ext2/3/4 :
btrfs filesystem resize /dev/sdab size
Изменять флаг раздела в parted тоже возможно, вы можете установить один из нужных вам:
Например сделаем раздел загрузочным:
Удаление раздела с помощью parted
Если вам требуется удалить раздел на диске, вы можете использовать команду rm в оболочке parted:
Эта команду удалит раздел с номером 1:
Model: Virtio Block Device (virtblk) Disk /dev/vdb: 21.0GB Sector size (logical/physical): 512B/512B Partition Table: msdos Disk Flags:
Будьте осторожны в использовании данной команды, так как она не требует подтверждение удаления.
Восстановление случайно удаленных разделов с помощью rescue
Удаленный раздел можно восстановить с помощью утилиты rescue, которая доступа в оболочке parted:
Команда запросит начальный и конечный размер разделе. Если на этих позициях есть инфа о разделе, команда попробует восстановить удаленный раздел.
Как видите, утилита parted проста в использовании и очень удобна для создания/изменения разделов вашего диска. Надеемся, что данная статья поможет вам разобраться во многих вопросах.
![]() Предыдущая статья Следующая статья
Предыдущая статья Следующая статья ![]()