- How to expand ext4 partition size using command-line?
- 5 Answers 5
- Как изменить размер Ext4
- Как увеличить размер Ext4
- Шаг 1. Увеличение раздела
- Шаг 2. Увеличение файловой системы
- Шаг 3. Проверка на ошибки
- Шаг 4. Монтирование
- Как уменьшить размер Ext4
- Шаг 1. Проверка файловой системы
- Шаг 2. Уменьшение файловой системы
- Шаг 3. Уменьшение раздела
- Шаг 4. Монтирование
- Выводы
- Похожие записи
- Оцените статью
- Об авторе
How to expand ext4 partition size using command-line?
There is 478GB unallocated space, how would I go about adding this space to /dev/sda1 without losing the data that is currently on /dev/sda1 ? (the filesystem is ext4). NOTE: it is a server with only SSH, no GUI for running stuff like gparted.
Also see askubuntu.com/a/937351/621883 especially the answer containing growpart and resize2fs was useful for me.
5 Answers 5
Enlarge the partition: fdisk -u /dev/sda .
p to print the partition table, take note of the number, start, end, type of sda1.
Recreate it using command n with same number (1), start and type but with a bigger end (taking care not to overlap with other partitions). Try to align things on a megabyte boundary that is for end, make it a multiple of 2048 minus 1. Change the type if needed with t (for partitions holding an extX or btrfs filesystem, the default of 83 is fine).
Then w to write and q to quit.
The partition table will have been modified but the kernel will not be able to take that into account as some partitions are mounted.
However, if in-use partitions were only enlarged, you should be able to force the kernel to take the new layout with:
If that fails, you’ll need to reboot. The system should boot just fine.
Then, resize the filesystem so it spreads to the extent of the enlarged partition (might be located in /sbin ):
Which for ext4 will work just fine even on a live FS.
@CanadianLuke, yes, deleting the partition in fdisk only modifies the partition table. If you recreate it the same size, there will be no change at all. The data is never altered unless you shrink a partition and create another logical or extended partition in the middle of what your partition used to be, in which case the partition record for that extended/logical partition will be written over some data there.
That sounds reasonable, but what if i have Extended, Linux LVM and Linux swap/Solaris partitions which starts on the end of Linux partition? Should I delete these partitions>? I am worried that in that case, filesystem won’t start, becuase may be using Linux LVM for example in same start and end. And i don’t want to loose data too.
@cyan resizing a LVM logical volume with a ext4 FS on it, or resizing a partition used as a physical volume for LVM would be different questions with different procedures.
It is very ease to expand ext4 partition with growpart.
sfdisk -d /dev/sdb > sdb_partition_bak.dmp
- Execute dry-run to see what will be changed. If you don’t have this tool. Run apt-get install cloud-utils
You can’t do it safely while the partition is mounted, meaning you need to boot some other partition and do it from there.
gparted is a nice, easy GUI for this purpose. In our deleted comment exchange you mentioned it would not start because of «can’t access display» — this implies you aren’t in X; since it is a GUI it won’t work without that.
Of course, if you don’t have another partition to use, you’ll need a live CD or something — I think they usually come with gparted. Your best bet is probably the actual gparted live CD, which looks to have a reasonably recent latest stable version (and will fit on a CD, which is nice since the «live CD» is rapidly becoming the «live DVD»).
I’ve never had gparted cause a problem but of course do back your important tish up first.
I can’t use gparted as I only have SSH access (it is a headless server). I am able to unmount the HDD, as the system does not run on /dev/sda.
If you don’t have physical access to the system and thus can’t usefully unmount and change the partition, I think you are out of luck, or at least into very sketchy territory — eg, you could attempt to use fdisk while mounted, select (x)pert, (c)hange number of cylinders. But I have not done this and would only do so if there was absolutely no other choice.
I just said that I can unmount the partition. I can even netboot the whole server and go in from another server, which would be just like using a Live CD (just without a GUI).
I know this is very old issue, but many people are looking for that resolve.
For this example you have the following typical situation. On the beginning is a single partition, and on the end a swap partition is located. it isn’t good because swap can be heavily loaded, and end of rotated disk is the slowest part of it. what I suggest?
- Create boot partition at the begin. Why at the beginning? because many tools have got problems with end of large disk above 2TB barrier. After boot partition should be swap partition. This is for performance. Rest of disk should be used for other partitions.
But what with this situation? I don’t recommend expanding sda1. I suggest creating other partitions after sda1 & sda2, mounted as /home and /usr . On that directories are stored the most user and system data, and it is possible to securely move data from that directories to new partitions.
- But. (second «but») if you still want keep your current structure, you should first remove swap partition. You should do swapoff, remark this in /etc/fstab . if swapon tells you (see man) no swap is used, you can remove it by partition tool (fdisk or similar). When you don’t have this partition, you can enlarge your sda1. Using fdisk you should firstly print partition. It is for remembering where it starts. Secondly remove partition using ‘d’ key. Don’t panic, nothing is written to hard drive :). After print you see, no partition exist on the disk. Next create new partition, but be careful. See on what sector original partition started. Write the same number. After that look at the end. fdisk prompts you for last available sector. Use calculator and assign in your mind how much swap do you need in kilobytes. Multiple it by 2, and subtract this number from last sector number prompted by fdisk. Create partition. Print this (it is still in fdisk temporary memory), and look all is ok. After this press ‘w’ key, this will tru write new partitioning to the drive. You will see information all is synced, or sync is failed. If failed, you can call command partx /dev/sda for doing sync. If it still fails, you should reboot your system. After reboot you have prepared larger partition, but filesystem on it is still smaller. You should grow it. EXT4 is growable on the fly :), use resize2fs /dev/sda1 for do it. You don’t need remounting rebooting etc. Last, you should restore swap partition. Simply use fdisk again, create new partition as swap. After writing ‘w’, device sda2 will be restored. Prepare swap structure on it using mkswap /dev/sda2 , remove remarks for swap on /etc/fstab and finally do swapon -a . Look using swapon or top command, swap is activated.
I know, it’s very long explanation. I hope it will be usable for any. Notice, in my opinion xfs filesystem is much better, unfortunately this fs doesn’t support shrinking without temporary copying to alternate place, but shrink is used rarely. It is nice, xfs takes extremely little place for his own metadata, and is faster in many ways in comparison to ext4.
Another hint, better use some LVM as middle layer for partitioning. after that any resizing is much easier. Performance is comparable, of course, you can use mix of HDD management. you can use in common raw partitions and LVM.
Как изменить размер Ext4
На данный момент Ext4 — это самая популярная файловая система для операционных систем семейства Linux, она используется как на серверах, так и на домашних компьютерах, и там и там часто возникает необходимость изменить размер раздела.
В сегодняшней статье мы рассмотрим как расширить раздел Ext4 в графическом интерфейсе или с помощью терминала.
Как увеличить размер Ext4
Шаг 1. Увеличение раздела
Если вы хотите изменить размер корневого раздела файловой системы, то вам обязательно надо будет загрузится с LiveCD иначе вы не сможете редактировать примонтированный раздел. Если это не системный раздел, то его можно отмонтировать и затем изменять. Для увеличения раздела будем использовать parted. Сначала запустите утилиту:
Здесь /dev/sda — это ваш диск, один из разделов которого вы хотите расширить. Сначала выведите текущую таблицу разделов, для этого выполните:

Как видите, здесь есть только один раздел и он занимает 16 гигабайт, а всего на диске доступно 21,7 гигабайт. Чтобы расширить Ext4 и занять всё это пространство используйте команду resizepart:
(parted) resizepart 1 21,7GB
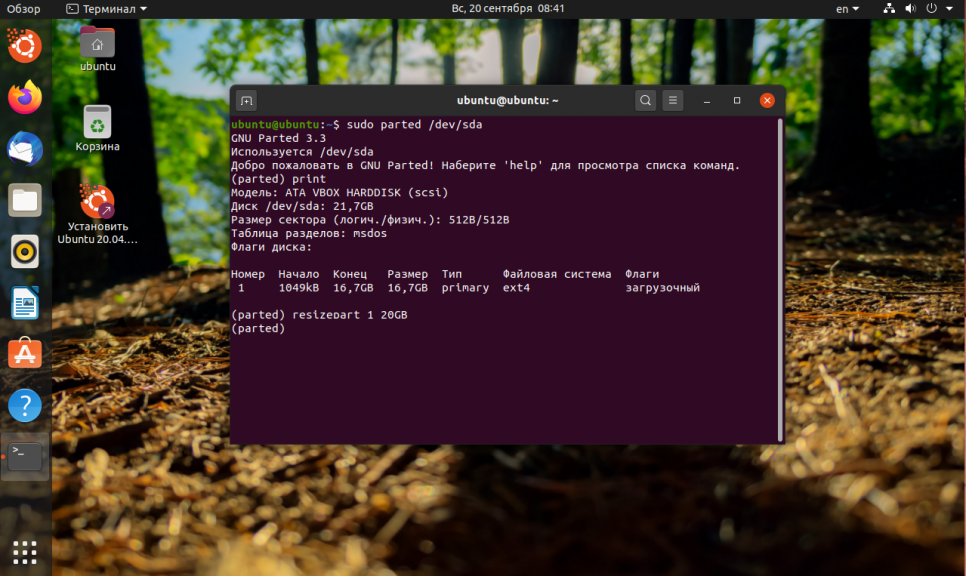
Первый параметр, это номер раздела, который вы узнали из предыдущей команды, а второй, размер раздела, доступный размер тоже выводится в предыдущей команде. Теперь утилиту можно закрыть:
Шаг 2. Увеличение файловой системы
Осталось увеличить самую файловую систему до конца раздела. Для этого воспользуемся утилитой resize2fs. Она может работать даже когда файловая система смонтирована.
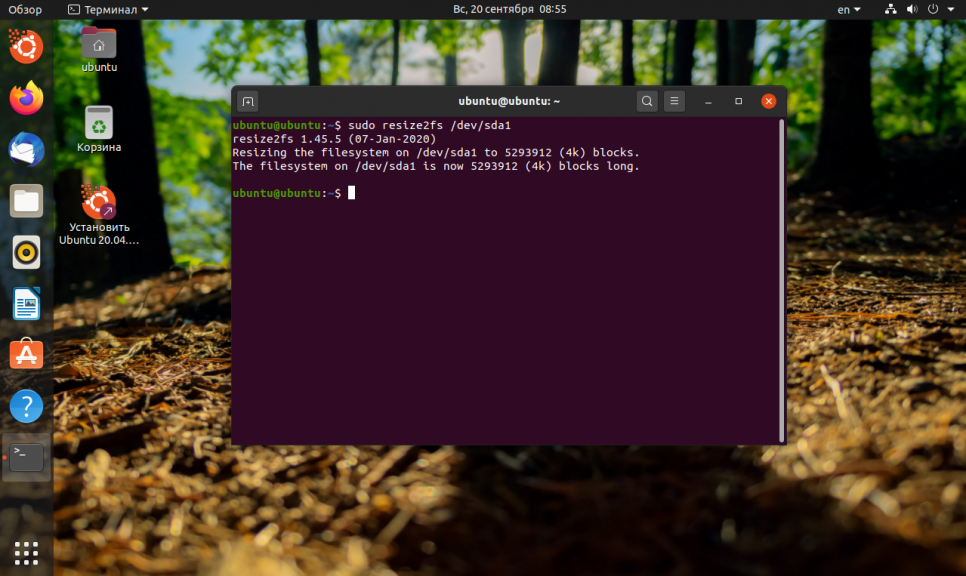
Утилита по умолчанию увеличивает файловую систему на всё доступное пространство раздела.
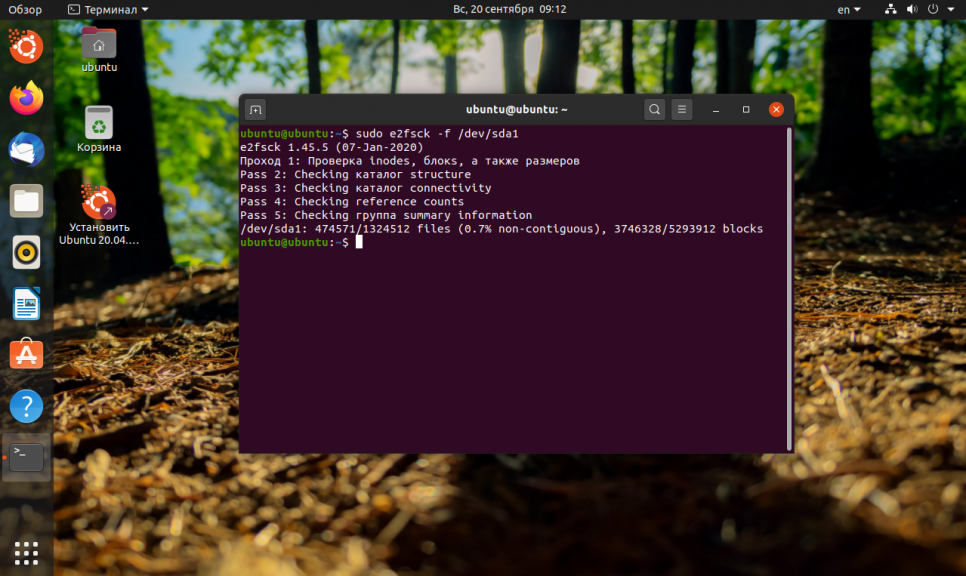
Шаг 3. Проверка на ошибки
После этого не помешает проверить всё на ошибки с помощью fsck:
Шаг 4. Монтирование
Затем можно монтировать полученную файловую систему и проверять её размер, как видите, теперь она занимает 20 гигабайт:
Как уменьшить размер Ext4
Допустим, нам надо отделить от корневого раздела четыре гигабайта и создать из них другой раздел, например, раздел подкачки. Для этого сначала надо уменьшить размер файловой системы, а затем самого раздела.
Шаг 1. Проверка файловой системы
Перед тем, как уменьшить размер Ext4 надо проверить её на ошибки. Если файловая система смонтирована, размонтируйте её:
Шаг 2. Уменьшение файловой системы
Уменьшение размера файловой системы тоже выполняется с помощью resize2fs. Но теперь утилите надо передать в параметрах новый размер файловой системы. Например, 16 гигабайт:
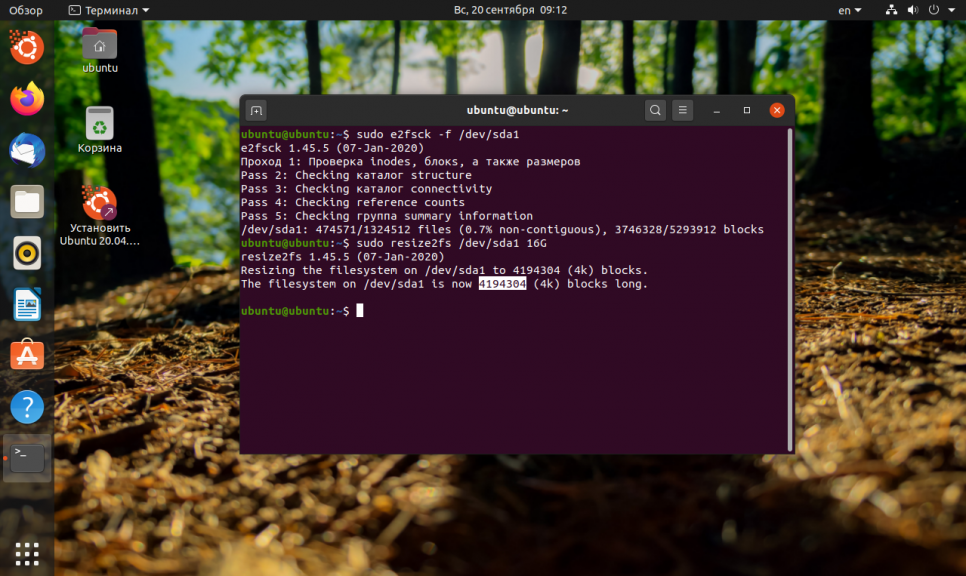
Размер можно указывать в килобайтах (K), мегабайтах (M) или гигабайтах (G). Теперь вы знаете как изменить размер Ext4. В выводе утилита вы увидите сколько теперь блоков занимает файловая система. Это число надо умножить на 4096 чтобы получить размер файловой системы в байтах. Цифра четыре взята потому что размер одного блока в Ext4 равняется четырём килобайтам. Например, в данном случае это будет 17179869184 байт или 16 гигабайт:

Теперь надо уменьшить размер раздела с помощью parted. Но значение желательно брать чуть больше, для безопасности, потому, что если вы зацепите пространство, где расположена файловая система, то работать с ней вы больше не сможете.
Шаг 3. Уменьшение раздела
Запустите parted и используйте ту же команду resizepart чтобы уменьшить размер раздела:
(parted) resizepart 1 16,1GB
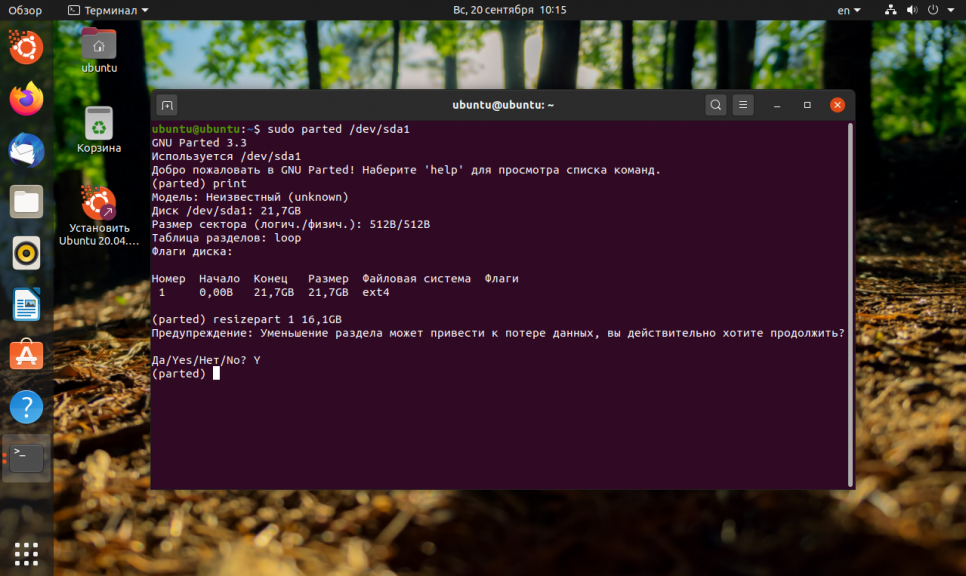
Чтобы закрыть программу выполните:
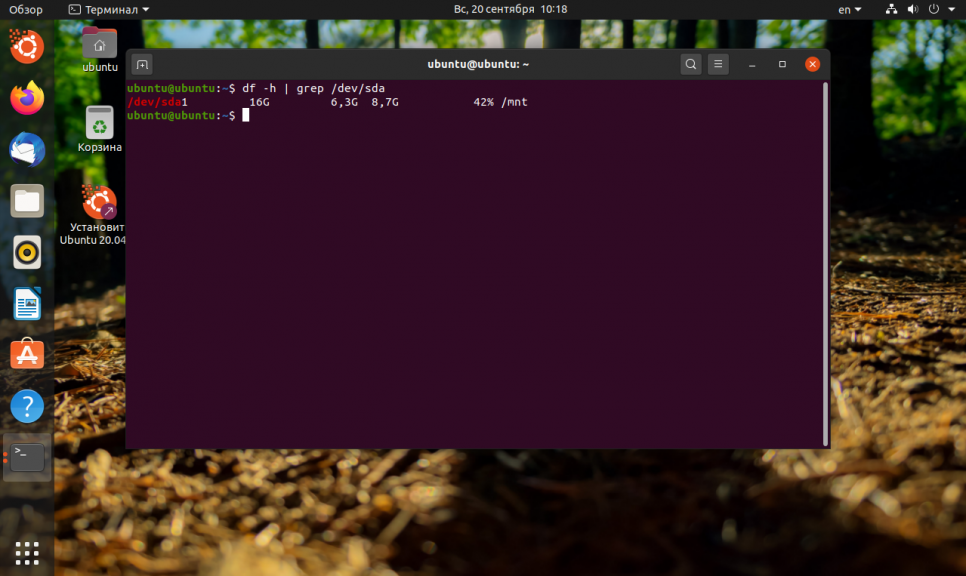
Шаг 4. Монтирование
После этого файловую систему можно монтирововать и проверять её размер:
Выводы
В этой статье мы рассмотрели как уменьшить раздел Ext4, а также как его увеличить через терминал. Если вы работаете в графическом интерфейсе, то всё выполняется гораздо проще. Для этого можно воспользоваться утилитой Gparted. Она автоматически меняет как размер раздела, так и файловой системы. К тому же программа может не только менять положение конца раздела, но и начала, иногда это может быть полезно. А как вы меняете размер файловой системы? Напишите в комментариях!
Обнаружили ошибку в тексте? Сообщите мне об этом. Выделите текст с ошибкой и нажмите Ctrl+Enter.
Похожие записи
Оцените статью
Статья распространяется под лицензией Creative Commons ShareAlike 4.0 при копировании материала ссылка на источник обязательна .
Об авторе
Основатель и администратор сайта losst.ru, увлекаюсь открытым программным обеспечением и операционной системой Linux. В качестве основной ОС сейчас использую Ubuntu. Кроме Linux, интересуюсь всем, что связано с информационными технологиями и современной наукой.