Resizing Virtual drive [duplicate]
I am running Ubuntu as a guest on an iMac with VirtualBox version 4.1.8. What is the easiest way to resize the virtual drive? Please provide as much detail as possible including the correct format for any commands.
I had the same question, running Ubuntu as a guest on a Windows 7 host. @Joni’s answer was a great help, with the addition of askubuntu.com/questions/154921/… to get the swap working again.
2 Answers 2
This answer is directed at a Windows host, but if you use bash in place of the PowerShell and replace ‘\’ with ‘/’ it should work just fine.
- From VirtualBox
- Release the VDI file: File -> Virtual Media Manager -> Select VDI -> Release
- Copy the location of the VDI inside the properties box ‘C:\Users\campbell\VirtualBox VMs\Ubuntu14\Ubuntu14.vdi’
- Backup the VDI file
- Copy the VDI file to a new location.
- Assign a new UUID to the original VDI file:
- Start Powershell (not as an administrator):
- Change to your Oracle VirtualBox directory cd C:\Program Files\Oracle\VirtualBox
- .\VBoxManage.exe internalcommands sethduuid «C:\Users\campbell\VirtualBox VMs\Ubuntu14\Ubuntu14.vdi»
- File -> Virtual Media Manager -> Select VDI -> Remove
- Apply.
- Right click your VM -> Configuration -> Storage -> Controller: SATA -> Add new hard drive. Select your .vdi file.
- Work out desired size: you can google it, eg. ’40 Gb=MB’ returns 40000 MB
- Start PowerShell (not as administrator)
- Change to your Oracle VirtualBox directory cd C:\Program Files\Oracle\VirtualBox
- Resize your .vdi file .\VBoxManage.exe modifyhd «C:\Users\campbell\VirtualBox VMs\Ubuntu14\Ubuntu14.vdi» —resize 40000
- Now start your virtual machine. You will receive the same warning about space that prompted you to engage in this procedure. Not to worry, we are near the end.
- Start the partition manager gparted (install it if is is missing sudo apt-get install gparted )
- Get rid of the swap partition, which prevents you from expanding the root partition. Note that you cannot harm the rest of your machine — this is all happening inside a single file. Worst case scenario you trash this file and you have to use your backup instead.
- Make a note of the size of the linux-swap partition 4 GiB in my case
- Right click on it and Swapoff
- Right click on it and Delete
- Apply by clicking on the checkmark (Apply all operations). Ignore the dire warning — life is too short to indulge Cassandras
- right click on the extended file system that once housed the swap partition (/dev/sda2 in all likelihood) and delete it
- right click on the root partition (/dev/sda1) and resize it. Tab to the ‘Free space following’ field and enter the size of the swap partition. Shift-Tab and the machine will work out the new size for you automatically.
- Right click in the unallocated space at the end and make it an extended partition
- Right click in the new partition and select linux-swap in the File system field.
- Commit your changes as before
- Right click on your swap partition and select swapon
- Tell the Fat Lady to commence singing.
References:
Worked, with a few extra steps (1.1) I had to remove the VDI and then add it back to the virtual machine after giving it a new uuid and resizing it. (1.5) I had to cd into c:\Program Files\Oracle\VirtualBox stackoverflow.com/questions/15074878/…
Very good description but you can shorten it to: «.\VBoxManage modifyhd myUbuntu14.vdi —resize 40000» followed by the steps under point «3. On your virtual machine». Nevertheless I gave you an upvote for your good answer
Note that you may have to activate swap and edit /etc/fstab after doing this askubuntu.com/a/819689/100362
If you are making the disk bigger, you would
- first enlarge the disk from VirtualBox, and then
- enlarge the partition, and
- the filesystem it contains.
To enlarge a disk you can use the VBoxManage modifyhd command. Suppose you want to resize the disk to 20,000 megabytes (~20GB). First locate the disk file that you want to expand. Then, in terminal, give this command to resize the disk:
VBoxManage modifyhd "path-of-disk-file" --resize 20000To enlarge the partition and file system, probably it’s easiest to boot the virtual machine using a Ubuntu livecd and do the job with GParted, as it does both at the same time and gives you a graphical user interface for it.
Attach a livecd ISO image to the virtual machine and change the boot order to first boot from CD. If you don’t have a Ubuntu livecd at hand you can use any livecd that comes with the appropriate tools. SliTAZ for example is only 35MB to download. Open GParted and choose the disk you want to resize. Then right-click on the partition that you want to expand and choose the option «resize-move.» In the dialog box that opens, in the graphic that represents the partition, drag the triangle at the end of the partition all the way to the right to maximize it. Then close the dialog and choose «Apply» on the toolbar. Since no data has to be moved this should be a quick operation.
When done, don’t forget to detach the livecd from the virtual machine and change the boot order.
Увеличить размер раздела диска в Ubuntu

21.02.2023
itpro
Linux, Ubuntu
комментария 3
Если вы используете виртуальные машины с Ubuntu Linux, скорее всего рано или поздно вы столкнетесь с необходимостью расширения места на виртуальном диске. Установщик Ubuntu по умолчанию предлагает использовать логические LVM тома для развертывания ОС, поэтому мы рассмотрим расширение диска на примере именно LVM.
В первую очередь нужно увеличить размер виртуального диска со стороны вашей системы виртуализации:
После того, как вы расширили диск в ВМ, нужно расширить его в гостевой ОС (в этом примере это Ubuntu 22.04 LTS). Чтобы Ubuntu увидела добавленное место, выполните принудительный рескан дисков с помощью команды:
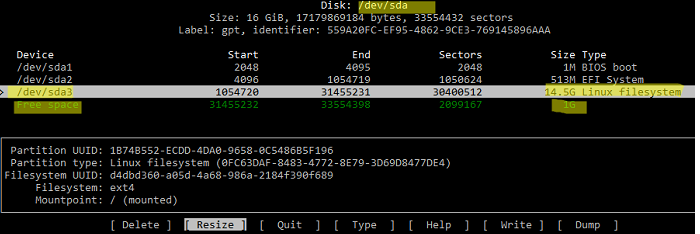
Для управления разделами используйте утилиту cfdisk:
В данном примере видно, что на диске /dev/sda есть свободное место размером 1 Гб. Выберите раздел, который нужно расширить (/dev/sda3 в этом примере) и выберите в меню Resize.
Чтобы сохранить изменения в разделах диска, выберите в меню Write.
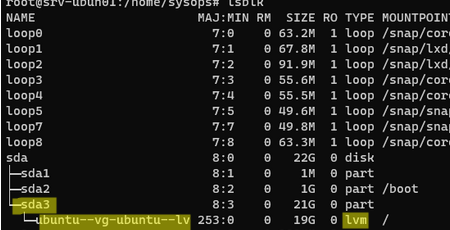
После того, как вы увеличили физический раздел, нужно увеличить размер логического раздела Ubuntu. Проверьте, что у вас используется используются тома LVM:
- Physical Volume (PV) — ваши физические диски /dev/sda , /dev/sdb , и т.д.
- Volume Group (VG) — группы томов, в которые объединены физически диски. Например ubuntu-vg = /dev/sda + /dev/sdb . Также VG можно состоять всего из одного диска.
- Logical Volume (LV) — логический раздел в группе томов. Например, ubuntu-vg/root , ubuntu-vg/home , и т.д.
Проверьте свободное место в группе томов LVM с помощью:
Для расширения раздела LVM нужно сначала увеличить PV (Physical Volume):
Теперь можно увеличить логический том. В этом примере мы расширим том за счет всего доступного пространства:
$ sudo lvextend -l +100%FREE /dev/mapper/ubuntu—vg-ubuntu—lv
Logical volume ubuntu-vg/ubuntu-lv successfully resized
Осталось расширить файловую систему. Для ext2, ext3 и ext4 выполните:
$ sudo resize2fs /dev/mapper/ubuntu—vg-ubuntu—lv
Проверьте свободное место в Linux с помощью команды:
Итак, мы успешно расширили LVM том в Ubuntu.
$ sudo parted
print free
resizepart nПредыдущая статья Следующая статья Установка и настройка прокси сервера Squid в Linux
Мониторинг срока регистрации (освобождения) домена в Zabbix
Настройка Wi-Fi точки доступа на Linux
Управление конфигурацией Windows через Ansible
Правильное увеличение размера диска в виртуальной машине
Не претендуя на полноту, все же считаю, что это может пригодиться системным администраторам.
Увеличение размера диска в виртуальной машине происходило при следующих вводных: формат файла виртуалки qcow2, виртуальная машина использует lvm и ext4, root partition находится в extended partition. Действо обычно происходит ночью, когда нагрузка минимальна и даунтайм не сильно давит на нервы. Хотя при работе с highload-проектами адреналина всё равно выделяется достаточно, чтобы 10 раз подумать, перед тем, как что-либо делать. Поэтому перед началом процесса, лучше отключить систему оповещения по СМС, чтобы не пугать коллег сообщениями типа «Server down» среди ночи.
1. Выключить виртуальную машину
Я сделал это через GUI, нажав на красную кнопку power в virt-manager. Если нет virt-manager, это можно сделать дав команду shutdown в командной строке виртуальной машины.
2. На гипервизоре увеличиваем размер файла (в моем случае на 200 гигабайт)qemu-img resize /path/to/vm-disk.qcow2 +200G3. Цепляем диск к другой (сервисной) виртуальной машине через управляющую машину с virt-manager, альтернативный вариант — загрузиться с CD с поддержкой lvm.
Cooтветственно, при загрузке с LiveCD, vdb поменяется на vda
4. Запускаем сервисную машину (на ней тоже должен быть lvm) через virt-manager.
5. Далее на сервисной (или LVM liveCD) машине:(parted) print Model: Virtio Block Device (virtblk) Disk /dev/vdb: 1288GB Sector size (logical/physical): 512B/512B Partition Table: msdos Number Start End Size Type File system Flags 1 1049kB 256MB 255MB primary ext2 boot 2 257MB 1000GB 1000GB extended 5 257MB 1000GB 1000GB logical lvmувеличим extended partition, если этого не сделать получим Error: Can’t have overlapping partitions. ubuntu parted -gparted
(parted) resizepart 2 End? [1000GB]? 1288Gb(parted) resizepart 5 End? [1000GB]? 1288Gb (parted) qroot@vm-service:/etc# lvextend /dev/vm-db-0-vg/root -l +100%FREE lvextend /dev/vm-db-0-vg/root -l +100%FREE File descriptor 7 (pipe:[7918]) leaked on lvextend invocation. Parent PID 1378: bash (на это можно не обращать внимания) Extending logical volume root to 1.12 TiB Logical volume root successfully resized root@vm-service:/etc# resize2fs /dev/vm-db-0-vg/rootThe filesystem on /dev/vm-db-0-vg/root is now 231278592 blocks long.fsck -f /dev/mapper/vm--db--0--vg-rootдиск готов
6. выключаем сервисную машину, отключаем от нее диск в virt-manager
из командной строки, не используя GUI для управления виртуальными машинам можно сделать это при помощи virsh, использование которого хорошо описано здесь: управление виртуальными машинами из командной строки
7. Запускаем сервер
Увеличение с минимальным даунтаймом, почти на лету, проверено на lvm2/ext4 можно сделать так:
1. Увеличение размера файла на 200 гигабайт выполняется на гипервизореqemu-img resize /path/to/vm-disk.qcow2 +200G(parted) print Model: Virtio Block Device (virtblk) Disk /dev/vda: 1288GB Sector size (logical/physical): 512B/512B Partition Table: msdos Number Start End Size Type File system Flags 1 1049kB 256MB 255MB primary ext2 boot 2 257MB 1000GB 1000GB extended 5 257MB 1000GB 1000GB logical lvm(parted) resizepart 2 End? [1000GB]? 1288Gb(parted) resizepart 5 End? [1000GB]? 1288Gb (parted) qroot@vm-db-0:/etc# lvextend /dev/vm-db-0-vg/root -l +100%FREE lvextend /dev/vm-db-0-vg/root -l +100%FREE File descriptor 7 (pipe:[7918]) leaked on lvextend invocation. Parent PID 1378: bash Extending logical volume root to 1.12 TiB Logical volume root successfully resized root@vm-db-0:/etc# resize2fs /dev/vm-db-0-vg/rootВ этом случае проверять и исправлять файловую систему нельзя, fsck -f /dev/mapper/vm—db—0—vg-root убьёт файловую систему
Проверить, что получилось: