- How do I restore a linux boot partition?
- 3 Answers 3
- How to recover lost partition in Linux
- Steps to recover lost or deleted partition for free using Linux:
- Linux For You Mate .
- How to recover /boot partition on RHEL or CentOS 7?
- What if mistakenly you delete all the files from /boot partition or files got corrupted due to some reason !
- Comments
- Post a Comment
- Popular posts from this blog
- Recover or restore initramfs file in RHEL or CentOS 7
- Space reclamation / UNMAP on RHEL or CentOS 7
How do I restore a linux boot partition?
First of all, I’m a linux noob (I’ve been using linux for a about four-five years, but only fixed problems as I got them though usually I just reinstalled everything). I have recently installed kubuntu 9.04, then upgraded to the latest Kubuntu (10.4). Everything went smooth and I have used it OK for about two weeks. After the latest security/bugfixes update, the bootloader got corrupted. My questions: Can I restore it from the 9.04 boot CD/DVD, or do I need a special rescue system? Should I get a new live DVD for 10.4 and fix it from there? Also, what do I need to actually fix? What utilities do I need? (What should my steps be?) Thanks 🙂
3 Answers 3
(K)ubuntu 10.04 uses Grub2 and the good news is that you can restore the boot loader configuration and the MBR by booting up from the live CD. See instructions here — even though the title sounds like it is related to only recovering from windows installation, the steps there allow you to re-install the respective bootloader back on your system.
On a side-note, I think since you have upgraded from Kubuntu 9.04 your system will probably still use legacy grub boot-loader. Please check here for how to upgrade to grub2. This is strictly optional — there is a note there about why the normal upgrade process didn’t change the boot-loader when you moved from 9.04 to 10.04.
Please comment if you need more info.
More often than not, the process of restoring GRUB (in recent releases of Ubuntu, that means Grub2) is described in a convoluted way. In fact it’s pretty straightforward. In a nutshell, the boot process may be broken because of one (or both) of these reasons:
- Grub isn’t installed to the boot sector of your drive («Master Boot Record» or MBR) or has been corrupted (this may be caused by a number of things, including eminently installing Windows). N.B.: Grub can be installed to the MBR of your boot disk or to the «volume boot record» of a partition. In most cases, you’ll want it to be installed in the MBR.
- Your grub configuration ( grub.cfg ) is wrong or has been corrupted. On Ubuntu this file is generated for you (see below), so you don’t need to touch it yourself, but you can manually re-create it by using update-grub .
I recommend following these instructions in the section «Recover Grub2 via Live CD». The procedure described there takes care of both sources of problems. These are the tasks you’ll perform:
- Start from a working Linux system, preferably a recent Ubuntu installation disc which is at the same time a Live CD. You do not need to use the Live CD of the variant or version of Ubuntu you’re using. An older version is fine. The Live CD is only used to get access to your hard drive.
- Find out the name of the partition that holds your boot directory, e.g. `/dev/sda1. In almost all cases, that’s just the Linux partition where you’ve installed Ubuntu.
- Mount that partition to /mnt and chroot into the mount point. Note that this means that you get a shell that looks and behaves as if you had booted the system normally. You can do many things you can do on your regular system, like installing packages and editing configuration. You might be fine without chrooting, using the update-grub provided by the Live CD along with the switch —root-directory . But knowing how to chroot into a system partition is a useful skill, and the procedure is more robust.
- Check /etc/default/grub to see if something’s wrong there (normally this should be fine).
- Regenerate grub.cfg by running update-grub .
- Install grub to the hard disk by running grub-install . This is the crucial step.
Then you can reboot and the system should start again. For the details, see the link. Finally, note that the step preceded by «If you have /boot on a separate partition» is not needed in normal circumstances, though the three commands doing the «bind»-mounts which follow are required.
How to recover lost partition in Linux
Partition tables define how your disks are divided into distinct partitions. Each partition must be formatted with a filesystem (e.g., ext4, exFAT, NTFS) before usage.
When a partition is deleted, only its entry in the partition table is removed, leaving the filesystem itself intact. By scanning the disk for existing filesystems and rebuilding the partition table based on the found filesystems, you can recover deleted or lost partitions.

In Linux, one such partition recovery application is TestDisk. To ensure successful partition recovery, use unmounted filesystems and a live Linux distribution or installer disk (e.g., Ubuntu).
Steps to recover lost or deleted partition for free using Linux:

For Ubuntu installer, click on the Try Ubuntu button.

If no Live CD mode available, press + + keys to get to the terminal.
$ lsblk NAME MAJ:MIN RM SIZE RO TYPE MOUNTPOINT loop0 7:0 0 1.9G 1 loop /rofs loop1 7:1 0 89.3M 1 loop /snap/core/6673 loop2 7:2 0 53.7M 1 loop /snap/core18/941 loop3 7:3 0 151M 1 loop /snap/gnome-3-28-1804/31 loop4 7:4 0 4M 1 loop /snap/gnome-calculator/406 loop5 7:5 0 14.8M 1 loop /snap/gnome-characters/254 loop6 7:6 0 1008K 1 loop /snap/gnome-logs/61 loop7 7:7 0 3.7M 1 loop /snap/gnome-system-monitor/77 loop8 7:8 0 35.3M 1 loop /snap/gtk-common-themes/1198 sda 8:0 0 20G 0 disk sr0 11:0 1 2G 0 rom /cdrom
$ sudo add-apt-repository universe 'universe' distribution component enabled for all sources. ##### snipped
$ sudo apt install --assume-yes testdisk Reading package lists. Done Building dependency tree Reading state information. Done The following NEW packages will be installed: testdisk 0 upgraded, 1 newly installed, 0 to remove and 316 not upgraded. Need to get 345 kB of archives. ##### snipped

Select No Log with the arrow keys and press [ENTER].

Choose the disk with the lost or deleted partition and press [ENTER] to proceed.
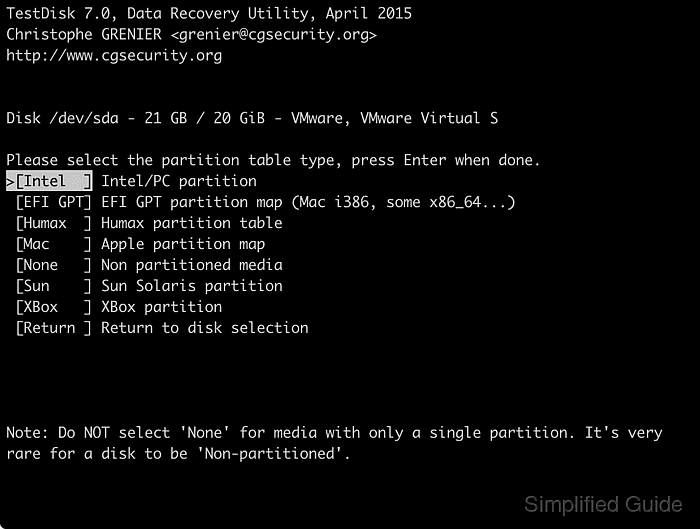
Select the disk’s partition table type and press [ENTER].
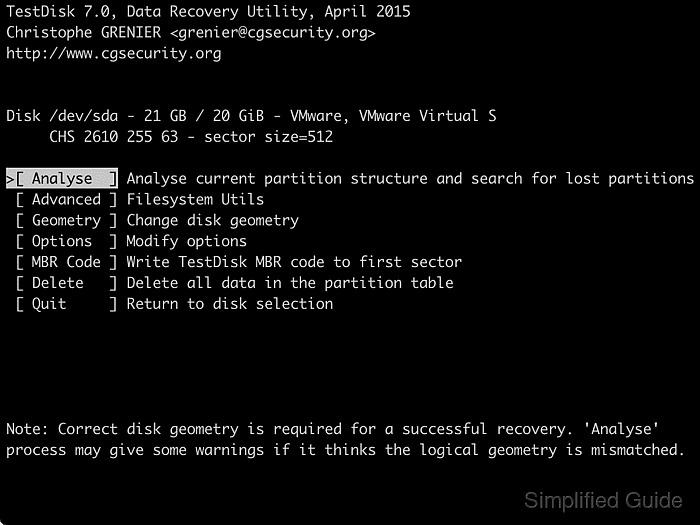
Press [ENTER] to start analysing the disk.
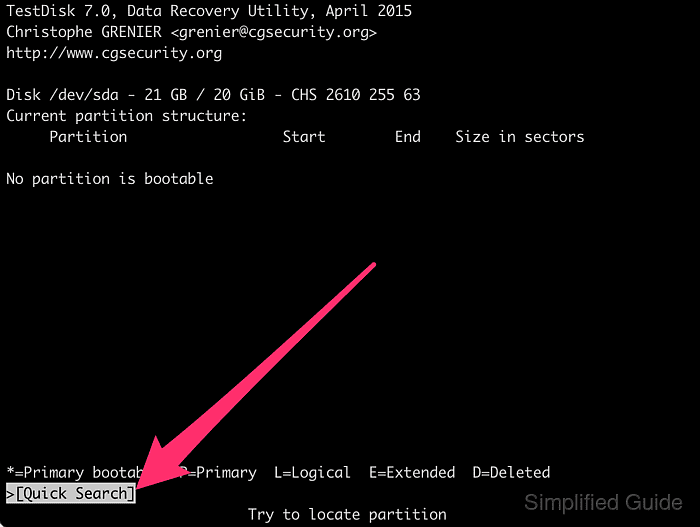
Press [ENTER] again to search for potential partitions on the chosen disk.

Select the found partition and press [ENTER] to continue.
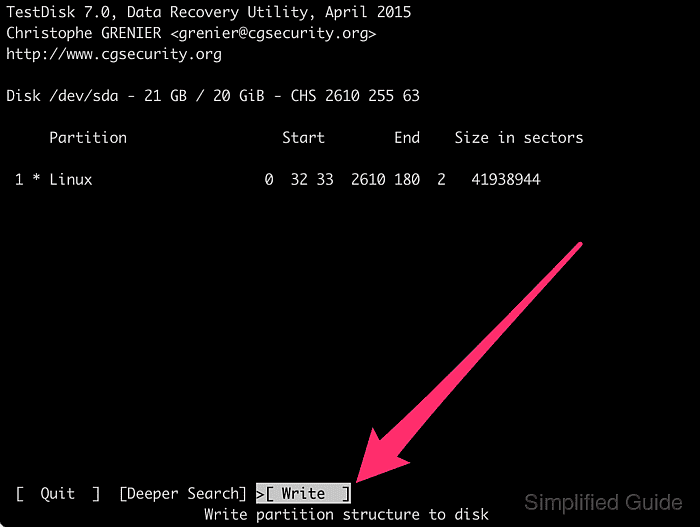
Choose Write and press [ENTER] to update the partition table.

Press Y to confirm the partition table update.

Press [ENTER] on Ok to continue.

Select Quit and press [ENTER] to return to disk selection menu.

Select Quit and press [ENTER] to exit the program.

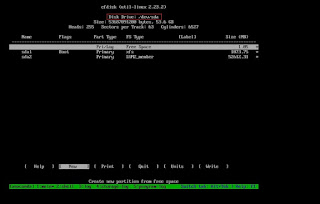
Verify that the partition table has been recovered.
Linux For You Mate .
Hi i am Ashish, having 12 Yr’s of experience in IT field. Worked on some of the most known OS distro’s of Linux like RHEL/CentOS, Virtualization (VMware vSphere ESXi 5.x and 6.x), Docker as well as on storage like EMC VNX/VMAX and HPE 3PAR. Here on this forum i’ll share some of my good experiences with you all, Hope this will help you .
How to recover /boot partition on RHEL or CentOS 7?
- Get link
- Other Apps
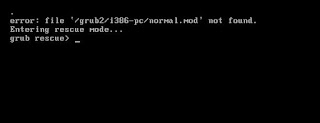
What if mistakenly you delete all the files from /boot partition or files got corrupted due to some reason !
You will see below error on the screen at the time of system boot. But there is a way to recover /boot partition files 🙂
Step 1 : Mount RHEL or CentOS 7 ISO image on your physical server and boot from it. In case you are using HPE Prolient server you can mount this ISO image on iLO, if this is virtual environment then mount it accordingly and reboot server or VM from ISO. Once rebooted you will see below options:


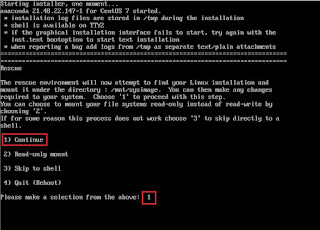
Step 5 : To continue, Type «1» and press ENTER, this will bring you to rescue mode, chroot sysimage filesystem using below command:

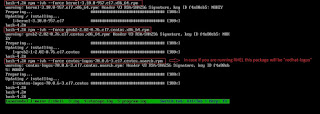
Step 6 : Next we will install 3 mandatory packages from the CentOS 7 iso:
# rpm -ivh —force kernel-3.10.0-957.el7.x86_64.rpm
# rpm -ivh —force grub2-2.02-0.76.el7.centos.x86_64.rpm
# rpm -ivh —force centos-logos-70.0.6-3.el7.centos.noarch.rpm
Note: In case if you are trying to recover /boot on RHEL 7 then you will find «redhat-logos*.rpm» in-place of «centos-logos-70.0.6-3.el7.centos.noarch.rpm» package.
Step 7 : Install grub2 on the boot disk:
In case you have multiple disks and you don’t know on which disk you have /boot partition then use:
Check all the disks one by one if /dev/sda is not the one you are looking for.
Step 8 : Once grub2 is installed on the disk then, then the last pending thing is to generate «grub.cfg»:
# grub2-mkconfig -o /boot/grub2/grub.cfg

- Get link
- Other Apps
Comments
This worked perfectly! I only needed to re-install the kernel, but it saved my broken VM. Thank you! Reply Delete
Post a Comment
Popular posts from this blog
Recover or restore initramfs file in RHEL or CentOS 7

What if «initramfs» file is deleted or corrupted on your RHEL or CentOS 7 ? Lets know what is initramfs image ? The INITial RAM Disk (initrd) is an initial root file system that usually get mounted prior to when the real root file system gets available. The «initrd» image is also known as «initramfs (Initial RAM FileSystem)» from RHEL 6.x onwards. The initrd/initramfs gets bound to the kernel and loaded as part of the kernel boot procedure. The kernel then mounts this initrd/initramfs as part of the two-stage boot process to load the modules to make the real file systems available and mount’s the real root file system. Initrd/Initramfs image provides the capability to load a RAM disk by the boot loader. This RAM disk can then be mounted as the root filesystem and programs can be run from it. Afterwards, a new root file system can be mounted from a different device. The previous root filesystem which was mounted from initrd/initramfs is then
Space reclamation / UNMAP on RHEL or CentOS 7
What is Space Reclamation? This feature supports Thin Provisioned environment, and it is the process of freeing space from the storage system that has already been freed from the host file system. A host file system contains metadata to keep track to know which blocks are available to store new data and which blocks contain actual data and must not be overwritten. This metadata is stored within the LUN. When a file is deleted in the host file system, the file system metadata is updated to mark that file’s blocks as free space. Total file system free space is then recalculated to include the newly-freed blocks. To the storage system, these metadata updates appear no different than any other writes being performed by the host. Therefore, the storage system is unaware that any deletions have occurred. What is Unmapping? Unmapping is a process which de-allocates relationship between LBA and a physical block in a logical unit. Reclamation within RHEL and CentOS: RHEL / Ce