Why does root get Permission denied when accessing FUSE directory?
I use a FUSE filesystem with no problems as my own user, but root can’t access my FUSE mounts. Instead, any command gives Permission denied . How can I give root the permission to read these mounts?
~/top$ sudo ls -l total 12 drwxr-xr-x 2 yonran yonran 4096 2011-07-25 18:50 bar drwxr-xr-x 2 yonran yonran 4096 2011-07-25 18:50 foo drwxr-xr-x 2 yonran yonran 4096 2011-07-25 18:50 normal-directory ~/top$ fuse-zip foo.zip foo ~/top$ unionfs-fuse ~/Pictures bar ~/top$ ls -l total 8 drwxr-xr-x 1 yonran yonran 4096 2011-07-25 18:12 bar drwxr-xr-x 2 yonran yonran 0 2011-07-25 18:51 foo drwxr-xr-x 2 yonran yonran 4096 2011-07-25 18:50 normal-directory ~/top$ ls bar/ Photos ~/top$ sudo ls -l ls: cannot access foo: Permission denied ls: cannot access bar: Permission denied total 4 d. ? ? ? ? ? bar d. ? ? ? ? ? foo drwxr-xr-x 2 yonran yonran 4096 2011-07-25 18:50 normal-directory ~/top$ sudo ls bar/ ls: cannot access bar/: Permission denied $ uname -a Linux mochi 2.6.32-33-generic #70-Ubuntu SMP Thu Jul 7 21:13:52 UTC 2011 x86_64 GNU/Linux $ lsb_release -a No LSB modules are available. Distributor ID: Ubuntu Description: Ubuntu 10.04.3 LTS Release: 10.04 Codename: lucid Edit: removed the implication that root used to be able to access the mounts. Come to think of it, maybe my scripts never tried to access the directory as root.
Ошибка «Permission denied» в Linux
Все операционные системы семейства Linux имеют четко разграниченные права доступа. В своей домашней директории пользователь может делать все, что ему угодно, до тех пор, пока укладывается в отведенные рамки. Попытка выйти за них приводит к появлению ошибки «Permission Denied».
Изменение прав в терминале
Рассмотрим вариант, в котором необходимо прочесть текстовый документ, созданный другим пользователем. Файлы TXT в Linux можно просматривать непосредственно в терминале с помощью команды «cat».
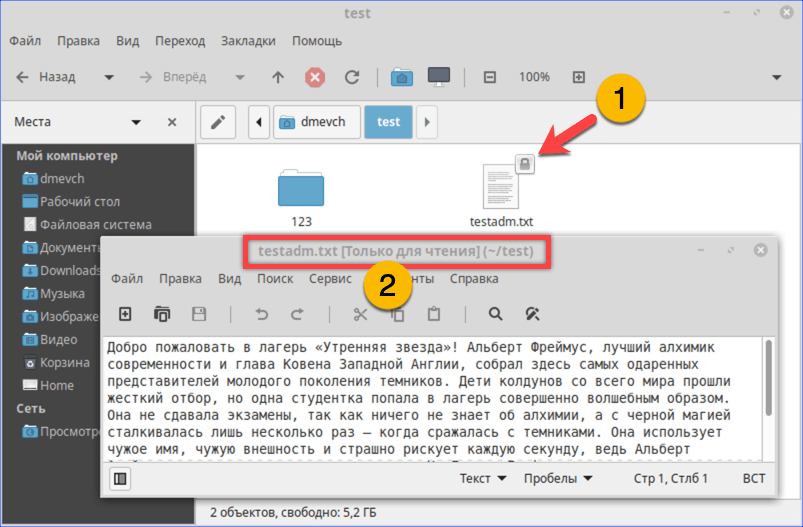
- Заходим в каталог с интересующим нас документом. Набираем команду «cat filename», подставляя вместо «filename» имя нужного файла. На скриншоте показана ошибка «Permission Denied», выглядящая в русской локализации как «Отказано в доступе».

Получаем ошибку «Permission Denied» при попытке просмотреть содержимое файла
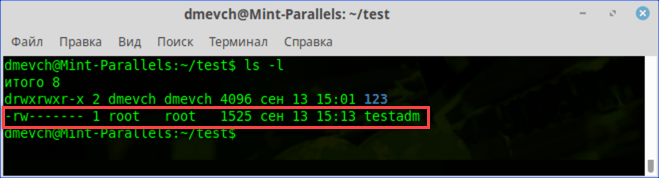
Проверяем права доступа к документу используя команду «ls -l»
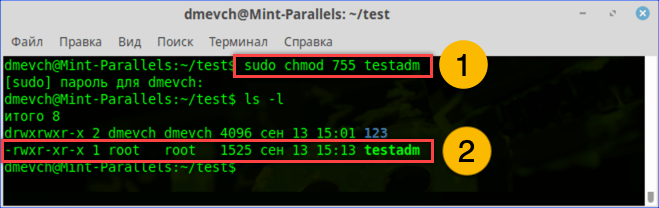
Используем команду «chmod» и административные права для получения доступа
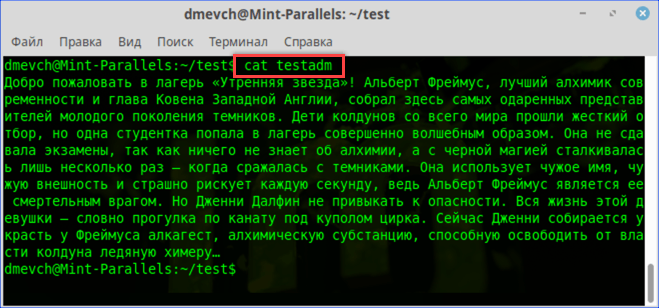
Просматриваем содержимое текстового документа командой «cat»
Изменение прав в файловом менеджере
Разберемся, как выполнить рассмотренную выше операцию в графическом интерфейсе, используя файловый менеджер из дистрибутива.
- Как видно на скриншоте, значок файла изначально имеет дополнительные символы, указывающие на то, что доступ у нему ограничен. При попытке посмотреть содержимое получаем графический вариант ошибки «Permission Denied».
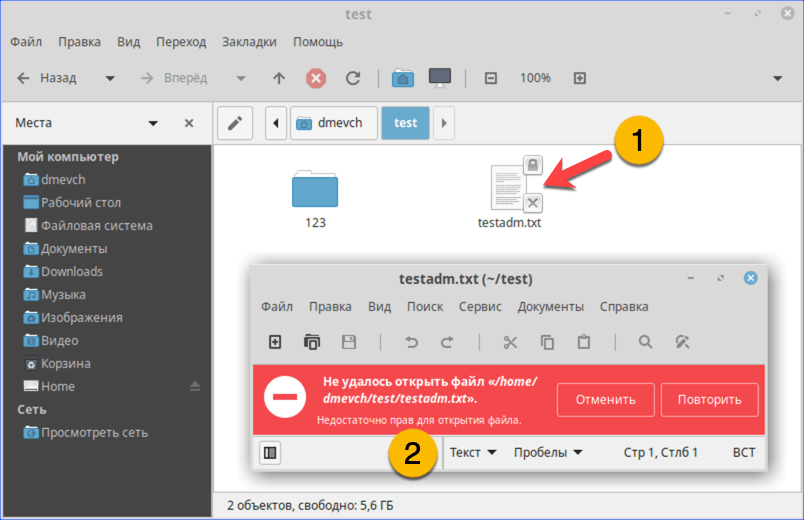
При попытке открыть текстовый документ получаем ошибку «Permission Denied»
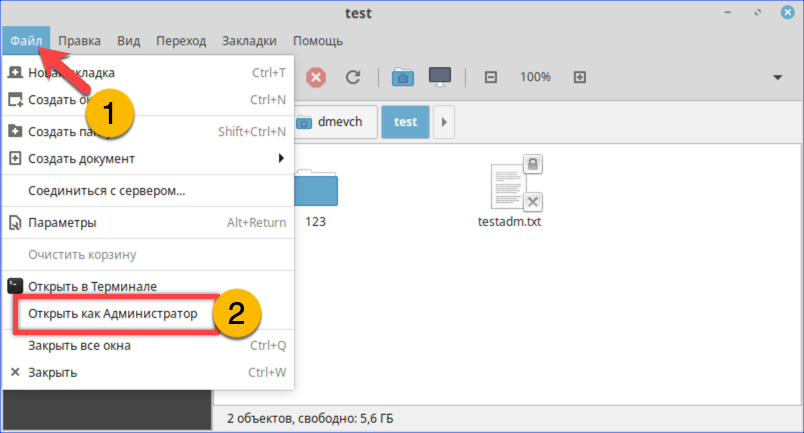
Открываем меню «Файл» и перезапускаем файловый менеджер от имени root
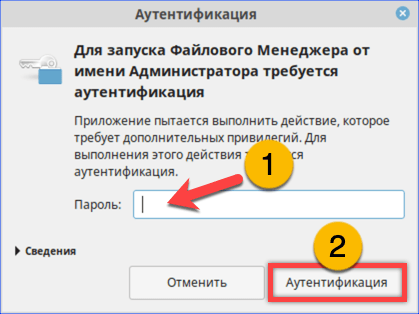
Набираем пароль root в окне аутентификации
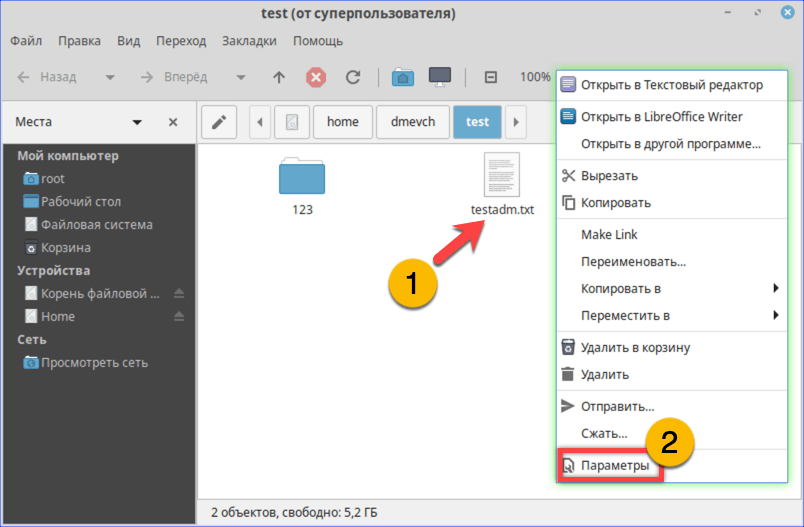
Открываем параметры файла с помощью контекстного меню
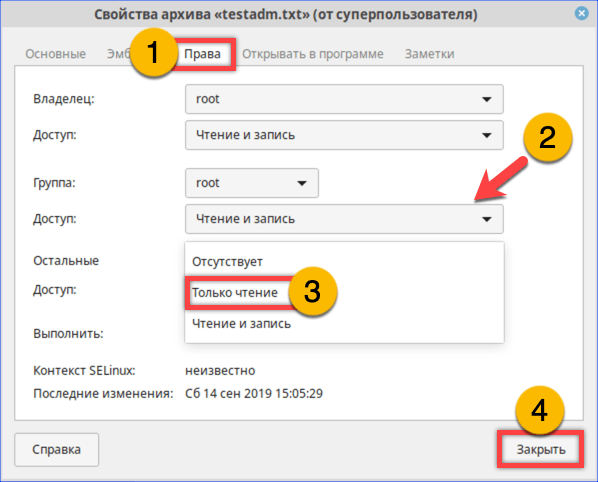
На вкладке «Права» разрешаем доступ для группы root и остальных пользователей
Открываем ранее недоступный файл в режиме чтения и изучаем содержимое
В заключение
Как видим, избавиться от ошибки Permission Denied достаточно просто. Решив изменить правда доступа к системным файлам, лишний раз убедитесь, что полностью уверены в своих действиях и понимаете последствия вносимых изменений.
I Can’t access the root folder
I do not have access to my root folder: Ubuntu says I do not have the necessary permissions to access it. I also cannot access lost + found , which gives me the same error message Is there anyone here that can provide answers to these questions?
@DevynCollierJohnson Probably not. It seems likely that this is asking about / (the root directory) rather than /root (root’s home directory). Furthermore, this also asks about lost+found (which is always in / but never in /root , since in practice /root is one of the few top-level directories nobody puts on a separate filesystem.
3 Answers 3
There are two different folders called the «root» folder: / (the root of the filesystem, which is really the only folder that should ever be called the «root folder»), and /root (the root user’s home directory). During the normal course of operation (i.e., except while performing administrative tasks), users cannot create new files in / or /root .
You should not change the ownership or permissions of either directory (changing them for / in particular could break things very badly, perhaps even beyond creating security problems depending on what assumptions your applications and services make about the ownership and permissions of / ).
If you have the gksu package installed, you can run gksudo nautilus to open a root-owned file browser window. If you do this, please be extra careful to only use it for tasks where you must be root, and to close it when you’re done (so you don’t later confuse it with an ordinary Nautilus window).
If you don’t have gksu installed and don’t want to install it, sudo -i nautilus or sudo -H nautilus are reasonably safe. (In contrast, if you were to use plain sudo nautilus , you might have to fix some things in your home directory to get Nautilus to work properly again when you’re not running it as root.)
However, usually you don’t need to do that either. You rarely have to manually edit the top-level contents of / or the contents of /root . I recommend providng more information—or asking a new question—to explain exactly what you’re trying to accomplish. The particular task you need to do will determine how you should proceed.
Finally, a note on lost+found . This stores files recovered in filesystem repair operations. Since such files could be from anywhere in the filesystem, it’s necessary to require root permissions to access them (or any information on the system could potentially be accessed by someone who is not an administrator). If you think there may be files there that you wish to reclaim, you can check by running
in a Terminal window ( Ctrl + Alt + T ).
If there are files there that you want, then you can copy them out (and if their ownership and permissions don’t give you the necessary access, change them). You can do that as root from the Terminal with cp , chmod and chown (run as root with sudo ), or with a root-owned Nautilus window as described above.
If you need to change ownership and permissions for files, then:
- make sure not to do so for more files than necessary—for example, some people accidentally change ownership or permissions for large parts of the system and then have to reinstall, and
- I recommend this guide for understanding the ownership/permissions system in Ubuntu (which also applies to most other Unix-like OSes). Wikipedia may help too.
Unable to SU with root: `/bin/bash: permission denied`
Honestly, no matter what I do, I cannot reproduce this problem. Have you tried testing this on a freshly installed system?
5 Answers 5
Change the permission of these folders like this and now you can su to another user.
chmod 755 / chmod 755 /bin chmod 755 /lib My problem was solved by doing chmod 755 / What is strange is that I needed to do this after a fresh install of Ubuntu 16.04.1 amd64 Desktop
# ls -ld /bin drwxr-xr-x 2 root root 4096 May 27 21:39 /bin # ls -l /bin/*sh -rwxr-xr-x 1 root root 1037464 Sep 1 2015 /bin/bash -rwxr-xr-x 1 root root 154072 Feb 17 21:25 /bin/dash lrwxrwxrwx 1 root root 4 Sep 1 2015 /bin/rbash -> bash lrwxrwxrwx 1 root root 4 Feb 17 21:25 /bin/sh -> dash lrwxrwxrwx 1 root root 7 Aug 19 2015 /bin/static-sh -> busybox # ls -lL /bin/*sh -rwxr-xr-x 1 root root 1037464 Sep 1 2015 /bin/bash -rwxr-xr-x 1 root root 154072 Feb 17 21:25 /bin/dash -rwxr-xr-x 1 root root 1037464 Sep 1 2015 /bin/rbash -rwxr-xr-x 1 root root 154072 Feb 17 21:25 /bin/sh -rwxr-xr-x 1 root root 1964536 Aug 19 2015 /bin/static-sh # ldd /bin/bash linux-vdso.so.1 => (0x00007ffdefb5a000) libtinfo.so.5 => /lib/x86_64-linux-gnu/libtinfo.so.5 (0x00007f714bbbd000) libdl.so.2 => /lib/x86_64-linux-gnu/libdl.so.2 (0x00007f714b9b9000) libc.so.6 => /lib/x86_64-linux-gnu/libc.so.6 (0x00007f714b5ef000) /lib64/ld-linux-x86-64.so.2 (0x000055c6bc494000) # ls -ld /lib /lib/x86_64-linux-gnu /lib64 drwxr-xr-x 26 root root 4096 May 15 07:41 /lib drwxr-xr-x 2 root root 4096 May 14 15:52 /lib64 drwxr-xr-x 3 root root 16384 May 27 21:39 /lib/x86_64-linux-gnu # ls -l /lib/x86_64-linux-gnu/libtinfo.so.5 /lib/x86_64-linux-gnu/libdl.so.2 /lib/x86_64-linux-gnu/libc.so.6 /lib64/ld-linux-x86-64.so.2 lrwxrwxrwx 1 root root 32 Apr 14 23:16 /lib64/ld-linux-x86-64.so.2 -> /lib/x86_64-linux-gnu/ld-2.23.so lrwxrwxrwx 1 root root 12 Apr 14 23:16 /lib/x86_64-linux-gnu/libc.so.6 -> libc-2.23.so lrwxrwxrwx 1 root root 13 Apr 14 23:16 /lib/x86_64-linux-gnu/libdl.so.2 -> libdl-2.23.so lrwxrwxrwx 1 root root 15 Feb 19 09:23 /lib/x86_64-linux-gnu/libtinfo.so.5 -> libtinfo.so.5.9 # ls -lH /lib/x86_64-linux-gnu/libtinfo.so.5 /lib/x86_64-linux-gnu/libdl.so.2 /lib/x86_64-linux-gnu/libc.so.6 /lib64/ld-linux-x86-64.so.2 ##or # ls -lL /lib/x86_64-linux-gnu/libtinfo.so.5 /lib/x86_64-linux-gnu/libdl.so.2 /lib/x86_64-linux-gnu/libc.so.6 /lib64/ld-linux-x86-64.so.2 -rwxr-xr-x 1 root root 162632 Apr 14 23:16 /lib64/ld-linux-x86-64.so.2 -rwxr-xr-x 1 root root 1864888 Apr 14 23:16 /lib/x86_64-linux-gnu/libc.so.6 -rw-r--r-- 1 root root 14608 Apr 14 23:16 /lib/x86_64-linux-gnu/libdl.so.2 -rw-r--r-- 1 root root 167240 Feb 19 09:23 /lib/x86_64-linux-gnu/libtinfo.so.5