- The Big Picture
- Preparations
- Unlocking the Bootloader
- Using AutoRoot to install SuperSU
- Installing OTA updates
- Optional: Replacing the Recovery System
- restoring stock recovery
- Alternative superuser apps
- Complete Beginners Guide To Root Samsung Galaxy S2 In Ubuntu Linux
- How to root Samsung Galaxy S2 in Ubuntu Linux
- Prerequisites:
- Step 1: Find the Kernel version on your phone
- Step 2: Download the rooted Kernel image
- Step 3: Extract the downloaded Kernel image
- Step 4: Download and install Heimdall
- Step 5: Put your phone in Download mode
- Step 6: Connect the phone to computer
- Step 7: Flash the Kernel
- Note.
- Step 8: Check if your Android phone is rooted
The Big Picture
typically only the main system is running, that is the Linux Kernel, the launcher, the phone app etc.. If we talk about rooting, that means we want to add an additional app to the main system which has access to secured parts of the system and acts as a gatekeeper for other apps that also want to get access.
The problem is the secured parts of the system are locked down – otherwise they would not be secure. This means that we can not simply install that app (e.g. an apk) from within the main system.
Therefore we have to go one level down. This is where the recovery system is. Typically you do not see it, as it is only active when the main system can not run – either because a system update is installed or because you do a factory reset.
As the recovery system can do a full system update, it means that it has also access to the secured parts of the main system – exactly what we need.
The stock recovery system obviously does not allow altering the main system – otherwise everybody could get your private data if you lose your phone.
So we need to replace it as well. But before that we have to talk about the bootloader.
The bootloader is a tiny piece of software which decides whether to start the recovery or the main system (or another main system, like Ubuntu Phone).
In the default configuration in only starts systems that it knows and trusts. In this configuration the bootloader is called locked.
Although this prevents malicious software to change the phone and spy on us, it also prevents us from replacing the recovery system. By the way, this concept is also coming to the PC where it is called UEFI secure-boot.
Here is a graphical overview of the Android components:
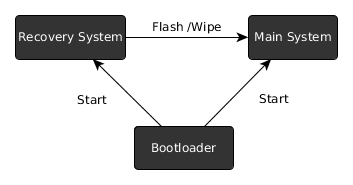
So what we need to do in order to get root access is
Note that unlocking the bootloader also allows attackers to circumvent any of the android security features (PIN etc). It becomes possible to access all the files on the device using a different recovery system. (unless userdata is encrypted)
Therefore android will wipe all userdata when the bootloader state is changed from locked to unlocked.
So if you lose your unlocked device or it gets stolen, you better hope the thief is not tech savvy.
Preparations
First you need to install the fastboot binary to be able to perform low-level communication with the device
apt-get install android-tools-fastboot android-tools-adb android-sdk-platform-tools-common
The android-sdk-platform-tools-common package most importantly contains a whitelist (/lib/udev/rules.d/51-android.rules) with devices to which users can send commands over USB, so you do not have to run fastboot as root.
Now you have to reboot into fastboot mode. Usually there is a key combination you have to press on startup.
Remember this key combination as you will need some more times.
Samsung Devices however, like the Galaxy S3, do not support the fastboot mode – instead they have a download mode, which uses a proprietary Samsung protocol. To flash those you have to use the Heimdall tool. While this article does not cover the heimdall CLI calls, the general discussion still applies.
Unlocking the Bootloader
last warning: this will wipe all user data on the device
for google devices, like a Nexus 4 or Nexus 7 it is just do
if you have a Sony Xperia device, like a Xperia Z, you additionally have to request a unlock key and then do
where is the key you obtained.
Using AutoRoot to install SuperSU
There are several superuser apps to choose from for Android 4 and below. However the only superuser app working on Android 5/ Lollipop and above is SuperSU by Chainfire.
As there are devices like the Nexus 5X shipping with Android 6/ Marshmallow, I will describe this method first.
Chainfire created an “installer” called AutoRoot that includes the fastboot utility and will perform the unlocking step described above. However if you have read this far, you probably also want to understand the rest of the process.
First you have to download the appropriate package for your device. There you will find a recovery image which we have start with
fastboot boot image/CF-Auto-Root-hammerhead-hammerhead-nexus5.img
the command above will not flash anything on your device, but just upload the image and immediately start it. The image contains a script to modify the main system (change startup to get around SELinux) and install the superuser app.
If everything goes well, you can now just reboot your phone and you are done.
You could lock your bootloader again now to make your device more secure. However the next Android update will remove root again and repeating the rooting procedure will wipe userdata – so you have to balance security update vs. the risk of your device being stolen. For the latter case you still have the option to enable encryption of userdata though.
Installing OTA updates
Android over the air (OTA) updates contain only the changes to the current system. In order to verify that the update succeeded Android computes a checksum of the patched system and reverts to the old state otherwise.
As SuperSU has changed the boot image to start itself, the updates obviously will fail. So to install an OTA update you will have to grab a factory image and restore the boot partition using the included boot.img
fastboot flash boot boot.img
after this you will have to patch the boot partition again using the procedure described above.
Also note that if you use apps that change the system partition (like AdAway that changes the hosts file), you will have to revert those changes as well in order for the OTA update to succeed.
Optional: Replacing the Recovery System
If you want some advanced features, like backing up all your installed apks, you can permanently replace the recovery image on your device. However this will most likely prevent you from installing OTA updates.
There are two prominent alternative recovery systems with the ability to install apps
Clock Work Mod has been discontinued, so we will use TWRP. From the Website linked above download the recovery image which fits your phone.
fastboot flash recovery .img
where is the name of the file you downloaded. For instance for a Nexus 9 and TWRP 3.2.3 it would be
fastboot flash recovery twrp-3.2.3-0-flounder.img
restoring stock recovery
If you have a Google Device, you can grab the factory images here. There you will find a image of the stock recovery. You can restore it by
fastboot flash recovery recovery.img
Alternative superuser apps
If you run a device with Android older than 5/ Lollipop you have some alternatives to SuperSU:
I would recommend getting Superuser by CWM, as it is open source and also nag-free as there is no “pro” version of it. There is even a pull-request which might make it also work with Android 5 in the future.
To install the app we need to get this zip archive and copy it to the device. Then we need to reboot into fastboot mode and then select “Recovery Mode” to get to the recovery system. Once in Recovery mode select
install zip -> choose zip from /sdcard
then browse and select the “superuser.zip” you just copied.
Go Back -> reboot system now
Once the system has started you should have a “Superuser” App on your device. Congratulations, you are done.
Complete Beginners Guide To Root Samsung Galaxy S2 In Ubuntu Linux

You might think it is a bit late to write on how to root Samsung Galaxy S2 in Ubuntu Linux because its been over 3 years since its release and there are already Samsung Galaxy S3 and S4 in market. But it was only recently when I decided to root my Samsung Galaxy S2 after my contract with SFR was over. At least now I won’t be violating the warranty from the manufacturer as its over 2 years now for my phone.
The other reason why I am writing this article on rooting Android phone is that I did not find any good articles that could teach a beginner to easily root an Android smartphone on Linux. I followed the steps mentioned on XDA forum, but I felt the need of improving the article with clear steps and proper screenshots and hence I came up with this article to show you how to root Samsung Galaxy S2 easily in Ubuntu Linux.
How to root Samsung Galaxy S2 in Ubuntu Linux
The tutorial was performed on Elementary OS Luna and Samsung Galaxy S2 I9100 running on Jelly Beans (Android 4.2.1). But these steps are generic and with a little modification, can be followed on any other Linux distribution and any other Smartphone with any other Android version.
Prerequisites:
Here are some of the prerequisites to root an Android phone on Ubuntu:
- A USB data cable to connect your phone to computer
- A computer running any standard Linux OS with internet connection (to download some files, mentioned later).
The procedure may seem a bit long to you, but trust me, it is not. Its really easy to root your Android phone and it won’t take you more than 10-15 minutes to follow the complete procedure. Steps are detailed so that even a beginner can easily root the phone.
Step 1: Find the Kernel version on your phone
First thing first. You need to find which Kernel version your smartphone is currently running. On your phone, go to Settings-> About phone. Look closely for Build number.
On Android: Settings->About phone-> Build number
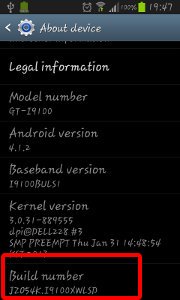
As you can see in the picture above, the build number for my Samsung Galaxy S2 is I9100XWLSD. Notice the LSD. This is important to download the correct “rooted Kernel” image for your phone.
Step 2: Download the rooted Kernel image
Once you have got the Kernel number, its time to download the rooted Kernel image (thanks to XDA developers). For XWLSD, download Siyah-s2-v6.0b4.tar file.
For other Kernel versions, please check on XDA developer forum or search on Google. Its not possible for me to provide the links for each of them.
Step 3: Extract the downloaded Kernel image
Once you have downloaded the tar file, extract it. The extracted file would be zImage. Copy it to your home directory (for simplicity purposes).
Step 4: Download and install Heimdall
Heimdall is a cross platform Open Source tool that is able to flash firmware on Samsung devices. You can download Heimdall form their repository. Reposiory has a number of files for different Linux distributions. Basically, you have to download the command line (heimdall) and front-end (heimdall-frontend) files for your Linux OS.
For Ubuntu and other Debian based distributions, you can see the .deb binaries there. Download and install the one for your Ubuntu version.
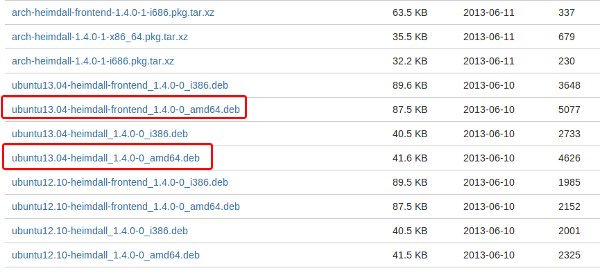
Alternatively, you can also try to compile the source code.
Step 5: Put your phone in Download mode
Once you have the correct rooted Kernel image and Heimdall installed on your Linux system, its time to start the rooting process. For this purpose, you have to put your phone in “download mode”. Try the following steps:
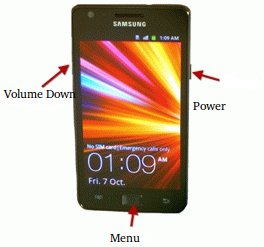
You’ll see a warning message after few seconds on the screen. Press volume up button to continue in “download mode”.
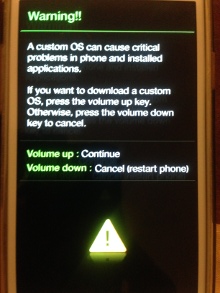
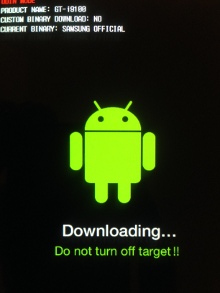
Once you are in downloaded mode, you shall see a screen like this on your Android phone:
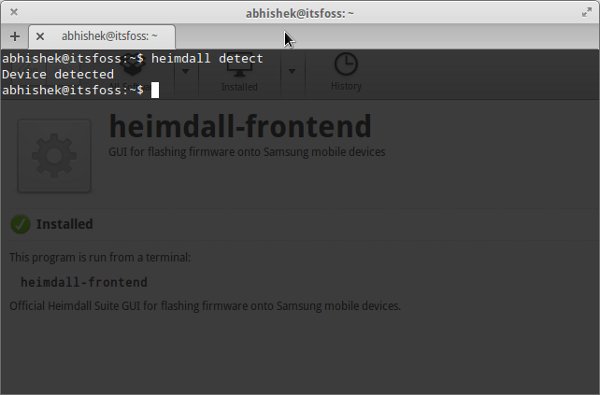
Step 6: Connect the phone to computer
In the download mode, connect your phone to the computer using a USB data cable. To check if it is well detected by your Linux OS, open a terminal (Ctrl+Alt+T) and use the following command:
This should show you a result like “device detected“:
Step 7: Flash the Kernel
Now is the time to replace your old Kernel with the rooted one. In the terminal, use the following command:
sudo heimdall flash --KERNEL zImage
It will be a long output. If its a success you will see the following lines at the end of the long message:
Uploading KERNEL 100% KERNEL upload successful Ending Session. Rebooting Device. Re-attaching kernel driver.
Note.
If it was not successful for some reason, you should see the message at the bottom of the log. In the first try, I saw this error message: ERROR: Partition “kernel” does not exist in the specified PIT. When I checked with sudo heimdall print-pit –verbose command, I found that there were several partition on my phone and the Kernel was on partition KERNEL and not kernel (case sensitive, you see).
Your phone will be logged in automatically.
Step 8: Check if your Android phone is rooted
Al right, it was a success for you so far. But how to verify if your phone is rooted? For this download a terminal app on your Android phone. I used Android Terminal Emulator. It is like a Linux terminal in your Android phone. Start the app and write the following command in the terminal and press enter key.
If you are rooted, it will prompt you like this to ask for root access:
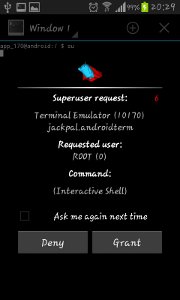
Once you give the root access, the $su will change in #su. An indicator that you have root access now and it also means that you have successfully rooted your Galaxy S2.
I hope this guide helps you to root your Samsung Galaxy S2 in Linux. Feel free to drop your suggestions, feedback, thanks and questions in the comment box below. Subscribe to the blog for more tutorials. Ciao 🙂