- Use ssh agent to hold your keys
- Enabling the SSH Agent
- Start ssh-agent
- Adding your key to the agent
- Add your key to the agent
- Linux:
- Windows:
- Agent lifetime
- как настроить ssh-agent
- How to use ssh-agent on Ubuntu
- Prerequisites:
- Syntax:
- Different options of ssh-agent:
- Using ssh-agent command for non-interactive authentication:
- Use ssh-add to add the private key passphrase to ssh-agent:
- Copy file from client to server:
- Remove all cached ssh-agent private keys:
- Conclusion:
- About the author
- Fahmida Yesmin
Use ssh agent to hold your keys
Remembering your credentials and which key you use for different services can become non-trivial if you work with many remote systems. You can use the ssh config file, ~/.ssh/config to specify features of your connection e.g. if you have different usernames on different systems:
Host service IdentityFile id_ed25519_service User userid_service
Enabling the SSH Agent
So far we have just replaced the need to enter a password to access a remote host with the need to enter a key pair passphrase. Because of this is may be tempting to leave the passphrase empty when creating your key so that we do not have to enter it every time we access a service which may be many times a day. This is poor security practise and is likely to be in breach of the acceptable use policies covering the services you are accessing.
It is also a completely unnecessary risk as you can enable an agent on your local system so that you only have to enter the passphrase once and after that you will be able to access the remote system without entering the passphrase. Here we will demostrate how to use ssh-agent but:
- on Linux you might want to consider the GNOME keyring
- if using putty you can use pageant
- if using MobaXterm you can use its internal MobAgent
Start ssh-agent
Most modern Linux distributions (and macOS) should have ssh-agent running by default. If your system does not then you should find the instructions for enabling it in your distribution using Google. Typically you can check this with:
If the output is empty then it isn’t running. It can be launched with:
eval `ssh-agent` Agent pid 123
and now you can confirm it is running with:
Adding your key to the agent
To add the private part of your key pair to the SSH Agent, use the ssh-add command (on your local machine).
By default this will add the files: ~/.ssh/id_rsa , ~/.ssh/id_dsa , ~/.ssh/id_ecdsa , ~/ssh/id_ed25519 and ~/.ssh/identity , if they exist.
If we want to add a specific key that is not one of these we must specify it explicitly:
ssh-add ~/.ssh/id_ed25519-service Enter passphrase for home/user/.ssh/id_ed25519_service: [Passphrase] Identity added: home/user/.ssh/id_ed25519_service (home/user/.ssh/id_ed25519_service)
We can also add keys for a specific length of time. To add the key for one hour we inculde the flag and parameter -t 3600 , you will need to enter your passphrase one more time:
ssh-add -t 3600 ~/.ssh/id_ed25519-service Enter passphrase for home/user/.ssh/id_ed25519_service: [Passphrase] Identity added: home/user/.ssh/id_ed25519_service (home/user/.ssh/id_ed25519_service) Lifetime set to 3600 seconds
Now you can test that you can access the remote host without needing to enter your passphrase:
ssh [userID]@ 'date' Wed May 8 10:42:56 BST 2020
again we have run date on the remote service to confirm that we have been able to use the ssh-agent successfully.
Remember that in the above user will be your username on your local machine and that [userID] is you username on the remote .
Add your key to the agent
Linux:
Following the instructions above add just the key you have created to access the remote service to your agent.
Windows:
Using pageant which is included with the putty bundle, add your ssh-key, text instructions are in the documentation.
Agent lifetime
By default ssh-agent will store your key forever, until the machine is rebooted. Remember that we are trying to ensure that we operate as securely as possible. If we could be completely confident that our local machine could not be taken and compromised then we would not use passwords.
Similarly with the ssh-agent we must consider how long that the passphrase needs to be or should be remembered. If we are in a secure office at work and we will be accessing the service repeatedly throughout the day then we might want the key to be remembered for several hours. If we are doing half an hour’s work in a cafe we would probably want to have the keys stored for that length of time. Note that the time is in seconds.
At the end of a session you can remove all stored keys with:
как настроить ssh-agent
Есть множество способов настроить ssh-agent в Linux. Приведу самый удобный для себя, который нашел относительно недавно.
Для начала, напишу зачем нужен ssh-agent. Представим, что у вас есть несколько ssh ключей, каждый ключ защищен паролем (да, лучше запароливать ключи). Вы решаете соединиться с каким-то сервером и при каждом соединении ssh клиент просит ввести пароль. Неудобно, не так ли?
А что, если вы хотите соединиться с несколькими серверами по цепочке или же скачать какой-то приватный git репозиторий на удаленном сервере? Придется загружать туда свой приватный ssh ключ. Опять неудобно.
Вот тут на выручку и приходит ssh-agent, он же агент ssh. Он безопасно хранит в памяти все ваши ключи, не требует пароль постоянно, и его можно пробрасывать на удаленные сервера без особых усилий (ssh -A).
Как же включить и настроить его?
Для начала убедитесь, что он установлен в системе (на примере Debian-based систем), скорей всего он уже установлен:
sudo apt-get update sudo apt-get -y install openssh-client ssh-agent идет в комплекте с ssh клиентом, удобно.
Далее пропишите в ~/.profile следующую строку:
Почему в ~/.profile ? Потому что нам достаточно запустить агент всего лишь единожды для сессии, можно конечно запускать их на каждый bash процесс и т.п., но это излишне.
Что значит эта команда? Она запустит ssh-agent, который выдаст необходимые переменные окружения для shell, которые будут экспортированы во все shell процессы пользователя.
Проверить эти переменные можно вот так:
└─$ env | grep SSH_ SSH_AUTH_SOCK=/tmp/ssh-Hg0DgkE9cvLu/agent.2346 SSH_AGENT_PID=2347 Мы запустили ssh-agent, но этого еще недостаточно, он ничего не знает про наши ssh ключи. Добавим же их в него. Для этого отредактируем ~/.ssh/config , если у вас его нет, то создайте. Вот сокращенный пример моего конфига:
Host * ForwardAgent yes AddKeysToAgent yes IdentityFile ~/.ssh/id_ecdsa IdentityFile ~/.ssh/id_rsa Первой строкой мы указываем к каким хостам применять данную конфигурацию, как видно, ко всем.
Далее мы разрешаем проброс агента на удаленные сервера. Это не всегда безопасно, поэтому можете отключить эту опцию.
AddKeysToAgent yes самая главная строка, она добавляет ключи в агент, если ключ запаролен, то при любом первом подключении у вас будет запрошен пароль и далее сохранен на протяжении всей сессии.
Строки с IdentityFile указывают нужные мне ключи для использования клиентом ssh.
Вот и всё, для вступления изменений в силу достаточно в терминале выполнить . ~/.profile и попробовать подключиться к любому серверу по ssh, например:
Для проверки добавленных ключей в агент, выполните
└─$ ssh-add -l 256 SHA256:EdQaJRIu22tco6giujxrZhsVH44Io+8gkhfUjfj3lNI insider@localhost (ECDSA) 2048 SHA256:9wUbS3ZM8dHsmcRWc3ZBAeQqzN8kw+78grWFSEyL9To (RSA) 256 SHA256:Upg/EVhSYoErKdFBVvhKt50dxLJeZtUewn6bpGfQnnE insider@xps13 (ED25519) How to use ssh-agent on Ubuntu
![]()
ssh-agent is configured to execute on Ubuntu automatically. If it is not started at the login automatically, it can be started manually by the `eval` command. The password of the SSH private key can be created manually by the user handle by ssh-agent. It is called an authentication agent. The ssh-agent uses the SSH_AUTH_SOCK environment variable for authentication. If this variable is set properly, then the ssh-agent will work properly. The uses of ssh-agent on Ubuntu for different purposes have been explained in this tutorial.
Prerequisites:
Before starting the steps of this tutorial, the following steps will be required to complete.
Enable the SSH service on Ubuntu if it is not enabled before.
Generate the SSH Key pairs to execute the commands in the remote server. Run the following command to create the public key and the private key. The private key will be stored in the remote server, and the public keys will be stored in the client securely.
Run the following command to open the sshd_config file using nano editor to add some necessary configurations.
Add the following lines in the file to enable the root login and password-based authentication.
Run the following command to restart the SSH service.
Syntax:
Two different syntaxes of the ssh-agent have given below. The meaning of the options used with this command is described in the next part of this tutorial.
ssh-agent [ -c | -s ] [ -Dd ] [ -a bind_address ] [ -E fingerprint_hash ] [ -t life ] [ command [ arg . ] ]
Different options of ssh-agent:
the ssh-agent command has many options. The uses of the options are given below.
| Option | Purpose |
| -a bind_address | It is used to bind the UNIX domain socket to the given file path forcefully instead of using the default socket. |
| -c | It is used to generate the C-shell commands on stdout. The shell is automatically detected by default. |
| -d | It is used to enable the debug mode. |
| -E fingerprint_hash | It is used to define the algorithm used to generate the SSH key fingerprints. md5 and sha256 are the valid values. |
| -k | It is used to kill the currently running agent. |
| -s | It is used to generate the Bourne shell (/bin/sh) commands on stdout forcefully. The shell is automatically detected by default. |
| -t life | It is used to define the maximum number of seconds used to keep the agent’s identity. The value of this option defines in seconds, but it can be defined by different suffixes, such as m for minutes, h for hours, d for days, and w for weeks. If this option is not used, the agent will keep the keys in the memory as long as it runs. This value will be overridden when the ssh-add command will be executed. |
The use of the -t option has been shown here. Run the following command to keep the identity of the agents for 60 seconds.
The following output will be appeared after executing the above command.

Using ssh-agent command for non-interactive authentication:
Run the following command from the server machine to start the ssh-agent for non-interactive authentication.
The following output will be appeared after executing the above command. ssh-agent is running now. Here, the username of the server machine is ‘fahmida.’

Use ssh-add to add the private key passphrase to ssh-agent:
the ssh-add command will require providing the passphrase for the ssh private keys. Now, log in to the client machine and run the ssh-add command from the terminal.

After adding the private key to the ssh-agent, different types of SSH commands, such as scp, sftp, ssh, etc., can be executed from the client machine.
Copy file from client to server:
The scp command to copy the file from the client to the server and ssh command to connect with the server for checking the file is copied or not shown in this part of the tutorial. Create a text file named testfile.txt with the following content.
It is a testing file created in the client machine.
Run the following command to check the content of the testfile.txt file before executing the `scp` command.
The following output will be appeared after executing the above command.

Run the following command to copy the testfile.txt file from the client machine to the Documents folder of the server machine.
The following output will be appeared after executing the above command if the file is copied successfully to the server location. Here, the username of the server machine is ‘fahmida,’ and the username of the client machine is ‘Yasmin.

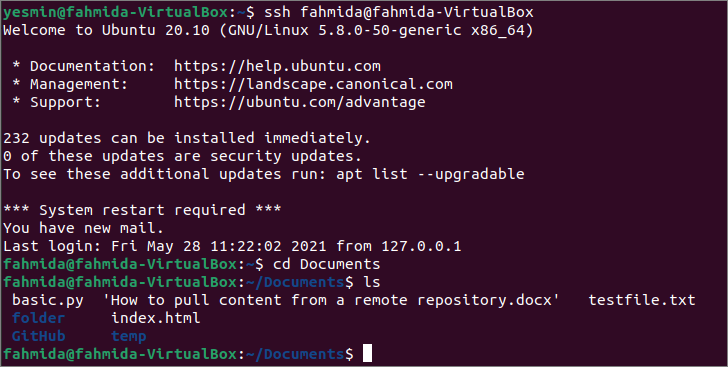
Run the following command to establish a connection with the server using ssh command.
Run the following command to go to the Documents folder of the server machine to check the text file has been copied here or not.
Run the following command to check the list of the files and folders of the Documents folder.
The following output shows that the text file exists in the Documents folder of the server machine.
Now, run the following command to check the content of the testfile.txt file of the server machine.
The following output shows that the content of testfile.txt of the server machine is the same as the content of the textfile.txt of the client machine.

Remove all cached ssh-agent private keys:
Run the following ssh-add command with the -D option to remove all private keys of the cached ssh-agent.
The following output will be appeared after executing the above command.

Conclusion:
Using ssh-agent is one way to connect with the remote machine from the client machine to do different tasks. Any file can be copied from the client machine to the server machine by running an SSH agent shown in this tutorial to help the reader know the use of this command.
About the author
Fahmida Yesmin
I am a trainer of web programming courses. I like to write article or tutorial on various IT topics. I have a YouTube channel where many types of tutorials based on Ubuntu, Windows, Word, Excel, WordPress, Magento, Laravel etc. are published: Tutorials4u Help.