- Create an Active Directory Infrastructure with Samba4 on Ubuntu – Part 1
- Requirements:
- Step 1: Initial Configuration for Samba4
- Step 2: Install Required Packages for Samba4 AD DC
- Step 3: Provision Samba AD DC for Your Domain
- Step 4: Final Samba Configurations
- Samba в домене Active Directory на примере Linux Ubuntu. Простая инструкция для начинающих
Create an Active Directory Infrastructure with Samba4 on Ubuntu – Part 1
Samba is a free Open Source software which provides a standard interoperability between Windows OS and Linux/Unix Operating Systems.
Samba can operate as a standalone file and print server for Windows and Linux clients through the SMB/CIFS protocol suite or can act as an Active Directory Domain Controller or joined into a Realm as a Domain Member. The highest AD DC domain and forest level that currently Samba4 can emulate is Windows 2008 R2.
The series will be titled Setting Up Samba4 Active Directory Domain Controller, which covers following topics for Ubuntu, CentOS, and Windows:
This tutorial will start by explaining all the steps you need to take care off in order to install and configure Samba4 as a Domain Controller on Ubuntu 16.04 and Ubuntu 14.04.
This configuration will provide a central management point for users, machines, volume shares, permissions and other resources in a mixed-up Windows – Linux infrastructure.
Requirements:
Step 1: Initial Configuration for Samba4
1. Before proceeding your Samba4 AD DC installation first let’s run a few pre-required steps. First make sure the system is up to date with the last security features, kernels and packages by issuing the below command:
$ sudo apt-get update $ sudo apt-get upgrade $ sudo apt-get dist-upgrade
2. Next, open machine /etc/fstab file and assure that your partitions file system has ACLs enabled as illustrated on the below screenshot.
Usually, common modern Linux file systems such as ext3, ext4, xfs or btrfs support and have ACLs enabled by default. If that’s not the case with your file system just open /etc/fstab file for editing and add acl string at the end of third column and reboot the machine in order to apply changes.
3. Finally setup your machine hostname with a descriptive name, such as adc1 used in this example, by editing /etc/hostname file or by issuing.
$ sudo hostnamectl set-hostname adc1
A reboot is necessary after you’ve changed your machine name in order to apply changes.
Step 2: Install Required Packages for Samba4 AD DC
4. In order to transform your server into an Active Directory Domain Controller, install Samba and all the required packages on your machine by issuing the below command with root privileges in a console.
$ sudo apt-get install samba krb5-user krb5-config winbind libpam-winbind libnss-winbind
5. While the installation is running a series of questions will be asked by the installer in order to configure the domain controller.
On the first screen you will need to add a name for Kerberos default REALM in uppercase. Enter the name you will be using for your domain in uppercase and hit Enter to continue..
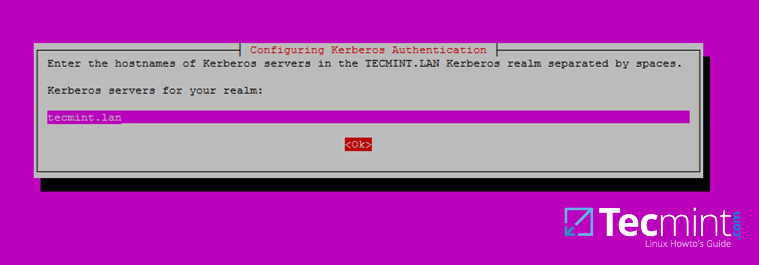
6. Next, enter the hostname of Kerberos server for your domain. Use the same name as for your domain, with lowercases this time and hit Enter to continue.
7. Finally, specify the hostname for the administrative server of your Kerberos realm. Use the same as your domain and hit Enter to finish the installation.
Step 3: Provision Samba AD DC for Your Domain
8. Before starting to configure Samba for your domain, first run the below commands in order to stop and disable all samba daemons.
$ sudo systemctl stop samba-ad-dc.service smbd.service nmbd.service winbind.service $ sudo systemctl disable samba-ad-dc.service smbd.service nmbd.service winbind.service
9. Next, rename or remove samba original configuration. This step is absolutely required before provisioning Samba AD because at the provision time Samba will create a new configuration file from scratch and will throw up some errors in case it finds an old smb.conf file.
$ sudo mv /etc/samba/smb.conf /etc/samba/smb.conf.initial
10. Now, start the domain provisioning interactively by issuing the below command with root privileges and accept the default options that Samba provides you.
Also, make sure you supply the IP address for a DNS forwarder at your premises (or external) and choose a strong password for Administrator account. If you choose a week password for Administrator account the domain provision will fail.
$ sudo samba-tool domain provision --use-rfc2307 --interactive
11. Finally, rename or remove Kerberos main configuration file from /etc directory and replace it using a symlink with Samba newly generated Kerberos file located in /var/lib/samba/private path by issuing the below commands:
$ sudo mv /etc/krb5.conf /etc/krb5.conf.initial $ sudo ln -s /var/lib/samba/private/krb5.conf /etc/
12. Start and enable Samba Active Directory Domain Controller daemons.
$ sudo systemctl start samba-ad-dc.service $ sudo systemctl status samba-ad-dc.service $ sudo systemctl enable samba-ad-dc.service
13. Next, use netstat command in order to verify the list of all services required by an Active Directory to run properly.
$ sudo netstat –tulpn| egrep ‘smbd|samba’
Step 4: Final Samba Configurations
14. At this moment Samba should be fully operational at your premises. The highest domain level Samba is emulating should be Windows AD DC 2008 R2.
It can be verified with the help of samba-tool utility.
$ sudo samba-tool domain level show
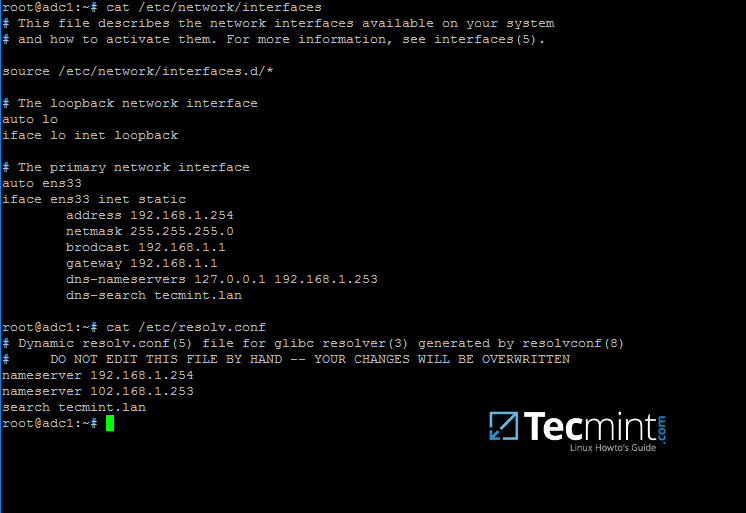
15. In order for DNS resolution to work locally, you need to open end edit network interface settings and point the DNS resolution by modifying dns-nameservers statement to the IP Address of your Domain Controller (use 127.0.0.1 for local DNS resolution) and dns-search statement to point to your realm.
$ sudo cat /etc/network/interfaces $ sudo cat /etc/resolv.conf
When finished, reboot your server and take a look at your resolver file to make sure it points back to the right DNS name servers.
16. Finally, test the DNS resolver by issuing queries and pings against some AD DC crucial records, as in the below excerpt. Replace the domain name accordingly.
$ ping -c3 tecmint.lan #Domain Name $ ping -c3 adc1.tecmint.lan #FQDN $ ping -c3 adc1 #Host
Run following few queries against Samba Active Directory Domain Controller..
$ host -t A tecmint.lan $ host -t A adc1.tecmint.lan $ host -t SRV _kerberos._udp.tecmint.lan # UDP Kerberos SRV record $ host -t SRV _ldap._tcp.tecmint.lan # TCP LDAP SRV record
17. Also, verify Kerberos authentication by requesting a ticket for the domain administrator account and list the cached ticket. Write the domain name portion with uppercase.
That’s all! Now you have a fully operational AD Domain Controller installed in your network and you can start integrate Windows or Linux machines into Samba AD.
On the next series we’ll cover other Samba AD topics, such as how to manage you’re the domain controller from Samba command line, how to integrate Windows 10 into the domain name and manage Samba AD remotely using RSAT and other important topics.
Samba в домене Active Directory на примере Linux Ubuntu. Простая инструкция для начинающих
В статье есть не обязательные пункты, можете их пропустить, а если не будет работать вернуться к ним.
За основу была взятая информация товарища @gotch из послесловия к статье.
muz.ru — пример нашего домена
(не обязательный пункт) Вполне возможно потребуется создать на сервере DNS запись вида а*aaa.
Заходим в диспетчер серверов -> средства > dns. Зоны прямого просмотра -> выбираем имя домена -> нажимаем правой кнопкой -> создать узел (А или АААА) — вводим имя и айпи компьютера.
Перед установкой желательно обновиться:
sudo aptitude update sudo aptitude upgrade
Нужно обязательно синхронизировать время с контроллером домена.
(не обязательный пункт) Автоматическая же синхронизация настраивается с помощью ntpd, это демон будет периодически выполнять синхронизацию.
Для начала его необходимо установить:
sudo aptitude install ntp Теперь исправьте файл /etc/ntp.conf, добавив в него информацию о вашем сервере времени:
#You do need to talk to an NTP server or two (or three). server dc.muz.ru
После чего перезапустите демон ntpd:
Теперь пора настраивать непосредственно взаимодействие с доменом.
- Устанавливаем нужные пакеты: sudo apt install realmd samba-common-bin samba-libs smbclient sssd-tools krb5-user adcli cifs-utils
- (не обязательный пункт) Редактируем (проверяем) файл /etc/hosts, указываем FQDN для данного хоста: 127.0.0.1 localhost 127.0.1.1 имякомпьютера.muz.ru имякомпьютера
- Проверяем, что наш домен виден в сети: realm discover muz.ru
- Вводим машину в домен: sudo realm —verbose join muz.ru -U логинадминадомена —install=/
- Редактируем настройки PAM: sudo pam-auth-update Оставим по умолчанию.
Дополнительный плюс данного варианта — сквозная авторизация на файловых ресурсах домена.
Для того чтоб при входе не указывать дополнительно к логину домен, можно добавить суффикс по умолчанию.
В файле /etc/sssd/sssd.conf, в блоке [sssd] добавляем строку:
Даём root права суперюзеру.
Проще всего будет выдать данное разрешение не для конкретного пользователя, а сразу для указанной доменной группы. Создаём группу на контролере домена, например linuxadmins и включаем туда нужных пользователей и группы. Редактируем /etc/sudoers:
Приведу фрагмент файла, в котором описываются пользователь и группа имеющие возможность выполнять sudo (здесь была добавлена последняя строчка фрагмента):
#includedir /etc/sudoers.d MUZ\user1 ALL=(ALL:ALL) ALL %MUZ\linuxadmins ALL=(ALL) ALL
После сохранения файла снова входим в систему доменным пользователем и пробуем выполнить любую команду с sudo.
Монтирование сетевых папок.
Cоздадим на нашем Linux директорию, к которой мы будем монтировать сетевой ресурс. Назовем ее myshare и расположена она будет в каталоге /mnt.
Монтирование общих папок проводим через редактирование фаила /etc/fstab
В этих примерах монтируем 2 директории — smbt и отдел экспозиц. Обратите внимание на различия в синтаксисе.
//192.168.0.5/smbt /mnt/share cifs username=логинадмина,password=парольадмина,domain=muz.ru, vers=3.0,iocharset=utf8,filemode=0777,dirmode=0777 0 0
//192.168.0.5/отдел\040экспозиц /mnt cifs username=логинадмина,password=парольадмина, domain=muz.ru,vers=3.0,iocharset=utf8,filemode=0777,dirmode=0777 0 0
iocharset=utf8 — эта кодировка позволяет работать с именами файлов, в которых используются не только латинские буквы. vers=3.0, — версия протокола smb По умолчанию сетевой ресурс монтируется с полными правами (rwx или 777). Если Вы хотите установить иные права, используйте опции dirmode и filemode.
Следующей командой запустим монтирование всех точек, описанных в /etc/fstab
Всем крепких нервов и здоровья.


