- Определите тип кэша
- Очистка кэша страниц
- Очистка кеша Dentry и Inode
- Очистка кэша страниц, Dentry и Inode
- Проверьте сброс кэша
- Заключение
- Как полностью сбросить дисковые кэши?
- How to Clear Cache on Linux
- How Linux File System Cache Works
- Using Free command to view Cache Usage
- Proc Sys VM Drop Caches Command
- Experimental Verification that Drop Caches Works
- Conclusion
- About the author
- Linux Wolfman
Определите тип кэша
В системе Linux существует несколько типов кэшей, включая кэш страниц, кэш dentry и кэш inode. Вам необходимо определить тип кэша, который вы хотите сбросить, прежде чем продолжить. Вот какие типы кэша бывают:
- Кэш страниц: Это наиболее распространенный тип кэша в системе Linux. Он сохраняет недавно использованные данные с диска в памяти, что ускоряет доступ к ним в следующий раз, когда они понадобятся.
- Кэш Dentry: В этом кэше хранятся записи каталога, что ускоряет поиск путей к файлам.
- Кэш Inode: В этом кэше хранится информация о файлах, например, об их владельце, разрешениях и датах создания/модификации.
Наиболее распространенным кэшем является кэш страниц, в котором недавно использовались данные с диска в памяти. Чтобы проверить размер кэша страниц, используйте следующую команду:
Очистка кэша страниц
Чтобы очистить кэш страниц, вы можете использовать следующую команду:
$ sync && echo 1 > /proc/sys/vm/drop_cachesЭта команда запишет все отложенные данные на диск, а затем очистит кэш страниц.
Очистка кеша Dentry и Inode
Если вам нужно очистить кеш dentry и inode, вы можете использовать следующую команду:
sync && echo 2 > /proc/sys/vm/drop_cachesОчистка кэша страниц, Dentry и Inode
Чтобы очистить все три кэша одновременно, используйте следующую команду:
sync && echo 3 > /proc/sys/vm/drop_cachesПримечание: Важно использовать команду «sync» перед сбросом кэша, чтобы убедиться, что все данные записаны на диск до того, как они будут удалены из памяти.
Проверьте сброс кэша
После сброса кэша вы можете убедиться, что он был очищен, снова проверив размер кэша с помощью команды free:
Заключение
В этой статье мы обсудили, как сбросить кэш на сервере Linux. Очистка кэша может помочь повысить производительность системы за счет освобождения памяти, используемой устаревшими или поврежденными данными. Не забудьте использовать команду «sync» перед сбросом кэша и проверьте размер кэша после его сброса, чтобы убедиться, что он был успешно очищен.
Как полностью сбросить дисковые кэши?
При чтении — получаю старый файл, изменений нет. Текущий workaround — загадить всю оперативу (dd if=big_disk_file of=/dev/null bs=1024 count=4000000) занимает 40 сек, а хотелось бы быстро.
Debian Jessie (kernel 3.16.0-4-amd64), без systemd.
У тебя либо баг, либо ты о чём-то умалчиваешь.
обновить ядро и попробовать с ним воспроизвести — не вариант?
hdparm -F /dev/. ?
blockdev —flushbufs /dev/. ?

у меня почему-то ключом -F, когла на флэшки посылаю, ругается. -f не ругается.

Насколько я знаю, штатного способа сбросить вообще все кеши из юзерспейса не существует. Но это можно сделать тривиальным модулем ядра: https://github.com/i-rinat/utility-kernel-modules/tree/master/shrink-memory
Собираешь make’ом, загружаешь insmod’ом, а потом пишешь что-нибудь в /proc/shrink-memory.
anonymous , cetjs2 , это нормальное поведение ядра. vm.drop_caches=3 не сбрасывает вообще всё. В этом можно убедиться, помониторив вывод grep file /proc/meminfo во время vm.drop-caches=3.
Потому что у флэшки нет встроенного кэша?
разве нет? а -f то работает
Спасибо, как-то не задумывался.
Статистика маленькая и ненадёжная, и ещё я упростил описание. Но в целом — так. Ещё повторю тест скоро..

i-rinat , спасибо! Попозже попробую откомпилить (надо поставить исходники ядра..). А там действительно надо именно 13 раз вызывать shrink_all_memory((unsigned long)-1); ? 🙂
А там действительно надо именно 13 раз вызывать
На самом деле, я не знаю. Но помню, что в коде освобождения памяти есть такое понятие, как приоритет. Сначала он равен 12, что означает освобождать 1/4096 от списков. Потом по надобности он двигается к нулю, с каждым шагом увеличивая долю в два раза. Это в нормальном режиме. Как меняется приоритет при повторных вызовах shrink_all_memory(), я не проверял. Так, пальцем в небо. Поэтому там цикл.
Так это для кэша в оперативке.
как? а sync тогда что делает?
ого, это ты специально для этого треда модуль ядра написал? нереально крут.

Вы сильно упростили. Вы выдёргиваете флешку чтоли? Тогда сбросить кеш: eject /dev/sdX
Ну вот зачем так лор опускать. На каком-нибудь прости господи античате это обычное дело, не говоря про стековерфлоу.
не знаю, к сожалению или нет, но лор — не античат и уж тем более не стековерфлоу. каждый день тут для анонимуса модули ядра точно не пишут. тут чаще пятизвёздочники такие вопросы задают, что со стула падаешь.
Ох.. Юзер-хомяк я, локахост админю..
Поставил исходники. Там куда я их разжал: подложил (разжатый) /usr/src/linux-config-3.16/config.amd64_none_amd64.xz, убедился что make oldconfig (old — подхватить подложенный .config), make modules начинает компилять.. Ещё раз сделал (после mrproper) oldconfig, prepare, и теперь уже из директории shrink_mem:
$ make make -C /lib/modules/3.16.0-4-amd64/build M=/pub/alexey/__NEW/_NEW/shrink_mem modules make[1]: Entering directory '/pub/alexey/kernel-build/linux-source-3.16' WARNING: Symbol version dump ./Module.symvers is missing; modules will have no dependencies and modversions. CC [M] /pub/alexey/__NEW/_NEW/shrink_mem/shrink-memory.o /bin/sh: 1: ./scripts/recordmcount: not found scripts/Makefile.build:263: recipe for target '/pub/alexey/__NEW/_NEW/shrink_mem/shrink-memory.o' failed make[2]: *** [/pub/alexey/__NEW/_NEW/shrink_mem/shrink-memory.o] Error 127 Makefile:1354: recipe for target '_module_/pub/alexey/__NEW/_NEW/shrink_mem' failed make[1]: *** [_module_/pub/alexey/__NEW/_NEW/shrink_mem] Error 2 make[1]: Leaving directory '/pub/alexey/kernel-build/linux-source-3.16' Makefile:4: recipe for target 'all' failed make: *** [all] Error 2 $ Внутри scripts/Makefile.build есть вызов recordmcount, но править его пока не решился, боюсь что-то не то делаю..
$ ll recordmcount* -rw-r--r-- 1 alexey alexey 14921 Apr 5 00:21 recordmcount.c -rw-r--r-- 1 alexey alexey 16772 Apr 5 00:21 recordmcount.h -rwxr-xr-x 1 alexey alexey 18364 Apr 5 00:21 recordmcount.pl $
vodz Флэшка не вынималась на время записи-чтения (пока не совпадут чек-суммы — со второго раза), ни при чём это. Если eject — из Гнома — я Redhat’s bloatware свободным не считаю
$ apt-cache search eject flash $ apt-cache search eject usb $
А ещё, i-rinat , а полученный модуль — можно будет загружать в обновлённом штатном ядре (ну когда через месяц скажем будет апдэйт)? Или каждый раз компилять надо?
abvgdee ★ ( 01.06.17 18:59:40 MSK )
Последнее исправление: abvgdee 01.06.17 19:06:20 MSK (всего исправлений: 1)
Что-то сложно делаешь. Можно проще: поставить пакет linux-headers-3.16.0-4-amd64, в нём уже есть нужные заголовки и симлинки.
можно будет загружать в обновлённом штатном ядре
Нет, для новой версии ядра модули нужно пересобирать. Старые бинарники скорее всего не загрузятся, там для этого специально вставлены проверки. Для серьёзных модулей пересборку автоматизируют с помощью DKMS. Это такой набор скриптов, который запускает пересборку сторонних модулей сразу после обновления пакета с ядром.
How to Clear Cache on Linux
![]()
The linux file system cache (Page Cache) is used to make IO operations faster. Under certain circumstances an administrator or developer might want to manually clear the cache. In this article we will explain how the Linux File System cache works. Then we will demonstrate how to monitor the cache usage and how to clear the cache. We will do some simple performance experiments to verify the cache is working as expected and that the cache flush and clear procedure is also working as expected.
How Linux File System Cache Works
The kernel reserves a certain amount of system memory for caching the file system disk accesses in order to make overall performance faster. The cache in linux is called the Page Cache. The size of the page cache is configurable with generous defaults enabled to cache large amounts of disk blocks. The max size of the cache and the policies of when to evict data from the cache are adjustable with kernel parameters. The linux cache approach is called a write-back cache. This means if data is written to disk it is written to memory into the cache and marked as dirty in the cache until it is synchronized to disk. The kernel maintains internal data structures to optimize which data to evict from cache when more space is needed in the cache.
During Linux read system calls, the kernel will check if the data requested is stored in blocks of data in the cache, that would be a successful cache hit and the data will be returned from the cache without doing any IO to the disk system. For a cache miss the data will be fetched from IO system and the cache updated based on the caching policies as this same data is likely to be requested again.
When certain thresholds of memory usage are reached background tasks will start writing dirty data to disk to ensure it is clearing the memory cache. These can have an impact on performance of memory and CPU intensive applications and require tuning by administrators and or developers.
Using Free command to view Cache Usage
We can use the free command from the command line in order to analyze the system memory and the amount of memory allocated to caching. See command below:

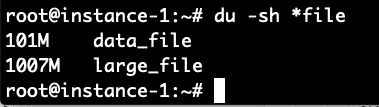
What we see from the free command above is that there is 7.5 GB of RAM on this system. Of this only 209 MB is used and 6.5 MB is free. 667 MB is used in the buffer cache. Now let’s try to increase that number by running a command to generate a file of 1 Gigabyte and reading the file. The command below will generate approximately 100MB of random data and then append 10 copies of the file together into one large_file.
# dd if=/dev/random of=/root/data_file count=1400000
# for i in `seq 1 10`; do echo $i; cat data_file >> large_file; done
Now we will make sure to read this 1 Gig file and then check the free command again:

We can see the buffer cache usage has gone up from 667 to 1735 Megabytes a roughly 1 Gigabyte increase in the usage of the buffer cache.
Proc Sys VM Drop Caches Command
The linux kernel provides an interface to drop the cache let’s try out these commands and see the impact on the free setting.

We can see above that the majority of the buffer cache allocation was freed with this command.
Experimental Verification that Drop Caches Works
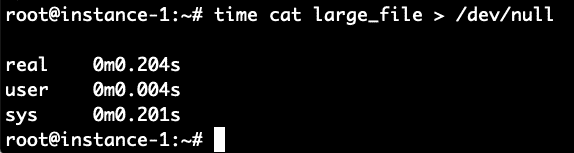
Can we do a performance validation of using the cache to read the file? Let’s read the file and write it back to /dev/null in order to test how long it takes to read the file from disk. We will time it with the time command. We do this command immediately after clearing the cache with the commands above.

It took 8.4 seconds to read the file. Let’s read it again now that the file should be in the filesystem cache and see how long it takes now.
Boom! It took only .2 seconds compared to 8.4 seconds to read it when the file was not cached. To verify let’s repeat this again by first clearing the cache and then reading the file 2 times.
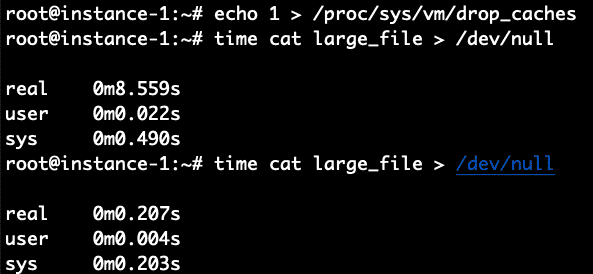
It worked perfectly as expected. 8.5 seconds for the non-cached read and .2 seconds for the cached read.
Conclusion
The page cache is automatically enabled on Linux systems and will transparently make IO faster by storing recently used data in the cache. If you want to manually clear the cache that can be done easily by sending an echo command to the /proc filesystem indicating to the kernel to drop the cache and free the memory used for the cache. The instructions for running the command were shown above in this article and the experimental validation of the cache behavior before and after flushing were also shown.
About the author
Linux Wolfman
Linux Wolfman is interested in Operating Systems, File Systems, Databases and Analytics and always watching for new technologies and trends. Reach me by tweeting to @linuxhint and ask for the Wolfman.