- How to do a Port Scan in Linux?
- Why Do We Need to Do a Port Scan and What Ports are Used in Linux?
- Method 1: Port Scanning Using nmap
- Installing nmap
- Using nmap
- Method 2: Port Scanning Using netcat
- Install netcat
- Using netcat
- Method 3: Port Scanning Using ss Command
- Method 4: Port Scanning Using netstat
- Method 5: Port Scanning Using lsof Command
- Method 6: Port Scanning Using telnet Command
- Conclusion
- How to do a Port Scan in Linux
- TCP Scanning
- UDP Scanning
- Port Scanners
- Nmap
- Zenmap
- Netcat
- Unicornscan
- Conclusion
- About the author
- Usama Azad
How to do a Port Scan in Linux?
The port scan is the process of checking whether the ports it’s listening to the outside connections or not. Two ports can be used in Linux for an IP: TCP (Transmission Control Protocol) and UDP. The advancement in network technology produces a lot of risks over the internet/remote connections that cause security issues. This write will discuss the methods to do a port scan in Linux using the below-supporting content:
- Why Do We Need to Do a Port Scan and What Ports are Used in Linux?
- Port Scanning Using nmap
- Port Scanning Using netcat
- Port Scanning Using ss Command
- Port Scanning Using netstat
- Port Scanning Using lsof Command
- Port Scanning Using telnet Command
Why Do We Need to Do a Port Scan and What Ports are Used in Linux?
With the advancement in network technology, internet attacks have increased. Port scanners have become a helpful tool to avoid external attacks that scan the ports. We need to do a port scan in Linux for several reasons that are as follows:
- To check which ports are opened, closed, or filtered to send or receive the information.
- To find out which services are available or running on a host.
- To Identify the vulnerabilities in the system that helps the network engineers to diagnose the issues in the system.
The ports in Linux are reserved for different purposes. The port allocation by the ICANN (International Corporation for Assigned Names and Numbers) is as follows:
- 0-1023: Reserved for the well-known or system ports.
- 1024: 49151: Reserved for the user or registered ports.
- 49152-65535: Reserved for the dynamic/private ports.
Let’s discuss the port scanners used to do a port scan.
Method 1: Port Scanning Using nmap
Among the most common tools for port scanning, nmap offers advanced scanning capabilities. The nmap allows the users to find the hosts and the available services on a machine’s network by sending the data packets and diagnosing the response.
Installing nmap
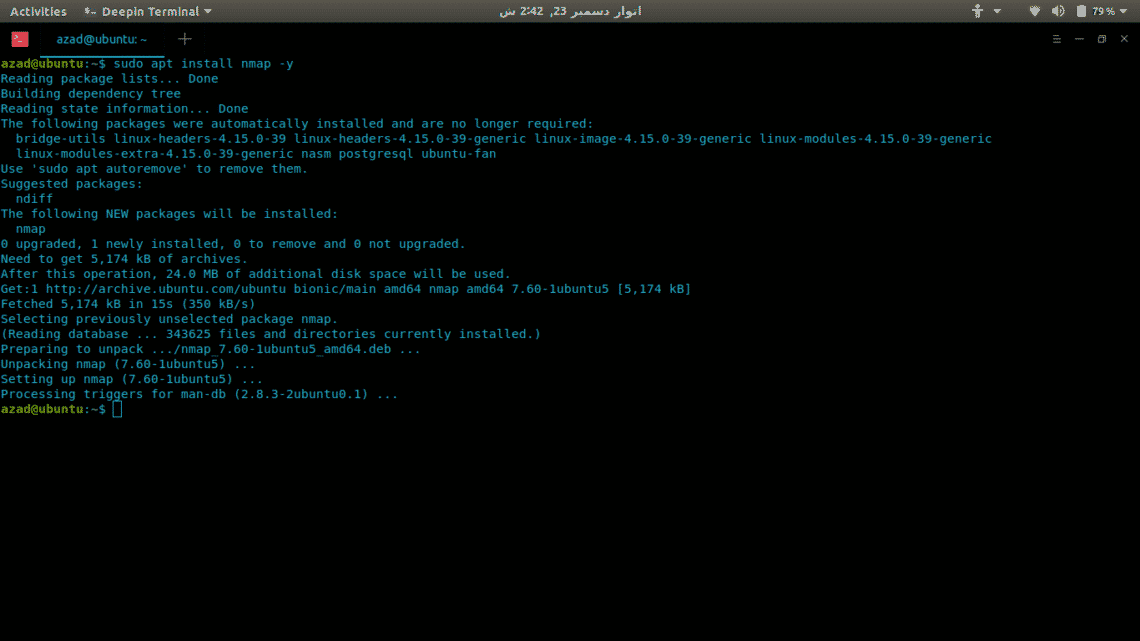
To use the nmap network discovery tool, you must install it via one of the following commands (as per the distribution ).
$ sudo apt install nmap #Debian-Ubuntu-based $ sudo snap install nmap #snap enabled Linux distro
Using nmap
To scan the target hostname itslinuxfoss.com for finding the open ports and the services available on those available, the below nmap command is executed:
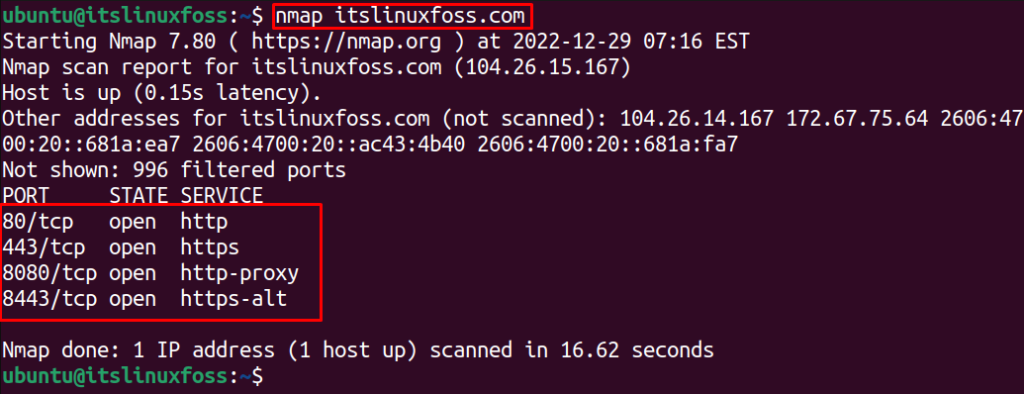
It shows that four ports are opened (listening to the incoming connections) “80”, “443”, “8080” and “8443” that are using different services which are listed in front of the port number.
To scan for TCP ports, use the “sT” option of the nmap command as displayed below:
$ sudo nmap -sT itslinuxfoss.com
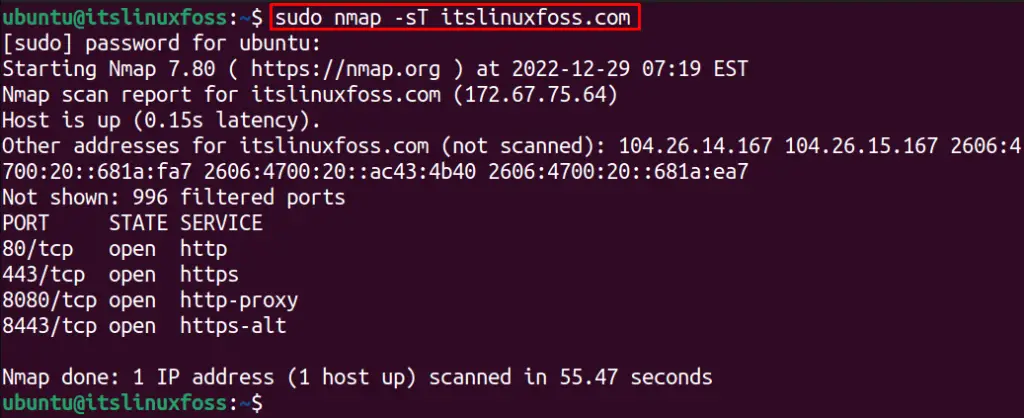
All the TCP ports are shown in the above output.
To check the open ports for UDP, utilize the “sU” option with the nmap command:
$ sudo nmap -sU itslinuxfoss.com

There are no open ports for the UDP service.
Note: There can be three different statuses for the nmap port scans:
- Open: Open means the system is listening on that port.
- Filtered: The nmap has checked for those ports but cannot identify if the port is open or closed.
- Close: The port is not listening for any connections
Method 2: Port Scanning Using netcat
The netcat tool is a command utility used for network discovery, testing, and security auditing. The netcat command can be used to scan the open ports.
Install netcat
Before using it, ensure that the utility is installed on your Linux system.
$ sudo apt install netcat #Debian/Ubunut-based $ sudo yum install nc #Fedora/RedHat-based
Using netcat
For instance, the below command will scan port “80”, if it’s open and listening or not:
$ nc -z -v itslinuxfoss.com 80

It shows the status “succeeded”, which means that the port has successfully established connection with itslinuxfoss.com on port 80.
Similarly, a range of ports can be scanned to see whether a port can connect successfully to the server. For example, the below-mentioned command will scan for ports 20 to 30 to check which ports the connection can be established with itslinuxfoss.com:
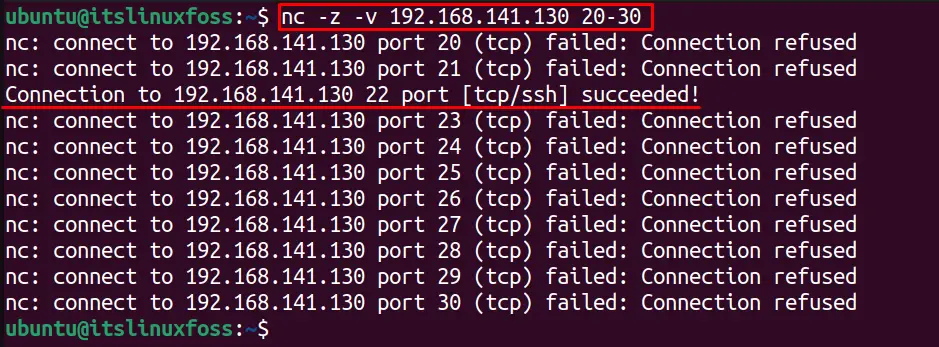
It shows that only port “22” is successfully connected to the server.
Note: The netcat tool can show two different statuses for the port scan, which are as follows:
- Succeeded: It shows that the connection is successfully established and the port is open.
- Connection refused: The connection has been rejected by that port, and the port is closed.
Method 3: Port Scanning Using ss Command
The ss (socket statistics) command displays the details of the computer socklets. It displays different details about the ports, such as state, ports on which they are listening, and netid. For instance, to scan the TCP and UDP open ports, use the below ss command options:
- t: Checks for the TCP ports.
- u: It checks the UDP ports.
- l: It shows the listening sockets.
- p: It displays the related socket PID and the name.
- n: Don’t resolve names
Let’s execute the command to check the open ports:
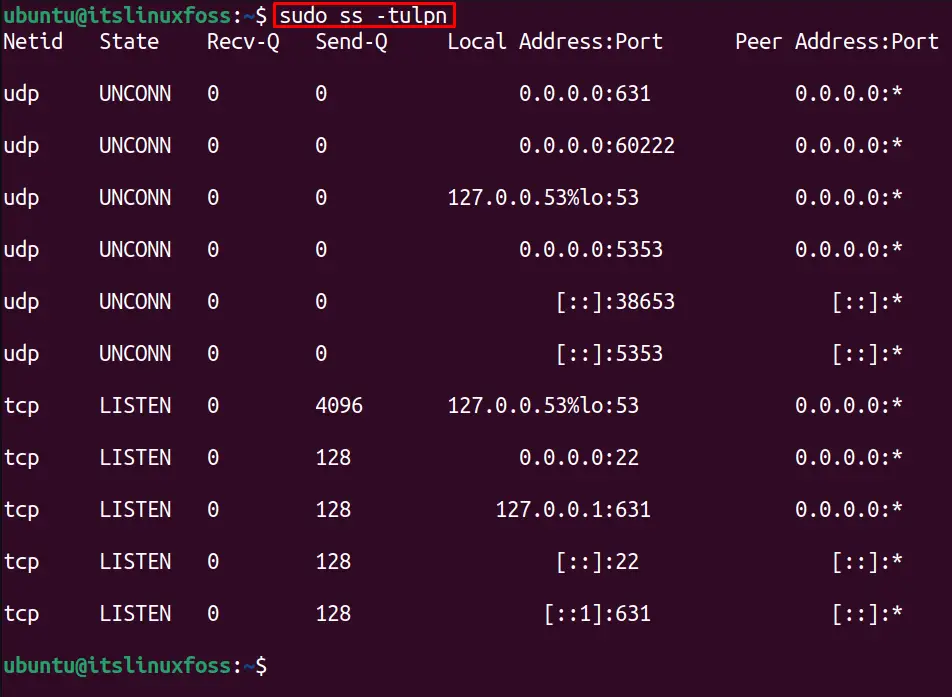
The output shows the opened ports, such as port “631” which is opened for UDP service and listening on all the IP addresses (0.0.0.0). Moreover, the “60222” port is opened and listening to the IP address “127.0.0.53”.
Method 4: Port Scanning Using netstat
The netstat command shows the network statistics and configurations. It works the same way as the ss command and shows the details after sending the data packets and analyzing its response. The options below can be used to find the open ports using the UDP and TCP services:
- t: Checks for the TCP ports.
- u: It checks the UDP ports.
- l: It shows the listening sockets.
- p: It displays the related socket PID and the name.
- n: Don’t resolve names
- grep LISTEN: It displays open ports only whose status is “LISTEN”.
Let’s execute the below command to find the opened ports:
$ sudo netstat -tulpn | grep LISTEN
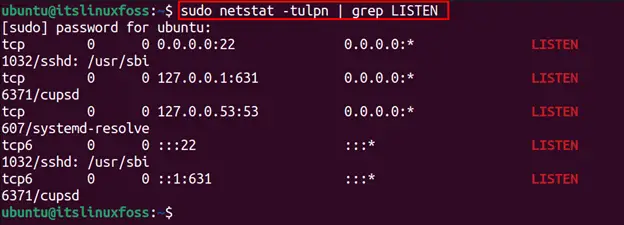
The output shows the opened ports, such as port “22”, which is opened by sshd processes and listening on all the IP addresses for SSH connections. Moreover, the “631” port is opened by cupsd service and listening to the IP address “127.0.0.1”.
Method 5: Port Scanning Using lsof Command
The lsof command stores the details of the open files, which can be used to get the “LISTEN” port details. For instance, to get the details of the TCP and UDP services details, use the following lsof command options:
- -i: To display the listing ports.
- -P: Prevents network files from being converted from port numbers to names.
- -n: Avoid using DNS names.
- grep LISTEN: Filters the ports with “LISTEN” status only.
Let’s execute the below lsof command to find the system’s UDP and TCP open ports:
$ sudo lsof -i -P -n | grep LISTEN
It shows the process used by the open ports along with the service (TCP) and the desired port numbers.. For instance, the IP address “127.0.0.53” is listening on port “53” to the “sshd” service.
Method 6: Port Scanning Using telnet Command
The telnet command is used to port scan and send the request to the server for creating a remote connection. The telnet connection is created on port “23” by default.
For instance, to do a port scan on port “80” for “itslinuxfoss.com”, use the following command:
$ telnet itslinuxfoss.com 80

The user is successfully connected to the itslinuxfoss.com server.
This is how we can scan ports in Linux.
Conclusion
We need to do a port scan in Linux to check the system’s opened, filtered, or closed ports, which helps us find the computer’s services for connection. Several methods are used to do a port scan that, includes nmap, netcat, ss, netstat, lsof, and telnet commands which are described in detail throughout this guide.
How to do a Port Scan in Linux
![]()
Port scanning is a process to check open ports of a PC or a Server. Port scanners are often used by gamers and hackers to check for available ports and to fingerprint services. There are two types of ports to scan for in TCP/IP Internet Protocol, TCP(Transmission Control Protocol) and UDP(User Datagram Protocol). Both TCP and UDP have their own way of scanning. In this article, we’ll look at how to do port scan in Linux environment but first we’ll take a look at how port scanning works. Note that port scanning is illegal in often countries, make sure to check for permissions before scanning your target.
TCP Scanning
TCP is stateful protocol because it maintains the state of connections. TCP connection involves a three-way handshaking of Server socket and client-side socket. While a server-socket is listening, the client sends a SYN and then Server responds back with SYN-ACK. Client then, sends ACK to complete the handshake for the connection

To scan for a TCP open port, a scanner sends a SYN packet to the server. If SYN-ACK is sent back, then the port is open. And if server doesn’t complete the handshake and responds with an RST then the port is closed.
UDP Scanning
UDP on the other hand, is a stateless protocol and doesn’t maintain the state of connection. It also doesn’t involve three-way handshake.
To scan for a UDP port, a UDP scanner sends a UDP packet to the port. If that port is closed, an ICMP packet is generated and sent back to the origin. If this doesn’t happen, that means port is open.
UDP port scanning is often unreliable because ICMP packets are dropped by firewalls, generating false positives for port scanners.
Port Scanners
Now that we’ve looked at how port scanning works, we can move forward to different port scanners and their functionality.
Nmap
Nmap is the most versatile and comprehensive port scanner available till now. It can do everything from port scanning to fingerprinting Operating systems and vulnerability scanning. Nmap has both CLI and GUI interfaces, the GUI is called Zenmap. It has a lot of varying options to do quick and effective scans. Here’s how to install Nmap in Linux.
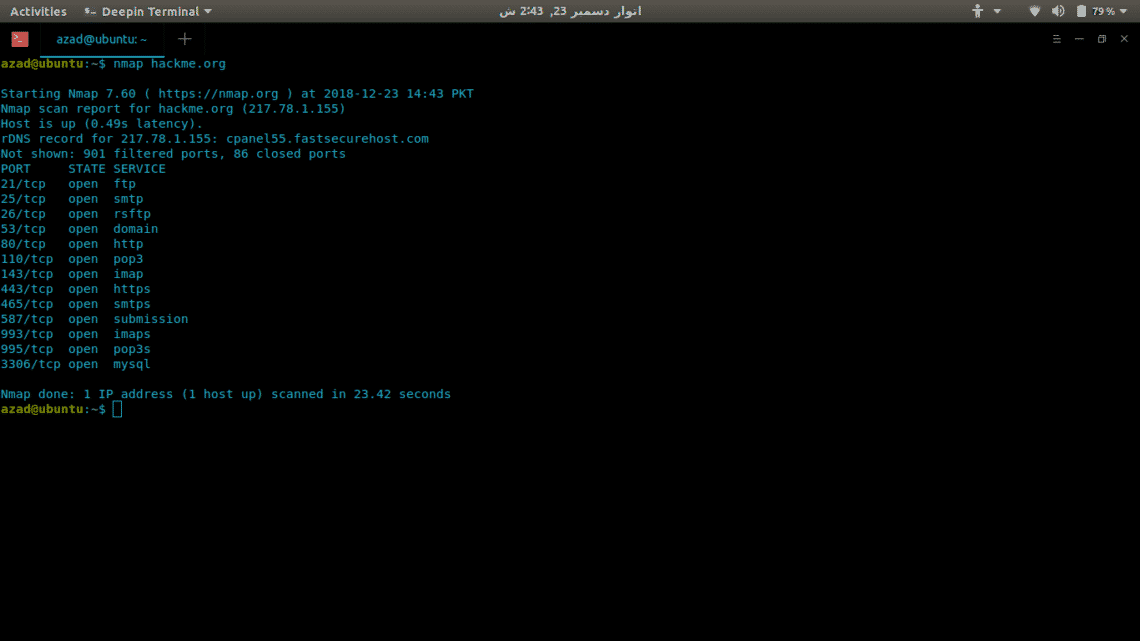
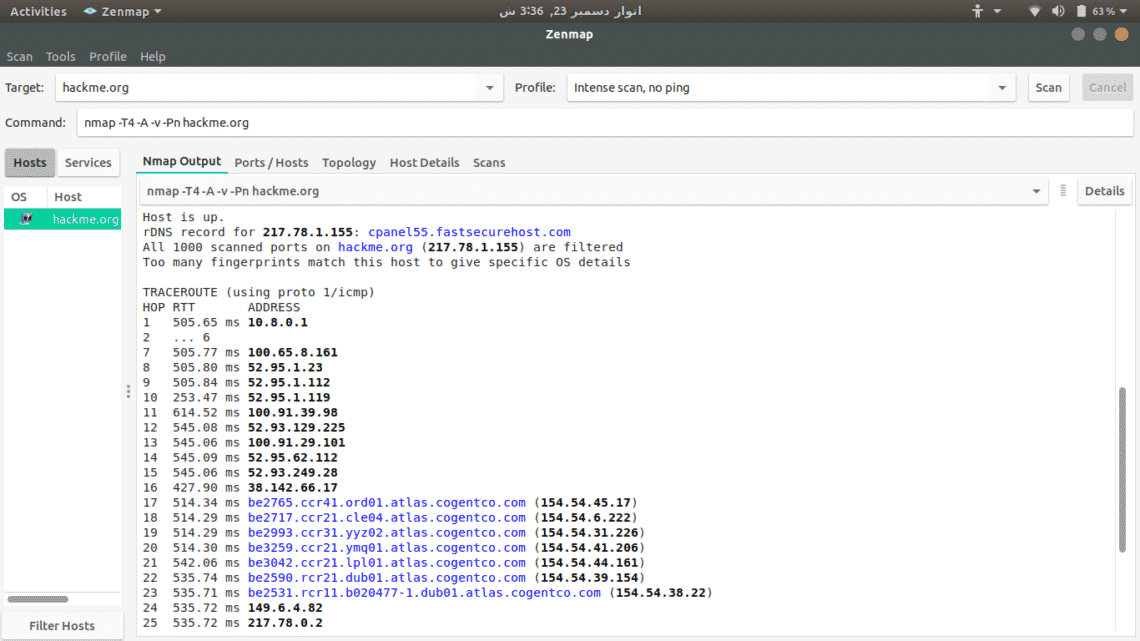
Now we’ll use Nmap to scan a server (hackme.org) for open ports and to list services available on those ports, its really easy. Just type nmap and the server address.
To scan for UDP ports, include -sU option with sudo because it requires root privileges.

There are a lot of other options available in Nmap such as:
-p- : Scan for all 65535 ports
-sT : TCP connect scan
-O : Scans for operating system running
-v : Verbose scan
-A : Aggressive scan, scans for everything
-T [ 1 — 5 ] : To set the scanning speed
-Pn : In case the server blocks ping
Zenmap
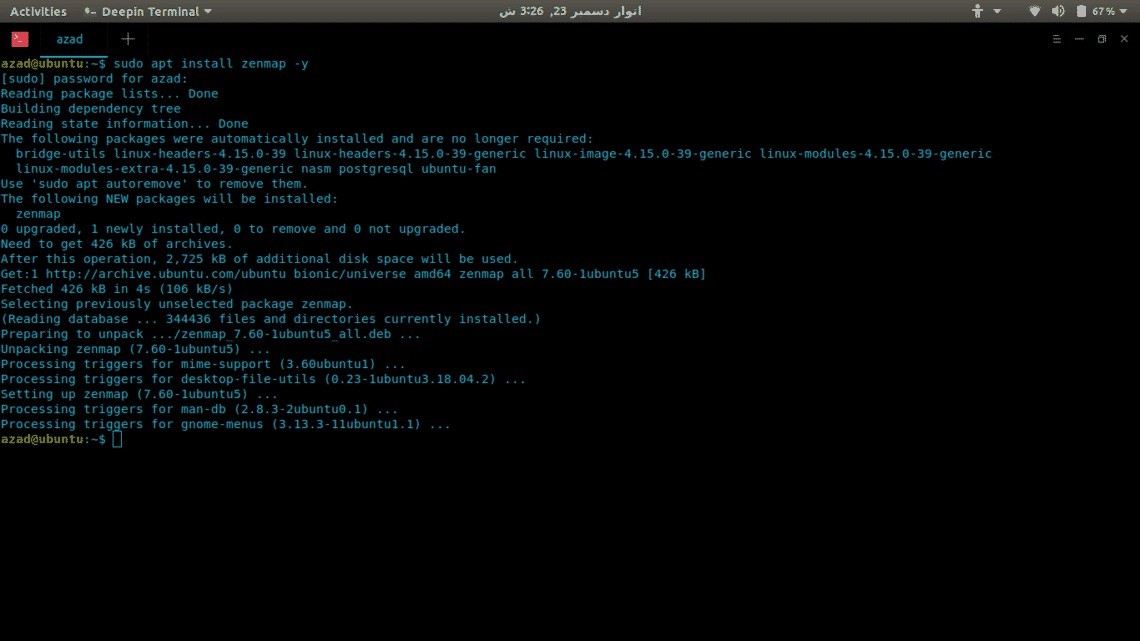
Zenmap is a GUI interface of Nmap for click-kiddies so that you won’t have to remember its commands. To install it, type
To scan a server, just type its address and select from available scan options.
Netcat
Netcat is a raw TCP and UDP port writer which can also be used as a port scanner. It uses connect scan that’s why it is not so fast like Network Mapper. To install it, type
To check for an open port, write
To scan for a range of ports, type
ubuntu@ubuntu:~$ nc -z -nv 127.0.0.1 20 — 80
( UNKNOWN ) [ 127.0.0.1 ] 80 ( http ) open
( UNKNOWN ) [ 127.0.0.1 ] 22 ( ssh ) open
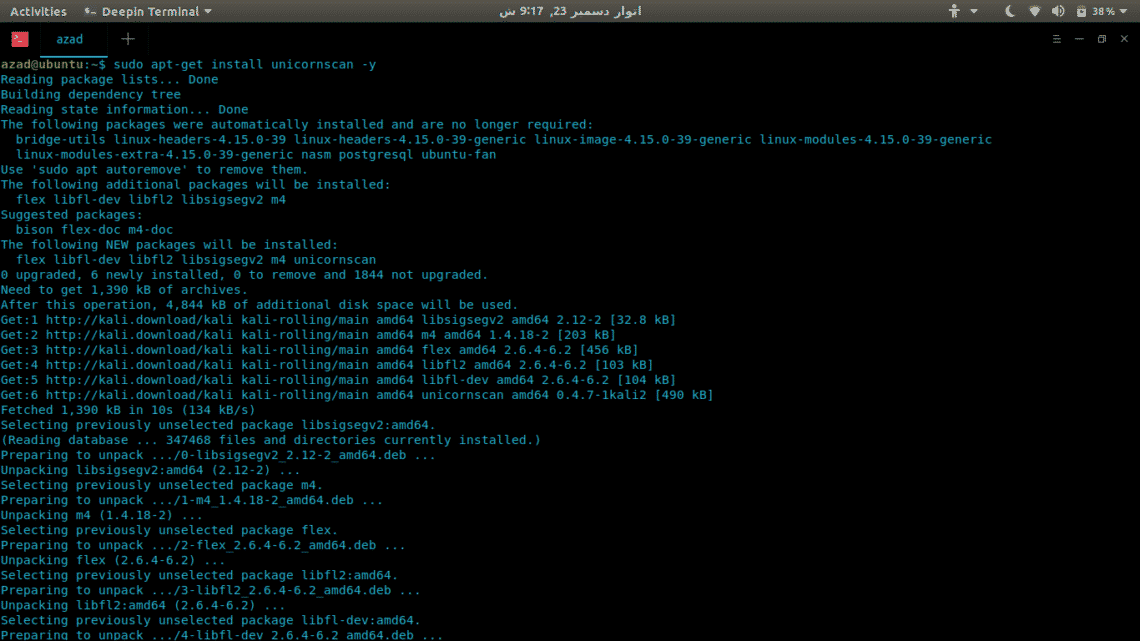
Unicornscan
Unicornscan is a comprehensive and fast port scanner, built for vulnerability researchers. Unlike Network Mapper, it uses its own User-land Distributed TCP/IP stack. It has a lot of features that Nmap doesn’t, some of them are given,
- Asynchronous stateless TCP scanning with all variations of TCP Flags.
- Asynchronous stateless TCP banner grabbing
- Asynchronous protocol specific UDP Scanning (sending enough of a signature to elicit a response).
- Active and Passive remote OS, application, and component identification by analyzing responses.
- PCAP file logging and filtering
- Relational database output
- Custom module support
- Customized data-set views
To install Unicornscan, type
ubuntu@ubuntu:~$ sudo us 127.0.0.1
TCP open ftp [ 21 ] from 127.0.0.1 ttl 128
TCP open smtp [ 25 ] from 127.0.0.1 ttl 128
TCP open http [ 80 ] from 127.0.0.1 ttl 128
. snip.
Conclusion
Ports scanners come in handy whether you are a DevOp, Gamer or a Hacker. There is no real comparison between these scanners, none of them is perfect, each of them has its benefits and drawbacks. It completely depends upon your requirements and how you use them.
About the author
Usama Azad
A security enthusiast who loves Terminal and Open Source. My area of expertise is Python, Linux (Debian), Bash, Penetration testing, and Firewalls. I’m born and raised in Wazirabad, Pakistan and currently doing Undergraduation from National University of Science and Technology (NUST). On Twitter i go by @UsamaAzad14