- Using Screen on Ubuntu with Shell
- Shell script with screen launching multiple commands
- How to Use the Screen Command on Linux
- Intro to Screen in Linux (Run Multiple Terminal Screens)
- Why and how to use the screen command
- Unable to run code in screen
- How to start a screen session from a shell script using crontab and then reattach to it?
- Как пользоваться утилитой screen в Linux?
- Немножко теории
- Установка screen в Linux
- Установка screen в Ubuntu и Debian
- Установка screen в CentOS и Fedora
- Запуск screen в Linux
- Сессия screen с именем
- Как правильно работать с окнами в Windows
- Выход из screen сессии
- Возврат к screen сессии
- Немножко кастомизации screen под вас
- Типовой сценарий использования screen
- Выводы
Using Screen on Ubuntu with Shell
The messages for both beginning and ending the mitmproxy screen lack a defined PID. Therefore, you must provide all commands as arguments to the screen, as it does not support running multiple shell commands.
Shell script with screen launching multiple commands
By appending ‘&’ to the first command, it will enable the execution of the second command. Therefore, modify the first command as follows:
screen -S PluginTest java -Xms1024M -Xmx1024M -XX:MaxPermSize=128M -jar /home/kalenpw/TestWorld/spigot-1.10.jar & By adding ‘&’ to the command, it will run in the background. Similarly, appending ‘&’ to the second command will enable both commands to run in the background, and by executing the ‘jobs’ command, you can view them. This way, after running your script, you will return to the prompt.
How can I start GNU Screen automatically when I open a new, When screen starts, the first window launches your shell, and you’ve told your shell to start screen. Then, when screen starts,
How to Use the Screen Command on Linux
Missing: shell | Must include:
Intro to Screen in Linux (Run Multiple Terminal Screens)
Reserve the Ruby Steel crypto rewards card and get a $25 bonus (use affiliate code «Caleb Duration: 11:20
Why and how to use the screen command
Screen is a fantastic tool to help you manage sessions. You can split the screen any way you Duration: 8:31
Unable to run code in screen
When using the -R option, you are trying to resume a screen session that may already have a running process. Simply pushing shell commands into the session may not work since it could interfere with any existing processes. For instance, resuming a screen session with an editor running would not allow new commands to execute. Therefore, it is best not to use the -R option when specifying a command to run.
Lucky for you, screen provides the option to execute customized commands during startup. This process is straightforward and only involves using screen command args (without adding -R after the screen).
To execute multiple shell commands, you need to pass all your commands as arguments to /bin/sh in your case. Screen will not run these commands for you. The following format should do the trick:
$ screen /bin/sh -cx "cd /home/users/devops_tester/apps/Selenium-Webdriver; export DISPLAY=:99; npm start" Spawn a new screen session and execute your commands while enabling the shell to print the commands using the optional -x flag for reference.
It is possible to execute the aforementioned task in a prompt detached screen session and subsequently reconnect to it at a later time.
$ screen -d -m /bin/sh -cx "cd /home/. ; export . ; npm start" # runs the commands in screen but returns immediately This feature can come in handy if you intend to execute the commands at system startup.
Additionally, it is possible to re-connect to the aforementioned session in order to observe the current activity.
$ screen -R # re-attach to the above screen session To simplify things, consider creating a brief shell script with just three lines that you can execute with a simple call, rather than passing all your commands as arguments to /bin/sh . This way, you can avoid the hassle of repeating the same process.
The ‘stuff’ command for the screen can be utilized to insert command lines into the shell of running screen session.
NL=$(echo -ne '\015') screen -S YOURSCREEN -dm # # Wait a sec for screen to get going. sleep 1 screen -S YOURSCREEN -p 0 -x stuff "cd /home/users/devops_tester/apps/Selenium-Webdriver$" screen -S YOURSCREEN -p 0 -x stuff "export DISPLAY=:99$" screen -S YOURSCREEN -p 0 -x stuff "npm start$" To start long running interactive processes at boot time, I employ this method in both systemd and init.d.
Screen command not properly running in bash while using .desktop, Bash script contains screen commands. When executing (./script.sh), it works as expected. But when running the script using .desktop file
How to start a screen session from a shell script using crontab and then reattach to it?
It seems that the issue you are facing is due to the undefined status of $PID . The messages indicating the starting and stopping of the mitmproxy screen do not contain any PID reference. When launch.sh is executed from cron for the first time, the error from kill does not occur because the PID file is not present and the «Stopping mitmproxy» section is not executed. However, during the second attempt, kill is called with an undefined $PID , resulting in an error.
Do you need to specify absolute paths in the section where you determine the PID of screen and awk ? Is cron aware of their location?
Consider using expect to wrap the screen call, as it can emulate a pty. The crontab run and terminal run appear to be identical except for the absence of a pty when using crontab.
Why and how to use the screen command, Screen is a fantastic tool to help you manage sessions. You can split the screen any way you Duration: 8:31
Как пользоваться утилитой screen в Linux?
![]()
Сейчас вы точно прочувствуете важное команды screen . Бывало ли у вас такое, что вы выполняете (очень долго) команду в консоли — CLI на удаленной машине, будучи подключенным через SSH? Команда долго выполняется и близится к завершению как вдруг пропадает подключение, рвется SSH подключение и все, что вы делали — пропало?
Прости, что напомнили. Знаем, это болезненно. Что же, вытрем слезы. Для этих ситуаций есть команда screen о которой мы и поговорим.
Немножко теории
Так называемый screen это терминальный мультиплексор (нас тоже пугает это слово). Другими словами, оно дает нам возможность внутри действующей сессии открыть сколько угодно много виртуальных окон/терминалов. Что важно — процесс, запущенный внутри сессии через screen, будет продолжаться даже тогда, когда вы отключитесь от самой первой сессии.
Установка screen в Linux
Вообще, пакет screen предустановлен на большинстве современных Linux — дистров. Проверить можно командой:
screen --version Screen version 4.00.03 (FAU) 23-Oct-06

Если случилось так, что у вас его нет — это можно быстро исправить простой установкой.
Установка screen в Ubuntu и Debian
Установка screen в CentOS и Fedora
Запуск screen в Linux
Чтобы запустить screen в консоли, просто наберите screen . Что может быть проще, не правда ли?
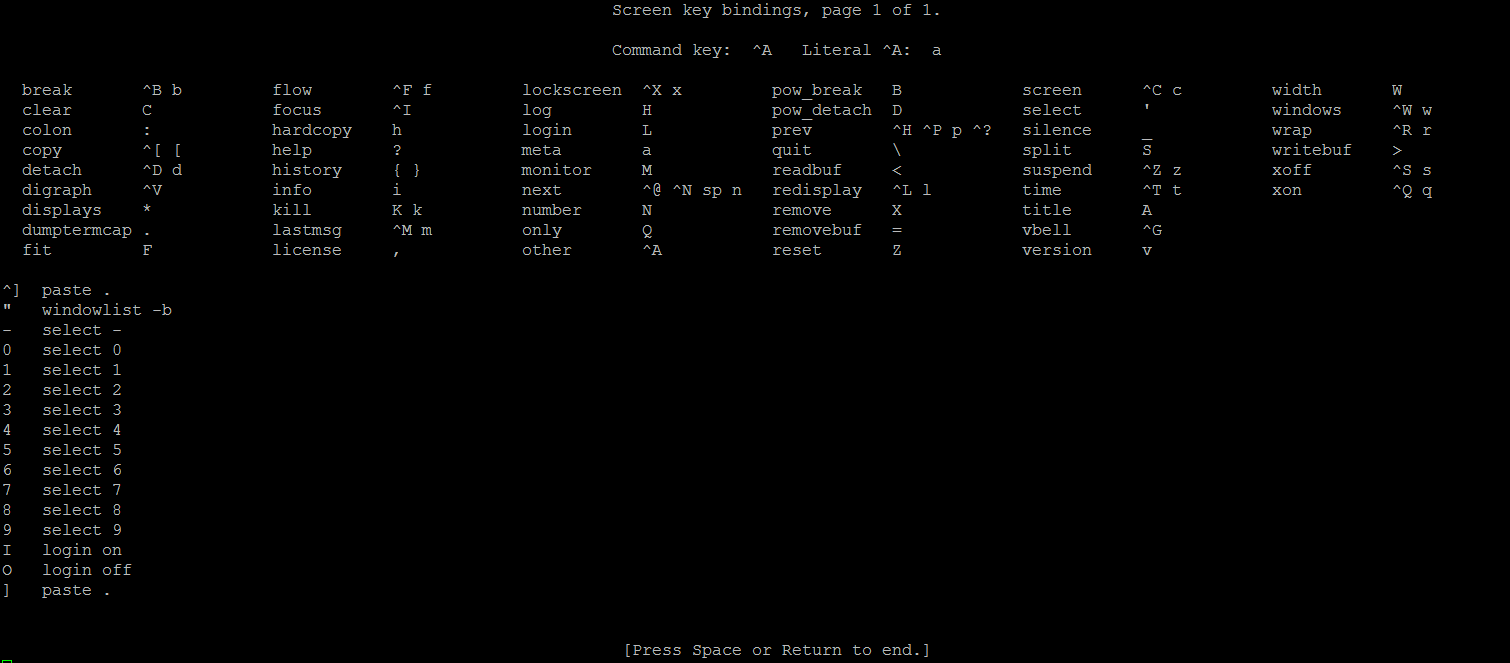
У вас откроется новая сессия в новом окне. Уже здесь вы можете вводить все нужные shell команды. Находясь в режиме скрина (screen) вы можете посмотреть список доступных вам команд управления этим режимом. Вот так:
Если не получается нажать указанную выше комбинацию, можно поступить проще: нажмите отдельно Ctrl+a , отпустите, а затем в консоль наберите ? и нажмите Enter
Сессия screen с именем
Ну очень удобная фича. Если вы делаете несколько процессов параллельно, просто обзовите их так, чтобы потом понять, что и где выполняется. Синтаксис такой:
screen -S имя_сессия_скрин
Например, вы можете запустить ping — замер хоста с 1С и назвать сессию так:
screen -S pings_towards_1C
Всегда используйте скрин именно так. Будет значительно удобнее.
Как правильно работать с окнами в Windows
Как мы уже сказали, когда вы создаете новую screen — сессию, вы создадите новое окно с shell оболочкой внутри. И что интересно — внутри скрин сессии вы можете создать множество дополнительных окон. Чтобы это сделать, воспользуйтесь командой (внутри скрина) Ctrl+a и c . Новому окну будет назначен номер от 0 до 9 (первый свободный).
Ниже мы собрали все команды, которые понадобятся вам для управления скринами:
- Ctrl+a и c — создать дополнительное окно ;
- Ctrl+a и » — показать список всех имеющихся окон;
- Ctrl+a и 0 — переключиться на окно с номером 0 (номер может быть иной);
- Ctrl+a и A — переименовать текущее окно;
- Ctrl+a и S — разделить окно по горизонтали на две области;
- Ctrl+a и | — разделить окно по вертикали на две области;
- Ctrl+a и tab — переключить рабочий фокус на следующую область разделенного окна;
- Ctrl+a и Ctrl+a — переключить рабочий фокус на предыдущую область разделенного окна;
- Ctrl+a и Q — закрыть все разделенные области кроме;
- Ctrl+a и X — закрыть текущую область;
Выход из screen сессии
Вы можете легко выйти из screen — сессии набрав:
Самое важное: запущенная вами в этот момент команда не остановится и будет продолжать свое выполнение.
Возврат к screen сессии
Чтобы вернуть к screen — сессии используйте команду:
Если у вас запущено больше чем одна screen — сессия, то после ключа r нужно указать ее ID. Узнать его просто с помощью команды:
Вывод этой команды будет выглядеть вот так:
screen -ls There are screens on: 32328.pings_towards_1C (Detached) 32482.wiki.merionet.ru_is_one_love (Detached) 2 Sockets in /var/run/screen/S-root.
В выводе выше мы выделили ID — сессий. Например, чтобы вернуться к сессии 32328 (pings_towards_1C), дайте команду:
Немножко кастомизации screen под вас
Когда screen запускается, он считывает свои конфигурационные параметры из /etc/screenrc и ~/.screenrc , если файл присутствует. Так вот — мы можем легко перенастроить предпочтения использования screen и сделать это в файле .screenrc .
Посмотрите пример с комментариями, как мы закастомили screen для себя:
# Выключаем приветствие startup_message off # включаем визуальный звонок vbell off # буфер для сохраненных строк делаем 10000 defscrollback 10000 # кастомим строку состояния hardstatus alwayslastline hardstatus string '%[ %%H %][%= %%?%-Lw%?%(%%n*%f%t%?(%u)%?%)%%?%+Lw%?%?%= %][% %m-%d %%c %]'
Типовой сценарий использования screen
Общий случай, так сказать. Обычно он состоит из следующих шагов:
- После SSH подключения к серверу, набираем screen ;
- Запускаем интересующую нас команду в режиме screen — сессии;
- Выполняем команду Ctrl + a и d , чтобы выйти из режима работы с экран-сессией
- Через какое-то время возвращаемся к запущенному ранее экрану командой screen -r
Выводы
Мы разобрались, как создавать screen сессии, управлять ими внутри, открывая новые окна, выходить из их режима управления (без прекращения выполнения команды), делить горизонтально и вертикально экраны.
Ах да, ещё мы научились кастомизировать screen под себя. Профит!