Disk cloning
Disk cloning is the process of making an image of a partition or of an entire hard drive. This can be useful for copying the drive to other computers or for backup and recovery purposes.
- Moving to a drive with a smaller logical sector size (e.g. from 4096 bytes to 512 bytes) will require recreating the partition table since partition boundaries are specified in sector numbers.
- Moving to a drive with a larger logical sector size (e.g. from 512 bytes to 4096 bytes) may not be possible at all if a file system’s block size is less than target drive’s logical sector size or is not divisible by it.
Tip: Over time file systems get new features and the mkfs utilities change their defaults, but not all new features can be enabled without reformatting. So, when moving data to a new drive, instead of cloning the block devices or file systems, consider creating a new file system and only copy the files (and their attributes, ACLs, extended attributes, etc.) with e.g. rsync.
Block-level cloning
Using dd
Using ddrescue
If possible, data recovery from disks should be performed using their native interface: SATA or, for older drives, IDE. Results may vary while using USB adapters.
GNU ddrescue is a data recovery tool capable of ignoring read errors. ddrescue is not related to dd in any way except that both can be used for copying data from one device to another. The key difference is that ddrescue uses a sophisticated algorithm to copy data from failing drives causing them as little additional damage as possible. See the ddrescue manual for details.
To clone a faulty or dying drive, run ddrescue twice. For the first round, copy every block without read error and map the errors to rescue.map .
# ddrescue --force -n /dev/sdX /dev/sdY rescue.map
where X is the partition letter of the source and Y of the target block device.
For the second round, copy only the bad blocks and try 3 times to read from the source before giving up.
# ddrescue --force -d -r3 -n /dev/sdX /dev/sdY rescue.map
In some circumstances the disk controller or a USB adapter may lock, while attempting to read a particular sector. The -i option may be used to instruct ddrescue to start reading after that position.
Now you can check the file system for corruption and mount the new drive.
File system cloning
This article or section needs expansion.
Using e2image
e2image is a tool included in e2fsprogs for debugging purposes. It can be used to copy ext2, ext3, and ext4 partitions efficiently by only copying the used blocks. Note that this only works for ext2, ext3, and ext4 filesystems, and the unused blocks are not copied so this may not be a useful tool if one is hoping to recover deleted files.
To clone a partition from physical disk /dev/sda , partition 1, to physical disk /dev/sdb , partition 1 with e2image, run
# e2image -ra -p /dev/sda1 /dev/sdb1
Versatile cloning solutions
This article or section needs language, wiki syntax or style improvements. See Help:Style for reference.
Reason: This application list does not respect Template:App#Style and might be better as a table. (Discuss in Talk:Disk cloning)
These applications allow easy backup of entire filesystems and recovery in case of failure, usually in the form of a Live CD or USB drive. They contain complete system images from one or more specific points in time and are frequently used to record known good configurations. See Wikipedia:Comparison of disk cloning software for their comparison.
See also Synchronization and backup programs for other applications that can take full system snapshots, among other functionality.
- Clonezilla — A partition and disk imaging/cloning program which helps with system deployment, bare metal backup and recovery.
- Complete backup and recovery solution: able to image and restore entire drives including boot sector, bootloader, partition table. for different operating systems including Windows
- Supports BIOS and UEFI, MBR and GPT
- Supports most filesystems (ext2-3-4, reiserfs, reiser4, xfs, jfs, btrfs, f2fs, FAT12-16-32, NTFS, HFS+, UFS and others) and LVM2
- Free-space aware when using Partclone (default), Partimage (optional), ntfsclone (optional), otherwise falls back to dd for block-level copying (dm-crypt/LUKS containers, unsupported filesystems. )
- Supports multi-threaded compression with different formats (including zstd) and levels
- Supports encrypting the backup
- Multicasting server to restore to many machines at once
- Dedicated LiveCD available to boot from CD, USB drive or PXE server
- Included on the Arch Linux installation media.
- Deepin Clone — Tool by Deepin to backup and restore. It supports to clone, backup and restore disk or partition.
- FSArchiver — A safe and flexible file-system backup/deployment tool
- Support for basic and extended file attributes
- Support for basic file-system attributes (label, uuid, block-size) for all linux file-systems
- Support for multiple file-systems per archive
- Support for all major Linux filesystems (extfs, xfs, btrfs, reiserfs, etc) and FAT (in order to backup/restore EFI System Partitions)
- Experimental support for cloning ntfs filesystems
- Checksumming of everything which is written in the archive (headers, data blocks, whole files)
- Ability to restore an archive which is corrupt (it will just skip the current file)
- Multi-threaded lzo, lz4, gzip, bzip2, xz/lzma and zstd compression
- Support for splitting large archives into several files with a fixed maximum size
- Encryption of the archive using a password. Based on blowfish from libgcrypt
- Support for restoring to a bigger or smaller partition (as long as there is enough space to store the data)
- Support for exclusion patterns to filter what is archived/restored
- Works with directories (creating a compressed and checksummed tarball of sorts)
- Included on the Arch Linux installation media
- Mondo Rescue — A disaster recovery solution to create backup media that can be used to redeploy the damaged system.
- Image-based backups, supporting Linux/Windows.
- Compression rate is adjustable.
- Can backup live systems (without having to halt it).
- Can split image over many files.
- Supports booting to a Live CD to perform a full restore.
- Can backup/restore over NFS, from CDs, tape drives and other media.
- Can verify backups.
- Partclone — A tool that can be used to back up and restore a partition while considering only used blocks.
- Supports ext2, ext3, ext4, hfs+, reiserfs, reiser4, btrfs, vmfs3, vmfs5, xfs, jfs, ufs, ntfs, fat(12/16/32), exfat, f2fs, nilfs
- Supports pipe, stdin and stdout to script special features (compression, encryption. )
- Rescue mode tries to skip bad blocks and backup only good blocks, option to create GNU Ddrescue domain log file from source device
- ncurses interface available
- All backed-up blocks are checksummed with crc32
- Included on the Arch Linux installation media
- Partimage — An ncurses disk cloning utility for Linux/UNIX environments.
- Has a Live CD.
- Supports the most popular filesystems on Linux, Windows and Mac OS.
- Compression.
- Saving to multiple CDs or DVDs or across a network using Samba/NFS.
- Development stopped in favor of FSArchiver.
- Redo Backup and Recovery — A backup and disaster recovery application that runs from a bootable Linux CD image.
- Is capable of bare-metal backup and recovery of disk partitions.
- Uses xPUD and Partclone for the backend.
- System Tar & Restore — Backup and Restore your system using tar or Transfer it with rsync
- GUI and CLI interfaces
- Creates .tar.gz, .tar.bz2, .tar.xz or .tar archives
- Supports openssl / gpg encryption
- Uses rsync to transfer a running system
- Supports Grub2, Syslinux, EFISTUB/efibootmgr and Systemd/bootctl
See also
Как клонировать раздел или жесткий диск в Linux
Существует множество причин, по которым вы можете захотеть клонировать раздел Linux или даже жесткий диск. Большинство из которых связаны с созданием резервных копий ваших данных. Существует несколько способов добиться этого в Linux с помощью некоторых внешних инструментов, таких как partimage или Clonezilla.
Однако в этой статье мы рассмотрим клонирование дисков Linux с помощью инструмента под названием dd, который чаще всего используется для преобразования или копирования файлов.Поставляется dd предустановленным в большинстве дистрибутивов Linux.
Как клонировать раздел Linux
С помощью команды dd вы можете скопировать весь жесткий диск или только раздел Linux. Давайте начнем с клонирования одного из наших разделов. В моем случае у меня есть следующие диски: /dev/sdb, /dev/sdc.. Я буду клонировать файл /dev/sdb1/ в файл /dev/sdc1.
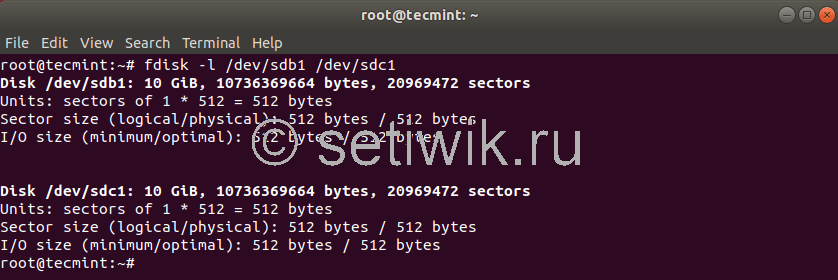
Сначала перечислите эти разделы с помощью команды fdisk, как показано ниже.

Теперь клонируйте раздел /dev/sdb1/ в /dev/sdc1, используя следующую команду dd.
Приведенная выше команда говорит dd использовать /dev/sdb1 в качестве входного файла и записать его в выходной файл /dev/sdc1.

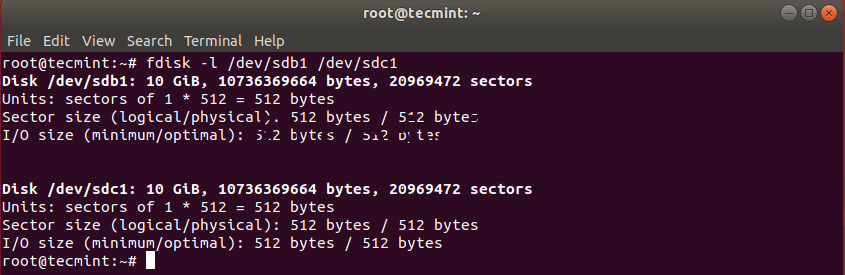
После клонирования раздела Linux вы можете проверить оба раздела с помощью команды:

Как клонировать жесткий диск Linux
Клонирование жесткого диска Linux аналогично клонированию раздела. Однако вместо указания раздела вы просто используете весь диск целиком. Обратите внимание, что в этом случае рекомендуется, чтобы жесткий диск был того же размера (или больше), что и исходный диск.

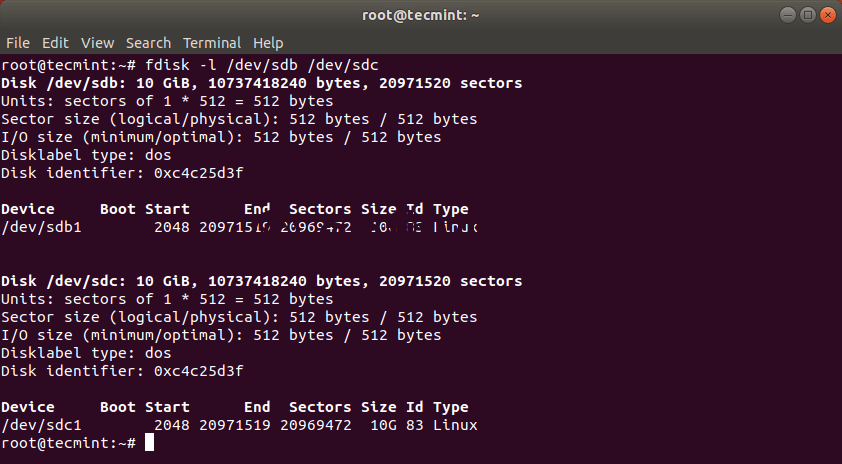
Это должно было скопировать диск /dev/sdb с его разделами на целевой жесткий диск /dev/sdc. Вы можете проверить эти изменения, перечислив оба диска с помощью команды fdisk.

Как сделать резервную копию MBR в Linux
Команда dd также может быть использована для резервного копирования вашего MBR. Который находится в первом секторе устройства, перед первым разделом. Поэтому, если вы хотите создать резервную копию вашего MBR, просто запустите:
# dd if=/dev/sda of=/backup/mbr.img bs=512 count=1.
Приведенная выше команда говорит dd скопировать /dev/sda в /backup/mbr.img с шагом 512 байт, а опция count говорит скопировать только 1 блок.
Другими словами, вы говорите dd скопировать первые 512 байт из /dev/sda в предоставленный вами файл.

Вот и все! команда dd — это мощный инструмент Linux, который следует использовать при копировании или клонировании разделов или дисков Linux. Но будьте очень осторожны так как любая неточность может стереть ваши данные.