- How to Perform Grep Search on All Files and in All Directories
- Grep search in all files of a directory
- Grep recursive search in all subdirectories of a directory
- Bonus tip: Exclude a certain directory from the recursive grep search
- To summarize
- Introduction
- The Basics
- Locating Files by Name
- Locating Files by Size
- Locating Files by Access Time
- Advanced Usage
- Combining Searches
- Acting On The files
- Using xargs
- More Information
How to Perform Grep Search on All Files and in All Directories
The versatile grep command lets you perform search for a text in all the files and all the subdirectories of a directory. Here’s how to do that.
Grep is an excellent tool when you have to search on the content of a file.
Usually, you run grep on a single file like this:
grep search_term filenameGrep is quite versatile. If you want to search all the files in a directory with grep, use it like this:
There is a problem with it. It only searches in all the files in the current directory. It won’t search in the subdirectories.
You can make grep search in all the files and all the subdirectories of the current directory using the -r recursive search option:
You may also specify the directory path if you are not in the directory where you want to perform the search:
grep -r search_term directory_pathThat was a quick recap. Let me show you all this in details with proper examples so that it is easier for you to understand.
Grep search in all files of a directory
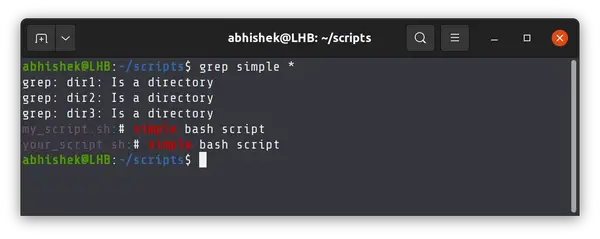
Here’s the directory structure I am going to use in this example. Except empty.txt, all files contain the term ‘simple’ on which I’ll perform the grep search.
[email protected]:~/scripts$ tree . ├── dir1 │ └── new_script.sh ├── dir2 │ └── your_script.sh ├── dir3 │ ├── empty.txt │ └── linked.txt -> ../../sample.txt ├── my_script.sh └── your_script.sh 3 directories, 6 files To search for the word ‘simple’ in all the files of the current directories, just use wild card (*). The wild card actually substitutes with the name of all the files and directories in the current directory.
This will search in all the files in the current directories, but it won’t enter the subdirectories. Since you cannot directly grep search on a directory, it will show «XYZ is a directory» error along with search results.
If you are not in the same directory where you want to perform, you can specify the directory path and end it with /*
grep search_term directory_path/*Basically, you are using the wild card to expand on all the elements (files and directories) of the given directory.
Now that you know that, let’s see how you can perform a recursive search with grep so that it also looks into the files in the subdirectories.
Grep recursive search in all subdirectories of a directory
Grep provides a -r option for the recursive search. With this option, grep will look into all the files in the current (or specified) directory and it will also look into all the files of all the subdirectories.
Here’s the recursive search I performed in the previous example to do a grep search in the current folder:
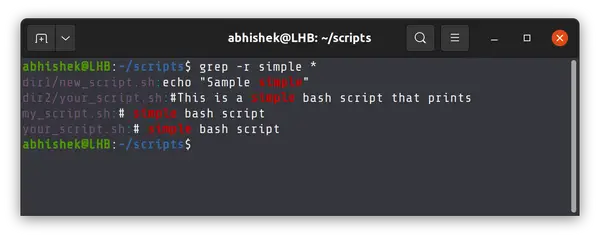
There is also a -R option for recursive search and it works almost the same as the -r option.
So, what’s the difference grep -r and grep -R ? Only one, actually. The -R is dereferenced search which means it will follow the symbolic links to go to the original file (which may be located in some other part of the system).
Take a look at the output of the -R search in the same example:
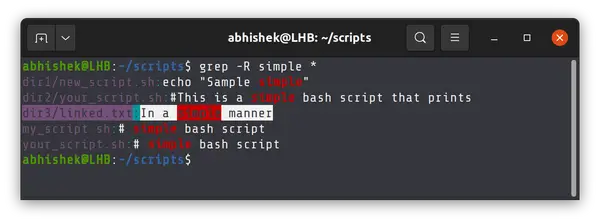
Did you notice that it gives an additional search result with the linked.txt which is basically a symbolic link and was omitted from the grep search with -r option?
If you are not in the directory where you want to perform the recursive search, just provide the absolute or relative path of the directory to grep command:
grep -r search_term path_to_directoryBonus tip: Exclude a certain directory from the recursive grep search
Everything seems good but what if you want to exclude a certain directory from the recursive search? There is a provision for that too. I told you, grep is an extremely versatile command.
grep -r --exclude-dir=dir_name serach_term directory_pathThat’s not it. You can exclude more than one subdirectory from the recursive search in the following fashion:
grep -r --exclude-dir= serach_term directory_pathHere’s what excluding directories look like in our example here:
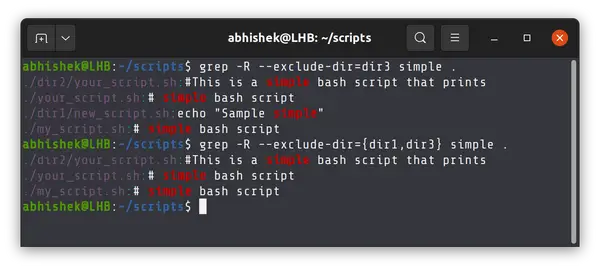
And yes, as demonstrated by the example above, the exclusion works with both -r and -R recursive options.
To summarize
Here’s a quick summary of using grep search for multiple files and directories:
| Grep Command | Description |
|---|---|
| grep string * | Searches in all the files in current directory |
| grep string dir | Searches in all the files in dir directory |
| grep -r string . | Recursive search in all the files in all the subdirectories |
| grep -r string dir | Recursive search in all files in all the subdirectories of dir |
| grep -R string . | Same as r but follows the symbolic links |
I hope you like this quick grep tip. If you want more, you may read this detailed tutorial on using the grep command:

Let me know if you have any questions or suggestions on this topic.
Introduction
The GNU find command searches files within a directory and its subdirectories according to several criteria such as name, size and time of last read/write. By default find prints the name of the located files but it can also perform commands on these files.
- find — search for files in a directory hierarchy, whether its a database or not
- locate — list files in databases that match a pattern, i.e. find inside updatedb’s list
- updatedb — update a file name database, i.e. collection of db’s only, such as sqlite
- xargs — build and execute command lines from standard input — usually you do this directly w/o xargs
This wiki page will be only be dealing with find while also briefly mentioning xargs. Hopefully locate and updatedb will be covered on their own page in the near future. «find», like «locate», can find database-files as well, but «locate» is more specialized for this task. You would run updatedb before using locate, which relies on the data produced by «updateDB».
The Basics
will find this file below the home directory. find works incredibly fast on the second run! You can search the whole / root-dir-tree in a mere approx. 3 seconds (on second run, when cache is effective) on a 500 GB ext4-fs hard disk.
The syntax for using find is:
find [-H] [-L] [-P] [path. ] [expression]
- -H : Do not follow symbolic links, except while processing the command line arguments.
- -L : Follow symbolic links.
- -P : Never follow symbolic links: the default option.
The option [path. ] refers to the particular location that you wish to search, whether it be your $HOME directory, a particular directory such as /usr, your present working directory which can simply be expressed as ‘.’ or your entire computer which can be expressed as ‘/’.
The option [expression] refers to one or a series of options which effect the overall option of the find command. These options can involve a search by name, by size, by access time or can also involve actions taken upon these files.
Locating Files by Name
The most common use of find is in the search for a specific file by use of its name. The following command searches the home directory and all of its subdirectories looking for the file mysong.ogg:
It is important to get into the habit of quoting patterns in your search as seen above or your search results can be a little unpredictable. Such a search can be much more sophisticated though. For example if you wished to search for all of the ogg files in your home directory, some of which you think might be named ‘OGG’ rather than ‘ogg’, you would run:
Here the option ‘-iname’ performs a case-insensitive search while the wildcard character ‘*’ matches any character, or number of characters, or zero characters. To perform the same search on your entire drive you would run:
This could be a slow search depending on the number of directories, sub-directories and files on your system. This highlights an important difference in the way that find operates in that it examines the system directly each time unlike programs like locate or slocate which actually examine a regularly updated database of filnames and locations.
Locating Files by Size
Another possible search is to search for files by size. To demonstrate this we can again search the home directory for Ogg Vorbis files but this time looking for those that are 100 megabytes or larger:
find $HOME -iname '*.ogg' -size +100M
There are several options with -size, I have used ‘M’ for ‘megabytes’ here but ‘k’ for ‘kilobytes’ can be used or ‘G’ for ‘Gigabytes’. This search can then be altered to look for files only that are less than 100 megabytes:
find $HOME -iname '*.ogg' -type f -size -100M
Are you starting to see the power of find, and the thought involved in constructing a focused search? If you are interested there is more discussion of these combined searches in the Advanced Usage section below.
Locating Files by Access Time
It is also possible to locate files based on their access time or the time that they were last used, or viewed by the system. For example to show all files that have not been accessed in the $HOME directory for 30 days or more:
This type of search is normally more useful when combined with other find searches. For example one could search for all ogg files in the $HOME directory that have an access time of greater than 30 days:
find $HOME -iname '*.ogg' -atime +30
The syntax works from left to right and by default find joins the 2 expressions with an implied «and». This is dealt with in more depth in the section below entitled «Combining Searches».
Advanced Usage
The sections above detail the most common usage of find and this would be enough for most searches. However there are many more possibilities in the usage of find for quite advanced searches and this sections discusses a few of these possibilities.
Combining Searches
It is possible to combine searches when using find with the use of what is known in the find man pages as operators. These are
find ~ -name 'xx*' -and -not -name 'xxx'
unless you prefer the cryptic syntax below (-o instead of -or)
The classic example is the use of a logical AND syntax:
find $HOME -iname '*.ogg' -size +20M
This find search performs initially a case insensitive search for all the ogg files in your $HOME directory and for every true results it then searches for those with a size of 20 megabytes and over. This contains and implied operator which could be written joined with an -a. This search can be altered slightly by use of an exclamation point to signify negation of the result:
find $HOME -iname '*.ogg' ! -size +20M
This performs the same search as before but will look for ogg files that are not greater than 20 megabytes. It is possible also to use a logical OR in your find search:
find $HOME -iname '*.ogg' -o -iname '*.mp3'
This will perform a case insensitive search in the $HOME directories and find all files that are either ogg OR mp3 files. There is great scope here for creating very complex and finely honed searches and I would encourage a through reading of the find man pages searching for the topic OPERATORS.
Acting On The files
One advanced but highly useful aspect of find usage is the ability to perform a user-specified action on the result of a find search. For example the following search looks for all ogg vorbis files in the $HOME directory and then uses -exec to pass the result to the du program to give the size of each file:
find $HOME -name '*.ogg' -type f -exec du -h '<>' \;
This syntax is often used to delete files by using -exec rm -rf but this must be used with great caution, if at all, as recovery of any deleted files can be quite difficult.
Using xargs
xargs feeds here-string / as parameter («argument») to the ls command
When using a really complex search it is often a good idea to use another member of the findutils package: xargs. Without its use the message Argument list too long could be seen signalling that the kernel limit on the combined length of a commandline and its environment variables has been exceeded. xargs works by feeding the results of the search to the subsequent command in batches calculated on the system capabilities (based on ARG_MAX). An example:
find /tmp -iname '*.mp3' -print0 | xargs -0 rm
This example searches the /tmp folder for all mp3 files and then deletes them. You will note the use of both -print0 and xargs -0 which is a deliberate strategy to avoid problems with spaces and/or newlines in the filenames. Modern kernels do not have the ARG_MAX limitation but to keep your searches portable it is an excellent idea to use xargs in complex searches with subsequent commands.
More Information
- Linux Basics: A gentle introduction to ‘find’ — An Ubuntu Forums guide that was incorporated into this wiki article with the gracious permission of its author.
- Using Find — Greg’s Wiki — A very comprehensive guide to using find, along similar lines to this guide, that is well worth reading through.
- Linux Tutorial: The Power of the Linux Find Command The amazing Nixie Pixel gives a video demonstration of find.
find (последним исправлял пользователь p5B3C87CE 2015-02-24 00:21:33)
The material on this wiki is available under a free license, see Copyright / License for details
You can contribute to this wiki, see Wiki Guide for details