- Selecting text in the terminal without using the mouse
- 7 Answers 7
- Bash Select Command
- Example-1: Creating a simple menu
- Example-2: Select command with a case statement
- Example-3: Creating nested bash menu
- Example-4: Create a bash menu with an array
- Conclusion
- About the author
- Fahmida Yesmin
- MySQL Linux command line tool and properly formatted results [duplicate]
- 4 Answers 4
Selecting text in the terminal without using the mouse
Shift-Home and Ctrl-Shift-Home do the same for me (jump to beggining of terminal) and neither of them seem to copy anything to be pased by neither Ctrl-Y or Ctrl-Shift-V (nor select). But it does work in text editor, not copying, just selecting. Using OpenSUSE Leap 15 in Virtual Box. Every other key-binding mentioned in answers works.
7 Answers 7
If you are using one of the shells that understands emacs keys (bash, csh, etc.) then you can copy the current command by:
- control-A will take you to the beginning of the line.
- control-K will kill the whole line that you have just entered.
- control-Y will yank the text back.
See man bash and then when it comes up, type /emacs followed by a couple of n ‘s (next) to move you forward to the READLINE section.
@BalKrishnaJha Even better than Ctrl+U — You can insert arguments from your previous commands into the current one with Alt+. (press multiple times to grab older arguments).
Now after using Crtl + P your line will be copied into clipboard. You can paste it in terminal using:
And into any X application using middle mouse button or Shift + Insert .
i want to avoid using the mouse. Is it possible to paste it with ctrl+shift+v instead of middle mouse button?
@MrGigu, this uses a different clipboard (see here). You need to use other shortcut. By default it should be Shift+Insert (see here)
Or use xsel -b to use the standard clipboard, i.e the one that uses Ctrl+V/Ctrl+Shift+V. Also worth noting that this method fails on multi-line commands.
@Alexander It sets up a keybinding, that when you press it, inputs the current line into xsel , which is a clipboard manager.
The closest I can think of is Ctrl + u , Ctrl + y
This would delete from cursor to the beginning of line, then paste from the readline buffer. This isn’t exactly the same as the clipboard though, but you would be able to paste inside the shell, if that is what you need.
There is a program called screen. It creates a text windowing system that allows you to switch between multiple instances. But it also allows you to select text.
sudo apt-get install screen You use ctr-a to start the command sequence. Then press esc and your cursor will move in any direction. Press enter to start text selection, move to end point, press enter again. That will copy to buffer.
Then ctr-a and then > will paste
Good suggestion, but I don’t like screen for different reasons, so assume regular Ubuntu terminal. Edited my question for clarification.
If you are inside vim you can visually select one or more lines with Shift + v and then use a binding, e.g. y y , to pipe the selection to xclip.
Add the binding to your vimrc:
vnoremap yy :w !xclip -selection clipboard
This requires xclip to be installed, it is in the Debian/Ubuntu aptitude repository.
xclip stores stdin, with the -selection clipboard option it also pushes stdin to the system clipboard.
So you can also use xclip in a generic way from the terminal, for example to copy an entire file to the system clipboard:
cat myfile | xclip -selection clipboard If you can optionally also create an alias, such as:
alias cb="xclip -selection clipboard" Daniel Micay’s Termite sports a «selection mode». Pressing Ctrl+Shift+Space will activate it. It’s got vim-like key bindings. v or V will select à la vim’s visual mode, y will yank, Esc will exit selection mode.
Assuming bash or compatible, you can copy the command from your history to the clipboard after running it:
$ fc -lrn | head -1 | xclip -se c If you don’t want to run it before copying it to the clipboard, jump to the front with Ctrl+A and temporarily turn it into a comment by adding # .
Having an alias for the command line above is handy when recording command line procedures for later reference or documentation. However, it’s even more convenient to just append the last command directly to a file as needed by making a command like this ( c2f = command to file ):
$ cat <(echo '!! example command that "includes chars" with shell >semantics, etc') | cat >&2 $ c2f readme.md To make it quicker to edit the file later, it can also be convenient to slightly expand on the above and add some appropriate syntax wrapping the command being append to the file, such as «`bash. «` .
Bash Select Command
![]()
Select command is used in scripts for menu creation. Different types of menu generation tasks can be implemented with the select command such as: creating menu based director list, creating a menu from file content etc. How you can implement these types of tasks using bash select command are shown in this Linux Hint tutorial.
Here, the menu item will be created from the data_list that can be an array or other data source. Each menu item retrieves from the data_list and stores in a variable to create the menu. ‘Select’ command can be used with ‘case’ command also to create the menu. Different types of menu creation tasks are shown here using very simple examples.
Example-1: Creating a simple menu
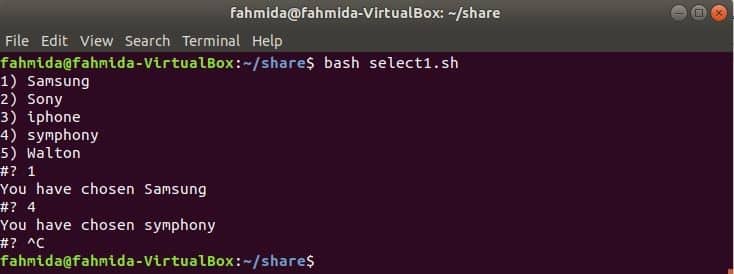
Create a bash file named select1.sh with the following bash script. Here, ‘select’ command will retrieve each data from the list and print the data as a menu. The following script contains the brand names of mobile phones and after executing the script it will create a menu of mobile brands and ask the user to choose any brand. It will print the name of the selected brand. The user has to press Ctrl+c to terminate from the script.
#!/bin/bash
# Define the menu list here
select brand in Samsung Sony iphone symphony Walton
do
echo «You have chosen $brand »
done
The following output will appear after running the script and selecting the menu item number 1 and 4.
Example-2: Select command with a case statement
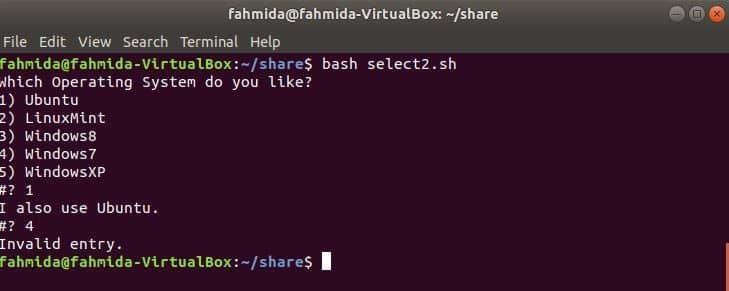
How you can create a bash menu with case statement is shown in this example. Create a bash file named select2.sh with the following bash script. After running the script, the user will select any menu item and case statement will match the selected value with case value. Here multiple case values are used for matching with the selected menu item. If none of the case value matches with the selected menu item then “Invalid entry” will print.
#!/bin/bash
echo «Which Operating System do you like?»
# Operating system names are used here as a data source
select os in Ubuntu LinuxMint Windows8 Windows7 WindowsXP
do
case $os in
# Two case values are declared here for matching
«Ubuntu» | «LinuxMint» )
echo «I also use $os .»
;;
# Three case values are declared here for matching
«Windows8» | «Windows7» | «WindowsXP» )
echo «Why don’t you try Linux?»
;;
# Matching with invalid data
* )
echo «Invalid entry.»
break
;;
esac
Output:
Run the script.
The different output will appear for different selection. Here, 1 is selected the first time that is Ubuntu. it matched with first case value print the message “I also use Ubuntu”. 4 is selected next time and the menu item is Windows7 but there is no case value with this name. So, this time it printed “Invalid entry” and terminate from the script.
Example-3: Creating nested bash menu
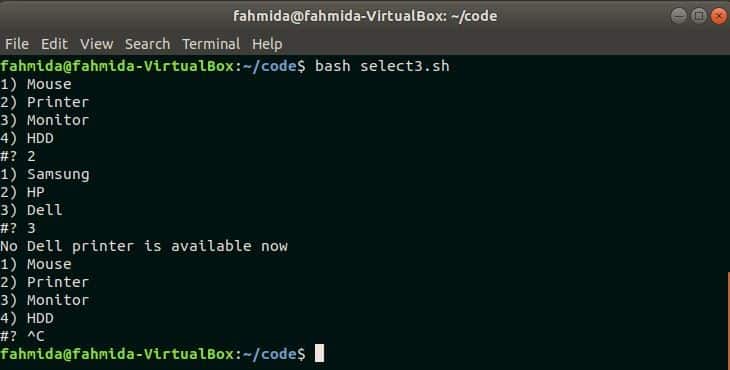
When any menu is created under the other’s menu then it is called a nested menu. The nested menu can be created in the base by using two or more select and case statements. Create a bash file named select3.sh with the following bash script. Here, two select and case statements are used to implement the nested menu. The parent menu contains 4 items and sub-menu contains 3 items here.
#!/bin/bash
while true
do
# Parent menu items declared here
select item in Mouse Printer Monitor HDD
do
# case statement to compare the first menu items
case $item in
Mouse )
echo «Which type of monitor you like?»
;;
Printer )
# Sub-menu items here declared here
select sub_item in Samsung HP Dell
do
# case statement for sun-menu items
case $sub_item in
Samsung )
echo «The price of samsung printer is $100»
break
;;
HP )
echo «New HP 880 printer price printer is $450»
# return to parent menu
break
;;
Dell )
echo «No Dell printer is available now»
# return to the parent menu
break 2
;;
esac
done
break
;;
Monitor )
echo «Buy our new Samsung Monitor at low cost»
break # return to current (main) menu
;;
HDD )
echo «Good quality HDD are available in the stock»
# return from the script
break 2
esac
done
done
After running the script, the parent menu with 4 items displayed. Here, only the second menu item of the parent menu contains sub-menu. After selecting 2, the sub-menu appeared and when the user selected 3 then it displayed the matching message of menu item 3 and return back to the parent menu.
Example-4: Create a bash menu with an array
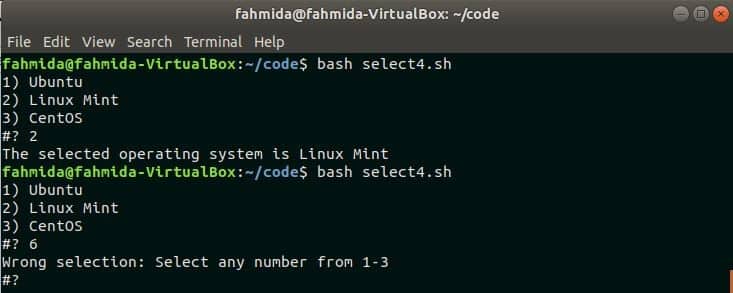
An array variable can store multiple data. So, you can use an array as a data list for creating a base menu. How you can use an array with a select statement to create a menu is shown in this example. Create a bash file named select4.sh with the following bash script. Bash subroutine is used in this script to create a menu from the array. An array with three elements is used and menu_from_array () is called to create the menu. The script will check the selected menu item number is between 1-3 or not. If the number is not within this range then it will instruct the user select it within this range, it will print select menu item with other text.
menu_from_array ( )
{
select item; do
# Check the selected menu item number
if [ 1 -le » $REPLY » ] && [ » $REPLY » -le $# ] ;
then
echo «The selected operating system is $item »
break ;
else
echo «Wrong selection: Select any number from 1-$#»
fi
done
}
# Declare the array
linux = ( ‘Ubuntu’ ‘Linux Mint’ ‘CentOS’ )
# Call the subroutine to create the menu
menu_from_array » $ «
Here, 2 is selected first that is within the range and printed the text. 6 is selected the second time that is out of range and suggest the user select a number within the range.
To understand this code we should learn a few tricks 😉
- Because the in list is not provided in the select positional parameters are used which are in this case the words in the array passed to the function
- $REPLY stores the value input by the user
- the logical IF AND conditional in the function is checking the reply is between 1 and the size of the POSITIONAL PARAMETER array
Conclusion
Bash menu creation task by using a select statement is explained in this tutorial as simple as possible. There are many simple and fancy ways to use SELECT in bash when creating menus and we hope these examples give you a starting point to create your own combinations.
About the author
Fahmida Yesmin
I am a trainer of web programming courses. I like to write article or tutorial on various IT topics. I have a YouTube channel where many types of tutorials based on Ubuntu, Windows, Word, Excel, WordPress, Magento, Laravel etc. are published: Tutorials4u Help.
MySQL Linux command line tool and properly formatted results [duplicate]
Does anyone know of a good tool to use from the shell to query the database and get intelligible results? On the command line, from SSH, I want to query the database using mysql but the results are pretty much unreadable because there is no formatting for the terminal screen. If I run the following it is vary hard to make sense of the results.
use mydb; select * from db3_settings; 4 Answers 4
You can obtain a vertically formatted output with \G .
This is the standard output:
mysql> select * from tblSettings; +-----------+----------------+---------------------+ | settingid | settingname | settingvalue | +-----------+----------------+---------------------+ | 1 | maxttl | 30 | | 2 | traceroutepath | /usr/bin/traceroute | | 3 | alertemail | me@host.com | +-----------+----------------+---------------------+ 3 rows in set (0.00 sec) And this is what the output looks like with \G :
mysql> select * from tblSettings \G; *************************** 1. row *************************** settingid: 1 settingname: maxttl settingvalue: 30 *************************** 2. row *************************** settingid: 2 settingname: traceroutepath settingvalue: /usr/bin/traceroute *************************** 3. row *************************** settingid: 3 settingname: alertemail settingvalue: me@host.com 3 rows in set (0.00 sec)