- How to send only one UDP packet with netcat?
- 6 Answers 6
- Send and Receive UDP packets via Linux CLI
- Expectations:
- Netcat Command:
- General Set Up Diagram:
- Send UDP packet:
- Start Server:
- Start Client:
- Check Connection:
- Send UDP packets:
- Check packets in Wireshark:
- Other command to send UDP packets:
- Conclusion:
- References:
- About the author
- Bamdeb Ghosh
- RELATED LINUX HINT POSTS
- Send TCP/UDP Packets on Linux using /dev/tcp & /dev/udp Pseudo Devices
- Base Command
- UDP
- TCP
- 👉 Any questions? Please comment below.
- Share on
- Leave a comment
- You may also enjoy
- [SOLVED] Fix Kubernetes Flannel & CoreDNS Failure with Error: x509: certificate is valid for , , not
- JavaScript: Remove element from Array — by index / value / position / range / filter function (programmatically)
- [SOLVED] Fix Kubernetes Client Certificates Issue with Error: Part of the existing bootstrap client certificate is expired . failed to run Kubelet: unable to load bootstrap kubeconfig: stat /etc/kubernetes/bootstrap-kubelet.conf: no such file or directory
- [SOLVED] Fix npm ERR! code EINTEGRITY , integrity checksum failed , tarball data seems to be corrupted , npm ERR! shasum check failed , npm WARN registry Unexpected warning issues during npm install
- Отправка и получение UDP-пакетов через Linux CLI
- Ожидания:
- Команда Netcat:
- Схема общей настройки:
- Отправить пакет UDP:
- Стартовый сервер:
- Стартовый клиент:
- Проверьте подключение:
- Отправлять UDP-пакеты:
- Проверяем пакеты в Wireshark:
- Другая команда для отправки пакетов UDP:
- Заключение:
- Рекомендации:
How to send only one UDP packet with netcat?
I can see that the server is getting the hello stuff but I have to press Ctrl + c to quit the netcat command. How can I make it quit after sending hello? Sorry, for the noise, I re-read the man page and found the -q option.
echo -n "hello" | nc -4u -q1 localhost 8000 Man page on debian: -q seconds: after EOF on stdin, wait the specified number of seconds and then quit. If seconds is negative, wait forever.
6 Answers 6
If you are using bash, you might as well write
echo -n "hello" >/dev/udp/localhost/8000 and avoid all the idiosyncrasies and incompatibilities of netcat.
This also works sending to other hosts, ex:
echo -n "hello" >/dev/udp/remotehost/8000 These are not «real» devices on the file system, but bash «special» aliases. There is additional information in the Bash Manual.
For some reason, I needed to use 127.0.0.1 instead on localhost on Ubuntu 14.04. (Yes, I do have localhost in /etc/hosts .)
I did not find the -q1 option on my netcat. Instead I used the -w1 option. Below is the bash script I did to send an udp packet to any host and port:
#!/bin/bash def_host=localhost def_port=43211 HOST=$ PORT=$ echo -n "$1" | nc -4u -w1 $HOST $PORT On a current netcat (v0.7.1) you have a -c switch:
-c, --close close connection on EOF from stdin echo "hi" | nc -cu localhost 8000 For clarity, with Linux-based netcat, the -c option requires a command as an argument, which «executes the given argument via /bin/bash» — commandlinux.com/man-page/man1/nc.1.html
I had the same problem but I use -w 0 option to send only one packet and quit. You should use this command :
echo -n "hello" | nc -4u -w0 localhost 8000 Netcat sends one packet per newline. So you’re fine. If you do anything more complex then you might need something else.
I was fooling around with Wireshark when I realized this. Don’t know if it helps.
I think this is only correct for TCP. With UDP, it will send multiple lines in one packet (if they fit).
Unfortunately nc is not a unique name for a single tool. To find out which nc you have, look at the first line of output from nc -h . To send a single UDP packet and exit immediately, use the appropriate arguments for your specific nc.
Related but thankfully not calling themselves nc :
If you want a portable nc wrapper for sending a single UDP packet, try this as nc-udp-oneshot.sh :
#!/bin/sh helpword=$(nc -h 2>&1 | awk '') case $helpword in *GNU*) args=-uc ;; *) args=-uq0 ;; esac exec nc $args "$@" Now you can run echo -n hello | ./nc-udp-oneshot.sh with whichever nc happens to be installed. Or xxd -r -p
Send and Receive UDP packets via Linux CLI
![]()
We already know about two main transport layer protocols like TCP and UDP. For more information about TCP and UDP, you can check the reference section. In this article, we will learn how to send and receive UDP packets via the Linux command-line interface (CLI) using nc (mainly) command.
Expectations:
Here are the key points to learn from this article
- To understand nc command in Linux.
- Use nc command for sending and receiving UDP packets through network.
- Send some human readable sentences through nc command.
- Capture the UDP packet sent by nc command.
- Check network packet in Wireshark.
- Find out any other command other than netcat for Linux.
Netcat Command:
Netcat(nc) command is installed by default in Linux OS. Open one terminal [Shortcut Alt+Ctrl+t] and use below command to check if nc is present or not.
Here is the expected output
This is nc from the netcat-openbsd package. An alternative nc is available
in the netcat-traditional package.
usage: nc [-46bCDdhjklnrStUuvZz] [-I length] [-i interval] [-O length]
[-P proxy_username] [-p source_port] [-q seconds] [-s source]
[-T toskeyword] [-V rtable] [-w timeout] [-X proxy_protocol]
[-x proxy_address[:port]] [destination] [port]
This means nc command is already exist in Linux.
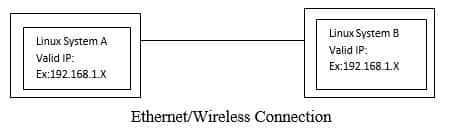
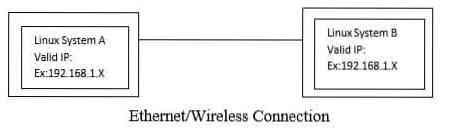
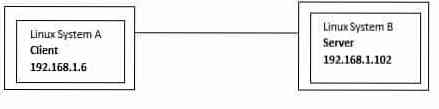
General Set Up Diagram:
Send UDP packet:
Let’s take an example like we will send UDP packet from System A to System B. So, in server-client concept, we have to run server at System B side and client at System A side.

Also we have valid IP addresses.
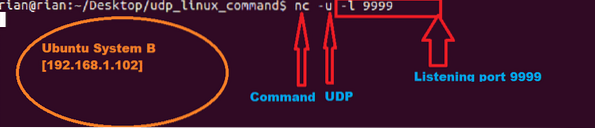
Start Server:
To start sever using nc command use below command in System B terminal

This command does not have any output to show as of now. This is just listening mode on port 9999.
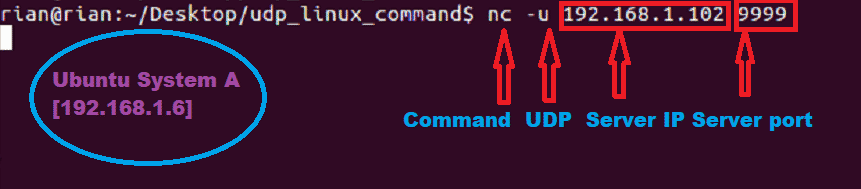
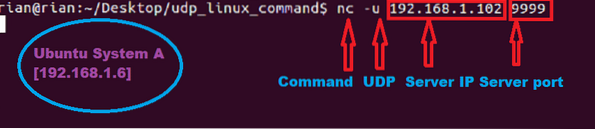
Start Client:
To connect to server using nc command use below command in System A terminal
Now system A has to connect to System B. So we have provided server IP address and port number.
Check Connection:
We can check the below command for the confirmation about client connation to server port.

Send UDP packets:
Now we can send udp packet from System A to B and vice versa.
Now go to system A and send any sentences like

We should able to see this in System B side. Here is the screenshot

We can also send UDP packets from System B to System A.
Go to System B and send sentence like
Here is the screenshot from System B

Here is the screenshot from System A

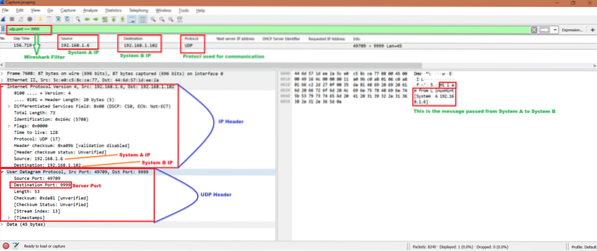
Check packets in Wireshark:
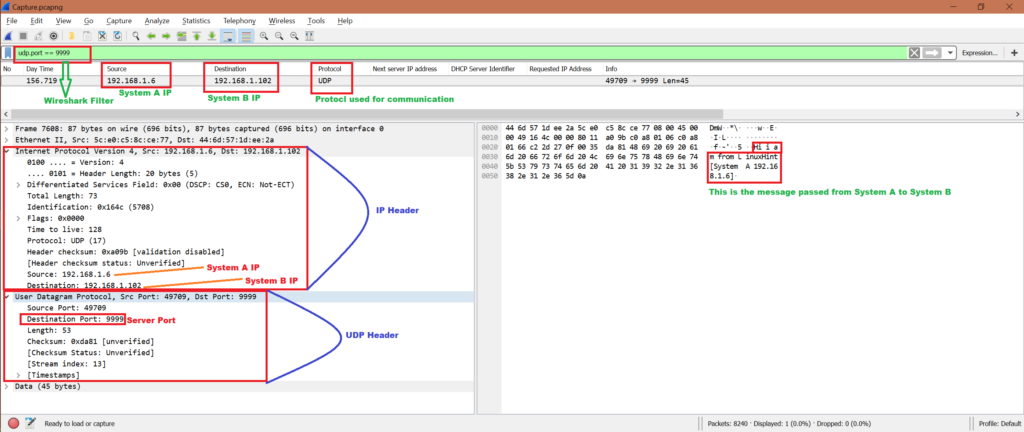
Now while we have been sending UDP packets from System A to System B and vice verse, we can start Wireshark in either System A or System B. Here we have the capture file, let’s do some analysis and confirm if this server and client communication used UDP protocol.
Note that we will only analyze the first communication:
System A has sent:
We will use filter “udp.port == 9999” to get only related packets in Wireshark. Refer below screenshot for analysis from Wireshark capture:
To know how to use Wireshark refer below link
Other command to send UDP packets:
There is another method to send UDP packets
Run below command at System A:
$ echo -n «hello» >/ dev / udp / 192.168.1.102 / 8000
192.168.1.102: System B’s IP
8000 : The server port
Message sent: “hello”
But we are able to send only one time “hello”. If we kill server and rerun then it’s working.
Conclusion:
From the above exercise we have learned the mechanism to send some messages using UDP protocol. And the best method is to use nc command in Linux.
References:
About the author
Bamdeb Ghosh
Bamdeb Ghosh is having hands-on experience in Wireless networking domain.He’s an expert in Wireshark capture analysis on Wireless or Wired Networking along with knowledge of Android, Bluetooth, Linux commands and python. Follow his site: wifisharks.com
RELATED LINUX HINT POSTS
Linux Hint LLC, editor@linuxhint.com
1309 S Mary Ave Suite 210, Sunnyvale, CA 94087
Privacy Policy and Terms of Use
Send TCP/UDP Packets on Linux using /dev/tcp & /dev/udp Pseudo Devices
Pseudo tools like /dev/tcp & /dev/udp can be used to easily send an instant TCP/UDP packet on Linux terminal.
Here is a quick tutorial on sending UDP and TCP data on Linux terminal using /dev/udp and /dev/tcp .
Base Command
UDP
$ echo "This is my UDP message" > /dev/udp/127.0.0.1/30000 TCP
$ echo "This is my TCP message" > /dev/tcp/127.0.0.1/30100 👉 Any questions? Please comment below.
Updated: January 02, 2020
Share on
Leave a comment
You may also enjoy
[SOLVED] Fix Kubernetes Flannel & CoreDNS Failure with Error: x509: certificate is valid for , , not
Use the correct cluster configuration for your control plane when regenerating new certificates
JavaScript: Remove element from Array — by index / value / position / range / filter function (programmatically)
Many ways to remove items from a JavaScript array
[SOLVED] Fix Kubernetes Client Certificates Issue with Error: Part of the existing bootstrap client certificate is expired . failed to run Kubelet: unable to load bootstrap kubeconfig: stat /etc/kubernetes/bootstrap-kubelet.conf: no such file or directory
Renew the expiring/expired Kubernetes PKI (client certificates & keys)
[SOLVED] Fix npm ERR! code EINTEGRITY , integrity checksum failed , tarball data seems to be corrupted , npm ERR! shasum check failed , npm WARN registry Unexpected warning issues during npm install
Clean npm cache, node_modules, package-lock.json files to recover from all ‘npm ERR! code EINTEGRITY’ error messages during ‘npm install’
Отправка и получение UDP-пакетов через Linux CLI
Мы уже знаем о двух основных протоколах транспортного уровня, таких как TCP и UDP. Для получения дополнительной информации о TCP и UDP вы можете проверить справочный раздел. В этой статье мы узнаем, как отправлять и получать UDP-пакеты через интерфейс командной строки (CLI) Linux, используя NC (в основном) команда.
Ожидания:
Вот основные моменты, которые следует изучить из этой статьи
- Понимать NC команда в Linux.
- Использовать NC команда для отправки и получения UDP-пакетов по сети.
- Отправьте несколько удобочитаемых предложений через NC команда.
- Захватить пакет UDP, отправленный NC команда.
- Проверить сетевой пакет в Wireshark.
- Найдите любую другую команду, кроме netcat для Linux.
Команда Netcat:
Команда Netcat (nc) по умолчанию установлена в ОС Linux. Откройте один терминал [сочетание клавиш Alt + Ctrl + t] и используйте команду ниже, чтобы проверить, присутствует ли NC или нет.
Это nc из пакета netcat-openbsd. Доступен альтернативный NC
в традиционном пакете netcat.
использование: nc [-46bCDdhjklnrStUuvZz] [-I длина] [-i интервал] [-O длина]
[-P proxy_username] [-p source_port] [-q секунды] [-s source]
[-T toskeyword] [-V rtable] [-w timeout] [-X proxy_protocol]
[-x proxy_address [: порт]] [пункт назначения] [порт]
Это означает, что команда nc уже существует в Linux.
Схема общей настройки:
Отправить пакет UDP:
Давайте возьмем пример, как мы отправим пакет UDP из системы A в систему B. Итак, в концепции сервер-клиент мы должны запустить сервер на стороне системы B и клиент на стороне системы A.
Также у нас есть действующие IP-адреса.
Система А IP: 192.168.1.6
Система B IP: 192.168.1.102
Стартовый сервер:
Чтобы запустить сервер с помощью команды nc, используйте команду ниже в терминале системы B
На данный момент у этой команды нет выходных данных для отображения. Это просто режим прослушивания порта 9999.
Стартовый клиент:
Чтобы подключиться к серверу с помощью команды nc, используйте команду ниже в терминале системы A
Теперь система A должна подключиться к системе B. Итак, мы предоставили IP-адрес сервера и номер порта.
Проверьте подключение:
Мы можем проверить приведенную ниже команду для подтверждения о подключении клиента к порту сервера.

Отправлять UDP-пакеты:
Теперь мы можем отправить пакет udp из системы A в систему B и наоборот.
Теперь перейдите в систему A и отправьте любые предложения вроде
«Привет, я из LinuxHint [Система A 192.168.1.6] »

Мы должны увидеть это на стороне Системы B. Вот скриншот

Мы также можем отправлять UDP-пакеты из Системы B в Систему A.
Перейдите в систему B и отправьте предложение вроде
«Привет, я из LinuxHint [Система B 192.168.1.102] «
Вот скриншот из Системы B

Вот скриншот из Системы А

Проверяем пакеты в Wireshark:
Теперь, когда мы отправляем UDP-пакеты из системы A в систему B и наоборот, мы можем запустить Wireshark либо в системе A, либо в системе B. Здесь у нас есть файл захвата, давайте проведем некоторый анализ и подтвердим, использует ли этот сервер и клиент для связи протокол UDP.
Обратите внимание, что мы проанализируем только первое сообщение:
Система A отправила:
«Привет, я из LinuxHint [Система A 192.168.1.6] »
Мы будем использовать фильтр «UDP.порт == 9999 ” чтобы получить только связанные пакеты в Wireshark. См. Снимок экрана ниже для анализа захвата Wireshark:
Чтобы узнать, как использовать Wireshark, перейдите по ссылке ниже
https: // linuxhint.ru / wirehark_basics_how_to_use /
Другая команда для отправки пакетов UDP:
Есть еще один способ отправки UDP-пакетов
Запустите сервер в системе B:
Выполните команду ниже в системе A:
$ echo -n «привет»> / dev / udp / 192.168.1.102/8000
192.168.1.102: IP системы B
8000: порт сервера
Сообщение отправлено: «привет»
Но мы можем послать только один раз «привет». Если мы убьем сервер и перезапустим его, он заработает.
Заключение:
Из приведенного выше упражнения мы узнали механизм отправки некоторых сообщений по протоколу UDP. И лучший способ — использовать NC команда в Linux.
Рекомендации:
Чтобы понять TCP: https: // linuxhint.ru / tcp_packet_capture_analysis /
Чтобы понять UDP: https: // linuxhint.ru / udp_wireshark_analysis /

Игры
Игры для Linux получили серьезный толчок, когда Valve объявила о поддержке Linux для клиента Steam и своих игр в 2012 году. С тех пор многие игры AAA .

Игры
Введение в игру Civilization 6 — это современный подход к классической концепции, представленной в серии игр Age of Empires. Идея была довольно просто.

Игры
Введение в Doom Серия Doom возникла в 90-х годах после выхода оригинальной Doom. Это мгновенно стал хитом, и с тех пор серия игр получила множество на.
Свежие статьи об операционных системах. Множество интересных гайдов и полезных советов. Почувствуйте себя своим в мире современных технологий