- Setup a Linux server as a NAT router to share the Internet | 1 Easy guide
- Current Setup
- Enable Module
- Temporary Traffic forwarding
- Permanent Traffic forwarding
- Post routing and forwarding for NAT Router
- Client-Side Configuration
- Configuring forwarder DNS
- Conclusion:
- How to build Linux Router with Ubuntu Server 20.04 LTS
- How to build Linux Router with Ubuntu Server 20.04 LTS
Setup a Linux server as a NAT router to share the Internet | 1 Easy guide
In todays guide we are about to see how to setup our Linux server as a NAT router to share the internet with other hosts in the same network.
Few of my Linux servers are in a restricted environment and not allowed to connect with the internet directly. In this case, I need to share the Internet from my Linux Desktop or from a Linux Server to the remaining hosts by configuring it as a NAT router.
Back in the days, while configure squid serves we used to play with the IPtables a lot, thus this setup can be done in just three steps.
Current Setup
For Instance, my Linux Desktop or Linux Server1 have two interfaces.
- ens18 connected to the ISP Router and getting IP from the DHCP.
- ens19 connected to my LAN network with IP address 192.168.100.10, this is manually configured.
Remaining nodes in my network have only one interface with IP 192.168.100.0/24 range.
To make things easier to understand let’s keep things like this. Assume Linux Desktop or Linux Server as Server1 and remaining nodes as server2, 3 etc.
Enable Module
Load the module for NAT using modprobe command. Mostly in nowadays Linux distribution it will be loaded by default.
$ sudo modprobe iptable_natTemporary Traffic forwarding
Configure kernel parameters at runtime to forward the traffics, Enable the forwarding by appending 1 to the temporary /proc filesystem, Once we reboot the server this change will not be available. So, to make the changes persistent across reboot, make sure to use the next step.
# echo 1 > /proc/sys/net/ipv4/ip_forward or # sysctl -w net.ipv4.ip_forward=1
Permanent Traffic forwarding
If you need to make the persistent changes across the reboot, add the below entry to /etc/sysctl.conf
# echo "net.ipv4.ip_forward = 1" >> /etc/sysctl.conf
To make the changes without taking a reboot, run the below command.
Post routing and forwarding for NAT Router
Add the IPtables rules to do a post routing and forwarding the traffics, In your setup the interface name will differ, make sure to replace the interface name with yours.
# iptables -t nat -A POSTROUTING -o ens18 -j MASQUERADE # iptables -A FORWARD -i ens19 -j ACCEPT
That’s it, we have completed with the required changes in Server 1 side.
Client-Side Configuration
In other nodes the config should be like below, Print the current route
[root@server2 ~]# route -n Kernel IP routing table Destination Gateway Genmask Flags Metric Ref Use Iface 0.0.0.0 192.168.100.1 0.0.0.0 UG 100 0 0 ens18 192.168.100.0 0.0.0.0 255.255.255.0 U 100 0 0 ens18 [root@server2 ~]#
The nodes may have interface with IP 192.168.100.11, 12, 13 or something else, Change the default route with IP address of Server 1.
Once again print and verify to confirm the deleted default route
[root@server2 ~]# route -n Kernel IP routing table Destination Gateway Genmask Flags Metric Ref Use Iface 192.168.100.0 0.0.0.0 255.255.255.0 U 100 0 0 ens18 [root@server2 ~]#
Add a new default gateway for the interface, The gateway IP should be the IP of Server 1
# route add default gw 192.168.100.10 dev ens18
Print to verify the router using # route -n command
[root@server2 ~]# route add default gw 192.168.100.10 dev ens18 [root@server2 ~]# [root@server2 ~]# route -n Kernel IP routing table Destination Gateway Genmask Flags Metric Ref Use Iface 0.0.0.0 192.168.100.10 0.0.0.0 UG 100 0 0 ens18 192.168.100.0 0.0.0.0 255.255.255.0 U 100 0 0 ens18 [root@server2 ~]#That’s it, We are now connected to the internet.
Configuring forwarder DNS
Till the above steps we are good with connecting to the internet, however, when we try to access any web URL it should look for the name resolution by forwarding the request to a DNS server. To do so, we need to configure with the domain name and the IP of the DNS server which helps to forward the queries.
Configure the interface with DNS, Edit the interface configuration file or use nmcli command to add the DNS.
# ls -lthr /etc/sysconfig/network-scripts/ifcfg-ens18
DOMAIN=linuxsysadmins.localVerify the same in resolv.conf
# cat /etc/resolv.conf root@server2 ~]# cat /etc/resolv.conf # Generated by NetworkManager search linuxsysadmins.local nameserver 192.168.0.21 nameserver 192.168.0.1 [root@gateway ~]#
Now, we are good with internet and name resolution.
That’s it we have successfully configured our existing Linux Desktop or Server as a NAT router to share the internet.
Conclusion:
Sharing the internet from an existing Linux Desktop to any NIX based servers or to windows based Desktop/Server is easy. It can be configured in a few steps by adding NAT router forwarding rules. Subscribe to our newsletter and find more relevant how-to-guides on upcoming posts. Your feedbacks are welcome through the below command section.
I followed the procedures and successfully loaded some weird 8081 port configurations needed for the app, however I discovered it…
tried many times — followed all steps but was unable to setup custom context I always get -> The connection…
Hello Babin Lonston, Your tutorial is very helpful to me to Install the prometheus and nodeexporter on the server. Can…

How to build Linux Router with Ubuntu Server 20.04 LTS
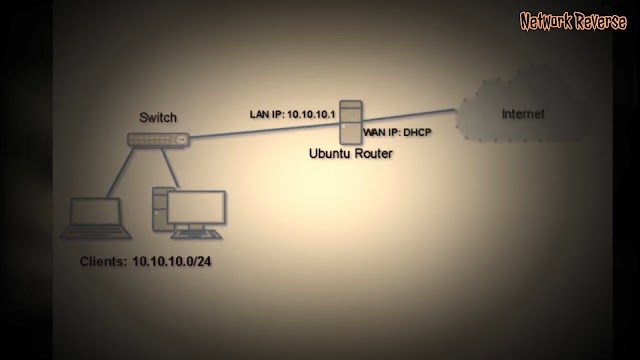
Linux router configuration is simple, you just need to make sure the router have two interfaces that connected to the network that will be routed, enable packet forwarding and iptables for NAT if needed. There are more advanced configuration, but in this post we will build Linux router on Ubuntu Server 20.04 to allow LAN traffic through to internet on WAN interface with NAT.
How to build Linux Router with Ubuntu Server 20.04 LTS
Ubuntu Server 20.04 comes with netplan as default network interface configuration tool.If you are not familiar with netplan please read the previous post about Ubuntu Server 20.04 LTS — Basic Network Configuration with netplan.
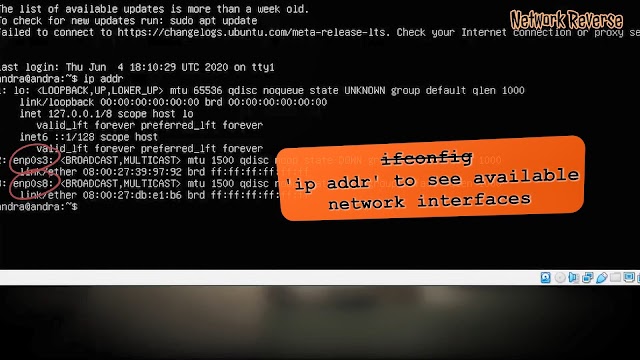
- enp0s3 is the WAN interface, it will be configured to obtain IP address from DHCP server.
- enp0s8 is the LAN interface, it will be configured to use 10.10.10.1/24 IP address.
nano /etc/netplan/anything.yaml
This configuration below addedd interface enp0s3 to obtain dhcp and enp0s8 to use 10.10.10.1/24 IP address. Just add lines that red colored to your configuration file, if it is a newly installed Ubuntu Server.
network: version: 2 renderer: networkd ethernets: enpos3: dhcp4: yes enp0s8 addresses: - 10.10.10.1/24 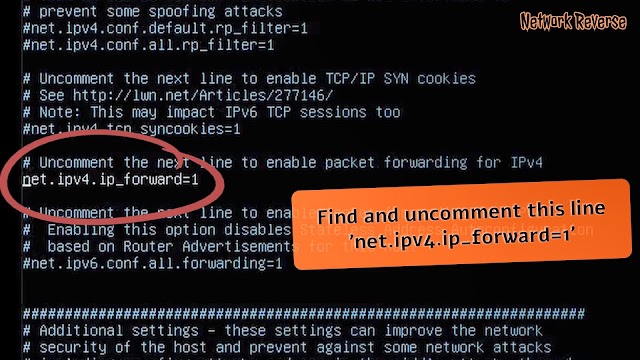
iptables -t nat -A POSTROUTING -j MASQUERADE
iptables command line will not be saved after the system reboot, there are many ways to make it persistent after reboot. This time we will use the easiest way to install iptables-persistent package to the Ubuntu server.
apt update -y && apt install iptables-persistent
It will asks you to save the current ipv4 and ipv6 iptables rules, answer yes to save it or no to save it later.
iptables-save > /etc/iptables/rules.v4 This command will save the iptables rules to /etc/iptables/rules.v4 , where later it will be restored by iptables-persistent on every reboot.
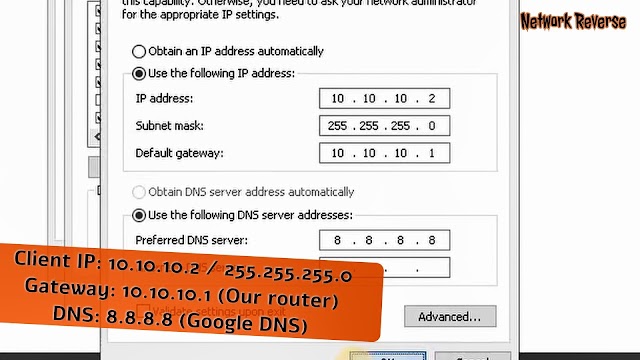
If all going well, we have finished building Linux Router with Ubuntu Server 20.04 LTS. According to the topology, the clients use 10.10.10.0/24 network address. So configure the clients accordingly.
You can watch all the activity above on building Linux Router with Ubuntu Server 20.04 LTS from this youtube video below. If you still have any problems, please put your comments.
