- How To Back Up A Linux Server
- #Backing Up The Server With The Tar Method
- #Tar Command for Creating Backup
- #Tar Command for Extraction
- #Backing up the Server with Bera Backup
- #Features of Bera Backup
- #Bera Backup Properties
- #The Command for Creating Backup
- #The command for Restoring Backup
- #Conclusion
- Marius Rimkus
- Join Cherry Servers Community
- Backup and Restore Your Linux System with rsync
- Video Tutorial
- Making the backup with rsync
- Restore the backup with rsync
- Conclusion
How To Back Up A Linux Server

With the growth of public cloud infrastructures, Linux has risen in importance as the most compatible open-sourced operating system that takes full advantage of what the cloud has to offer by stretching its capabilities.
Linux servers are known for providing high-end security, and that’s why many developers use these to keep backups of their sites. Just like conventional open-sourced Linux systems, these servers are chosen for their stability, security, and flexibility advantages.
Backups are important because they help prevent permanent loss of valuable data, making it imperative for system admins to know all their Linux server backup options. This is even more critical for people who work with enterprise-level data.
However, with security and flexibility as its attributes, backing up a Linux server is not easy. Several utilities and software can be used, and we’ll show you how to make backups using two of the easiest methods: the ‘Tar’ approach and the ‘Bera’ backup method.
#Backing Up The Server With The Tar Method
For this tutorial, we opt for an Ubuntu operating system, one of the more popular Linux-based servers used.
#Tar Command for Creating Backup
sudo tar –cvpzf backup.tar.gz –exclude=/home/server/backup.tar.gz –one-file-system This is a simple tar command that initiates backup. It will archive all the files you have on your server into a g-zipped compressed format. We’ve chosen backup.tar as the name for your backup and wrote -exclude to not ‘include’ this backup into a backup created earlier.
This command will also create a new directory for you to back up your Linux server as file permissions are preserved. This makes it easier to not only restore your server but save time configuring files and folders the way you opted initially.
After you’ve typed the code mentioned above, hit Enter .
You’ll see the system beginning to archive all the files on your server system. By backing up the root directory, it tends to recourse itself back into other previous directories.
Make sure your server is not performing maintenance procedures. Otherwise, the backup will take hours.
#Tar Command for Extraction
sudo tar –xvpzf /home/server/backup.tar.gz –C / --numeric-owner The system will start un-archiving as it overwrites all the files you backed up before and rewrite the files that were installed before if you had a functioning system.
In case of a complete system re-installation, all the files will be restored to how they were.
The -f option is for the name of the drive you used to store your backup. In this case, since it was Home-Back-Server chosen as the location and it was a root backup, try restoring it to the same folder to avoid confusions and simultaneously uncompressing the files too.
Once the extraction is finished, just reboot and your system will be restored to the way it was when you backed it up.
Note: You can also make backups and store them onto a USB drive, but it is not recommended if it is a massive backup, and the speed of the transfer will be slower as compared to a system-root/server location.
#Backing up the Server with Bera Backup
Bera Backup is a tool that can help make comprehensive Linux server backups and allows more file extensions than the normal Tar method.
This way, you can save a lot of time in case of server migration. The process is also more straightforward compared to the Tar method.
#Features of Bera Backup
You can migrate an entire server in less than ten minutes. The simplicity of the Bera backup tool makes it a much easier to understand method for backing up your server.
You can include tabs, folders, and receive periodic notifications during backups. Since Bera is based on RSync, the process is more secure than the conventional ‘Tar’ method.
#Bera Backup Properties
File Backups – For the important files and folders to include them in the backup
System Configurations – For Files like iptables, crontabs, users and all installed packages
#The Command for Creating Backup
./bera-backup.sh _path_config_backup Hit Enter and Bera will start with the backup process. You’ll see the program execute the following:
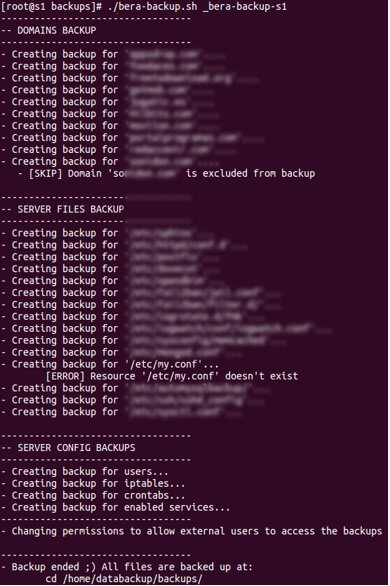
Note: It is highly recommended to have root permissions enabled before starting with the backup, to remove any permission problems that may occur during and after restoring the backup of your Linux server.
#The command for Restoring Backup
Type the following command:
./bera-restore.sh _path_config_restore Don’t forget the path you chose before you made the backup; this will replace ‘_path’ to extract the backup from the location.
While defining the backup, you can take your pick from several configurable parameters for server commands for Bera Restoration Procedure, these are highlighted below:
| Parameters | Description |
|---|---|
| backupOrigin | Indicates ‘local’ if the backup is on the server itself, or ‘ssh’ for download from another location |
| backupLocalDir | Local directory where the backup is (or where it will be downloaded via SSH). |
| backupRemoteUser | User for the SSH connection to the server where the backup is |
| backupremoteserver | Remote SSH server where the backup is |
| backupRemotePort | SSH server port |
| backupRemoteDir | Remote directory where the backup is |
#Conclusion
You should have website backups just for the peace of mind that your content is safe at all times.
Backups also help ensure that your website remains available to your visitors at all times, even if something terrible has happened.
Creating backups for your Linux server might seem complicated, but you can get the job done in a variety of ways. In addition to the methods mentioned above, also try Linux server backup tools such as Rsync Commands or Bacula and NAKIVO Hyper-V Backup for users using Hyper-V virtualized environments
While making backups is not difficult, choosing the right path and the right configurations is what gets challenging. It is also important to ensure that you don’t choose a cheap hosting service for your website.
If you’d like more information about using Linux Servers to their full potential or backing them up properly, get in touch with us today. Our Linux Server specialists are here to help you 24/7.

Marius Rimkus
I’m a keen technology enthusiast with strong interest in GPU computing and DevOps culture. I believe Agile development helps companies reach utmost customer satisfaction and makes their services stand out in the market.
Join Cherry Servers Community
Get monthly practical guides about building more secure, efficient and easier to scale systems on an open cloud ecosystem.
Backup and Restore Your Linux System with rsync

Rsync (Remote Sync) is a popular and powerful tool used to copy and synchronize files and directories between remote or local Linux/Unix systems. With the help of rsync, we can easily copy/synchronize data between local and remote directories, across different drives and networks.
In this tutorial, I will show you how to make a backup with rsync using the Linux terminal. If you prefer graphical programs, you can use rsync with graphical interface too.
Video Tutorial

Making the backup with rsync
To make this tutorial, I will use Arch Linux in a virtual machine built with VirtualBox. To simulate an external hard drive, I will connect a USB flash drive where the backup will be stored and then restored. I recommend you do the same to test your backup. This will give you the confidence to know that your backup works because an untested backup is not a backup.
For this case we will use this entire command:
sudo rsync -aAXv --delete --dry-run --exclude=/dev/* --exclude=/proc/* --exclude=/sys/* --exclude=/tmp/* --exclude=/run/* --exclude=/mnt/* --exclude=/media/* --exclude="swapfile" --exclude="lost+found" --exclude=".cache" --exclude="Downloads" --exclude=".VirtualBoxVMs"--exclude=".ecryptfs" / /run/media/alu/ALU/ To make a backup with rsync, we usually use the command line. I know that not everyone is confident with the command line tools, but you will realize that the process is not that complicated and you can also back up your system using the command line.
We now proceed to explain what this command means:
sudo — to execute the command as a superuser. Mandatory use.
rsync — is the program itself to use.
-A — preserve Access Control List.
-X — preserve extended attributes.
Basically, these three options mean to preserve all the attributes of your files. Owner attributes or permissions will not be modified during the backup process.
-v — It will show the progress of the backup.
—delete — this option allows you to make an incremental backup. That means, if it is not your first backup, it will backup only the difference between your source and the destination. So, it will backup only new files and modified files and it will also delete all the files in the backup which were deleted on your system. Be careful with this option.
—dry-run — This option simulates the backup. Useful to test its execution.
—exclude — Excludes folders and files from backup. I typed exclude as a separate option for every directory. You can also use it this way —exclude= . But make sure you change your working directory to root ( cd / ) before you run rsync, otherwise the joint exclude option may not work.
The excluded folders depend directly on each of us, however, the /dev/, /proc/, /proc/ /sys/ /tmp/ /run/ /mnt/ and /media folders are not important to backup because rsyn will not copy their content. /mnt/ it is vital to exclude them if we connect a USB memory.
/run/media/alu/ALU — This is where you what to backup. I recommend to enrypt the destination, to make your data safe.
We press enter, the command will execute in a simulation mode (because of the —dry-run option) This way we test it to make sure everything is okay. When you’re sure that everything is performed as you want, you remove —dry-run from the command and run it again.
Note: It is recommended that the backup drive has a Linux compatible file system as ext4.
Restore the backup with rsync
To restore the backup we have made, we are going to boot from a live ISO. Since we are working with Arch Linux, then the iso image must be from Arch Linux. Next, we must mount our USB flash drive.
Once logged in from the live image, we must create two folders, one for the system on the hard disk and the other where the backup created will be mounted:
Next, we need to check the names of our devices:
Then, we must mount the file system and the backup on the USB flash device:
mount /dev/sda1 /mnt/system mount /dev/sdb1 /mnt/usb 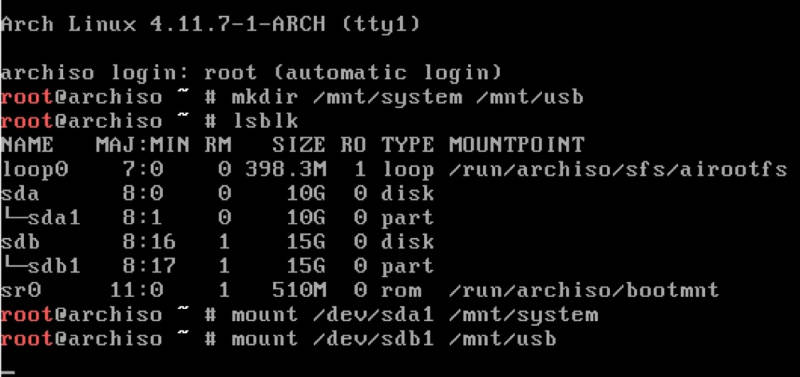
Finally, we proceed to perform the restoration of our backup. For this we run:
rsync -aAXv --delete --exclude="lost+found" /mnt/usb/ /mnt/system/ By running this command, we restore the backup of our system.
Conclusion
Rsync is a powerful tool that can be used from the command line, with multiple options that adapt to any need. You can of course use backup programs with graphical interface. There are also some really good non-open sources graphical backup programs.
Have you already done your backup? Let me know about your experience with rsync.
Please share this article through your social networks.
Average Linux UserFollow I am the founder of the Average Linux User project, which is a hobby I work on at night. During the day I am a scientist who uses computers to analyze genetic data.