- How to Install OpenSSH Server In Linux
- What is OpenSSH?
- Why Use OpenSSH Over Telnet Or Ftp?
- OpenSSH Features
- Install OpenSSH Server on Linux
- On Debian/Ubuntu/Linux Mint
- On RHEL/Centos/Fedora
- Configure OpenSSH Server in Linux
- How Do I Connect to OpenSSH
- Change SSH Port
- How to Compile and Install OpenSSH from Source in Linux
- Requirements:
- Install OpenSSH Server from Source
- Related Posts
- 25 thoughts on “How to Compile and Install OpenSSH from Source in Linux”
How to Install OpenSSH Server In Linux
Being a network administrator requires deep knowledge of remote login protocols such as rlogin, telnet, and ssh. The one I will discuss in this article is ssh.
SSH is a secure remote protocol that is used to work remotely on other machines or transfer data between computers using SCP (Secure Copy) command. But, what is OpenSSH, and how to install it in your Linux distribution?
What is OpenSSH?
OpenSSH is a free open-source set of computer tools used to provide secure and encrypted communication over a computer network by using the ssh protocol. Many people, new to computers and protocols, create a misconception about OpenSSH, they think it is a protocol, but it is not, it is a set of computer programs that use the ssh protocol.
OpenSSH is developed by the Open BSD group and it is released under a Simplified BSD License. A main factor that has made it possible for OpenSSH to be used so much among system administrators is its multi-platform capability and very useful nice features it has.
The latest version is OpenSSH 9.3 which has been released on 15 March 2023 and comes with many new features and patches, so if you already use OpenSSH for administering your machines, I suggest you do an upgrade or install ssh from the source.
Why Use OpenSSH Over Telnet Or Ftp?
The most important reason why one should use OpenSSH tools over ftp and Telnet is that all communications and user credentials using OpenSSH are encrypted, and they are also protected from man-in-middle attacks. If a third party tries to intercept your connection, OpenSSH detects it and informs you about that.
OpenSSH Features
- Secure Communication
- Strong Encryption (3DES, Blowfish, AES, Arcfour)
- X11 Forwarding (encrypt X Window System traffic)
- Port Forwarding (encrypted channels for legacy protocols)
- Strong Authentication (Public Key, One-Time Password, and Kerberos Authentication)
- Agent Forwarding (Single-Sign-On)
- Interoperability (Compliance with SSH 1.3, 1.5, and 2.0 protocol Standards)
- SFTP client and server support in both SSH1 and SSH2 protocols.
- Kerberos and AFS Ticket Passing
- Data Compression
Install OpenSSH Server on Linux
To install OpenSSH, open a terminal and run the following commands with superuser permissions.
On Debian/Ubuntu/Linux Mint
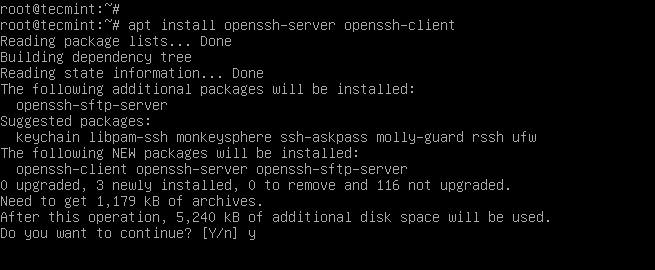
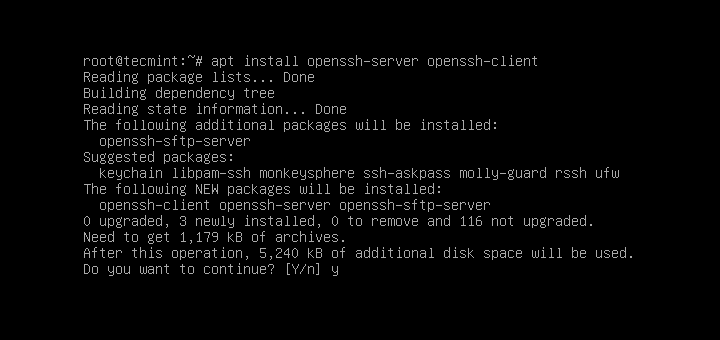
On Debian-based distributions, you can use the following apt command to install the openssh server and client as shown.
$ sudo apt install openssh-server openssh-client
On RHEL/Centos/Fedora
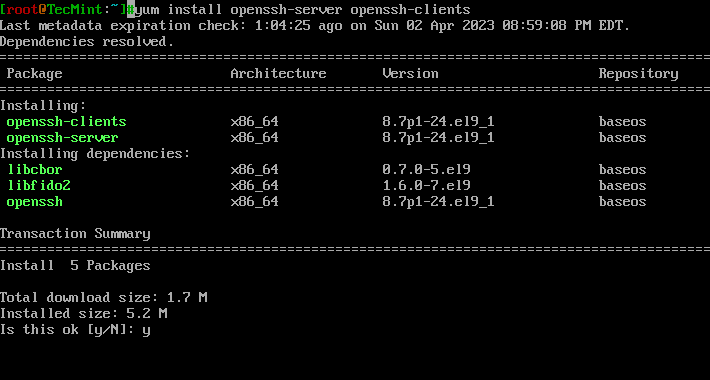
On RedHat-based distribution, type the following yum command to install the openssh server and client.
# yum -y install openssh-server openssh-clients
Configure OpenSSH Server in Linux
It’s time to configure our OpenSSH behavior through the ssh config file, but before editing the /etc/ssh/sshd_config file we need to back up a copy of it, so in case we make any mistake we have the original copy.
Open a terminal and run the following cp command to make a copy of the original sshd configuration file.
$ sudo cp /etc/ssh/sshd_config /etc/ssh/sshd_config.original_copy
As you can see from the command I typed, I added the original_copy suffix, so every time I see this file I know it is an original copy of the sshd config file.
How Do I Connect to OpenSSH
Before we go further, we need to verify if our openssh server is working or not. How to do that? You can try to connect to the openssh server from your localhost through your openssh client or do a portscan with nmap, but I like to use a small tool called netcat, also known as the TCP/IP Swiss army knife. I love working with this amazing tool on my machine, so let me show it to you.

Referring to the netcat results, the ssh service is running on port 22 on my machine. Very good! What if we want to use another port, instead of 22? We can do that by editing the sshd configuration file.
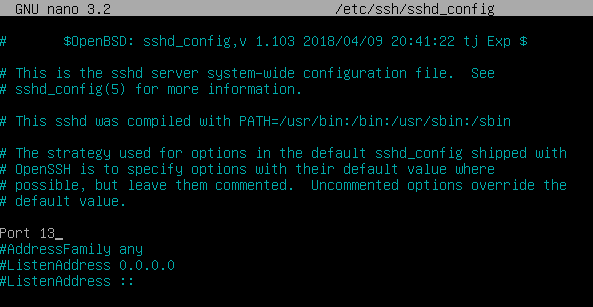
Change SSH Port
Set your OpenSSH to listen on TCP port 13 instead of the default TCP port 22. Open the sshd_config file with your favorite text editor and change the port directive to 13.
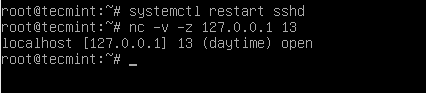
Restart the OpenSSH server so the changes in the config file can take place by typing the following command and running netcat to verify if the port you set for listening is open or not.
$ sudo systemctl restart sshd
Should we verify if our openssh server is listening on port 13, or not? This verification is necessary, so I am calling my lovely tool netcat to help me do the job.
Do you like to make your openssh server display a nice login banner? You can do it by modifying the content of the /etc/issue.net file.
Paste the following banner message.
Authorized access only! If you are not authorized to access or use this system, disconnect now!
Next, add the following line inside the sshd configuration file.
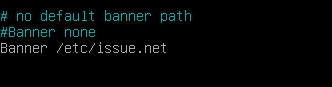
After making changes to the SSH configuration, make sure to restart.
$ sudo systemctl restart sshd
You might also like:
Conclusion
There are many things you can do with the openssh tools when it comes to the way you configure your openssh server, I can say that your imagination is the limit!
How to Compile and Install OpenSSH from Source in Linux
OpenSSH is a free and open source, full implementation of the SSH protocol 2.0, which provides a number of tools for securely accessing and managing remote computer systems, and managing authentications keys, such as ssh (a secure replacement for telnet), scp, sftp (secure replacement for ftp), ssh-keygen, ssh-copy-id, ssh-add, and more.
Recently OpenSSH 9.3 was released and ships with many new features and bug fixes; you can read the SSH release notes for more information.
In this article, we will explain how to install and configure the latest version of the OpenSSH server and client on a Linux system from sources. We assume that you have an existing installation of the OpenSSH suite.
Requirements:
- A Debian/Ubuntu or RHEL/CentOS Linux system
- C compiler
- Zlib 1.1.4 or 1.2.1.2 or greater
- LibreSSL or OpenSSL >= 1.0.1 < 1.1.0
Install OpenSSH Server from Source
Before installing the latest version of SSH, make sure to check the current version of SSH installed on your system using the following command.
$ ssh -V OpenSSH_7.7p2 Ubuntu-4ubuntu2.5, OpenSSL 1.0.2g 1 Mar 2016
From the above result, the installed OpenSSH version is 7.7, to install the latest OpenSSH version, first, you need to install a few dependencies, i.e development tools or build essentials and the other required packages, as follows.
-------------- On RedHat-based Distros -------------- $ sudo yum update $ sudo yum group install 'Development Tools' $ sudo yum install zlib-devel openssl-devel -------------- On Debian-based Distros -------------- $ sudo apt update $ sudo apt install build-essential zlib1g-dev libssl-dev
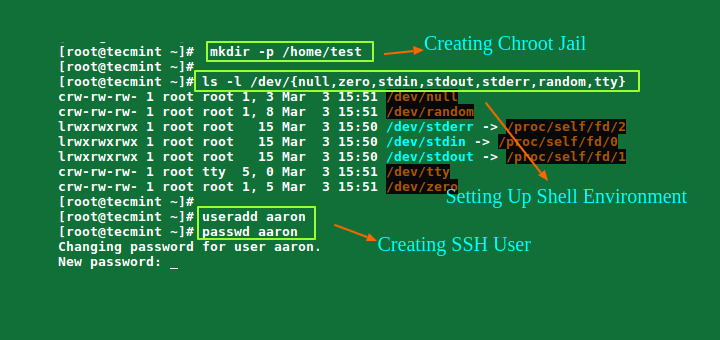
To create a proper environment for installing the OpenSSH server, we need to create a new system user and group named “sshd”, as well as a safe place to chroot.
Note: Generally, if you have an existing installation, this environment should already be in place, you can skip this section and go to the next. Otherwise, run the following commands to set it up.
$ sudo mkdir /var/lib/sshd $ sudo chmod -R 700 /var/lib/sshd/ $ sudo chown -R root:sys /var/lib/sshd/ $ sudo useradd -r -U -d /var/lib/sshd/ -c "sshd privsep" -s /bin/false sshd
Explaining the flags in the useradd command above:
- -r – tells useradd to create a system user
- -U – instructs it to create a group with the same name and group ID
- -d – specifies the user’s directory
- -c – used to add a comment
- -s – specifies the user’s shell
Now, download the tarball of OpenSSH version 9.3 from any of the available HTTP mirrors or you can use the following wget command to download directly in your terminal.
$ wget -c https://cdn.openbsd.org/pub/OpenBSD/OpenSSH/portable/openssh-9.3p1.tar.gz $ tar -xzf openssh-9.3p1.tar.gz $ cd openssh-9.3p1/
Now we will build and install the OpenSSH server using the —with-md5-passwords , —with-privsep-path and —sysconfdir options, which will install all the files in /usr/local/ (this is the default installation PREFIX).
You can see all available options by running ./configure -h and customizing your installation further.
For instance, to enable PAM and SELinux support, add the —with-pam and —with-selinux options, respectively, you need to install all the necessary header files for them to work.
## Install PAM and SELinux Headers ## $ sudo apt install libpam0g-dev libselinux1-dev [On Debian/Ubuntu] $ sudo yum install pam-devel libselinux-devel [On CentOS/RHEL] ## Compile and Install SSH from Sources ## $ ./configure --with-md5-passwords --with-pam --with-selinux --with-privsep-path=/var/lib/sshd/ --sysconfdir=/etc/ssh $ make $ sudo make install
Once you have installed OpenSSH, restart SSH or open another terminal window and check the version of OpenSSH now installed on your system.
$ ssh -V OpenSSH_9.3p1, OpenSSL 3.0.1 14 Dec 2021
The various OpenSSH configuration files are located at:
- ~/.ssh/* – this directory stores user-specific ssh client configurations (ssh aliases) and keys.
- /etc/ssh/ssh_config – this file contains system-wide ssh client configurations.
- /etc/ssh/sshd_config – contains sshd service configurations.
You might also like to read the following SSH-related articles.
That’s it! In this article, we’ve explained how to install and configure the latest version of the OpenSSH server from a source on a Linux system. If you have any questions or comments, use the feedback form below to reach us.
Aaron Kili is a Linux and F.O.S.S enthusiast, an upcoming Linux SysAdmin, web developer, and currently a content creator for TecMint who loves working with computers and strongly believes in sharing knowledge.
Each tutorial at TecMint is created by a team of experienced Linux system administrators so that it meets our high-quality standards.
Related Posts
25 thoughts on “How to Compile and Install OpenSSH from Source in Linux”
I have followed all the guides. As a non-root user, it can display OpenSSH v8, but when as a root user it still shows OpenSSH v7. What’s wrong with my installation? thanks. Reply
@Dani Check the PATH you installed in. The root user and a non-root user’s PATH is always different. Reply
The good day Aaron: Is the SSH server directory included when you download the Ubuntu OS? Subsequently, is the micro Linux text editor a separate directory contained within a specific Ubuntu distribution? Please reply. Reply
Ah Sorry guys Adrian – All hopes the errors can be found in my posted script – there are some errors and also Note: the actual .configure command-line for each stage – must be all one line or if an error is encounter – being a vi conditioned fossil Control-4 and Control-6, at a line in question will take you too the beginning and or end of line – seeing that if you do copy as such the actual command could be broken shown when actually executing the code, – do the control-4 to end of what chars in that command-line that is failing at that point control-j will pull up the break – x out 1 char space recreating the proper syntax line – most break at dash dash of an option. SSL is to have -fPIC. Be honest to say – each compile session can throw one for a loop. make clean after attempts can help – read the READMEs and INSTALLs in each package if your attempting my similar fate. One can use my script and remove most all between apt-get gcc* Up-Too part actually installing openssh-8.0p1 .. Adrian is correct – simple method and does work.. Thanks all and hope success. I have re-written parts of the script. I will not repost unless request too. Only then to ask Adrian if he can “Clean my previous bad post” – well its no totally bad – errors contained in another expression, I’ll end here. myScript does provide a good framework to build from. (meHacker) Reply
Thanks for posting my Script. Its vanilla to run – the Chk part is simply an Exit 0 status check for steps in process if that makes sense ( does to me so I know when the script runs each step is progressing correctly. All hopes all can learn and feel free to fix any errors or other mistakes I may have made – this does work on the last 4 installs I have performed. Free to learn from. Cheers. Reply