- «Server Refused our key» after launching instance from private EBS AMI
- 13 Answers 13
- Как настроить SSH сертификаты входа на Ubuntu
- Подготовка папок
- Предварительная настройка сервера
- Настройка SSH сертификатов на сервере
- Настройка подключения PuTTY
- Преобразуем приватный ключ в формат ключа PuTTY
- Настройка подключения PuTTY с использованием SSH сертификата
- Финальная настройка сервера
- SSH: «Server refused our key» with no reason
- Questions
«Server Refused our key» after launching instance from private EBS AMI
How do I make new instance from my image to accept new key-pairs? I even tried removing «.ssh/authorized_keys» file in original image, launch new instance based on this image without public key and still no success.
Please advise how to create images that would not be attached to old key-pairs
How did you create the new key-pair ? Did you let AWS create it or did you create it with some other tool ?
When you look in /home/ec2-user/.ssh/authorized_keys, do you see the new public key, your old personal key, or both ?
In both locations: «.ssh/authorized_keys» and » /home/ec2-user/.ssh/authorized_keys» only one — old personal public key
13 Answers 13
I had a similar problem with that error message and here is how I fixed it. Hope this helps you, or someone else who is stuck and finds their way here:
- In the AWS Console ensure your instance is healthy and running
- Check you have used the correct public DNS address, listed when you click on an instance
- Select Security Groups from left hand side and click on the security group you want to use
- Click the Inbound tab
- From the Create a new rule: dialog select SSH
- In source put your IP address and CIDR value. If its just you don’t have a NAT on your network just use 32 as your CIDR (eg. . /32)
- Click Add Rule
- Click Apply Rule Changes
- Right click on your instance and select Create Image (EBS AMI)
- Give it an Image Name in the Create Image wizard and click Create
- After a short time select AMI’s from the left hand nav bar in AWS console
- Right click on the new AMI and click Launch Instance
- On the Request Instances Wizard click Continue until you have to Create Key Pair
- Choose a key pair and make note of it (NOTE: If you haven’t still got your .pem file for this key pair you will need to generate a new one from selecting Key Pairs on left hand navbar, Create Key Pair etc. to obtain .pem file)
- Select security group with the rule you created for your IP address (and CIDR of 32 — no subnet mask)
- Click continue, and on the next screen click Launch
- Go back to the Instances view and wait until your Instance is fully initialized and healthy
- Open PuttyGEN
- Click Conversions from the Toolbar, and Import Key
- Navigate to your .pem key in the file browser and open it
- Select SSH-1 (RSA) from the Parameters box
- Put your key pair name in the Key comment box (just for good house keeping)
- Click Save private key and save the .ppk file somewhere on your file system
- Open Putty
- Enter the public DNS for your EC2 instance in the Host Name box
- Enter port 22
- Tick SSH radio button from the Connection Type box
- Click on SSH from the Connection tree in the left hand side nav bar
- Click on Auth
- Click Browse in the Authentication parameters box, and open your .ppk file
- Click Session from the left hand nav bar
- Enter a name for this connection in the Saved Sessions text box, and click Save (this is so you don’t have to go through the putty connection set up each time, and can just double click your saved connection — for those unaware)
- Click Open
- When prompted for a login name you will probably use ‘ec2-user’ or ‘ubuntu’ (TIP: use ‘root’ and you will probably get a message telling you what username you should use instead!)
- No need for a password, the .ppk file will authenticate you
- Hopefully, you’re now connected to the EC-2 instance and good to go!
«TIP: use ‘root’ and you will probably get a message telling you what username you should use instead!» — very creative!
Как настроить SSH сертификаты входа на Ubuntu
Настройка входа на сервер используя SSH сертификаты, является отличным способом повышения безопасности сервера (перебор паролей SSH станет бесполезным). А использование пароля для приватного сертификата снизит риск взлома ключей (при копировании сертификата входа).
В инструкции рассматриваются вопросы создания и настройки SSH сертификатов на сервере Ubuntu 18 и клиентском приложении — PuTTY.
Подготовка папок
Выполняем подготовку папок и файла ключа на сервере.
Важный момент при настройке авторизации SSH по ключам — это указать правильные Права доступа на папку и файл ключа.
chmod 0644 ~/.ssh/authorized_keys
Предварительная настройка сервера
Разрешим вход с использованием публичного сертификата SHH на сервер и укажем путь до сертификата в настройках SSH, файл sshd_config.
Раскомментируйте или добавьте значения:
PubkeyAuthentication yes AuthorizedKeysFile .ssh/authorized_keys
Настройка SSH сертификатов на сервере
Выполним генерацию ключей SSH.
ssh-keygen -a 1000 -b 4096 -o -t rsa
Укажем путь хранения ключа и его имя
? В моем случае при создании сертификата для root оказалось важным указать жесткий путь /root/.ssh/, вместо относительного ~/.ssh/ чтобы избежать ошибки SSH Server refused our key.
Система так же создаст публичный ключ по данному пути.
Указываем ключевую фразу для доступа к приватному ключу.
Добавляем содержимое файла публичного ключа к файлу сертификата авторизации SSH.
cat ~/.ssh/id_rsa.pub >> ~/.ssh/authorized_keys
Настройка подключения PuTTY
Преобразуем приватный ключ в формат ключа PuTTY
? При попытке использовать скопированный ключ, PuTTY покажет ошибку: Unable to use key file (OpenSSH SSH-2 private key (new format)).
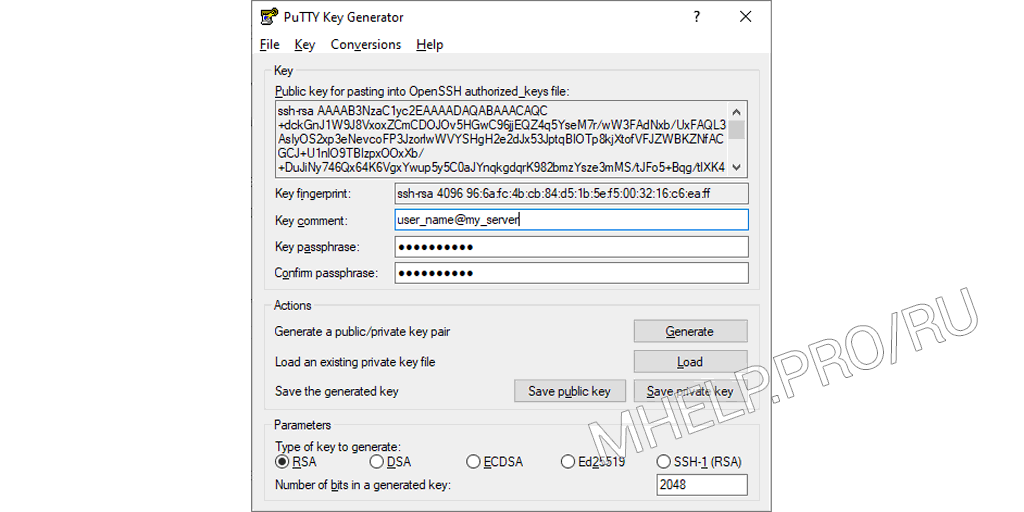
- Скопируйте приватный ключ id_rsa (или содержимое ключа в файл) на локальный компьютер;
- Запустите программу puttygen (из папки PuTTY);
- Нажмите кнопку Load и выберите файл приватного ключа;
- Введите пароль на приватный сертификат;
- Нажмите Save private key для сохранения приватного ключа в нужном формате (вы можете изменить Key comment, это не повлияет на работу ключа).
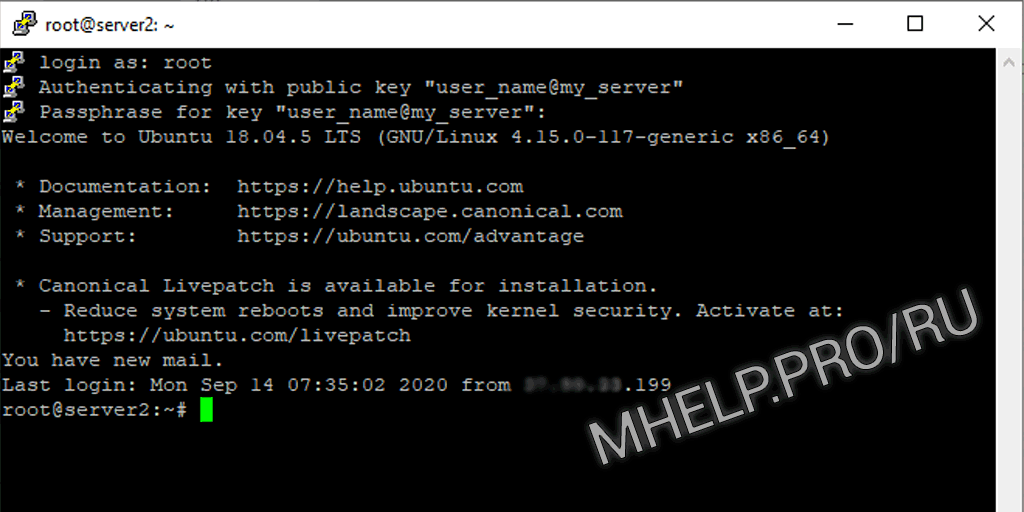
Настройка подключения PuTTY с использованием SSH сертификата
Добавьте приватный сертификат в подключение:
Connection > SSH > Auth > Private key file for authentication
При успешном подключении после ввода имени пользователя, выйдет запрос ключевой фразы сертификата, после чего вход на сервер должен быть успешно выполнен.
? Если при входе на сервер вы получаете сообщение SSH Server refused our key, проверьте правильность прав на папку .ssh и файл authorized_keys, а так же что вы входите под тем именем пользователя, в authorized_keys которого добавлен ваш ключ.
Финальная настройка сервера
Последний шаг настройки SSH — отключение возможности входа на сервер по паролю, в файле конфигурации.
Раскомментируйте или добавьте значениe:
PasswordAuthentication no
После чего перезапустите службу SSH.
Настройка авторизации по сертификату SSH — завершена!
Как настроить SSH сертификаты для входа на Ubuntu сервер и вариант исправить ошибку SSH Server refused our key , обсуждалось в этой статье. Я надеюсь, что теперь вы сможете настроить вход на сервер и клиент SSH с использованием сертификатов. Однако, если вы столкнетесь с каким-то проблемами при настройке сервера и клиента SSH, не стесняйтесь написать в комментариях. Я постараюсь помочь.
SSH: «Server refused our key» with no reason
I was trying to set up a simple backup script to run automatically that would copy a file from a Windows machine to a Linux one through SSH. As a lot of simple online tutorials suggest I used pscp with a private key generated with puttygen and placed the corresponding public key (presented in copy/paste form by putty itself) in the authorized_keys file in Linux. This seems pretty straightforward considering that it worked in 2 other windows machines to a different Linux machine, with the same configuration. There are no connectivity issues AFAICS and the same goes for ssh, considering I’m able to log in as root to the Linux machine. The config file ( sshd_config ) has the AuthorizedKeysFile set to ~/.sshd/authorized_keys . The error «Server refused our key» keeps showing up, no matter what I do. The logs don’t show any authentication problems. I’m planning to do more testing and setting the logLevel value to VERBOSE or DEBUG2 or 3 but considering the urgency of the matter and the fact that in order to actually test it on the machine I have to go through a lot of hassle considering the machine is in a place that is quite distant from my actual workplace.
Questions
It seems like this might actually be a problem related to ssh versions or something of the sorts.
I was also considering the possibility that I need to have the public key inserted in the authorized_keys file inside the user’s .ssh directory ( /user/.ssh/ ) besides having it in root’s folder (doesn’t make much sense because of the value of AuthorizedKeysFile in sshd_config ).
I’ve done some teting with the ssh server’s LogLevel set o VERBOSE but I could’nt retrieve the information (liability issues), so instead here goes an output/debug log from another source which seems to be displaying the same error.
Connection from 192.168.0.101 port 4288 debug1: Client protocol version 2.0; client software version OpenSSH_4.5 debug1: match: OpenSSH_4.5 pat OpenSSH* debug1: Enabling compatibility mode for protocol 2.0 debug1: Local version string SSH-2.0-OpenSSH_4.5 debug1: permanently_set_uid: 22/22 debug1: list_hostkey_types: ssh-rsa,ssh-dss debug1: SSH2_MSG_KEXINIT sent debug1: SSH2_MSG_KEXINIT received debug1: kex: client->server aes128-cbc hmac-md5 none debug1: kex: server->client aes128-cbc hmac-md5 none debug1: SSH2_MSG_KEX_DH_GEX_REQUEST received debug1: SSH2_MSG_KEX_DH_GEX_GROUP sent debug1: expecting SSH2_MSG_KEX_DH_GEX_INIT debug1: SSH2_MSG_KEX_DH_GEX_REPLY sent debug1: SSH2_MSG_NEWKEYS sent debug1: expecting SSH2_MSG_NEWKEYS debug1: SSH2_MSG_NEWKEYS received debug1: KEX done debug1: userauth-request for user dcowsill service ssh-connection method none debug1: attempt 0 failures 0 debug1: PAM: initializing for "dcowsill" debug1: userauth-request for user dcowsill service ssh-connection method publickey debug1: attempt 1 failures 1 debug1: test whether pkalg/pkblob are acceptable debug1: PAM: setting PAM_RHOST to "192.168.0.101" debug1: PAM: setting PAM_TTY to "ssh" debug1: temporarily_use_uid: 1052/105 (e=0/0) debug1: trying public key file /testuser/.ssh/authorized_keys debug1: restore_uid: 0/0 debug1: temporarily_use_uid: 1052/105 (e=0/0) debug1: trying public key file /testuser/.ssh/authorized_keys debug1: restore_uid: 0/0 Failed publickey for dcowsill from 192.168.0.101 port 4288 ssh2 debug1: userauth-request for user dcowsill service ssh-connection method publickey debug1: attempt 2 failures 2 debug1: test whether pkalg/pkblob are acceptable debug1: temporarily_use_uid: 1052/105 (e=0/0) debug1: trying public key file /testuser/.ssh/authorized_keys debug1: restore_uid: 0/0 debug1: temporarily_use_uid: 1052/105 (e=0/0) debug1: trying public key file /testuser/.ssh/authorized_keys debug1: restore_uid: 0/0 Failed publickey for dcowsill from 192.168.0.101 port 4288 ssh2 Connection closed by 192.168.0.101 It seems like the program is trying to open the authorized_keys file with permissions from the owner, but then there is no more information on what is generating the problem. One last thing, I’ve checked and double-checked the file and foler permissions and they’re all ok.