- Chapter 1. Getting started using the RHEL web console
- 1.1. What is the RHEL web console
- 1.2. Installing and enabling the web console
- 1.3. Logging in to the web console
- 1.4. Changing the default style setting for the web console
- 1.5. Disabling basic authentication in the web console
- 1.6. Connecting to the web console from a remote machine
- 1.7. Logging in to the web console using a one-time password
- 1.8. Rebooting the system using the web console
- 1.9. Shutting down the system using the web console
- 1.10. Configuring time settings using the web console
- 1.11. Joining a RHEL 8 system to an IdM domain using the web console
- 1.12. Disabling SMT to prevent CPU security issues using the web console
- 1.13. Adding a banner to the login page
- 1.14. Configuring automatic idle lock in the web console
Chapter 1. Getting started using the RHEL web console
Install the web console in Red Hat Enterprise Linux 8 and learn how to add remote hosts and monitor them in the RHEL 8 web console.
Prerequisites
- Installed Red Hat Enterprise Linux 8.
- Enabled networking.
- Registered system with appropriate subscription attached. To obtain a subscription, see Managing subscriptions in the web console.
1.1. What is the RHEL web console
The RHEL web console is a Red Hat Enterprise Linux web-based interface designed for managing and monitoring your local system, as well as Linux servers located in your network environment.
The RHEL web console enables you to perform a wide range of administration tasks, including:
- Managing services
- Managing user accounts
- Managing and monitoring system services
- Configuring network interfaces and firewall
- Reviewing system logs
- Managing virtual machines
- Creating diagnostic reports
- Setting kernel dump configuration
- Configuring SELinux
- Updating software
- Managing system subscriptions
The RHEL web console uses the same system APIs as you would in a terminal, and actions performed in a terminal are immediately reflected in the RHEL web console.
You can monitor the logs of systems in the network environment, as well as their performance, displayed as graphs. In addition, you can change the settings directly in the web console or through the terminal.
1.2. Installing and enabling the web console
To access the RHEL 8 web console, first enable the cockpit.socket service.
Red Hat Enterprise Linux 8 includes the RHEL 8 web console installed by default in many installation variants. If this is not the case on your system, install the cockpit package before enabling the cockpit.socket service.
- If the web console is not installed by default on your installation variant, manually install the cockpit package:
# yum install cockpit # systemctl enable --now cockpit.socket # firewall-cmd --add-service=cockpit --permanent # firewall-cmd --reload
Verification steps
1.3. Logging in to the web console
Use the steps in this procedure for the first login to the RHEL web console using a system user name and password.
Prerequisites
- Use one of the following browsers to open the web console:
- Mozilla Firefox 52 and later
- Google Chrome 57 and later
- Microsoft Edge 16 and later
- In your web browser, enter the following address to access the web console:
This provides a web-console login on your local machine. If you want to log in to the web console of a remote system, see Section 1.6, “Connecting to the web console from a remote machine”
After successful authentication, the RHEL web console interface opens.
To switch between limited and administrative access, click Administrative access or Limited access in the top panel of the web console page. You must provide your user password to gain administrative access.
1.4. Changing the default style setting for the web console
By default, the web console adopts its style setting from the setting of your browser. You can override the default style setting from your RHEL 8 web console interface.
Prerequisites
- Log in to the RHEL web console. For details, see Logging in to the web console.
- In the upper right corner, click the Session button.
- In the section Style , choose the preferred setting. The Default setting uses the same style setting as your browser.
Verification steps
1.5. Disabling basic authentication in the web console
You can modify the behavior of an authentication scheme by modifying the cockpit.conf file. Use the none action to disable an authentication scheme and only allow authentication through GSSAPI and forms.
Prerequisites
- The web console is installed and accessible. For details, see Installing the web console.
- You must have sudo privileges.
- Open or create the cockpit.conf file in the /etc/cockpit/ directory in a text editor of your preference.
# systemctl try-restart cockpit
1.6. Connecting to the web console from a remote machine
It is possible to connect to your web console interface from any client operating system and also from mobile phones or tablets.
Prerequisites
- Device with a supported internet browser, such as:
- Mozilla Firefox 52 and later
- Google Chrome 57 and later
- Microsoft Edge 16 and later
- Open your web browser.
- Type the remote server’s address in one of the following formats:
1.7. Logging in to the web console using a one-time password
If your system is part of an Identity Management (IdM) domain with enabled one-time password (OTP) configuration, you can use an OTP to log in to the RHEL web console.
It is possible to log in using a one-time password only if your system is part of an Identity Management (IdM) domain with enabled OTP configuration. For more information about OTP in IdM, see One-time password in Identity Management.
Prerequisites
- The RHEL web console has been installed. For details, see Installing the web console.
- An Identity Management server with enabled OTP configuration. For details, see One-time password in Identity Management.
- A configured hardware or software device generating OTP tokens.
- Open the RHEL web console in your browser:
- Locally: https://localhost:PORT_NUMBER
- Remotely with the server hostname: https://example.com:PORT_NUMBER
- Remotely with the server IP address: https://EXAMPLE.SERVER.IP.ADDR:PORT_NUMBER If you use a self-signed certificate, the browser issues a warning. Check the certificate and accept the security exception to proceed with the login. The console loads a certificate from the /etc/cockpit/ws-certs.d directory and uses the last file with a .cert extension in alphabetical order. To avoid having to grant security exceptions, install a certificate signed by a certificate authority (CA).
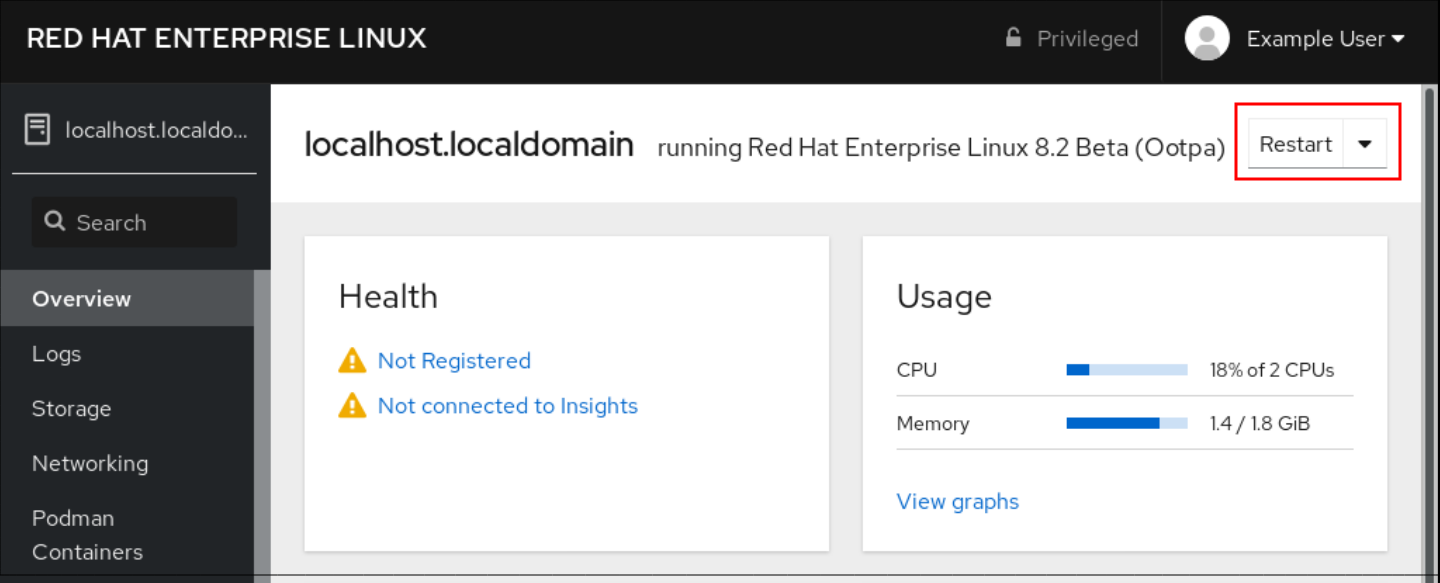
1.8. Rebooting the system using the web console
You can use the web console to restart a RHEL system that the web console is attached to.
Prerequisites
- Log into the RHEL web console. For details, see Logging in to the web console.
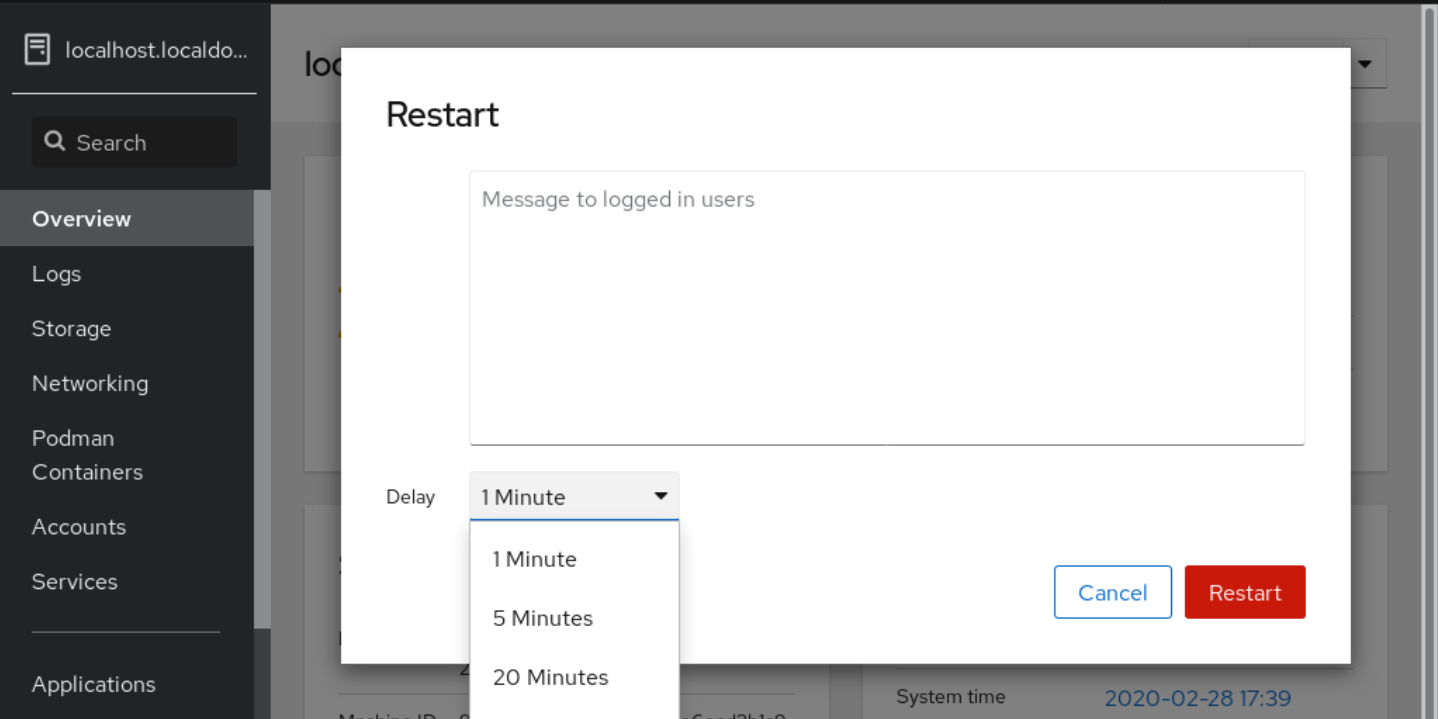
- In the Overview page, click the Reboot button.

- If any users are logged in to the system, write a reason for the restart in the Reboot dialog box.
- Optional: In the Delay drop down list, select a time interval for the reboot delay.
- Click Reboot .
1.9. Shutting down the system using the web console
You can use the web console to shut down a RHEL system that the web console is attached to.
Prerequisites
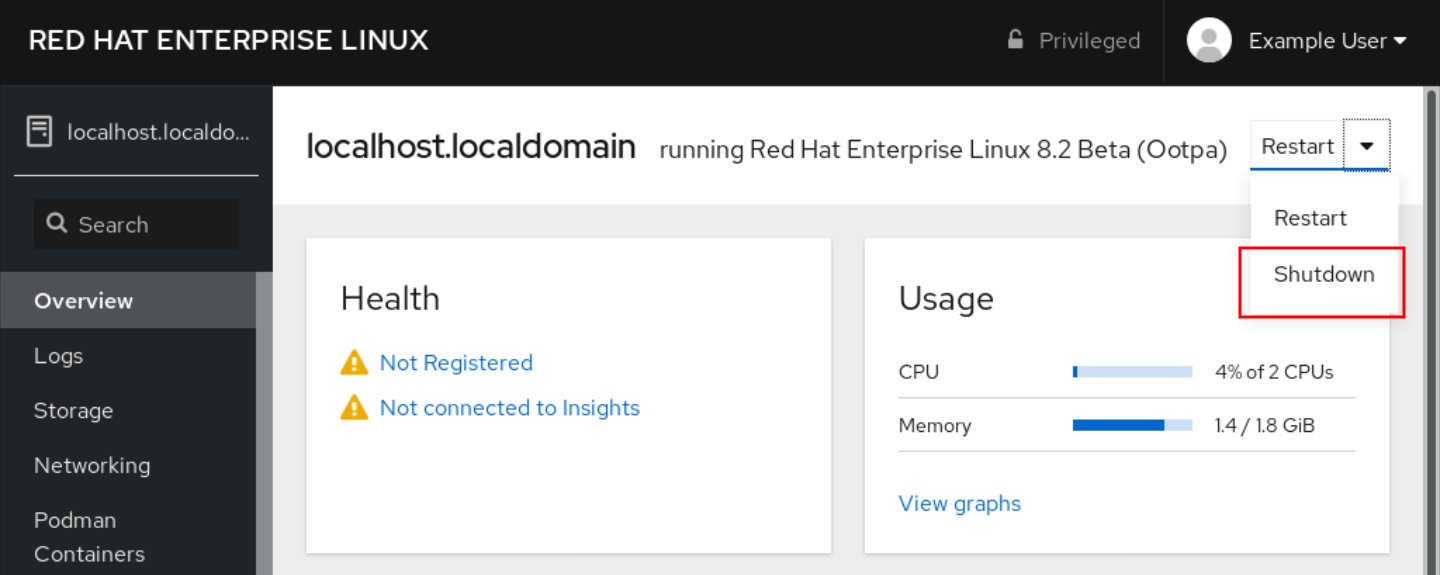
- Log into the RHEL web console. For details, see Logging in to the web console.
- Click Overview .
- In the Restart drop down list, select Shut Down .
- If any users are logged in to the system, write a reason for the shutdown in the Shut Down dialog box.
- Optional: In the Delay drop down list, select a time interval.
- Click Shut Down .
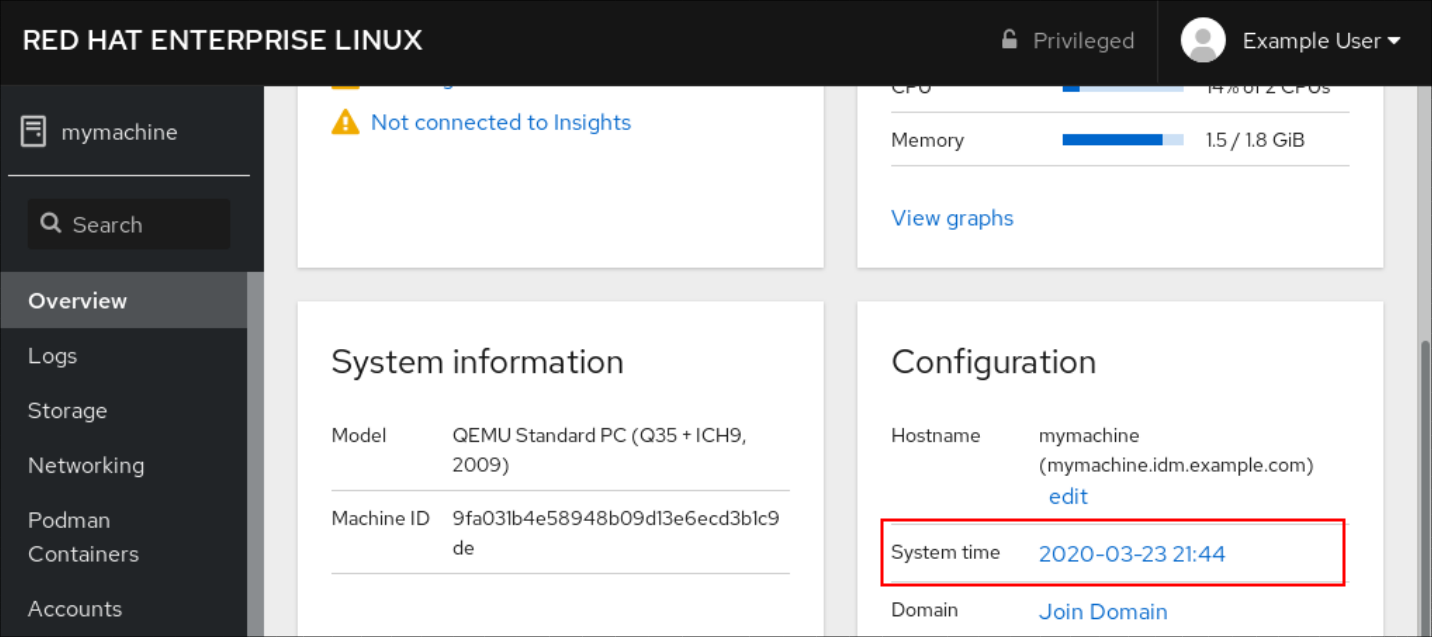
1.10. Configuring time settings using the web console
You can set a time zone and synchronize the system time with a Network Time Protocol (NTP) server.
Prerequisites
- Log in to the RHEL web console. For details, see Logging in to the web console.
- Click the current system time in Overview .
- Click System time .
- In the Change System Time dialog box, change the time zone if necessary.
- In the Set Time drop down menu, select one of the following:
Manually Use this option if you need to set the time manually, without an NTP server. Automatically using NTP server This is a default option, which synchronizes time automatically with the preset NTP servers. Automatically using specific NTP servers Use this option only if you need to synchronize the system with a specific NTP server. Specify the DNS name or the IP address of the server.

Verification steps
Additional resources
1.11. Joining a RHEL 8 system to an IdM domain using the web console
You can use the web console to join the Red Hat Enterprise Linux 8 system to the Identity Management (IdM) domain.
Prerequisites
- The IdM domain is running and reachable from the client you want to join.
- You have the IdM domain administrator credentials.
- Log into the RHEL web console. For details, see Logging in to the web console.
- In the Configuration field of the Overview tab click Join Domain .
- In the Join a Domain dialog box, enter the host name of the IdM server in the Domain Address field.
- In the Domain administrator name field, enter the user name of the IdM administration account.
- In the Domain administrator password , add a password.
- Click Join .
Verification steps
- If the RHEL 8 web console did not display an error, the system has been joined to the IdM domain and you can see the domain name in the System screen.
- To verify that the user is a member of the domain, click the Terminal page and type the id command:
$ id euid=548800004(example_user) gid=548800004(example_user) groups=548800004(example_user) context=unconfined_u:unconfined_r:unconfined_t:s0-s0:c0.c1023 Additional resources
1.12. Disabling SMT to prevent CPU security issues using the web console
Disable Simultaneous Multi Threading (SMT) in case of attacks that misuse CPU SMT. Disabling SMT can mitigate security vulnerabilities, such as L1TF or MDS.
Disabling SMT might lower the system performance.
Prerequisites
- Log in to the RHEL web console. For details, see Logging in to the web console.
- In the Overview tab find the System information field and click View hardware details .
- On the CPU Security line, click Mitigations . If this link is not present, it means that your system does not support SMT, and therefore is not vulnerable.
- In the CPU Security Toggles table, turn on the Disable simultaneous multithreading (nosmt) option.
- Click the Save and reboot button.
After the system restart, the CPU no longer uses SMT.
Additional resources
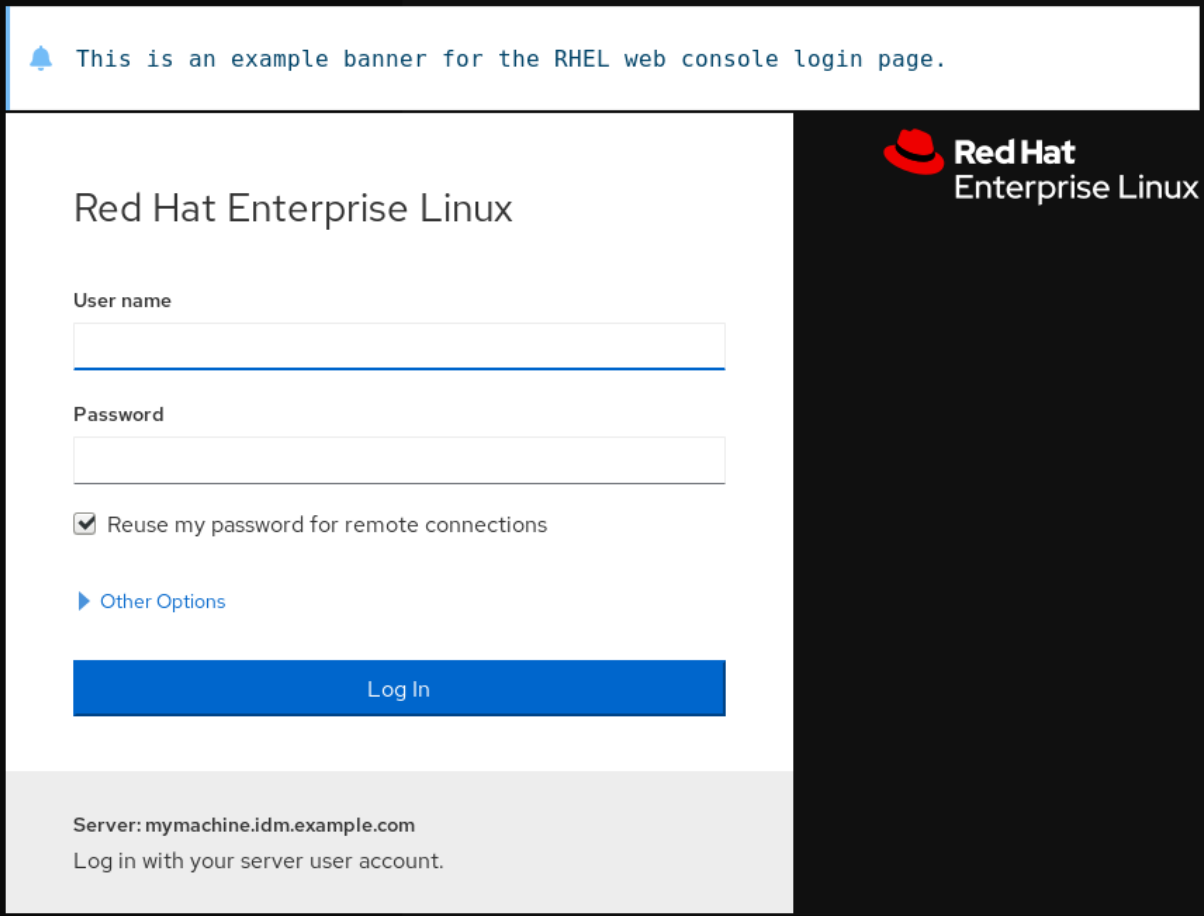
1.13. Adding a banner to the login page
Companies or agencies sometimes need to show a warning that usage of the computer is for lawful purposes, the user is subject to surveillance, and anyone trespassing will be prosecuted. The warning must be visible before login. Similarly to SSH, the web console can optionally show the content of a banner file on the login screen. To enable banners in your web console sessions, you need to modify the /etc/cockpit/cockpit.conf file. Note that the file is not required and you may need to create it manually.
Prerequisites
- The web console is installed and accessible. For details, see Installing the web console.
- You must have sudo privileges.
- Create the /etc/issue.cockpit file in a text editor of your preference if you do not have it yet. Add the content you want to display as the banner to the file. Do not include any macros in the file as there is no re-formatting done between the file content and the displayed content. Use intended line breaks. It is possible to use ASCII art.
- Save the file.
- Open or create the cockpit.conf file in the /etc/cockpit/ directory in a text editor of your preference.
[Session] Banner=/etc/issue.cockpit
# systemctl try-restart cockpit
Verification steps
Example 1.1. Adding an example banner to the login page
This is an example banner for the RHEL web console login page.
[Session] Banner=/etc/issue.cockpit
1.14. Configuring automatic idle lock in the web console
By default, there is no idle timeout set in the web console interface. If you want to enable an idle timeout on your system, you can do so by modifying the /etc/cockpit/cockpit.conf configuration file. Note that the file is not required and you may need to create it manually.
Prerequisites
- The web console must be installed and accessible. For details, see Installing the web console.
- You must have sudo privileges.
- Open or create the cockpit.conf file in the /etc/cockpit/ directory in a text editor of your preference.
# systemctl try-restart cockpit
Verification steps