- How to Set the Default Gateway in Ubuntu?
- Method 1: Using the “ip route” Command
- Method 2: Edit the Configuration File
- Conclusion
- How to Set the Default Gateway on Ubuntu
- Checking the Default Gateway
- How to Set a New Default Gateway
- Conclusion
- About the author
- Denis Kariuki
- Add a Default Route on Linux
- What Will We Cover?
- What Is a Default Gateway?
- Checking the Default Gateway
- Deleting the Default Gateway
- Creating a New Default Gateway
- Making the Routing Changes Permanent
- Conclusion
- About the author
- Ali Imran Nagori
How to Set the Default Gateway in Ubuntu?
In Ubuntu, the default gateway is the IP address of the router which connects the machine/computer to the internet. The objective of setting a default gateway is to allow the computer to communicate with devices on other networks. When a computer wants to communicate with a device on a network, it sends the data packet to the default gateway. The default gateway then forwards the packet to the destination network.
This article will explain the possible ways to set the default gateway in Ubuntu:
Method 1: Using the “ip route” Command
To set the default gateway, users can utilize the “ip route” command in Ubuntu terminal. Here are the steps that are given below:
Step 1: View the Current Gateway
It is a fine practice to view the current network configuration in the terminal. For this, execute the “ip route” command with the “show” option as below:

It displays the default gateway address as “192.168.157.2”.
Step 2: Set the New Default Gateway
To set the new default gateway, use the “ip route” command with the “add” option by specifying the gateway IP address. In our case, specify the “192.168.157.5” IP address of the default gateway:
$ sudo ip route add default via 192.168.157.5

The output shows that the new default gateway address “192.168.157.5” has been added.
Step 3: Set the Default Gateway to the Particular Network Interface
Users can also specify the network interface for setting the default gateway. For instance, mention the network interface “ens33” with the gateway address “192.168.157.5”:
$ sudo ip route add default via 192.168.157.5 dev ens33

The output shows that default gateway has been added to the “ens33” network interface.
Step 4: Verify the Added Default Gateway
To verify the newly added default gateway, use the “ip route” command with the “list” option as below:

The output shows that “192.168.157.5” has been newly added as a default gateway. While the “192.168.157.2” can be seen which is the previous gateway address.
Method 2: Edit the Configuration File
Users can also set the default gateway by editing the “01-network-manager-all.yaml” configuration file. Follow the given steps for the configuration:
Step 1: Set Default Gateway
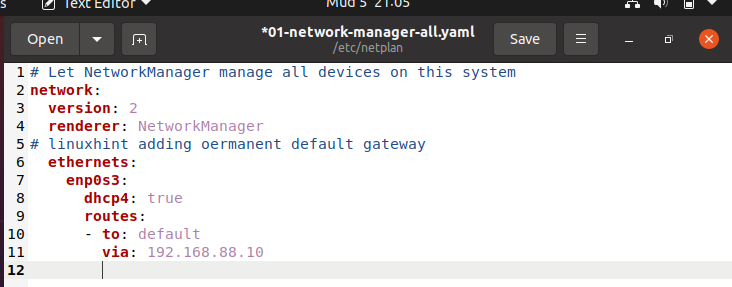
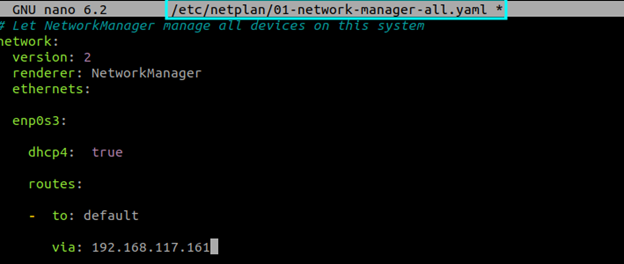
Open the “01-network-manager-all.yaml” configuration file that is located in the “netplan” directory via the below command:
$ sudo nano /etc/netplan/01-network-manager-all.yaml
It navigates to the particular file. Add the IP address in the particular section of the default gateway. In our case, mention the “192.168.157.2” IP address in the default section:
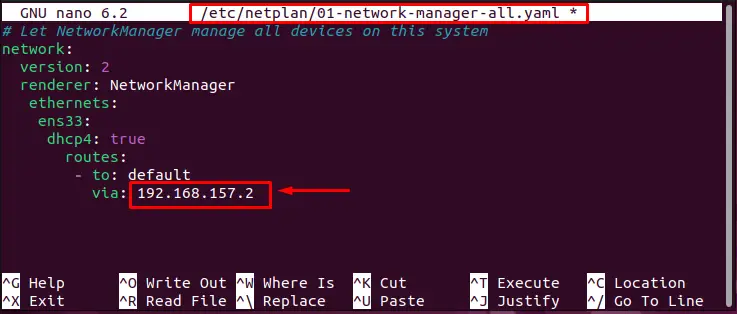
Save the changes and exit the text editor.
Note: The NetworkManager has by default a gateway in the “via” section that users can modify according to their requirements.
Step 2: Restart the Networking Service
To restart the networking service, use the “systemctl” script with the “restart” utility by mentioning the “NetworkManager” in the following code:
$ sudo systemctl restart NetworkManager

Hence, the network properties of the system are restarted.
Conclusion
To set the default gateway in Ubuntu, execute the “sudo ip route add default via ” command or edit the “01-network-manager-all.yaml” file. After adding the default gateway, it is required to restart the network manager properties.
This article has explained several ways to set the default gateway in Ubuntu.
How to Set the Default Gateway on Ubuntu
![]()
All the devices on your network rely on the default gateway for communication. Data packets pass through the router to and from your network before being routed to the particular device that owns the packet.
Each operating system comes with a default gateway. However, you can temporarily or permanently change the default gateway to add another route for your network devices. You can use the IP command on Ubuntu to modify your default gateway.
Checking the Default Gateway
Changing the default gateway is common when you have different sub-networks or when you must point a specific machine to a particular gateway. Before changing the default gateway, let’s list the available routes.
Use the list option with the IP command or its shorthand r to stand for the route.
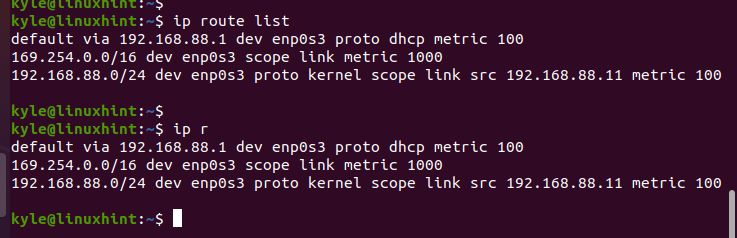
The default gateway has the default keyword in it. If you configured multiple routes on your network, you can use the grep command to filter the router and get the default gateway.
Use the following command:

The current default gateway is 192.168.88.1 on enp0s3 interface. Let’s proceed to set a new default gateway.
How to Set a New Default Gateway
The ip command uses the route option to set the new default gateway. You must specify the type of route that you want to add. In our case, it’s “default”.
For instance, let’s set the default gateway as 192.168.88.10.

Suppose we want to set the default gateway for a particular network interface. In that case, specify the network interface after the gateway. In our case, the interface is enp0s3.
Note that we must add sudo to use the administrator privileges since we are editing the routing table for Ubuntu which is an administrative task.
We can use the list or route options to verify the newly added default gateway.
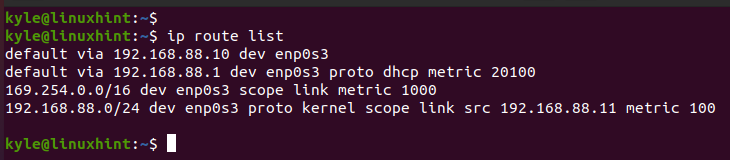
Note how the currently added default gateway is the one that we specified earlier. In the previous output, we now have two default gateways. The keynote is that the changes we made are temporary until you add them to the network manager configuration files.
In the previous case, we can delete the added gateway such that we remain with only one.
Use the delete keyword to remove the added gateway.
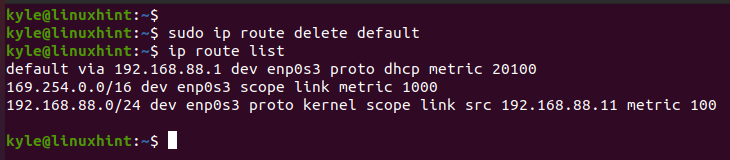
If we check the available default gateway after running the delete command, we confirm that we only have one default gateway remaining which is 192.168.88.1.
Suppose we want to make the permanent network changes to implement the new gateway. We must edit the configuration file. Open the network manager file using a file editor of your choice. In this case, let’s use gedit with the following command:

Add the new gateway using the following presented format. Make sure that the spacing is set to two whitespaces with the correct indention. Once edited, save the file and exit the editor.
Before applying the changes using the netplan command, run a dry test.
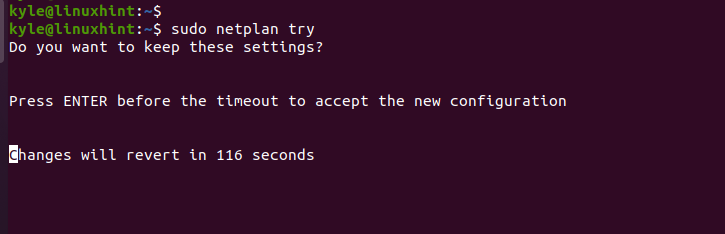
If you are sure with the new network configuration, press the enter key. Otherwise, the changes will revert to the previous settings after the specified seconds.

Conclusion
Ubuntu comes with a default gateway, but that doesn’t mean that you can’t set a new gateway. This guide covered everything about adding a new gateway using the ip command and how to save the changes permanently to the configuration file.
About the author
Denis Kariuki
Denis is a Computer Scientist with a passion for Networking and Cyber Security. I love the terminal, and using Linux is a hobby. I am passionate about sharing tips and ideas about Linux and computing.
Add a Default Route on Linux
![]()
Any Linux user, especially a systems administrator, should have skills to make simple network configurations on a Linux system. For the system to communicate to the other computers on the internet, gateways must be set up and adjusted as needed.
What Will We Cover?
In this article, we will see how to add a default route on the Linux systems. Notably, different systems may have different configurations. However, we will focus on the Ubuntu 20.04 system.
What Is a Default Gateway?
To connect your home network to the wider internet, you need a default gateway. The function of a gateway is implied by its name; it connects a local area network to the wider internet.
All traffic that are not meant for the local area network and for which no alternate route is defined in the routing table are sent via the default gateway. Typically, a network’s default gateway is a specific router.
The wireless router serves as the “default gateway” in most home networks. It’s a way to connect to resources which are located on other networks that are far from your own. Internet navigation would be considerably more difficult without it.
Checking the Default Gateway
We can use the ip command and the route object to view the system’s configured routes. Since the list option is already the default action, we don’t need to include it. Additionally, we can use “r” in place of route to cut down on typing:
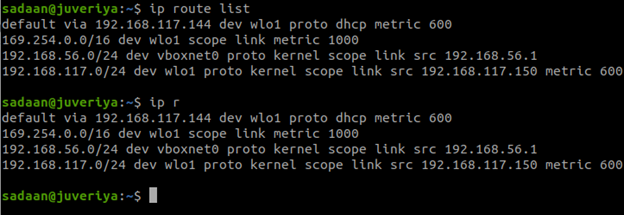
We can see the term “default” included in one of the routes. This is the standard route for the default gateway/route.
Automatic route addition and deletion are possible in certain cases. For example, while establishing a VPN connection, the ip r command on the same system yields a different set of results. In doing so, the network traffic is routed via a private tunnel:

With grep, it’s possible to easily isolate the default route from a large collection of configured ones:

Deleting the Default Gateway
Now, we delete the route that sends the traffic via the system’s default gateway. For this, we use the route object with the ip command and specify the delete option. Also, we require the sudo access to the routing table in order to make any modifications. First, we list the routes before deleting the default one. Then, we verify our action by listing them again:
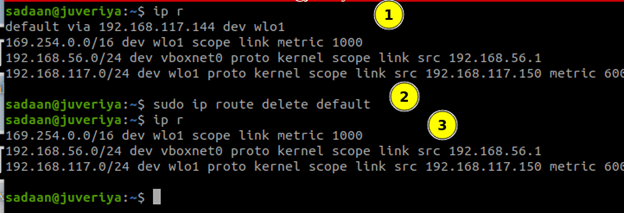
As we can see, the default gateway entry is deleted.
Creating a New Default Gateway
The route object with an add argument can be used to create a new default gateway. Let’s take example the adding of 192.168.117.161 as the new default gateway on the wlo1 interface:

The traffic now routes via this new default gateway on enp0s3.
Making the Routing Changes Permanent
The modifications we made have immediate effect, but they are lost once the machine is restarted. You must alter a few configuration files in order to make your modifications permanent.
For example, in the case of Ubuntu, the netplan command comes in handy. Here, we need to open the netplan network configuration file:
Now, add the following configuration inside it, below the line corresponding to the renderer:
You can refer to the following screenshot. Keep in mind that the successive level of indentation is important here as well.
After saving the file, apply the changes:
Getting back to the normal command line means that the configuration is successful. Also, you can use the netplan command with the try option to examine the modifications before you apply them:
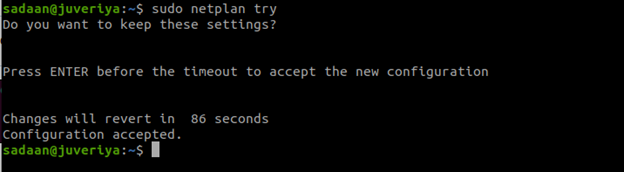
This provides you time to test your settings. If everything is set properly, you can save the configuration by hitting the “Enter” key within two minutes before the command times out. In this way, your changes are applied. Otherwise, if you don’t hit the “Enter” key, the changes only remain in the configuration file. However, your network settings are not yetmodified by them.
Note: On RHEL 8 Red Hat System, we can use the nmstatectl utility to define the gateway configuration in a YAML file. Similarly, RHEL System Roles (playbook approach) can also be used to set the default gateway.
Conclusion
We learned how to configure a default route on the Linux systems with the Ubuntu 20.04 target.
If your default gateway settings are correct, you’ll be able to communicate with the rest of the internet. However, familiarity with the hostname-to-IP address resolution is still required.
About the author
Ali Imran Nagori
Ali imran is a technical writer and Linux enthusiast who loves to write about Linux system administration and related technologies. You can connect with him on LinkedIn
.