- HowTo: Change Speed and Duplex of Ethernet card in Linux
- 1. Install ethtool
- 2. Get the Speed, Duplex and other information for the interface eth0
- 3. Change the Speed and Duplex settings
- 4. Change the Speed and Duplex settings Permanently on CentOS/RHEL
- How To Change Speed & Duplex of Ethernet Card in Linux with Ethtool Command
- Half Duplex, Full Duplex, and Auto-Negotiation
- What is a Duplex Mismatch?
- How to Use Ethtool Command to Configure NIC Settings
- Ethtool Command to Change Ethernet Adapter Settings
- Ethtool_opt Variable to Permanently Set Ethtool Command Settings
- Изменить скорость сетевой карты со 100Mbit на 1000Mbit
HowTo: Change Speed and Duplex of Ethernet card in Linux
To change Speed and Duplex of an ethernet card, we can use ethtool – a Linux utility for Displaying or Changing ethernet card settings.
1. Install ethtool
You can install ethtool by typing one of the following commands, depending upon your Linux distribution.
Install ethtool in Fedora, CentOS, RHEL etc.:
Install ethtool in Ubuntu, Debian etc.:
# sudo apt-get install ethtool
2. Get the Speed, Duplex and other information for the interface eth0
To get speed, duplex and other information for the network interface eth0, type the following command as root.
Settings for eth0: Supported ports: [ MII ] Supported link modes: 10baseT/Half 10baseT/Full 100baseT/Half 100baseT/Full 1000baseT/Half 1000baseT/Full Supports auto-negotiation: Yes Advertised link modes: 10baseT/Half 10baseT/Full 100baseT/Half 100baseT/Full 1000baseT/Half 1000baseT/Full Advertised auto-negotiation: Yes Speed: 100Mb/s Duplex: Half Port: Twisted Pair PHYAD: 1 Transceiver: internal Auto-negotiation: on Supports Wake-on: g Wake-on: d Current message level: 0x000000ff (255) Link detected: yes
3. Change the Speed and Duplex settings
The following changes are temporary and they’ll stop working after reboot. Read the next section, to make settings permanent.
The next command enables Auto-Negotiate feature:
# ethtool -s eth0 autoneg on
The next command disables Auto-Negotiation, enables Half Duplex and sets up Speed to 10 Mb/s:
# ethtool -s eth0 speed 10 duplex half autoneg off
The next command disables Auto-Negotiation, enables Full Duplex and sets up Speed to 100 Mb/s:
# ethtool -s eth0 speed 100 duplex full autoneg off
4. Change the Speed and Duplex settings Permanently on CentOS/RHEL
To make settings permanent, you need to edit /etc/sysconfig/network-scripts/ifcfg-eth0 file for eth0 interface. This file is used by RHEL, CentOS, Fedora etc.
# vi /etc/sysconfig/network-scripts/ifcfg-eth0
Append the line as follows to disable Auto-Negotiation, enable Full Duplex and set up Speed to 100 Mb/s:
ETHTOOL_OPTS="speed 100 duplex full autoneg off"
Restart the interface to apply changes:
How To Change Speed & Duplex of Ethernet Card in Linux with Ethtool Command
The configuration of your Ethernet Card defines how effectively your servers communicate.
It is necessary to understand how Auto-Negotiation, Speed, and Duplex settings affect the transfer of data to maintain network connectivity with minimal effort.
This article will show you how to change Speed, Duplex, and Auto-Negotiation settings in Linux (CentOS) with ethtool commands.
- Command-line/terminal window
- A user account with root or sudo privileges
- The Ethtool configuration tool installed
Half Duplex, Full Duplex, and Auto-Negotiation
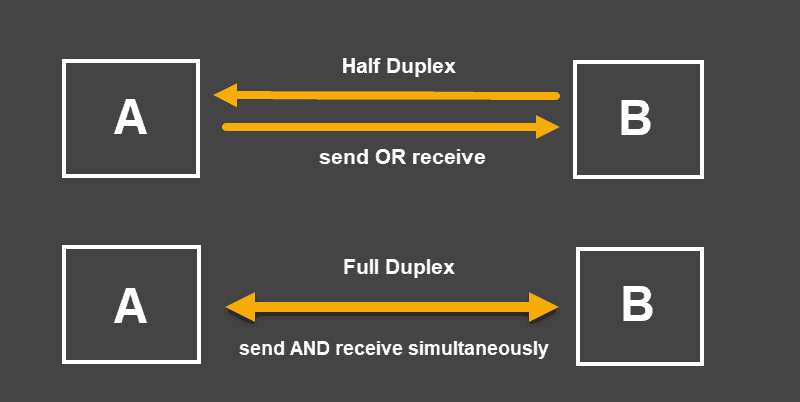
Half-duplex mode allows a device to either send or receive packets in turn. A device set to this mode cannot perform both actions at the same time.
When a device’s mode is at full-duplex, it can also send and receive packets simultaneously.
Auto-Negotiation is a mechanism by which a device automatically chooses the best performing transmission mode based on its counterparts’ characteristics. It is recommended to keep Auto-Negotiation enabled as it allows devices to choose the most efficient means for the transfer of data.
What is a Duplex Mismatch?
When a device, with enabled auto-negotiation, connects to a device that is not using this signaling method, the process does not work. The end of the connection with an active auto-negotiation is still able to detect the speed of the other end, but cannot correctly detect the duplex mode. As a rule, the auto-negotiating end of the connection is going to use half-duplex while the other end might be at full-duplex. This situation is considered a duplex mismatch.
A duplex mismatch does not stop communication completely. Single packets and small amounts of data do not cause immediate issues. However, when a large amount of data is sent from either end, the speed drops significantly. The connection is working, but the performance is reduced as the data transfer rate is asymmetrical and might lead to packet loss.
How to Use Ethtool Command to Configure NIC Settings
Ethtool is a Network Interface Card configuration command that allows you to retrieve information and change your NIC settings. These settings include Speed, Duplex, Auto-Negotiation, and many other parameters.
To proceed, you’ll need to know the name of your network interface card.
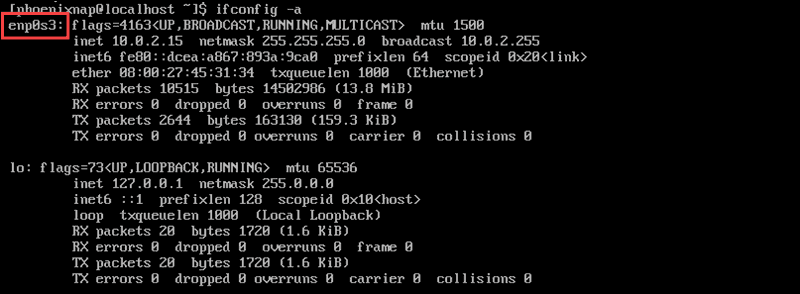
To find the name of your network interface card, run the following command from the command terminal:
The output provides the name of the device interface card. To learn more about this command, read our guide How to Install and Use ifconfig.
In the above example, the name of the device is enp0s3.
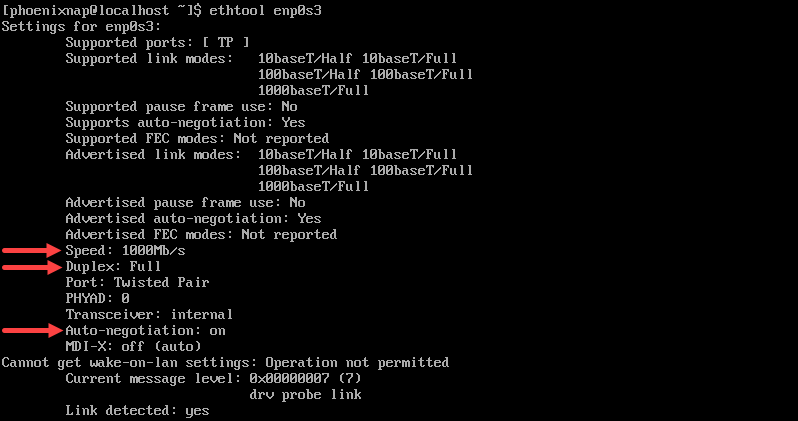
Now that you have determined the name of the device, check the current Speed, Auto-Negotiation, and Duplex mode settings with the command: ethtool devicename .
In our specific example the command is:
The output shows that the current speed is 1000Mb/s , that the Duplex is at Full , and that Auto-Negotiation is turned on .
Ethtool Command to Change Ethernet Adapter Settings
Note: The ethernet adapter settings cannot be changed for virtualized environments (such as a virtual machine) and on unsupported network drivers.
The ethtool -s command can be used to change the current settings by defining the values for speed , duplex , and autoneg in the following format:
sudo ethtool -s [device_name] autoneg [on/off] speed [10/100/1000] duplex [half/full]For example, to set the speed at 1000Mb/s , the duplex mode to full and the auto-negotiation to on the command would be:
sudo ethtool -s enp0s3 autoneg on speed 1000 duplex fullThe ethtool [device_name] command is necessary to confirm that the changes have been applied.
Ethtool_opt Variable to Permanently Set Ethtool Command Settings
Changes made with Ethtool are by default reverted after a system is re-booted.
To apply custom settings each time a system boots edit the file for the device interface:
sudo vi /etc/sysconfig/network-scripts/ifcfg-enp0s3Add the desired values as a line at the end of the file using the following syntax:
ETHTOOL_OPTS="speed [100|1000|10000] duplex [half|full] autoneg [on|off]"ETHTOOL_OPTS="speed 1000 duplex full autoneg on"Save the changes and exit the file.
Now the changes are applied after every reboot and are permanent unless the file is altered again.
By following this tutorial, you have successfully changed the settings on your Network Interface Card with ethtool commands. You have also gained a better understanding of how Auto-Negotiation and Duplex modes affect server performance.
Изменить скорость сетевой карты со 100Mbit на 1000Mbit
Сетевая карта гигабитная это точно. Запускал на этом микросервере Win8 Live в настройках подключения показывает гигабит. Расшарил каталог, скинул файл с другого ПК. Скорость была около 30 мегабайт/сек (хоть и не 1000, но так и так больше 100Mbit). В настройках маршрутизатора тоже показывает гигабит по этому подключению.
Устанавливаю Ubuntu server 16.04 (пробовал ставить ubuntu 17.04, но там не работает https пришлось отказаться от данной версии, понятно, что можно было настроить, но нахрапом я не нашел инфу, да и вопрос сейчас не об этом). Теперь маршрутик в настройках пишет, что по данному подключению 100Mbit (патч-корд используется тот же самый, что и при запуске Win8 Live).
Команда ifconfig выдает следующее:
enp2s0 Link encap:Ethernet HWaddr 00:e0:4c:66:86:82 inet addr:192.168.1.48 Bcast:192.168.1.255 Mask:255.255.255.0 inet6 addr: fe80::2e0:4cff:fe66:8682/64 Scope:Link UP BROADCAST RUNNING MULTICAST MTU:1500 Metric:1 RX packets:1882 errors:0 dropped:0 overruns:0 frame:0 TX packets:137 errors:0 dropped:0 overruns:0 carrier:0 collisions:0 txqueuelen:1000 RX bytes:235906 (235.9 KB) TX bytes:18090 (18.0 KB) lo Link encap:Локальная петля (Loopback) inet addr:127.0.0.1 Mask:255.0.0.0 inet6 addr: ::1/128 Scope:Host UP LOOPBACK RUNNING MTU:65536 Metric:1 RX packets:164 errors:0 dropped:0 overruns:0 frame:0 TX packets:164 errors:0 dropped:0 overruns:0 carrier:0 collisions:0 txqueuelen:1 RX bytes:12080 (12.0 KB) TX bytes:12080 (12.0 KB)Команда ethtool enp2s0:
Settings for enp2s0: Supported ports: [ TP MII ] Supported link modes: 10baseT/Half 10baseT/Full 100baseT/Half 100baseT/Full 1000baseT/Half 1000baseT/Full Supported pause frame use: No Supports auto-negotiation: Yes Advertised link modes: 10baseT/Half 10baseT/Full 100baseT/Half 100baseT/Full 1000baseT/Half 1000baseT/Full Advertised pause frame use: Symmetric Receive-only Advertised auto-negotiation: Yes Link partner advertised link modes: 10baseT/Half 10baseT/Full 100baseT/Half 100baseT/Full Link partner advertised pause frame use: Symmetric Link partner advertised auto-negotiation: Yes Speed: 100Mb/s Duplex: Full Port: MII PHYAD: 0 Transceiver: internal Auto-negotiation: on Cannot get wake-on-lan settings: Operation not permitted Current message level: 0x00000033 (51) drv probe ifdown ifup Link detected: yesНа просторах инета нашел вот эту команду
ethtool -s eth1 speed 100 duplex full autoneg off
ethtool -s enp2s0 speed 1000 duplex full autoneg off
Вывод на экране после ее ввода такой:
Cannot get current device settings: No such device not setting speed not setting duplex not setting autonegЧто делать дальше ХЗ. Может дело в драйверах? В таком случае, где их брать и как устанавливать из терминала?
Заранее благодарен за помощь.
UPD. По ссылке такая же проблема, только человеку нужно изменить 100Mbit на 10Mbit. Данную проблему они решили.
Здесь инструкция по изменению скорости сетевого интерфейса
Там перед командами вводят sudo. В моем случае это никак не помогло.


