- Переменная PATH в Linux
- Переменная PATH в Linux
- Выводы
- How to Auto-Mount a Drive at Boot in Linux
- Auto Mount Drive at Boot in Linux using fstab
- Adding an entry in the fstab file
- Auto Mount Drive at boot using gnome-disks
- Making a partition Writable
- Conclusion
- Thread: Where is $PATH set up when Ubuntu boots ?
- Where is $PATH set up when Ubuntu boots ?
- Re: Where is $PATH set up when Ubuntu boots ?
- Re: Where is $PATH set up when Ubuntu boots ?
- Re: Where is $PATH set up when Ubuntu boots ?
- Re: Where is $PATH set up when Ubuntu boots ?
- Re: Where is $PATH set up when Ubuntu boots ?
Переменная PATH в Linux
Когда вы запускаете программу из терминала или скрипта, то обычно пишете только имя файла программы. Однако, ОС Linux спроектирована так, что исполняемые и связанные с ними файлы программ распределяются по различным специализированным каталогам. Например, библиотеки устанавливаются в /lib или /usr/lib, конфигурационные файлы в /etc, а исполняемые файлы в /sbin/, /usr/bin или /bin.
Таких местоположений несколько. Откуда операционная система знает где искать требуемую программу или её компонент? Всё просто — для этого используется переменная PATH. Эта переменная позволяет существенно сократить длину набираемых команд в терминале или в скрипте, освобождая от необходимости каждый раз указывать полные пути к требуемым файлам. В этой статье мы разберёмся зачем нужна переменная PATH Linux, а также как добавить к её значению имена своих пользовательских каталогов.
Переменная PATH в Linux
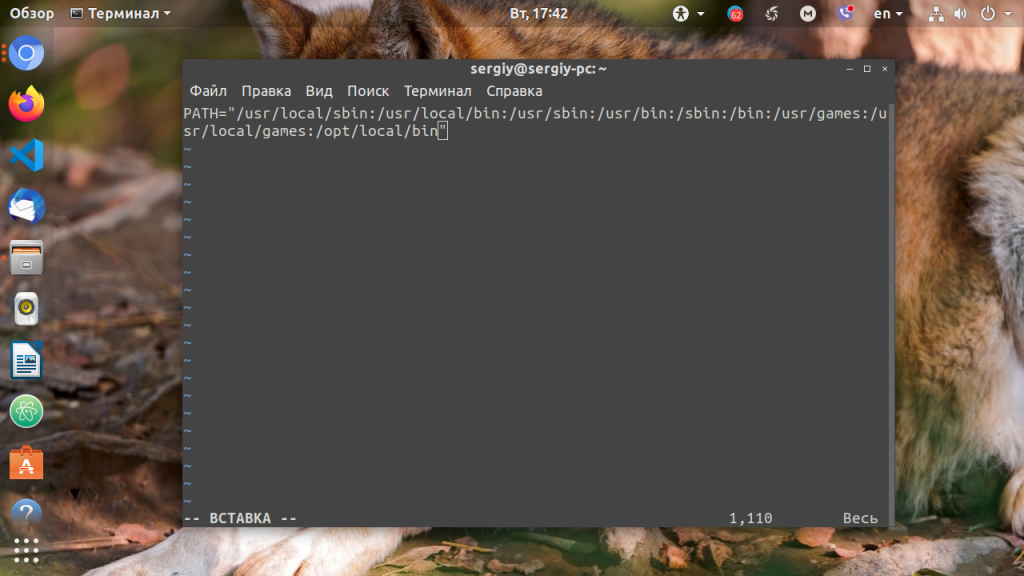
Для того, чтобы посмотреть содержимое переменной PATH в Linux, выполните в терминале команду:

На экране появится перечень папок, разделённых двоеточием. Алгоритм поиска пути к требуемой программе при её запуске довольно прост. Сначала ОС ищет исполняемый файл с заданным именем в текущей папке. Если находит, запускает на выполнение, если нет, проверяет каталоги, перечисленные в переменной PATH, в установленном там порядке. Таким образом, добавив свои папки к содержимому этой переменной, вы добавляете новые места размещения исполняемых и связанных с ними файлов.
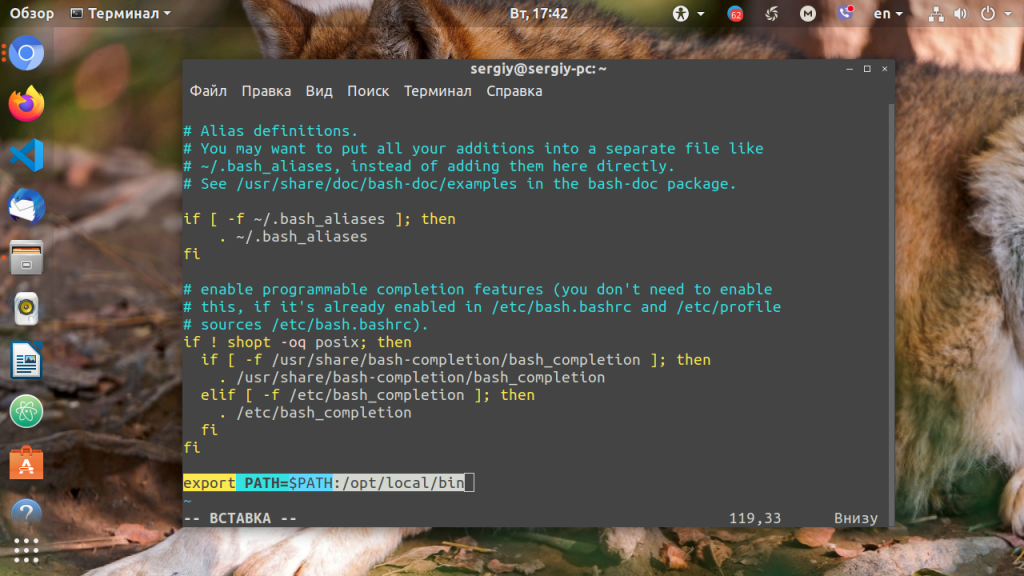
Для того, чтобы добавить новый путь к переменной PATH, можно воспользоваться командой export. Например, давайте добавим к значению переменной PATH папку/opt/local/bin. Для того, чтобы не перезаписать имеющееся значение переменной PATH новым, нужно именно добавить (дописать) это новое значение к уже имеющемуся, не забыв о разделителе-двоеточии:
Теперь мы можем убедиться, что в переменной PATH содержится также и имя этой, добавленной нами, папки:

Вы уже знаете как в Linux добавить имя требуемой папки в переменную PATH, но есть одна проблема — после перезагрузки компьютера или открытия нового сеанса терминала все изменения пропадут, ваша переменная PATH будет иметь то же значение, что и раньше. Для того, чтобы этого не произошло, нужно закрепить новое текущее значение переменной PATH в конфигурационном системном файле.
В ОС Ubuntu значение переменной PATH содержится в файле /etc/environment, в некоторых других дистрибутивах её также можно найти и в файле /etc/profile. Вы можете открыть файл /etc/environment и вручную дописать туда нужное значение:
Можно поступить и иначе. Содержимое файла .bashrc выполняется при каждом запуске оболочки Bash. Если добавить в конец файла команду export, то для каждой загружаемой оболочки будет автоматически выполняться добавление имени требуемой папки в переменную PATH, но только для текущего пользователя:
Выводы
В этой статье мы рассмотрели вопрос о том, зачем нужна переменная окружения PATH в Linux и как добавлять к её значению новые пути поиска исполняемых и связанных с ними файлов. Как видите, всё делается достаточно просто. Таким образом вы можете добавить столько папок для поиска и хранения исполняемых файлов, сколько вам требуется.
Обнаружили ошибку в тексте? Сообщите мне об этом. Выделите текст с ошибкой и нажмите Ctrl+Enter.
How to Auto-Mount a Drive at Boot in Linux
Partitioning a drive is very useful for organizing your data and workflow. Chances are that you also have multiple partitions/drives on your system.
Now suppose you have a drive with data that you need to access frequently. OR your Steam Library is in one of your drives. So, whenever you boot into your system to access that data or to play a game, you will have to mount that drive partition manually.
Setting your drive to auto mount on every boot In these cases will save your precious time and hassle.
Auto mounting a disk is very easy to do in Linux, you either do it via the command line or via a GUI tool. Here is a simple step-by-step guide to perform this in your favorite Linux distribution.
Auto Mount Drive at Boot in Linux using fstab
fstab (or /etc/fstab) is a file used by Linux system to manage drives, swap, efi and other partitions that needs to start with the system.
If we want to do the same for our drive/partition, we will need to edit the fstab file and add an entry for our drive.
To do so, the first thing that we need is the UUID of our drive.
Open a terminal window (also called tty or console) and type in:
Note down the UUID of the drive or partition that you want automatically mounted on boot.
You can identify the drive either by size, file system type, or mount point. Now we have the uuid we can proceed to next step, that is adding an entry in the fstab file.
Adding an entry in the fstab file
Open the fstab file in any editor of your choice, it is located in /etc/fstab . I am going to use nano to do so, if you want to follow, open a terminal window and type:
Remember, you will need admin privileges (or sudo) to edit this file.
Next, at the end of fstab, on a new line, paste this:
UUID=xxxxxxxxxx /mnt/mydrive ext4 defaults 0 2UUID=xxxxxxxxxx : as expected, uuid of your drive goes here.
/ mnt/mydirve : it is the location where your drive/partition will be mounted.
ext4 : this represents the file system (ntfs, fat32, etc.) of your drive, in my case it is ext4.
defaults : this will grant you basic permissions over your drive.
0 : this represents the value of the dump, we don’t need it in this case it is set to 0.
2 : this is the value of pass, 0 means no fscheck, 1 is usually set for drives that we need to boot from, and 2 for other disks.
Now save the file with Ctrl+o or Ctrl+s and you are done. The next time you boot your computer, your drive will be automatically mounted at the specified location.
Auto Mount Drive at boot using gnome-disks
Gnome Disks is an GUI disk utility for Linux. It is an easy-to-use disk utility that we can use to auto mount a disk if you are not comfortable using a terminal.
On Ubuntu, Gnome Disks comes pre-installed. If not installed on your system, simply open a terminal window and type in:
For Ubuntu/Debian and their Derivatives:
sudo apt install gnome-disk-utilityAnd if using Arch Linux or its derivatives:
sudo pacman -S gnome-disk-utilityYou can also install it via searching for ‘Gnome Disks’ in your Linux Distribution’s GUI package manager like Software Center in Ubuntu & Discover in KDE Plasma.
1. Open the Gnome disks app either from your app drawer or typing in gnome-disks in a terminal window.
2. Now select the partition that you want to auto mount.
3. Once the partition is highlighted, click on the low little gears and select ‘Edit Mount Options‘.
4. From there, turn off the ‘User session defaults’ is toggled off and the option ‘Mount at system startup‘ is ticked. Click Ok to save the changes that we just made.
5. Once done, your drive will get auto-mounted every time you boot your system.
(Note: The drive will not be already mounted after doing the steps above, reboot your system for changes to take effect.)
Making a partition Writable
While it is not so common but in some cases if you have just partitioned a new drive, it can give you a Read-only Drive error every time you try to copy data onto it.
In order to fix this, we need to change the drive’s ‘Write’ permissions. To do s, open up a terminal window and type:
sudo chmod ugo+wx /path/to/your/driveReplace path/to/your/drive with the actual mount path of your drive. To find your drives mount location, open a file manager, click on the drive to mount it and then you can copy its path.
If you want to use a terminal, make sure that the drive is mounted and then type in:
Output will be similar to this:
Conclusion
This concludes my post on how to auto mount a drive/partition on boot in Linux
If you have any suggestion, questions, regarding this guide do leave a comment down below. You can also comment if you are facing any problems following the guide, I will get back to you ASAP.
If you are interested in drive encryption, check this post on How to Encrypt your Drive in Linux (and if it is worth it or not).
Thread: Where is $PATH set up when Ubuntu boots ?
 5 Cups of Ubuntu
 ![]()
Where is $PATH set up when Ubuntu boots ?
Silly beginners question here: Where are the initial values for $PATH set up in Ubuntu. What is the equivalent of the DOS «autoexec.bat» file in which paths are set ?
Staff Emeritus ![]()
Re: Where is $PATH set up when Ubuntu boots ?
The root path is set up in /etc/environment
You would normally set user PATH in ~/.bashrc with the following format:
export PATH=$PATH:$HOME/path_to_folder:$HOME/path_to_next_folder
Ubuntu Developer ![]()
Re: Where is $PATH set up when Ubuntu boots ?
If i am reading the question correctly you want to know what Ubuntu’s default $PATH is?
bobbo@tiger:~/Code/terminator$ echo $PATH /home//bin:/usr/local/sbin:/usr/local/bin:/usr/sbin:/usr/bin:/sbin:/bin:/usr/games
Today we have 15 minutes of fame, tomorrow 15 minutes of anonymity.
My Blog | Veza — Opensource TinyURL clone with sensible URLs
5 Cups of Ubuntu ![]()
 Re: Where is $PATH set up when Ubuntu boots ?
Reason i asked is ’cause if i do from terminal:
export PATH=$PATH:$HOME/path_to_folder:$HOME/path_to_next_folder
that path is forgotten when i close the terminal window and open another one.
Have just re-installed gEDA, so will try putting it’s search paths into the «/etc/environment» file.
Will let you know if that works,
Staff Emeritus ![]()
Re: Where is $PATH set up when Ubuntu boots ?
![]() Originally Posted by Cap’n Redbeard
Originally Posted by Cap’n Redbeard 
Cheers bobbocanfly and drs305,
Reason i asked is ’cause if i do from terminal:
that path is forgotten when i close the terminal window and open another one.
Have just re-installed gEDA, so will try putting it’s search paths into the «/etc/environment» file.
That should work but it more properly should go in the user’s ~/.bashrc folder unless it’s going to be used by multiple users. It will be read during boot and available for the entire session.
5 Cups of Ubuntu ![]()
Re: Where is $PATH set up when Ubuntu boots ?
So each user’s paths are set up in their «/home/.bashrc» file whilst global paths are placed in the «/etc/environment» file ?
Another problem though is:
If i know where a programme has been installed and it’s definitley there, why doesn’t BASH find it ?
redbeard@the-wintel-box:~$ cd geda-install
redbeard@the-wintel-box:~/geda-install$ ls
bin html include info lib libexec man share
redbeard@the-wintel-box:~/geda-install$ cd bin
redbeard@the-wintel-box:~/geda-install/bin$ ls
bin gnet_hier_verilog.sh gschlas lxt2miner nghelp pcb smash_megafile vcd2lxt2
cmpp gnetlist gschupdate lxt2vcd ngmultidec refdes_renum stdio-wcalc vcd2vzt
convert_sym gnucap gsymcheck makeidx ngnutmeg rtlbrowse sw2asc vertex
garchive gnucap-modelgen gsymfix.pl Merge_dimPCBPS ngproc2mod sarlacc_schem tex2vcd vvp
gattrib grenum gsymupdate MergePCBPS ngsconvert sarlacc_sym tla2vcd vzt2vcd
gerbv gsch2pcb gtkwave mk_verilog_syms ngspice sch2eaglepos.sh tragesym vztminer
ghwdump gschem iverilog mvl2lxt olib share twinwave wcalc
gmk_sym gschemdoc iverilog-vpi mvl2vcd pads_backannotate shmidcat vcd2lxt wcalc-config
redbeard@the-wintel-box:~/geda-install/bin$ gschem
The program ‘gschem’ is currently not installed. You can install it by typing:
sudo apt-get install geda-gschem
-bash: gschem: command not found
redbeard@the-wintel-box:~/geda-install/bin$
Any ideas ? Is this getting off topic ?