- How to Set A Custom Screen Resolution in Ubuntu Desktop
- Changing the Resolution or Orientation of the Screen Using Displays
- Changing the Resolution or Orientation of the Screen Using Xrandr
- Set Screen Resolution in Ubuntu
- How to Add Missing or Set Custom Display Resolution Using xrandr
- Change the resolution or orientation of the screen
- Orientation
- Resolution
- Native Resolution
- Refresh Rate
- Scale
- Изменение разрешения или ориентации экрана
- Ориентация
- Разрешение
- Естественное разрешение
- Частота обновления
- Масштаб
How to Set A Custom Screen Resolution in Ubuntu Desktop
Is your screen (or external monitor) resolution is low? thus making the items on your screen look larger and less clear? Or do you want to simply increase the current maximum resolution or add a custom resolution?
In this article, we will show how to add missing or set custom display resolution in Ubuntu and its derivatives such as Linux Mint. By the end of this article, you will be able to set to a higher resolution, making content on your screen appear sharper and clearer.
Changing the Resolution or Orientation of the Screen Using Displays
Normally, to change the resolution or orientation of the screen, you can use the Displays graphical user interface tool (open the Activities overview and type Displays, click to open it or System Menu then type Displays and open it).
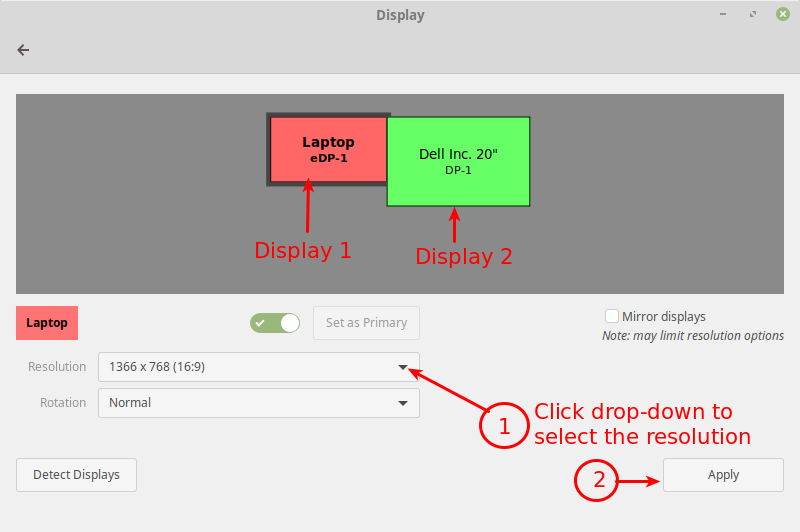
Note: In case you have multiple displays connected to your computer (as shown in the following image), if they are not mirrored, you can have different settings on each display. To change the settings for a display device, select it in the preview area.
Next, select the resolution or scale you want to use, and choose the orientation then click Apply. Then select Keep This Configuration.
Changing the Resolution or Orientation of the Screen Using Xrandr
Alternatively, you can also use the powerful xrandr tool (a command-line interface to RandR (Resize and Rotate) X Window System extension) which is used to set the size, orientation and/or reflection of the outputs for a screen.
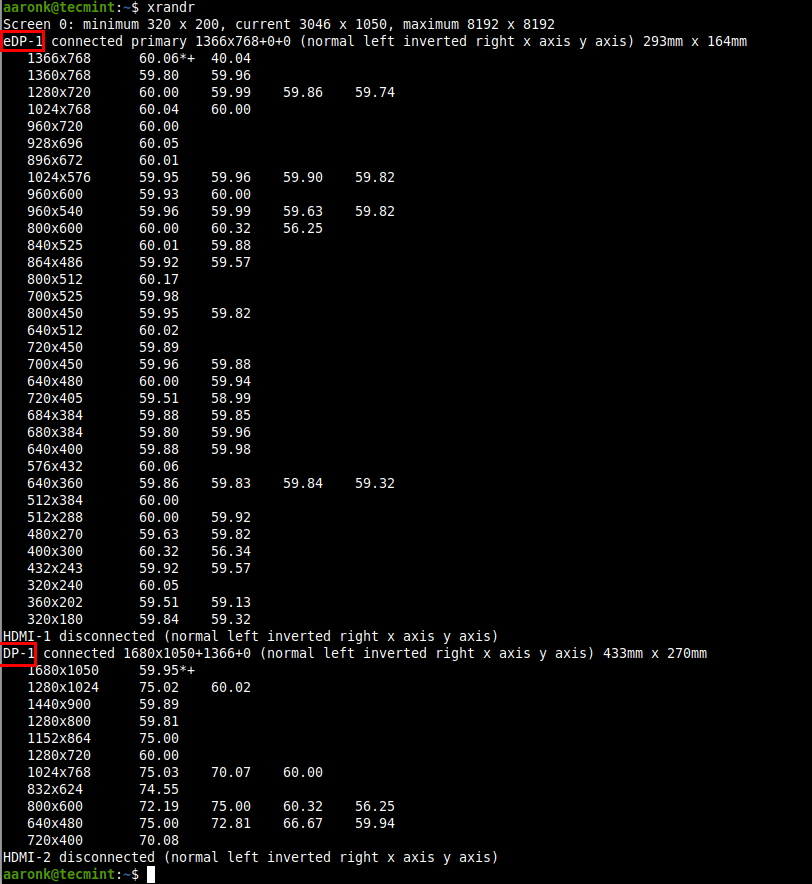
You can also use it to set the screen size or list all active monitors as shown.
$ xrandr --listactivemonitors

To show the names of different outputs available on your system and resolutions available on each, run xrandr without any arguments.
Set Screen Resolution in Ubuntu
To set the resolution for a screen for an external monitor named DP-1 to 1680×1050, use the —mode flag as shown.
$ xrandr --output DP-1 --mode 1680x1050
You can also set the refresh rate using the —rate flag as shown.
$ xrandr --output DP-1 --mode 1680x1050 --rate 75
You can also use the —left-of , —right-of , —above , —below , and —same-as options to arrange your screens either relatively to each other.
For example, I want my external monitor (DP-1) to be positioned left of the Laptop screen (eDP-1) in correspondence to the actual physical positioning:
$ xrandr --output DP-1 --left-of eDP-1
Keep in mind that any changes made using xrandr will only last until you log out or restart the system. To make xrandr changes persistently, use the xorg.conf configuration files for Xorg X server (run man xorg.conf for details on how to create a xorg.conf file) – this is the most effective method.
You can also use the ~/.xprofile file (add xrandr commands in it), however, there are some disadvantages of using this method, one is that this script is read fairly late in the startup process, thus it will not alter the resolution of the display manager (if you use one e.g lightdm).
How to Add Missing or Set Custom Display Resolution Using xrandr
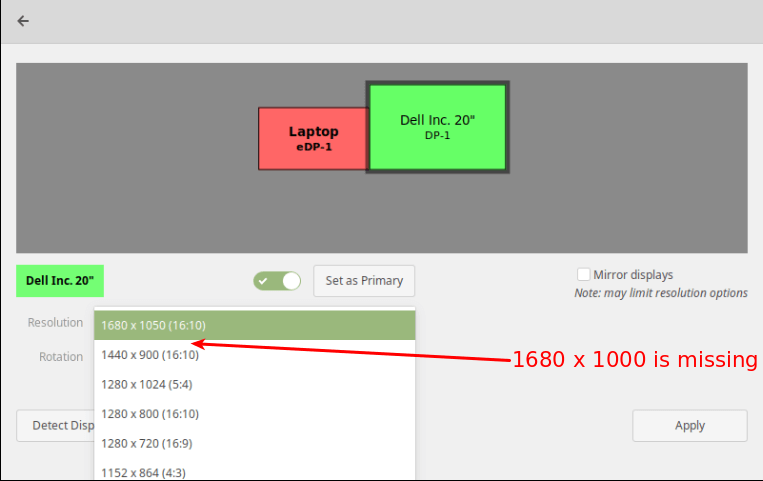
It is possible to add a missing or custom display resolution e.g 1680 x 1000 to Displays panel, for a specific display device (DP-1), as explained below.
To add a missing or custom display resolution, you need to calculate the VESA Coordinated Video Timing (CVT) modes for it. You can do this using the cvt utility as follows.
For example, if you need a horizontal and vertical resolution of 1680 x 1000, run the following command.
Next, copy the Modeline (“1680x1000_60.00″ 139.25 1680 1784 1960 2240 1000 1003 1013 1038 -hsync +vsync) from the output of the cvt command and use it to create a new mode using the xrandr as shown.
$ xrandr --newmode "1680x1000_60.00" 139.25 1680 1784 1960 2240 1000 1003 1013 1038 -hsync +vsync
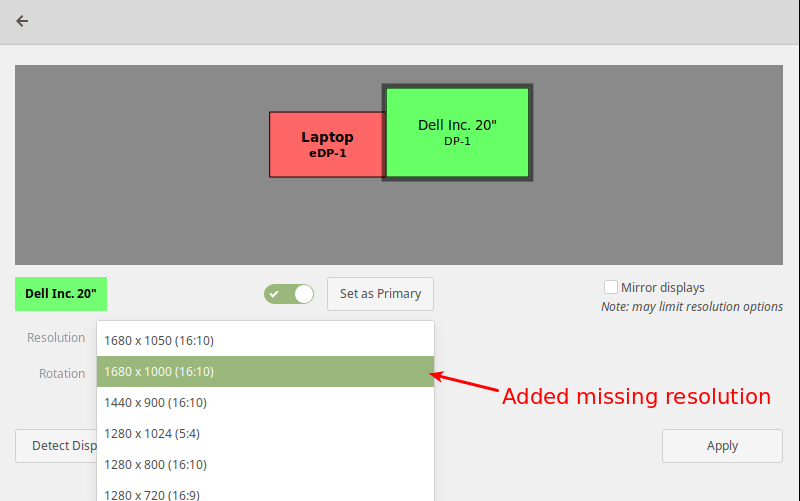
Then add the new mode to the display.
$ xrandr --addmode DP-1 "1680x1000_60.00"

Now open the Displays and check if the new resolution has been added.
The above changes are only temporary and work for the current session (they last until you log out or restart the system).
To add the resolution permanently, create a script called external_monitor_resolution.sh in the directory /etc/profile.d/.
$ sudo vim /etc/profile.d/external_monitor_resol.sh
Then add the following lines in the file:
xrandr --newmode "1680x1000_60.00" 139.25 1680 1784 1960 2240 1000 1003 1013 1038 -hsync +vsync xrandr --addmode DP-1 "1680x1000_60.00"
Save the changes and exit the file.
For more information on how xrandr works and how to use it, read its man page:
That brings us to the end of this article. If you have any thoughts to share or queries, reach us via the feedback form below.
Change the resolution or orientation of the screen
You can change how big (or how detailed) things appear on the screen by changing the screen resolution . You can change which way up things appear (for example, if you have a rotating display) by changing the rotation .
- Open the Activities overview and start typing Displays .
- Click Displays to open the panel.
- If you have multiple displays and they are not mirrored, you can have different settings on each display. Select a display in the preview area.
- Select the orientation, resolution or scale, and refresh rate.
- Click Apply . The new settings will be applied for 20 seconds before reverting back. That way, if you cannot see anything with the new settings, your old settings will be automatically restored. If you are happy with the new settings, click Keep Changes .
Orientation
On some devices, you can physically rotate the screen in many directions. Click Orientation in the panel and choose from Landscape , Portrait Right , Portrait Left , or Landscape (flipped) .
If your device rotates the screen automatically, you can lock the current rotation using the button at the bottom of the system menu . To unlock, press the button
Resolution
The resolution is the number of pixels (dots on the screen) in each direction that can be displayed. Each resolution has an aspect ratio , the ratio of the width to the height. Wide-screen displays use a 16∶9 aspect ratio, while traditional displays use 4∶3. If you choose a resolution that does not match the aspect ratio of your display, the screen will be letterboxed to avoid distortion, by adding black bars to the top and bottom or both sides of the screen.
You can choose the resolution you prefer from the Resolution drop-down list. If you choose one that is not right for your screen it may look fuzzy or pixelated .
Native Resolution
The native resolution of a laptop screen or LCD monitor is the one that works best: the pixels in the video signal will line up precisely with the pixels on the screen. When the screen is required to show other resolutions, interpolation is necessary to represent the pixels, causing a loss of image quality.
Refresh Rate
The refresh rate is the number of times per second the screen image is drawn, or refreshed.
Scale
The scale setting increases the size of objects shown on the screen to match the density of your display, making them easier to read. Choose 100% or 200% .
Изменение разрешения или ориентации экрана
Изменяя разрешение экрана , можно настроить, насколько крупно (или насколько подробно) показываются элементы изображения на экране. А изменяя ориентацию экрана (если, например, у вас есть вращающийся экран), можно настроить, какая сторона экрана будет верхней.
- Откройте Обзор и начните вводить: Мониторы .
- Нажмите Мониторы , чтобы открыть этот раздел настроек.
- Если у вас есть несколько мониторов, и они не отражаются зеркально, то к каждому монитору можно применить отдельные настройки. Выберите монитор в области предварительного просмотра.
- Выберите ориентацию, разрешение, масштаб и частоту обновления.
- Нажмите Применить . Новые настройки сначала применяются в течение 20 секунд, и если эффект применения новых настроек вас не устроит, откат к старым настройкам произойдёт автоматически. Если же всё хорошо, нажмите Оставить эту конфигурацию .
Ориентация
На некоторых устройствах вы можете физически поворачивать экран во многих направлениях. Нажмите Ориентация на панели и выберите Альбомная , Книжная правая , Книжная левая или Альбомная (перевёрнутая) .
Если ваше устройство поворачивает экран автоматически, вы можете заблокировать данное действие с помощью кнопки в нижней части системного меню . Чтобы разблокировать, нажмите кнопку
Разрешение
Разрешение — это количество пикселей (точек на экране) которое можно отобразить в каждом направлении. Разрешение имеет соотношение сторон , то есть отношение ширины к высоте. Широкоэкранные дисплеи используют соотношение 16:9, а традиционные — 4:3. При выборе разрешения, не соответствующего соотношению сторон вашего монитора, во избежание искажения изображения, к нему будет применена технология леттербоксинга, т.е. сверху и снизу (или справа и слева) экрана будут добавлены чёрные полосы.
Выбрать нужное разрешение можно из выпадающего списка Разрешение . Если выбрано разрешение, не подходящее для вашего экрана, изображение может стать размытым или мозаичным .
Естественное разрешение
Лучше всего работает собственное разрешение экрана ноутбука или ЖК-монитора: пиксели в видеосигнале точно совпадают с пикселями на экране. Если экрана будет показывать изображение с другим разрешением, для показа пикселей нужна будет интерполяция, что повлечет за собой потерю качества изображения.
Частота обновления
Частота обновления — это количество обновлений изображения на экране за одну секунду.
Масштаб
Настройка масштаба увеличивает размер объектов, отображаемых на экране, в соответствии с плотностью вашего дисплея, что облегчает их чтение. Выберите 100% или 200% .