- How can I create an administrator user from the command line?
- 4 Answers 4
- How to Make a User an Administrator in Ubuntu
- Make a User an Administrator in Ubuntu Through the GUI
- Make a User an Administrator in Ubuntu Through the Command Line
- Method 1: The usermod command
- Method 2: The gpasswd command
- Search
- About This Site
- Latest Tutorials
- Linux superuser access, explained
- Lock root at installation
- Disable root
- Training & certification
- Delegate administration
- Sudo aliases
- Protect your admin privileges
How can I create an administrator user from the command line?
@JizoSaves Generally speaking, it depends. adduser is more interactive, and useradd is designed for scripts.
4 Answers 4
Add the user to the sudo group with:
(If you’re running Ubuntu 11.10 or earlier, use the admin group.)
Default values are stored in /etc/adduser.conf , you can check them with
To create a user and add it directly to the sudo group use
(Again, use admin in place of sudo for 11.10 and earlier.)
Have a look at all the options you have with adduser here.
This is the first line of using -D : Option d is ambiguous (debug, disabled-login, disabled-password) . adduser interprets it as a mistake and tells you all the flags and options you can use . Definitely got nothing to do with defaults.
To create a new user with admin privileges in Ubuntu 12.04 and later:
In Ubuntu 11.10 and earlier, use this instead:
To modify a existing user (12.04 and later):
(Or for 11.10 and earlier: sudo usermod -aG admin )
-a stands for append whereas -G stands for groups. With the -a and -G flags as shown above, the sudo (or admin ) group will be added to the list of groups of which the user is a member.
When I do adduser foobar sudo before creating the user, in Xenial it says «adduser: the username `foobar’ does not exist», and it’s not shown in /etc/passwd , so I believe the user is not created.
On Trusty I get this: «` $ sudo adduser neue —group sudo adduser: Please specify a single name in this mode. $ sudo adduser neue sudo adduser: The user ‘neue’ does not exist. «`
The other answers are correct but you also asked about the home directory. You will also need a password for the new user.
sudo useradd *new-admin-username* -s /bin/bash -g sudo -m - -s sets the user’s login shell
- -m makes the user’s home directory if it doesn’t exist: /home/*new-admin-username*
- -g adds the user to the sudo group so they will have admin privileges (>11.10)
Once created, add a password for the user:
sudo passwd *new-admin-username* Login to the user to see if everything worked:
su *new-admin-username* cd ~/ pwd How to Make a User an Administrator in Ubuntu

If you have more than one user on your Linux system, you may not want all of them to perform administrative tasks or mess up private system settings. In this case, you can avoid giving these users administrative rights in Ubuntu. Unauthorized users won’t be able to install or uninstall software on your system, and they won’t be able to change important system settings and configurations. Even if you are not at your computer, unauthorized users cannot perform these tasks because they all need sudo privileges and must know the password for sudo.
However, if you want to grant administrative privileges to a user, this article is for you.
In this article, I describe how to make a user an administrator through the graphical user interface and explain what commands you need to use on the command line to add a user to the sudo (authorized) user group.
We have run the commands and procedures mentioned in this article on an Ubuntu 20.04 and Ubuntu 22.04 system.
Make a User an Administrator in Ubuntu Through the GUI
In order to change user settings through the UI, you need to open the Users tab in the System Settings utility. You can access it through the following two ways:
Enter the ‘users’ keyword in the system Dash and click on the “Users” search result.

Click on the downward arrow located in the top-right corner of your Ubuntu desktop, click on your username in the following view and then click Account Settings from the drop-down.

The Settings utility will open, displaying the Users tab. Please note that only an authorized user can change user settings in Ubuntu. First, you need to unlock the tab in order to make changes as an administrator by clicking the Unlock button located in the top-right corner of the Users view:

This will open the following Authentication dialog where you can provide the password for the authorized user:

Enter the password and then click the Authenticate button. Now you can make changes to any user’s settings. Click on the username of the user you want to make an Administrator.

In the Account Type of the user you will see two buttons; the Standard button and the Administrator button. Click on the Administrator button to make this user an Administrator. As soon as you do this, the user will be given administrative privileges and can now perform all operations that need root rights.
Make a User an Administrator in Ubuntu Through the Command Line
We will describe two ways to make a standard Ubuntu user an Administrator through the command line:
We will use the Ubuntu command line application, the Terminal, to perform this operation. You can open the Terminal either through the system Dash or the Ctrl+Alt+T shortcut.
Method 1: The usermod command
Open the Terminal and enter the following command as sudo as only an authorized user can edit user settings in Ubuntu:
$ sudo usermod -aG sudo “username”
In this example we will use the following command to make a user with the username “sampleuser” an administrator:
$ sudo usermod -aG sudo sampleuser

Enter the password for sudo and the user will be added to the “sudo” group which means that he/she can perform all administrative tasks on Ubuntu.
You can verify that the user is now in the “sudo” group by checking the groups a user belongs to, through the following command:
The following output of the ‘groups’ command for our “sampleuser” indicates that he/she is now part of the sudo group.
![]()
Method 2: The gpasswd command
Open the Terminal and enter the following gpasswd command as sudo as only an authorized user can edit user settings in Ubuntu:
$ sudo gpasswd -a “username” sudo
In this example, we are adding the “sampleuser” to the sudo group through the following command:
$ sudo gpasswd -a sampleuser sudo
![]()
You can also remove a user from the sudo group through the -r switch in the same gpasswd command:
$ sudo gpasswd -d “username” sudo
In this example, we are removing the “sampleuser” from the sudo group through the following command:
$ sudo gpasswd -a sampleuser sudo
![]()
Through the methods described in this article, you can make an ordinary Ubuntu user an Administrator so that they can perform all tasks that require root privileges on the system.
Search
About This Site
Vitux.com aims to become a Linux compendium with lots of unique and up to date tutorials.
Latest Tutorials
Linux superuser access, explained
Here’s how to configure Linux superuser access so that it’s available to those who need it—yet well out of the way of people who don’t need it.

On Linux, everything starts at «root.» The hard drive has a root partition ( / ), and the default initial user (at least traditionally) is root (often referred to as the «superuser»). Historically, you used the root account to log in, create secondary «normal» users, and then mostly forget about it.

These days, though, the root user is redundant to requirements. The Anaconda installer can create an initial user for you, and then you can perform «superuser» tasks with the sudo command. A computer’s admin must understand how to configure superuser access so that it’s well out of the way of people who don’t need it and available to those who require it.
Lock root at installation
An attacker with enough knowledge to attempt a break-in also knows that every Unix and Linux system once had a user called root . That’s one less guess an attacker must make when attempting unauthorized entry into a system. Locking down the root account is a significant foil to uninvited guests.
During installation, you have the option to lock the root account.
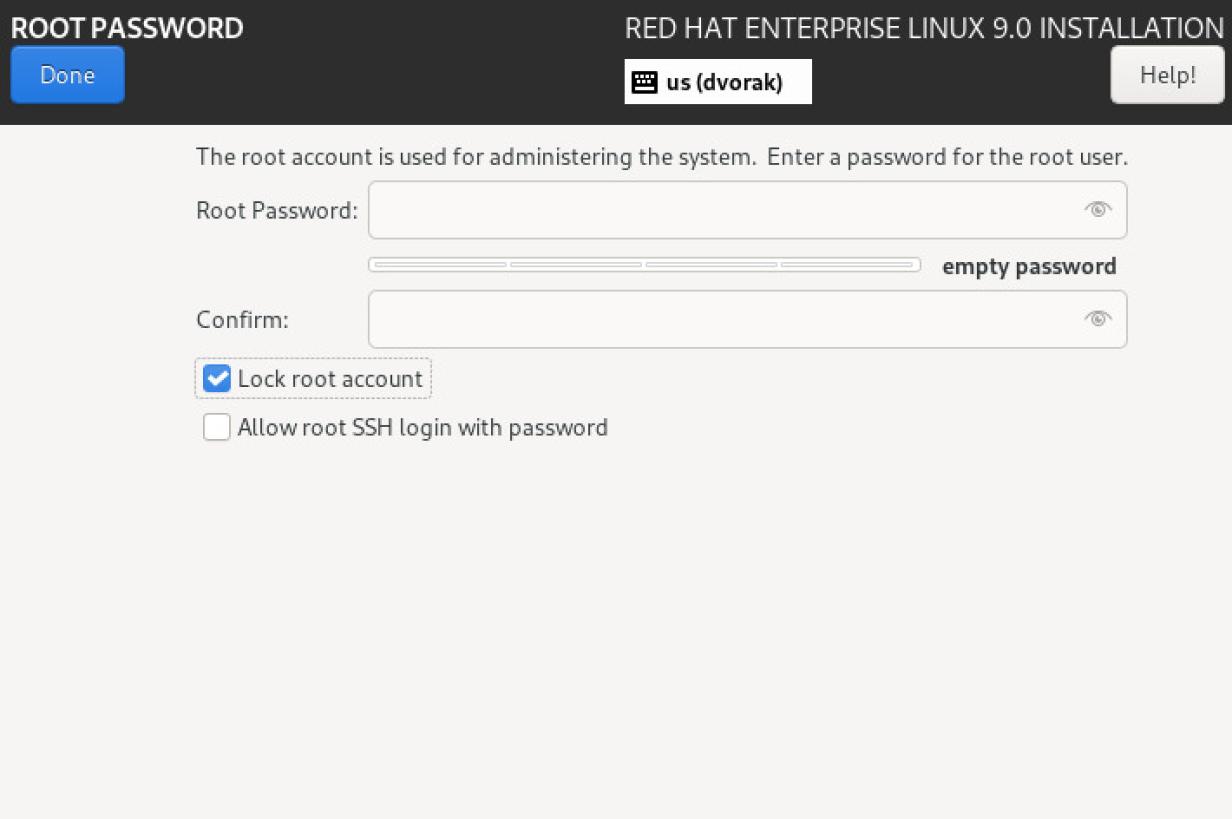
Locking the root account prevents you from logging in as the root user. If you do that, grant the user you create administrative privileges during user creation.

Making the user an admin adds that user to the special wheel group. By default, members of wheel can run any command with sudo with, essentially, root privilege. It seems nearly the same as using su to switch to the superuser account, but there are safeguards and advantages to sudo .
Disable root
If you didn’t lock the root account during installation, or if you’re unsure, then you can disable the root account later, as long as you have administrative privileges. If you don’t, then use the root account to add your user to the sudoers file and then use sudo to disable root.
To disable root, set the root shell to /sbin/nologin :
$ sudo sed -i 's_root:/bin/bash_root:/sbin/nologin_' /etc/passwdTest your change by attempting to switch to the superuser account with su :
$ sudo su - [sudo] password for tux: This account is currently not available.Training & certification
Delegate administration
The su command uses an all-or-nothing model. If you have the password for root, you get all the power. If you don’t have the password, you have no admin power. The problem with this approach is that a sysadmin must choose between handing over the master key to the system and withholding the key and all control of the system. That’s not always what you want. Sometimes you want to delegate.
Suppose you want to grant a user permission to run a specific application, such as the groupadd command, that usually requires administrative permissions. You don’t want to give this user permission to do any administrative task. You just want to allow them to create new groups.
To grant selective privileges to a single command or a group of commands, edit /etc/sudoers with the visudo command. The visudo command assumes you want to edit text with vi but also allows you to override that default by setting the variable EDITOR :
Find the section of the sudoers file defining command permissions, and add the user and command you want to allow. For instance, to permit the user shadowman to run the groupadd command:
## Next comes the main part: which users can run what software on ## which machines (the sudoers file can be shared between multiple ## systems). ## Syntax: ## ## user MACHINE=COMMANDS ## ## The COMMANDS section may have other options added to it. ## ## Allow root to run any commands anywhere # root ALL=(ALL) ALL shadowman ALL=/sbin/groupaddTest it out by switching to that user’s account and running the command:
$ su - shadowman Password: $ sudo groupadd qa [sudo] password for shadowman: $ sudo ls Sorry, user bogan is not allowed to execute '/bin/ls' as root on darkstar.sysadmin.local.Sudo aliases
You can create aliases in the sudoers file to group hosts, commands, and users together. You could have, for instance, an admin group that could use commands such as useradd , groupadd , and usermod , and a software group that could use commands like dnf and rpm .
The sudoers file provides example syntax, but here’s an example of allowing all users in the Unix group softadmins to run all commands in the sudoer alias SOFTWARE :
## Installation and management of software Cmnd_Alias SOFTWARE = /usr/bin/dnf, /usr/bin/rpm softadmins ALL=SOFTWARE Protect your admin privileges
Everything from mission-critical machines to computers with customer data, and even your own humble personal laptop, are too important to casually lend the keys out to anyone who needs an escalation of privilege. Disable the root account to avoid broad permission escalation, and use the sudo command and a well-tended sudoers file to manage who can manage your computers.