Общие папки Linux
Если вы администрируете какой-либо сервер, у вас может возникнуть необходимость создать общую папку, к которой будут иметь доступ все пользователи на сервере. Например, необходимо, чтобы они имели возможность создавать в ней файлы и все эти файлы были доступны всем пользователям на сервере.
В этой небольшой статье мы рассмотрим как настраиваются общие папки Linux с помощью стандартной системы полномочий Linux.
Общие папки в Linux
Как вы знаете, в Linux есть своя система полномочий для файлов и папок, в которой можно разрешить чтение, запись и выполнение для пользователя владельца, определённой группы пользователей и всех остальных. Если вы забыли как это работает ознакомьтесь со статьей Права доступа к файлам и Группы пользователей Linux.
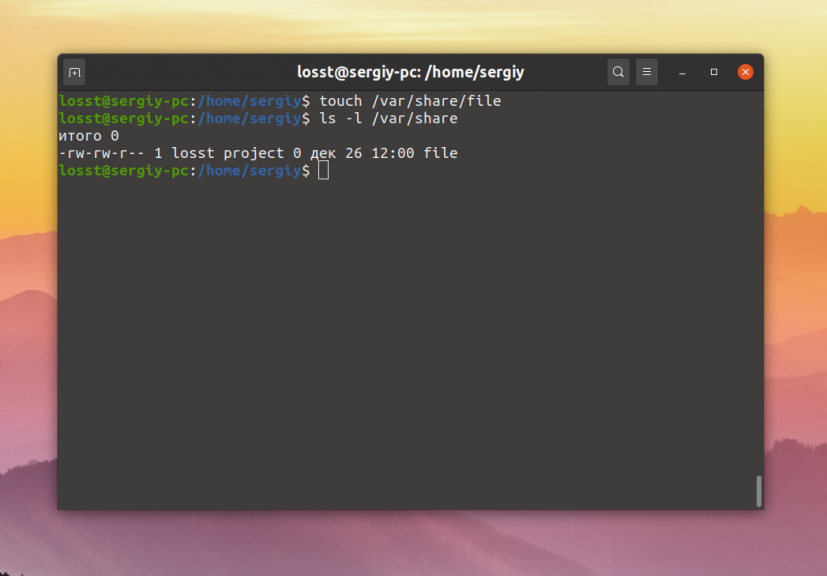
Сначала давайте создадим саму папку:
Если надо разрешить доступ к папке всем, то достаточно установить такие права:
sudo chmod ugo+rw -R /var/share
sudo chmod 766 -R /var/share
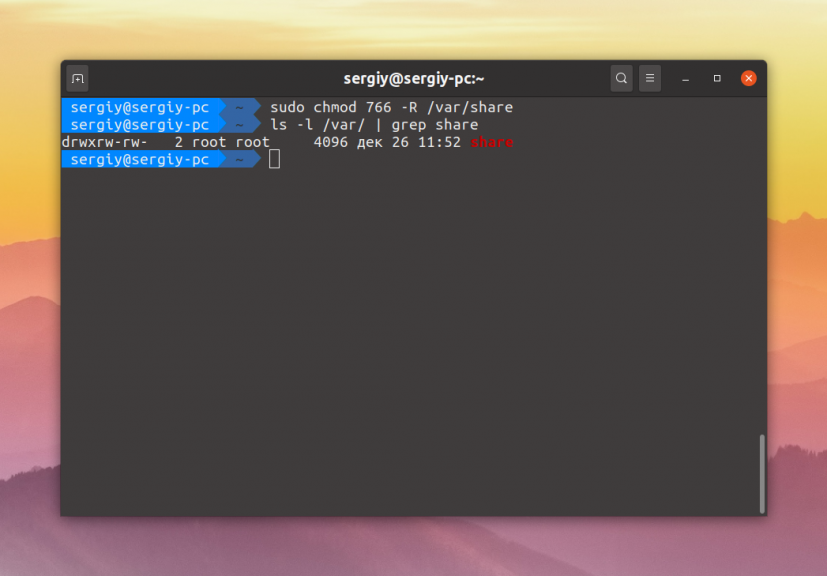
Эти две команды аналогичны. Они включают для владельца файла полный доступ к нему, а для группы и всех остальных — только чтение и запись. Опция -R позволяет применить изменения рекурсивно ко всем подпапкам и файлам в этом каталоге. Для того чтобы разрешить вообще всё используйте маску прав 777:
sudo chmod 777 -R /var/share
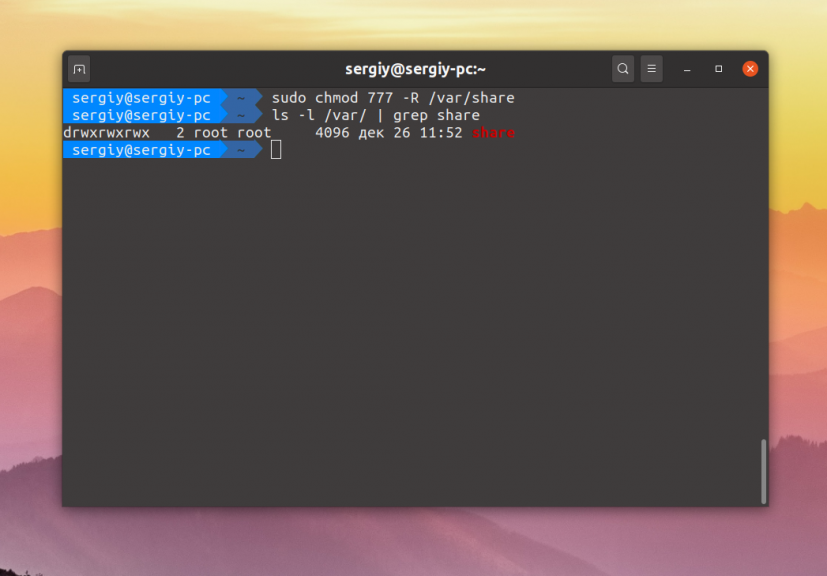
Теперь все пользователи смогут не только создавать и читать файлы в этой папке, но и выполнять их.
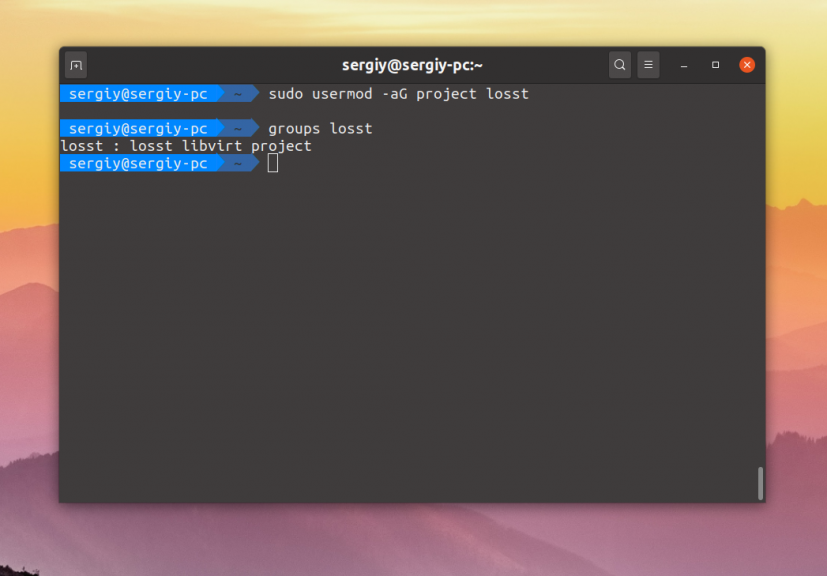
Если же надо чтобы папка была доступна только нескольким пользователям, надо объединить их в группу. Например, в группу project. Если такой группы не существует, создайте её:
Для добавления пользователя в группу используется команда usermod. Например, для пользователей losst и losst1 команды будут выглядеть так:
usermod -aG project losst
usermod -aG project losst1
Затем группу папки надо изменить на project. Для этого можно воспользоваться командой chgrp:
sudo chgrp project -R /var/share
Осталось сделать права для этой папки. Кроме стандартных прав, которые разрешают чтение, запись и выполнение файлов для группы project нам необходимо установить SGID бит. Если этот флаг устанавливается для файла, то он позволяет выполнять этот файл с правами группы файла, но если он устанавливается для папки, то все файлы и папки, создаваемые в ней будут получать ту же группу что и у этой папки. Это как раз то, что нам надо:
sudo chmod ug+rwx -R /var/share
sudo chmod +s -R /var/share
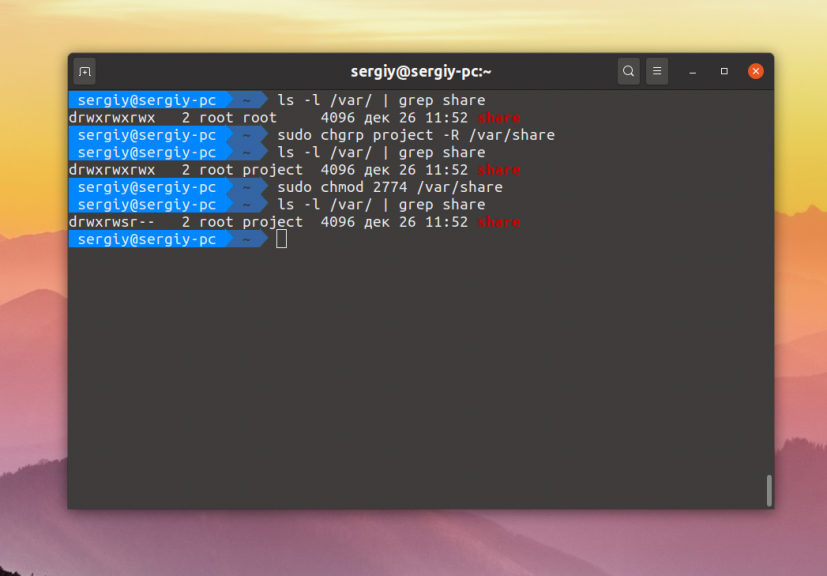
Маска прав 774 разрешает всё группе и владельцу, и разрешает только чтение всем остальным. Можно запретить им и чтение заменив 4 на 0, получится 770. После этого оба пользователя losst и losst1 смогут создавать файлы в этой папке, а также оба получат доступ к созданным файлам.
Как видите всё очень просто. А если вам надо создать общую папку, доступную по сети посмотрите на статью про настройку NFS или Samba.
Обнаружили ошибку в тексте? Сообщите мне об этом. Выделите текст с ошибкой и нажмите Ctrl+Enter.
Как сделать общую сетевую папку в Linux (настройка SMB в Linux)
Начните с установки пакетов samba и smbclient.
В Debian, Linux Mint, Ubuntu, Kali Linux и их производных для установки samba выполните команду:
sudo apt install samba smbclient
В Arch Linux, BlackArch и их производных выполните команду:
sudo pacman -S samba smbclient
Следующая команда не сработает, если отсутствует файл /etc/samba/smb.conf. Если у вас тоже нет этого файла, то создаёте его заглушку — к настройке самого файла smb.conf мы вернёмся позже:
sudo touch /etc/samba/smb.conf
Теперь нужно добавить пароль для пользователя Samba. Действует следующее правило: имя пользователя должно быть таким же, как у вашего текущего пользователя, а пароль можно установить иной, отличный от вашего системного пароля.
Для установки пароля Samba, выполните следующую команду:
Если вы хотите, чтобы у пользователя не было пароля, то укажите опцию -n.
Создайте папку, которая станет совместно используемой:
Узнаем абсолютный путь до папки ~/linuxshare:
Откройте для редактирования файл /etc/samba/smb.conf:
sudo gedit /etc/samba/smb.conf
Добавьте туда строки вида:
[ИМЯ_ПАПКИ] comment = Samba на Linux path = /home/ИМЯ_ПОЛЬЗОВАТЕЛЯ/ИМЯ_ПАПКИ valid users = ИМЯ_ПОЛЬЗОВАТЕЛЯ read only = no browsable = yes
Обратите внимание, что все пробелы в строках выше являются обязательными.
Для моих данных это строки:
[linuxshare] comment = Samba на Linux path = /home/mial/linuxshare valid users = mial read only = no browsable = yes
Теперь запустим службу SMB:
sudo systemctl start smb.service
Для добавления службы в автозагрузку выполните:
sudo systemctl enable smb.service
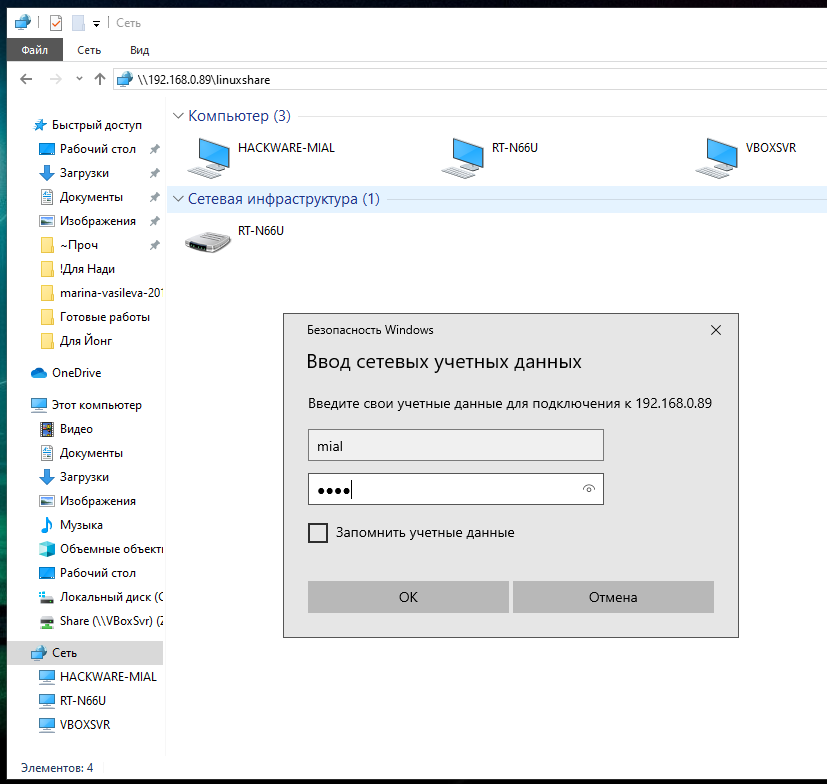
Для подключения к этой общей сетевой папке на Linux нужно использовать IP адреса компьютера Linux.
Создадим файл, чтобы сетевая папка не была пустой:
echo "Документ на Linux" > ~/linuxshare/document.txt
Посмотрите локальный IP адрес компьютера, на котором запущена Linux:
У меня этим IP является 192.168.0.89, а папку, как мы помним, я создал с именем linuxshare, тогда в Windows я перехожу в проводнике во вкладку «Сеть» и подключаюсь к этой папке следующим образом:
Вводим учётные данные (которые мы установили командой smbpasswd):
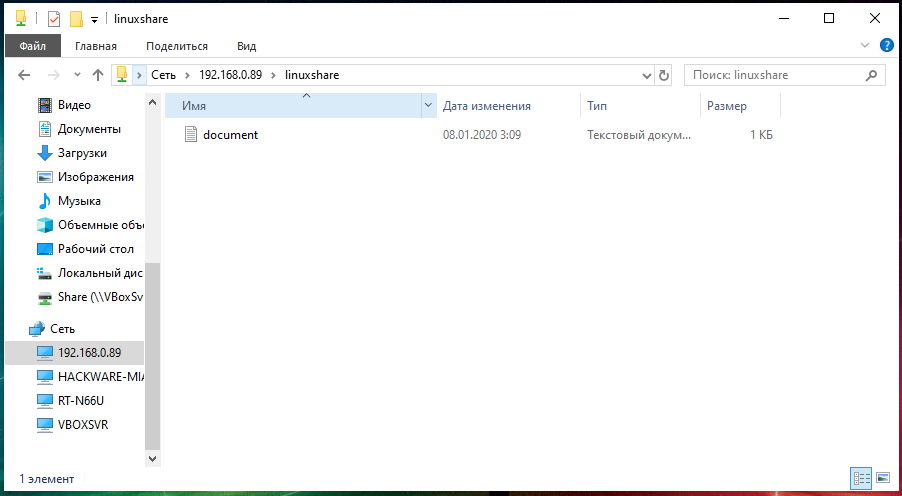
Видим содержимое совместно используемой папки, размещённой на Linux с помощью SMB:
Для подключения к сетевой папке из консоли Linux, запустите команду вида:
sudo smbclient //IP_АДРЕС/Папка -U ПОЛЬЗОВАТЕЛЬ
sudo smbclient //192.168.0.89/linuxshare -U mial
После ввода пароля нам становится доступным содержимое сетевой папки.
How to Create a Shared Directory for All Users in Linux
As a system administrator, you may have a certain directory that you want to give read/write access to every user on a Linux server. In this guide, we will review how to enable write access to all users on a particular directory (shared directory) in Linux.
This calls for setting the appropriate access permissions, and the most effective as well as reliable method to allocating a common group for all the users who will share or have write access to the specific directory.
So, start by creating the directory and common group in case it doesn’t already exist on the system as follows:
$ sudo mkdir -p /var/www/reports/ $ sudo groupadd project
Then add an existing user who will have write access to the directory: /var/www/reports/ to the group project as below.
$ sudo usermod -a -G project tecmint

The flags and arguments used in the above command are:
- -a – which adds the user to the supplementary group.
- -G – specifies the group name.
- project – group name.
- tecmint – existing username.
Afterwards, proceed to configure the appropriate permissions on the directory, where the option -R enables recursive operations into subdirectories:
$ sudo chgrp -R project /var/www/reports/ $ sudo chmod -R 2775 /var/www/reports/
Explaining the permissions 2775 in the chmod command above:
- 2 – turns on the setGID bit, implying–newly created subfiles inherit the same group as the directory, and newly created subdirectories inherit the set GID bit of the parent directory.
- 7 – gives rwx permissions for owner.
- 7 – gives rwx permissions for group.
- 5 – gives rx permissions for others.
You can create more system users and add them to the directory group as follows:
$ sudo useradd -m -c "Aaron Kili" -s/bin/bash -G project aaronkilik $ sudo useradd -m -c "John Doo" -s/bin/bash -G project john $ sudo useradd -m -c "Ravi Saive" -s/bin/bash -G project ravi
Then create subdirectories where the new users above will store their project reports:
$ sudo mkdir -p /var/www/reports/aaronkilik_reports $ sudo mkdir -p /var/www/reports/johndoo_reports $ sudo mkdir -p /var/www/reports/ravi_reports
Now you can create files/folders and share with other users on the same group.
That’s it! In this tutorial, we reviewed how to enable write access to all users on a particular directory. To understand more about users/groups in Linux, read How to Manage Users/Groups File Permissions and Attributes.
Remember to offer us your thoughts about this article via the feedback form below.
Aaron Kili is a Linux and F.O.S.S enthusiast, an upcoming Linux SysAdmin, web developer, and currently a content creator for TecMint who loves working with computers and strongly believes in sharing knowledge.
Each tutorial at TecMint is created by a team of experienced Linux system administrators so that it meets our high-quality standards.
Related Posts

15 thoughts on “How to Create a Shared Directory for All Users in Linux”
“The standard behavior for new files and sub-directories is to ALWAYS receive the creator’s GROUP” – RHCSA RHEL 8, A. Ghori, 1st edition. In the example of this tutorial, I do not understand why we enabled setgid for the directory SINCE all the system users created (aaronkilik, john, and ravi) belong to the same group (called “project“) as the group of the parent directory “reports” (sudo chgrp -R project /var/www/reports/). I mean if the user aaronkilik or any other of the two users create a file or sub-directory in “reports“, since the aaronkilik belongs to the group called “project“, the file/sub-directory created receives the creator’s group like stated in the first phase, that is the group “project“. Why is it needed to enabled setgid for the “project” directory? Maybe there is a reason but I do not see it now. I could see the reason to enable setgid in case the three system users created belonged to different groups (in this case chmod -R 2777 /var/www/reports/ would be needed too). Thank you. Reply
Hi, Need help to set up multiple project-wise Shared Directory via GUI panel on Ubuntu on currently running the server? Reply
What if a user copies or moves a directory tree from his home directory to the shared one?
I don’t think the subdirs will magically change their group, let atone recursivelyy because they are not newly created… Reply
@Evi1 That’s correct, including the recursive option allows subdirectories to be get top directory permissions automatically. Many thanks for the heads up. Reply
Hi, I think that you do not need 2775. More secure is to use chmod -R 2770. In this case only the desired users/group can access this shared folder, and any others will not have access. Reply
@lulian Yap, your correct, we should have used chmod -R 2770, other system users will be blocked from accessing a shared directory. However, always set permissions depending on your environment needs. Reply
In my case, i needed the shared folder were shared also with apache. I had to use “chmod -R 2775”. If I used “chmod -R 2770”, apache couldn’t access to the folders. Reply
How can I share a directory with an another user?
I don’t want the shared folder to be accessible by anyone on the system, I want it to be accessible just to a restricted set of users. How to I do that?
1 Answer 1
Taken from this excellent post on Ubuntu Forums by Morbius1.
The classic Linux way of doing this sort of thing goes something like this:
sudo chown :newgroup /home/Shared sudo adduser user1 newgroup Now you have some decisions to make about what you want those users to be able to do:
- [a] All group users can add to and delete from the folder and can read and but not write to each others files:
sudo chmod 0770 /home/Shared sudo chmod 1770 /home/Shared sudo chmod 2770 /home/Shared sudo chmod 3770 /home/Shared A 1 in the first position of the chmod command is the sticky bit which prevents deletion of a file to anyone other than the owner.
A 2 in the first position of the chmod command is the setgid bit which forces all new or copied files to have the group of that folder.
A 3 in the first position of the chmod command is the combination of the sticky ( 1 ) & setgid ( +2 ) bits.
There is one caveat to all this as far as the setgid bit is concerned. All new files created in and any files copied to that folder will in fact inherit the group of the folder. But not files moved to that folder. Moved files retain the ownership from wherever they were moved from. One way to get past this problem is to use bindfs.
Finally if you want others outside the group to be able to see the files but not change them change the final 0 in the chmod command to a 5 eg:
sudo chmod 0775 /home/Shared