How to list disks, partitions and filesystems in Linux? [duplicate]
In Windows, if you type LIST DISK using DiskPart in a command prompt it lists all physical storage devices, plus their size, format, etc. What is the equivalent of this in Linux?
3 Answers 3
There are many tools for that, for example fdisk -l or parted -l , but probably the most handy is lsblk (aka list block devices):
Example
$ lsblk NAME MAJ:MIN RM SIZE RO TYPE MOUNTPOINT sda 8:0 0 238.5G 0 disk ├─sda1 8:1 0 200M 0 part /boot/efi ├─sda2 8:2 0 500M 0 part /boot └─sda3 8:3 0 237.8G 0 part ├─fedora-root 253:0 0 50G 0 lvm / ├─fedora-swap 253:1 0 2G 0 lvm [SWAP] └─fedora-home 253:2 0 185.9G 0 lvm It has many additional options, for example to show filesystems, labels, etc. As always man lsblk is your friend.
@Dor it is worth explaining what additional options do, if you are recommending their use. -f or —fs shows the information about filesystems, such as format, crypto, raid member, etc. It is somewhat slower than the default though.
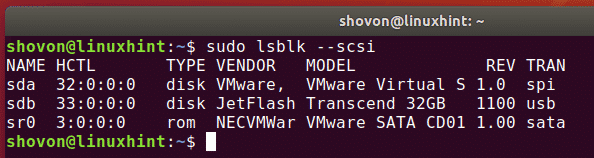
You’ll like this : you can do sudo lsblk —scsi and this shows the disk types including name(sda,sdb. ), scsi addr, type,vendor, model, rev, .. it’s easy to find which is which when you want to physically locate the disk.
Another way to quickly see the filesystems is the command df. On my machine (Finnish localization) it shows like this:
ptakala@athlon:/mnt$ df Tiedostojärjestelmä 1K-lohkot Käyt Vapaana Käy% Liitospiste /dev/root 38317204 19601752 16762352 54% / devtmpfs 4063816 0 4063816 0% /dev tmpfs 4097592 81988 4015604 3% /dev/shm tmpfs 4097592 10120 4087472 1% /run tmpfs 5120 8 5112 1% /run/lock tmpfs 4097592 0 4097592 0% /sys/fs/cgroup /dev/sda9 535267140 287403688 220666804 57% /work /dev/sda7 288239836 201635356 71956016 74% /home tmpfs 819520 4 819516 1% /run/user/113 tmpfs 819520 8 819512 1% /run/user/1000 /dev/sda1 39070048 37083304 1986744 95% /mnt/sda1 /dev/sda10 22662140 14032580 8629560 62% /mnt/sda10 /dev/sda5 29280176 20578032 8702144 71% /mnt/sda5 It won’t show the file system type, but usually that is non-essential, and you see by one eyedrop everything needed.
ptakala@athlon:/mnt$ df -h Tiedostojärjestelmä Koko Käyt Vapaa Käy% Liitospiste /dev/root 37G 19G 16G 54% / devtmpfs 3,9G 0 3,9G 0% /dev tmpfs 4,0G 89M 3,9G 3% /dev/shm tmpfs 4,0G 9,9M 3,9G 1% /run tmpfs 5,0M 8,0K 5,0M 1% /run/lock tmpfs 4,0G 0 4,0G 0% /sys/fs/cgroup /dev/sda9 511G 275G 211G 57% /work /dev/sda7 275G 193G 69G 74% /home tmpfs 801M 4,0K 801M 1% /run/user/113 tmpfs 801M 8,0K 801M 1% /run/user/1000 /dev/sda1 38G 36G 1,9G 95% /mnt/sda1 /dev/sda10 22G 14G 8,3G 62% /mnt/sda10 /dev/sda5 28G 20G 8,3G 71% /mnt/sda5 List Disks on Ubuntu
![]()
You can list all the attached disks on your computer from Ubuntu using the lsblk command as follows:

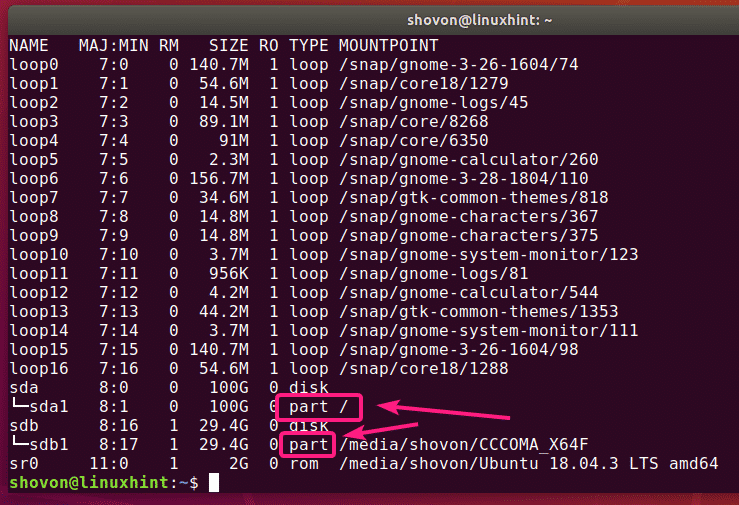
The ones with the TYPE disk are the physically attached disks on your computer.
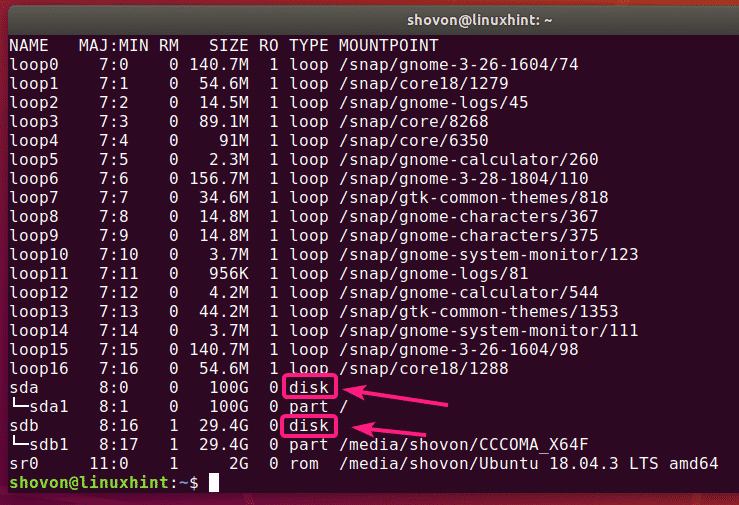
The ones with the TYPE part are the partitions of the disks.
The lsblk command without any filter shows a lot of loop devices that are used by the Ubuntu snap apps. It is annoying I know. Luckily, you can easily get rid of them from the list.
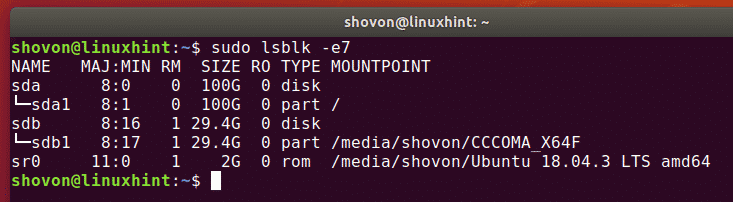
You can use the -e7 option with lsblk to hide the loop devices.

Now that the loop devices are gone, the list looks much clearer now.
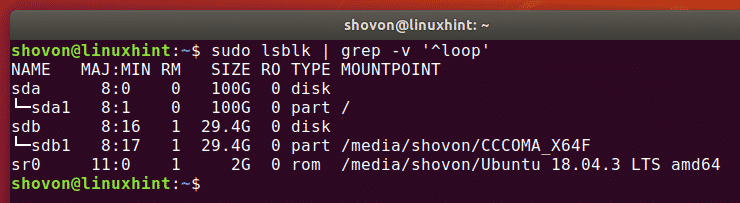
You can also do the same thing with grep.
You can also hide the CD/DVD rom device from the list. Just add the -e11 option along with -e7 option.

You can also list the attached disks on your computer, and their vendor and model information using lsblk as follows:

As you can see, all the attached disks on my computer are listed. Their vendor and model information are also listed.
Using fdisk Command:
You can also list all the attached disks on your computer from Ubuntu using the fdisk command as follows:

fdisk shows all the disks, their total size, their partitions, size of each partitions etc. But sadly, the list is too long and there is no easy way to hide the loop devices.


But if you know the device name (i.e. sda, sdb) of your disk, you can find more information about it very easily with fdisk.

You can also find information about more than one disk at the same time with fdisk. Just put the disks paths as fdisk arguments one after the other.

Using parted Command:
You can use parted to do the same thing. parted may not be installed by default on Ubuntu. But you can easily install it with the following command:

You can get a fdisk like output for all the storage disks attached on your computer with parted as follows:

As you can see, the output format is the same as in fdisk, but parted does not list the annoying loop devices. That’s a good thing.

Using GNOME Disks App:
If you don’t like to use the command line, then there are many graphical programs you can use to list disks on Ubuntu.
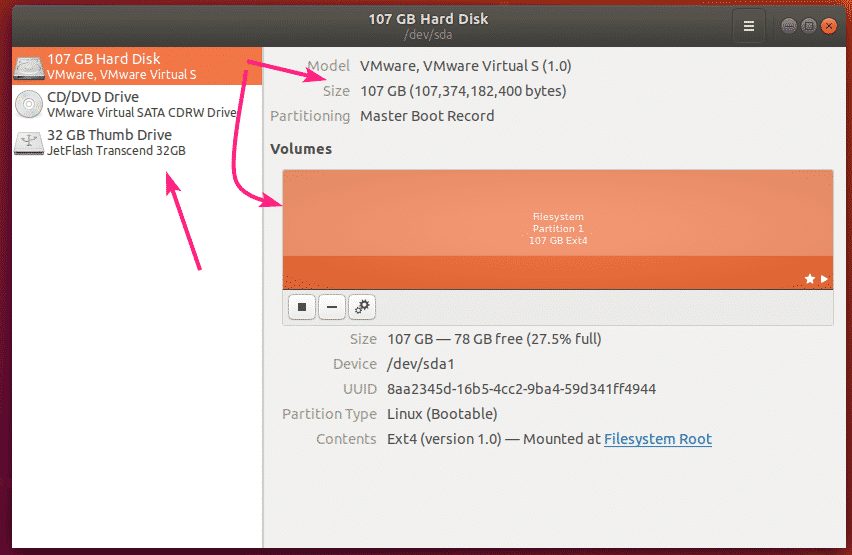
GNOME Disks is the default partitioning app on GNOME desktop environment. You can use it to list the disks attached on your computer.
First, open GNOME Disks from the Application Menu.

GNOME Disks should be opened. On the left side, you will see all the attached storage devices/disks on your computer. To find more information about the disk, click to select the disk. The disk size, partitions and other information about the disk should be listed on the right side.
Using GParted App:
If you don’t like the command line, then you can also use the GParted Partition Editor app to list all the attached disks on your computer.
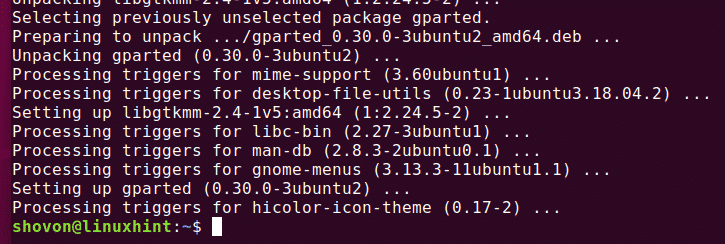
GParted is not installed by default on Ubuntu. But you can easily install GParted with the following command:

GParted should be installed.
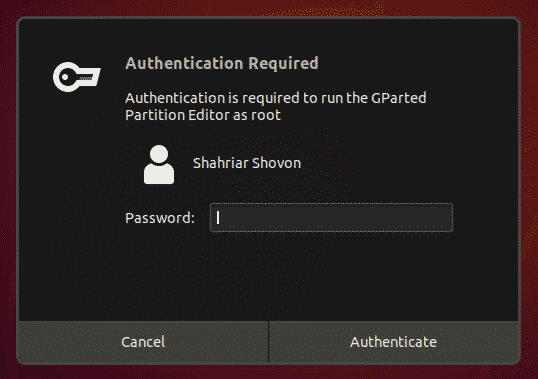
Now, you can start GParted from the Application Menu.

In order to use GParted, you will need superuser privileges. Type in your login password and click on Authenticate.
GParted should start. You can select a disk from the dropdown menu at the top right corner of GParted.
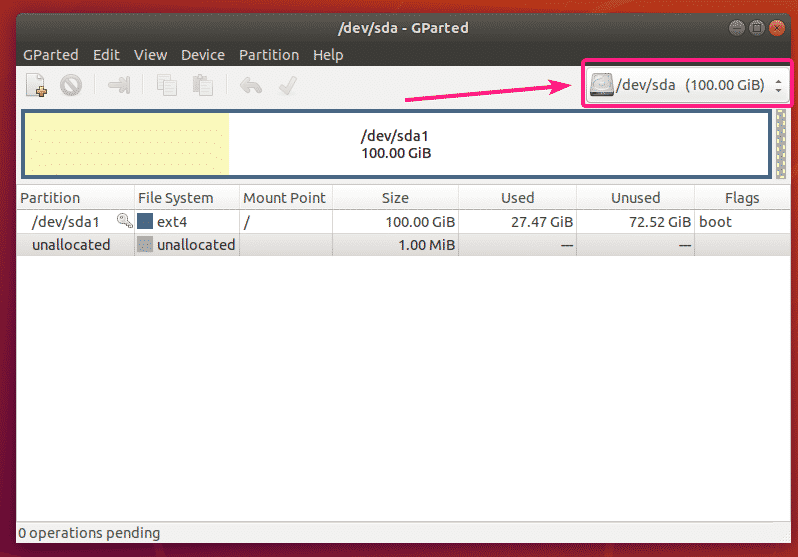
As you can see, all the disks attached on my computer is listed in the dropdown menu. Just select a disk from the list.

The partitions of your selected disk should be displayed.

So, that’s how you list all the disks attached on your computer from Ubuntu.
I’ve shown some of the common methods in this article. If you know of listing disks any other way on Ubuntu, be sure to let me know.
Thanks for reading this article.
About the author
Shahriar Shovon
Freelancer & Linux System Administrator. Also loves Web API development with Node.js and JavaScript. I was born in Bangladesh. I am currently studying Electronics and Communication Engineering at Khulna University of Engineering & Technology (KUET), one of the demanding public engineering universities of Bangladesh.
This post and this website contains affiliate links. See my disclosure about affiliate links.
how to list all hard disks in linux from command line
Hard Disk, Hard Drive, Disk Drive or Hard Disk Drive are all names for a data storage device (hardware device) for storing and retrieving digital information usually in a computer. A computer can have multiple hard disks attached to it, both internal and external.
Now these hard disks can be further divided to multiple logical containers in order to host different file systems or to keep file systems/files separate. These are called partitions and they can then mounted independently with out affecting the other disks and partitions. At a high level abstraction, you can view partition as separate disks as well.
Hard disks on a system are detected and/or identified by various device drivers in the kernel and then assigned an unique device id at boot time, enabling it to be mounted and read later (yeah, this is an over simplification of how it all works but it should suffice for this post). We will see later in the post how you can list disks that have been identified by the system.
The hard disks can be differentiated based on the interface used to interact with them. Some of the commonly used types of disk are SCSI (Small Computer System Interface), ATA or IDE (Advanced Technology Attachment), SATA (Serial ATA), SAS (Serial Attached SCSI) among others. As I mentioned, the physical hard disk is assigned an unique id at startup. This can configured (using udev among others) so that you can assign it pretty much id, but usually most systems follow some universally accepted conventions when naming devices.
By convention, the IDE disks use the device id prefixed with hd and the SCSI (and SATA) disks prefix their device id with sd. So, an IDE disk would be located at /dev/hd(*). eg: /dev/hda, /dev/hdb etc. Similarly, the SCSI disks would be /dev/sda, /dev/sdb etc or in general of the format /dev/sd(*).
There are several different commands that you can use in a Linux environment to list disks that have been mounted on the system.
df
The df command is primarily intended to report file system disk space usage. It is still a good utility to print out the disks that are available to the system, although it prints filesystems rather than disks per se.
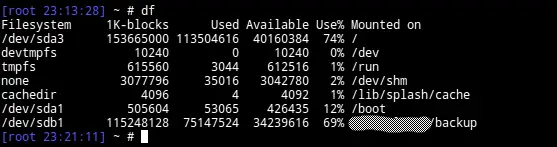
You can use the -h or –human-readable option with df to print out the disk usage in a human readable format. Look for file systems that identify as /dev/sda, /dev/sdb or /dev/hda to identify the disks.
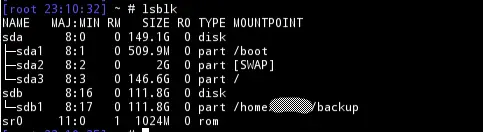
lsblk
The lsblk command is to list block devices. It reads the data from udev database along with sysfs file system to print a report on all available or specified block devices. Block devices abstracts the actual hardware characteristics of any physical device and allows you to interact with it using a buffered interface.
The lsblk command with out any argument will print out the block devices in a tree format. Again look for names, such as sda, sdb etc. The top level denotes the disk and the first level children represent the partitions with in the block.
The are several useful command line options that can be used with lsblk command. The -d or –nodeps will print out the device and not the partitions. The -S or –scsi will output only the SCSI devices.
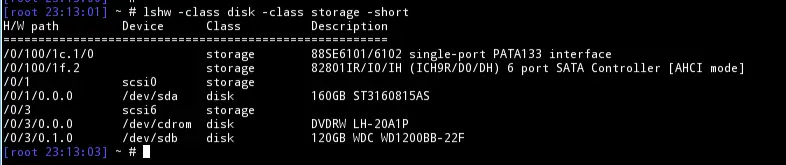
lshw
Another commonly used utility is lshw, which can print out detailed information about your hardware. Again it might not be default in some distros even though it is a system application.
The above command will list all disks on the system. You can also specify the storage class if you want to print out the storage controllers as well. You can further reduce the verbosity of the output by using the -short option
bash$ lshw -class disk -class storage -short
blkid
The previously mentioned lsblk command is a better and recommended option that the blkid command. I include it here just for the sake of completeness.
blkid will print out several different attributes about the block devices. You can usually make out the disks and partitions from the output just as with lsblk.
fdisk
fdisk is a popular command mostly used to manipulate the partition table. You can use it to list all partitions from the partition table and find the devices that are available. The –list or -l command line option will print out all the known partitions from all devices.
You are probably looking for something like this in the output.
Disk /dev/sda: 149.1 GiB, 160041885696 bytes, 312581808 sectors
Units: sectors of 1 * 512 = 512 bytes
Sector size (logical/physical): 512 bytes / 512 bytes
I/O size (minimum/optimal): 512 bytes / 512 bytes
Disklabel type: dos
Disk identifier: 0xa461a461
Disk /dev/sdb: 111.8 GiB, 120034123776 bytes, 234441648 sectors
Units: sectors of 1 * 512 = 512 bytes
Sector size (logical/physical): 512 bytes / 512 bytes
I/O size (minimum/optimal): 512 bytes / 512 bytes
Disklabel type: dos
Disk identifier: 0x00000000