How to Find Out What Motherboard You Have in Linux or Ubuntu
Just like with RAM cards and any USB, PCI or PCI Express devices that you might have attached to your system, Linux provides you with tools to find the make and model of the motherboard you have installed. This is particularly useful because while it can be difficult to get at the other devices to have a look at them, the motherboard is in even a worse spot when it comes to inspection.
Desktop workstations lock their motherboards in a case, and small netbooks or tablets might have a motherboard that’s impossible to access. You can perform an inspection with the command line or by mousing around in a graphical program. Both methods give you essentially the same information.
Method 1: Finding Out what Motherboard you Have with the Terminal
You’ll need to start a terminal window up by holding down Ctrl+Alt+T or by clicking on the Applications Menu, pointing to System Tools and then clicking on Terminal. Ubuntu users who still have the Unity Dash can search for the word Terminal at it and then select the option that comes up.
In any case, you should now be at a normal bash command prompt. From here, type sudo dmidecode | grep -A3 ‘^System Information’ and then push the enter key. You’ll need to type your administrative password if you’re working at a fresh prompt, since a normal user account can’t go poking around with the motherboard.

Polling the board should take nearly no time at all. On the low-powered i386 netbook we tested this command on, it took less than half a second. If there’s any sort of delay, then you might want to make sure that you entered it correctly. You can always swipe the text from this article with your mouse and then copy it. Click on the Edit menu in your terminal then select paste. Holding down Shift+Ctrl+V also works to paste copied text in a terminal.
As long as it ran correctly, then you’re completely done with no further playing around. Generally, motherboards themselves don’t actually have version numbers, as versions are reserved for software. The version number that gets displayed here is referencing the firmware we had installed in the BIOS. If you run this on a more modern UEFI system, then you might see a bit of additional information.
If you’re interested in reading more about your machine’s logic systems, then you have another option to run from the terminal if you’d like. Nevertheless, for most people the above technique was more than enough. It doesn’t require any additional playing around, though, so you can feel free to run it from the same terminal screen that you’re already at.
Try typing sudo dmidecode -t baseboard at the terminal and push enter to receive a mess of information about the baseboard that you’re using in your computer. While this will give you more information than the previous command would have, it will still be in a human-readable format, which makes it useful for troubleshooting.
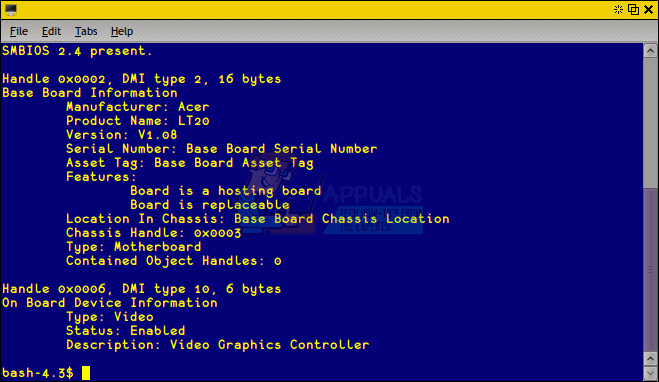
This command will additionally tell you whether or not the logic board that you’re working with is replaceable and where it is in the chassis. Since it uses grep, it still sorts it out quite nice however. Once again, the version number it returns is more than likely related to firmware. You might notice that the manufacturer name differs from the above command, which is the result of the vendor and manufacturer of a piece of hardware not always being completely the same company.
Method 2: Graphically Find Your Motherboard Using hardinfo
If you’re using LXDE or some GNOME implementations, then you have a tool called hardinfo installed. This does the same job, albeit graphically. Most users will want to use the command line app above, but the old Unix rule about there being more than one way to accomplish a task applies here. If you’re using a desktop environment that includes it, then click on the Application menu, point to System Tools and then click on System Profiler and Benchmark. This should go for most compatible re-spins of popular Linux distributions. For instance, Ubuntu got re-spun as Lubuntu with the LXDE desktop environment and there are versions of Debian and Fedora that come with this tool.
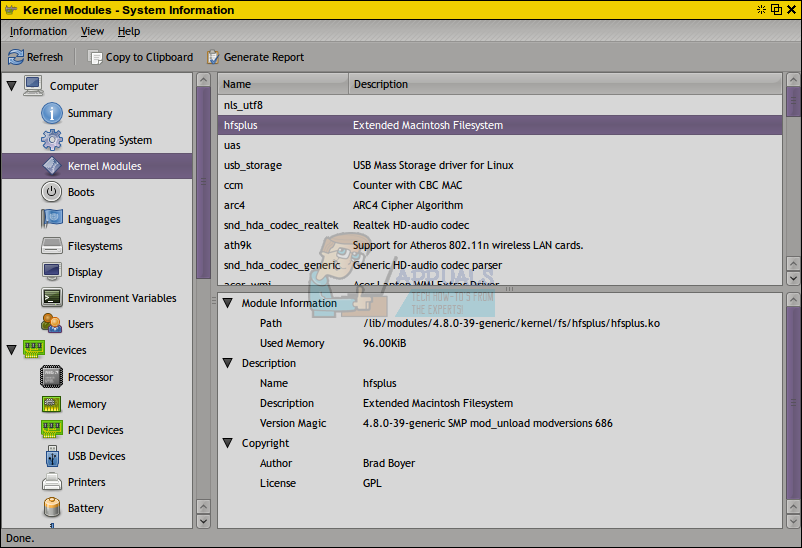
When it first starts, hardinfo may greet you with a blank screen or focus on Kernel Modules or something else that’s not relevant to the information that you’re trying to find right now.
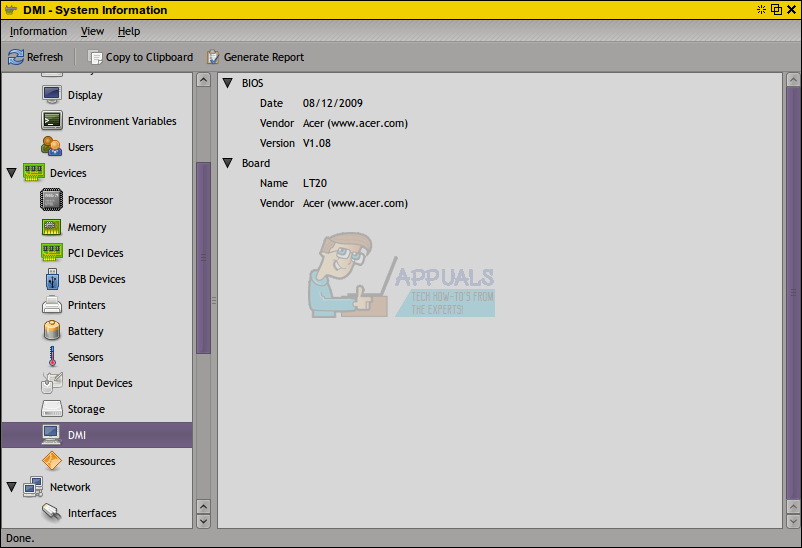
Scroll down to where it reads Devices on the left-hand side of the window and then click on DMI to find the same information that you would have in the command line app.
Even though it might take a couple extra seconds, this method usually won’t require you to use any administrative access, so it’s useful in situations where sudo doesn’t work. If you don’t have this program but you would like a copy, then you can head back over to the terminal window from the first method. Type sudo apt-get install hardinfo and push enter You’ll be asked to push the y key in order to approve the install. This gives you the option of running hardinfo on another type of desktop environment that might not come with it, such as the popular lightweight Xfce4 environment or something more full-featured like KDE Plasma.
If it doesn’t add an application shortcut to your menu, then you can just type hardinfo to run it from the terminal.
Once again, you might have noticed that the name of the manufacturer doesn’t stay the same. The reason for this is related to digital hardware vending practices. That being said, as long as you know one of the names and a model number you should be able to look documentation or replacement parts up online. In fact, if you do a quick search you might find that there are many different system boards packaged under different names that feature the same design as yours.
How to find your motherboard model and other hardware information in Linux

Compatibility is always a consideration when purchasing new hardware. There have been numerous times I’ve had to find my motherboard’s manufacturer or model to see if a certain feature was available, or how many full PCI-Express x16 slots I had. Years ago, this resulted in me opening my computer and looking for the model on the motherboard with a flashlight.
While this situation at least gave me an excuse to clean the dust from my computer, there is a much, much easier method to find this information straight from the command line.
Enter dmidecode, a tool that reads information directly from sysfs (/sys/) and prints it out to screen in a human-readable format. The following is taken directly from the command’s man page:
- A handle. This is a unique identifier, which allows records to reference each other. For example, processor records usually reference cache memory records using their handles.
- A type. The SMBIOS specification defines different types of elements a computer can be made of. In this example, the type is 2, which means that the record contains «Base Board Information».
- A size. Each record has a 4-byte header (2 for the handle, 1 for the type, 1 for the size), the rest is used by the record data. This value doesn’t take text strings into account (these are placed at the end of the record), so the actual length of the record may be (and is often) greater than the displayed value.
- Decoded values. The information presented of course depends on the type of record. Here, we learn about the board’s manufacturer, model, version and serial number.
As a quick forewarning, dmidecode does require root-level privileges to access the information it needs. Allowing any user to access hardware-specific information about a system would be a massive security risk!
dmidecode is typically pre-installed on most Linux distributions, but can certainly be installed through all the major repositories if happens not to be installed:
sudo apt-get -y install dmidecode
sudo dnf -y install dmidecode
Once installed, getting the system’s motherboard information can be done through the following command:
# dmidecode 3.3 Getting SMBIOS data from sysfs. SMBIOS 3.3.0 present. Handle 0x0002, DMI type 2, 15 bytes Base Board Information Manufacturer: Gigabyte Technology Co., Ltd. Product Name: X570 AORUS ELITE Version: Default string Serial Number: Default string Asset Tag: Default string Features: Board is a hosting board Board is replaceable Location In Chassis: Default string Chassis Handle: 0x0003 Type: Motherboard Contained Object Handles: 0
This identifies my motherboard as a Gigabyte X570 Aorus Elite. There’s also some additional information listed such as the serial number, the asset tag, and even the location in the chassis, however none of these fields are being utilized in my case.
dmidecode isn’t just limited to motherboard information. By altering the argument (the “2”), information can be found on additional hardware:
System Configuration Options
Management Device Component
Management Device Threshold Data
Memory Array Mapped Address
Memory Device Mapped Address
There are 256 total entries, however anything past 126 is typically disabled or only used in very specific use cases by OEMs.
For example, checking the “Physical Memory Array” (16) will return some basic information on the RAM controller, such as the maximum supported capacity, and whether or not the memory is Error-Correcting:
# dmidecode 3.3 Getting SMBIOS data from sysfs. SMBIOS 3.3.0 present. Handle 0x000B, DMI type 16, 23 bytes Physical Memory Array Location: System Board Or Motherboard Use: System Memory Error Correction Type: None Maximum Capacity: 128 GB Error Information Handle: 0x000A Number Of Devices: 4
Per the output, the motherboard has four total slots and can support up to 128GB.
In addition to the specific entries from the table above, dmidecode also supports keyword arguments to retrieve information on “groups” of hardware. For a full readout of all motherboard information, the argument “baseboard” could be passed in place of “2” and dmidecode will report back on entries 2, 10, and 41. Not all the hardware types will be supported or return any useful information for all hardware, but dmidecode can still be a great way to quickly reference certains aspects of a system.

Sean Potter
Editor-in-Chief
I’ve been a dedicated Linux user for over two decades, and have been building computers and servers for even longer. My professional career has taken me down the path of simultaneous systems administration and web development, which allows me to constantly strengthen my Linux-fu.