- RootUsers
- Guides, tutorials, reviews and news for System Administrators.
- How To Display Routing Table In Linux
- Using ip command
- Using netstat command
- Using route command
- Summary
- Share this:
- View Network Routing Table Using the ip route Command in Linux Mint 20.3
- View Network Routing Table Using the “ip route” Command
- Adding New Routes
- Permanently Adding Routes in Linux
- Deleting Routes
- Adding a New Default Gateway
- Conclusion
- About the author
- Karim Buzdar
- How to View the Network Routing Table in Ubuntu Linux
- How to View Routing Table?
- Method 1: Through the netstat command
- Method 2: Through the route command
- Method 3: Through the ip route command
- Search
- About This Site
- Latest Tutorials
RootUsers
Guides, tutorials, reviews and news for System Administrators.
How To Display Routing Table In Linux
The routing table is used to show you where various different network subnets will be routed to. Here are three different commands that you can use to print out the routing table in Linux.
Using ip command
The current recommended way of printing the routing table in Linux is with the ip command followed by route, as demonstrated below.
[[email protected] ~]# ip route default via 192.168.1.254 dev eno16777736 proto static metric 100 192.168.1.0/24 dev eno16777736 proto kernel scope link src 192.168.1.14 metric 100 192.168.122.0/24 dev virbr0 proto kernel scope link src 192.168.122.1
If you’re in a hurry you can also shorten this to ‘ip r’ which will print the same output. While this is the current recommended method of printing out the routing table in Linux, you will see that the output doesn’t look as nice as older options.
Check out our IP command examples for further information on how you can use this to display networking information.
Using netstat command
While this is a popular way of printing out routing information in Linux, netstat is actually deprecated and replaced instead with ip route – it even says so in the manual page. Nevertheless as it is still widely used, we have included it here.
Netstat combined with the -r option will display the kernel routing tables. This is commonly used with the -n option, which will only show numerical addresses rather than performing any sort of name resolution.
[[email protected] ~]# netstat -rn Kernel IP routing table Destination Gateway Genmask Flags MSS Window irtt Iface 0.0.0.0 192.168.1.254 0.0.0.0 UG 0 0 0 eno16777736 192.168.1.0 0.0.0.0 255.255.255.0 U 0 0 0 eno16777736 192.168.122.0 0.0.0.0 255.255.255.0 U 0 0 0 virbr0
Using route command
The manual page for route also states that it is obsolete and has been replaced by the ip route command previously mentioned, again as this is still used, here’s an example of it. Like netstat, the -n option is used to display numeric information only.
[[email protected] ~]# route -n Kernel IP routing table Destination Gateway Genmask Flags Metric Ref Use Iface 0.0.0.0 192.168.1.254 0.0.0.0 UG 100 0 0 eno16777736 192.168.1.0 0.0.0.0 255.255.255.0 U 100 0 0 eno16777736 192.168.122.0 0.0.0.0 255.255.255.0 U 0 0 0 virbr0
Summary
As we have seen there are a few ways to display the routing information in Linux, however most are now considered obsolete with ‘ip route’ being the current recommended method, despite the output in my opinion not looking as neat as the others.
Share this:
View Network Routing Table Using the ip route Command in Linux Mint 20.3
![]()
A routing table contains routing entries that determine where all packets go when they leave a router or a system. Usually, the Linux systems use dynamic routing, where the kernel decides which route out of multiple routes a packet should follow. However, you can also add static routes, which are not dynamically updated, if you want to forward specific traffic to a particular gateway or router.
In today’s article, we will cover how to view network routing tables using the “ip route” command in Linux Mint 20.3 OS.
Note: You need sudo privileges to make any changes in the routing table. However, viewing the routing table doesn’t need any sudo privileges.
View Network Routing Table Using the “ip route” Command
The “ip route” command in Linux is used to view and modify the routing table. Using this command, you can add new routes to a particular network or host. You can delete the routes if you no longer want them in your routing table.
To view the network routing table in your Linux Mint, open the Terminal and run the following command:
In the output, you will see a list of network destinations and gateways. The gateways are the addresses where the packets are forwarded when they are moving toward their destination. These routes are dynamic routes unless you have already added the static routes.
Following is the output of the “ip route” command in our system. The 192.168.42.0 is the local network attached to the network interface ens33. The 192.168.42.2 is the default gateway. Any traffic not intended for the local network and is not defined in the routing table is forwarded to this address.

Adding New Routes
Using the “ip route” command, you can also add a new route for a specific network. Use the following syntax to add a new route in your system’s routing table:
For instance, the following command adds the route for the 10.0.0.0/24 network through gateway 192.168.42.2 to route it through the ens33 network interface.
Permanently Adding Routes in Linux
The static route added by the “ip route” command is not a persistent route. A persistent route stays in place even when you reboot your system. To permanently add the static routes and to make them persistent, you will need to add the entry in the /etc/network/interfaces file.
Edit the /etc/network/interfaces file through the following command:
Add following entry for your static route:
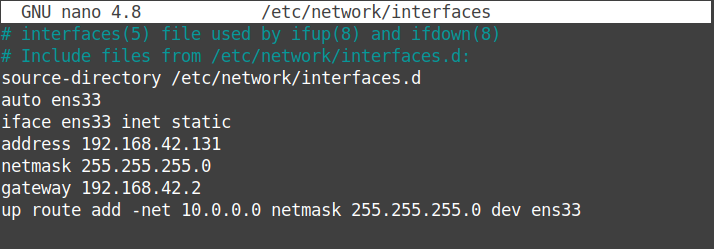
Then, save and close the file and restart the network service:
Deleting Routes
To delete a route using the “ip route” command, use the previous syntax but replace the add option by del:
Adding a New Default Gateway
Sometimes, you must add a new default gateway to your Linux system. The “ip route” command also allows you to add a new default gateway. Use the following syntax:
Conclusion
In this post, we reviewed how to view the network routing table using the “ip route” command in Linux Mint 20.3 OS. We also covered how to permanently add routes in Linux Mint so that they persist after reboot. Remember, this is not the only way to view the network routing table in Linux. You can also view the routing table using the “netstat” and “route” commands.
About the author
Karim Buzdar
Karim Buzdar holds a degree in telecommunication engineering and holds several sysadmin certifications. As an IT engineer and technical author, he writes for various web sites. He blogs at LinuxWays.
How to View the Network Routing Table in Ubuntu Linux

Routing is the transfer of an IP packet from one point to another across the network. When you send someone an email, you’re actually transmitting a series of IP packets or datagrams from your system to the other person’s computer. The packets sent from your computer pass through several gateways or routers to get to the destination computer system. The same is true for all Internet protocols such as HTTP, IRC, FTP, etc.
In all Linux and UNIX systems, the information about how the IP packets should be routed is stored in a kernel structure. These structures are called routing tables. If you want your system to communicate with other computers, you may want to configure these routing tables. First, it is important to know how to view these routing tables on your Linux system.
In this article, we explain how to view the routing tables in Ubuntu using the following three common commands:
We have run the commands and procedures mentioned in this article on a Ubuntu 22.04 LTS system.
We are using the Ubuntu command line, the Terminal, in order to run the above-mentioned commands. You can open the Terminal either through the system Dash or the Ctrl+Alt+T shortcut.
How to View Routing Table?
Method 1: Through the netstat command
The netstat command has always been a widely used method of printing routing table information in Linux. However, it is officially replaced by the ip route command. We are including it anyway as it is still an approach to retrieve the required information.
Here is how you can use this command:
-r This flag is used to display the Kernel routing tables
-n This flag is used to display the numerical addresses

This is what the output indicates:
| Destination | This column indicates the destination network. |
| Gateway | This column indicates the defined gateway for the network. If you see an * in this column, it means that no forwarding gateway is needed for the specified network. |
| Genmask | This column indicates the netmask of the network. |
| Flags | The U output in this columns means that the route is up. The G output indicates that specified gateway should be used for this route. D stands for dynamically installed, M stands for modified, and R means reinstated. |
| MSS | This column indicates the default Maximum Segment Size(MSS) for TCP connections for this route. |
| Window | This column indicates the default window size for TCP connections over this route. |
| Irtt | This column indicates the Initial Round Trip Time for this route. |
| Iface | The Iface column shows the network interface. If you had more than one interface, you would see lo (for loopback), eth0 (first Ethernet device), and eth1 (for the second Ethernet device), and so on for the number of interfaces, you have installed. |
Method 2: Through the route command
The route command also falls under the category of once widely used but now obsolete command to view routing tables. The manual page of this command also mentions that the command is now replaced by the ip route command.
Through this command, you can view exactly the same information that you could, through the netstat command. Here is how you can use it:
-n This flag is used to display the numerical addresses only

Method 3: Through the ip route command
Last but not least, here is the most recommended way of printing routing table information in Linux. Here is how to use this command:

Though this information is not much reader-friendly as that of the previously mentioned commands, it is still enough for you to configure the router.
These were a few commands to view the routing table information in Ubuntu. Though the ip route command in not neat looking, it is still the most recommended way of looking up for relevant routing table information. Though the other commands are considered obsolete, they are sometimes really helpful in deriving what you need to extract.
Search
About This Site
Vitux.com aims to become a Linux compendium with lots of unique and up to date tutorials.