- Creating a SOCKSS Proxy Server with Shadowsocks
- Before You Begin
- What Is SOCKS5 Proxy Service?
- What Is Shadowsocks?
- Install the Shadowsocks Server
- How Do You Run ShadowSocks On Ubuntu?
- How Do You Run ShadowSocks On CentOS 7?
- How Do You Use Shadowsocks Libev?
- Configure the Shadowsocks Server
- shadowsocks.json Breakdown
- Optimize Shadowsocks
- Create a Shadowsocks Systemd Service
- Open Firewall Port for Shadowsocks Client
- Install a Shadowsocks Client
- macOS Shadowsocks Client
- Windows Shadowsocks Client
- How Do You Know If SOCKS5 Proxy Is Working?
- Where to Go from Here
- More Information
Creating a SOCKSS Proxy Server with Shadowsocks
Estamos traduciendo nuestros guías y tutoriales al Español. Es posible que usted esté viendo una traducción generada automáticamente. Estamos trabajando con traductores profesionales para verificar las traducciones de nuestro sitio web. Este proyecto es un trabajo en curso.
This guide shows you how to create a SOCKS5 proxy server with Shadowsocks on Ubuntu and CentOS. Shadowsocks is a lightweight SOCKS5 web proxy tool primarily utilized to bypass network censorship and block certain websites and web protocols. A full setup requires a Linode server to host the Shadowsocks daemon, and a client installed on PC, Mac, Linux, or a mobile device.
Unlike other proxy software, Shadowsocks traffic is designed to be both indiscernible from other traffic to third-party monitoring tools, and also able to disguise as a normal direct connection. Data passing through Shadowsocks is encrypted for additional security and privacy.
Because currently, there is no Shadowsocks package available for Ubuntu or CentOS, this guide shows how to build Shadowsocks from the source.
Before You Begin
- The commands in this guide require root privileges. To run the steps as an elevated user with sudo privileges, prepend each command with sudo . If two commands are presented in the same instance (separated by && ), remember to use sudo after the && (ex. sudo [command] && sudo [command] ). To create a standard user account with sudo privileges, complete the Add a Limited User Account section of our Securing your Server guide.
- A working firewall is a necessary security measure. Firewall instructions are provided for UFW, FirewallD, and Iptables. To configure a firewall on a Linode, visit one of the following guides:
- How to Configure a Firewall with UFW
- Introduction to FirewallD on CentOS
What Is SOCKS5 Proxy Service?
SOCKS5 is an internet protocol of SOCKS that helps to route packets through a proxy between a client and a server. To carry out a secure communication, SOCKS5 uses three different modes of authentication: Null authentication, GSS-API based authentication, and a username-password based authentication.
When SOCKS5 uses a NULL authentication, any request between client and server connects to the set proxy without requiring any authentication. With GSS API authentication, a client’s or server’s identity is verified at the OS level to authenticate.
A username and password-based authentication uses credentials to connect to the proxy.
What Is Shadowsocks?
Shadowsocks is an open source, free encryption protocol client designed to securely transmit information between clients and servers. It uses asynchronous input-output and is event-driven to deliver speed. Shadowsocks isn’t a proxy, but it enables connecting to 3rd party SOCKS5 proxy connections. It also supports UDP traffic.
Install the Shadowsocks Server
How Do You Run ShadowSocks On Ubuntu?
To run and install Shadowsocks on Ubuntu Server follow these steps:
- Download and update the packages to the newest versions on Ubuntu
apt update && apt upgrade -yuf apt install -y --no-install-recommends gettext build-essential autoconf libtool libpcre3-dev \ asciidoc xmlto libev-dev libudns-dev automake libmbedtls-dev \ libsodium-dev git python-m2crypto libc-ares-dev cd /opt git clone https://github.com/shadowsocks/shadowsocks-libev.git cd shadowsocks-libev git submodule update --init --recursive \ ./autogen.sh ./configure make && make install How Do You Run ShadowSocks On CentOS 7?
To run and install Shadowsocks on CentOS7 follow these steps:
- Download and update the packages to the newest versions
yum update && yum upgrade -y yum install epel-release -y yum install -y gcc gettext autoconf libtool automake make pcre-devel asciidoc xmlto udns-devel \ libev-devel libsodium-devel mbedtls-devel git m2crypto c-ares-devel cd /opt git clone https://github.com/shadowsocks/shadowsocks-libev.git cd shadowsocks-libev git submodule update --init --recursive ./autogen.sh ./configure make && make install How Do You Use Shadowsocks Libev?
Shadowsocks libev is a lightweight, purely C-based proxy implementation for embedded devices. To use Shadowsocks libev after its installation, simply add a system user to Shadowsocks, create a directory with its configuration file.
Configure the Shadowsocks Server
adduser --system --no-create-home --group shadowsocks adduser --system --no-create-home -s /bin/false shadowsocks mkdir -m 755 /etc/shadowsocks shadowsocks.json Breakdown
| Property | Description | Possible Values |
|---|---|---|
| server | Enter the server’s public IP address. | User determined |
| server_port | Shadowsocks listens on this port. Use the default value of 8388 . | User determined |
| password | Connection password. Set a strong password. | User determined |
| timeout | Connection timeout in seconds. The default value should be sufficient here. | User determined |
| method | Encryption method. Using AEAD algorithms is recommended. | See Stream Ciphers and AEAD Ciphers |
| fast_open | Reduces latency when turned on. Can only be used with kernel versions 3.7.1 or higher. Check the kernel version with uname -r . | true, false |
| nameserver | Name servers for internal DNS resolver. | User determined |
Optimize Shadowsocks
Apply the following optimizations to the system kernel to provide for a smooth running Shadowsocks installation.
- Create the /etc/sysctl.d/local.conf system optimization file and paste the contents shown below into the file:
These settings provide the optimal kernel configuration for Shadowsocks. If you have previously configured the system kernel settings for any reason, make sure no conflicts exist.
Create a Shadowsocks Systemd Service
The Shadowsocks systemd service allows the daemon to automatically start on system boot and run in the background.
- Create a systemd file with the following content:
systemctl daemon-reload systemctl enable shadowsocks systemctl start shadowsocks Open Firewall Port for Shadowsocks Client
Depending on your preference, you may use either the iptables, UFW, or firewalld (CentOS 7 only) commands to complete this section.
Open port 8388 for the Shadowsocks Client:
iptables -4 -A INPUT -p tcp --dport 8388 -m comment --comment "Shadowsocks server listen port" -j ACCEPT ufw allow proto tcp to 0.0.0.0/0 port 8388 comment "Shadowsocks server listen port" firewall-cmd --permanent --zone=public --add-rich-rule=' rule family="ipv4" port protocol="tcp" port="8388" accept' firewall-cmd --reload Install a Shadowsocks Client
The second stage to a Shadowsocks setup is to install a client on the user’s device. This could include a computer, mobile device, tablet, and even home network router. Supported operating systems include Windows, macOS, iOS, Linux, Android, and OpenWRT.
macOS Shadowsocks Client
- Download the ShadowsocksX-NG GUI Client for macOS:
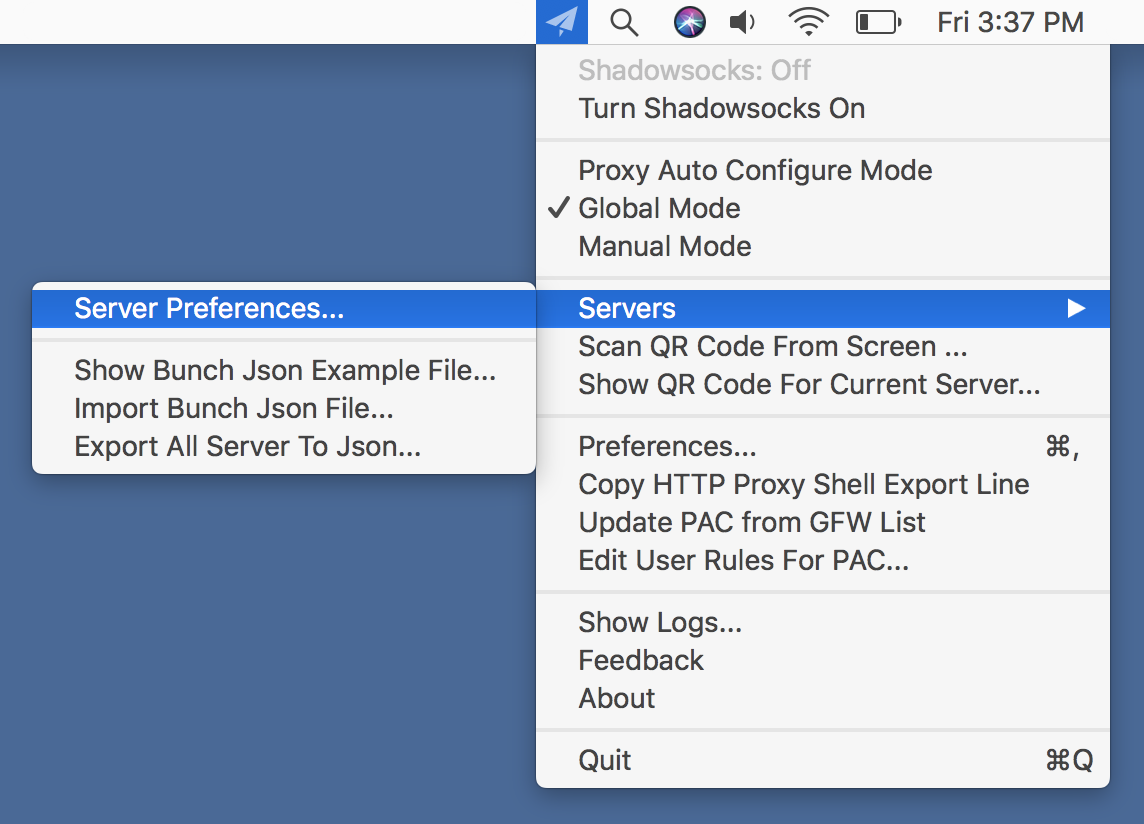
- Launch the application on your Mac. The app preferences is available from a new status menu bar icon. Select the Server Preferences menu item:

Windows Shadowsocks Client
- Navigate to the Windows Shadowsocks page. Click on Shadowsocks-4.0.4.zip under Downloads.
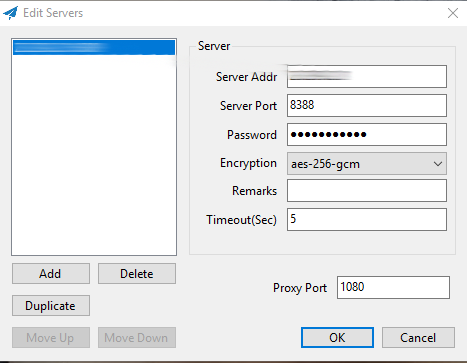
- Extract the contents of the .zip file into any folder and run Shadowsocks.exe . Shadowsocks runs as a background process. Locate the Shadowsocks icon in the taskbar (it may be in the Hidden Icons taskbar menu), right-click on the Shadowsocks icon, then click on Edit Servers. Enter the information that you saved in the shadowsocks.json file:
- Right-click on the Shadowsocks icon again. Mouse over PAC and select both Local PAC and Secure Local PAC. To confirm that the Linode’s IP address is selected, mouse over Servers.
- Verify that the Shadowsocks connection is active by visiting an IP address lookup website like ifconfig.co. When the connection is working as expected, the website lists the Shadowsocks Linode’s public IP.
How Do You Know If SOCKS5 Proxy Is Working?
To check if the SOCKS5 proxy is working, open the terminal and run the netstat command to see if there is an open port:
If the SOCKS5 proxy is working, you should see an output similar to below in the terminal:
tcp 0 0 232.222.333.414:8888 0.0.0.0:* LISTEN Another way to test whether SOCKS5 proxy is working is by using the curl command on the right port of the proxy. For a SOCKS5 proxy hosted at 232.222.333.414 listening at port 8080 , run the following command in the terminal:
timeout 5 curl -x socks5://232.222.333.414:8080 https://linode.com/ If the SOCKS5 proxy isn’t working properly on a proxy hosted at 232.222.333.414 , it returns a timeout on our terminal.
Where to Go from Here
After the Shadowsocks server is online, configure a client on your mobile phone, tablet, or any other devices you use. The Shadowsocks client download page supports all mainstream platforms.
More Information
You may wish to consult the following resources for additional information on this topic. While these are provided in the hope that they will be useful, please note that we cannot vouch for the accuracy or timeliness of externally hosted materials.
This page was originally published on Thursday, December 7, 2017.