- Saved searches
- Use saved searches to filter your results more quickly
- Logotipo/socks5-client-linux
- Name already in use
- Sign In Required
- Launching GitHub Desktop
- Launching GitHub Desktop
- Launching Xcode
- Launching Visual Studio Code
- Latest commit
- Git stats
- Files
- README.md
- Использование HTTP proxy и SOCKS в Linux
- How Do I Set Up a SOCKS5 Proxy on Ubuntu with Dante?
- Set up Socks5 proxy with Dante
- Step 1: Updating Cache Repository
- Step 2: Installing Dante
- Step 3: Verifying installation
- Step 4: Configuring Dante
- Step 5: Starting Danted proxy
- Step 6: Creating a user
- Conclusion
- About the author
- Shehroz Azam
Saved searches
Use saved searches to filter your results more quickly
You signed in with another tab or window. Reload to refresh your session. You signed out in another tab or window. Reload to refresh your session. You switched accounts on another tab or window. Reload to refresh your session.
Socks5 client for linux with supporting of CONNECT and UDP_ASSOCIATE
Logotipo/socks5-client-linux
This commit does not belong to any branch on this repository, and may belong to a fork outside of the repository.
Name already in use
A tag already exists with the provided branch name. Many Git commands accept both tag and branch names, so creating this branch may cause unexpected behavior. Are you sure you want to create this branch?
Sign In Required
Please sign in to use Codespaces.
Launching GitHub Desktop
If nothing happens, download GitHub Desktop and try again.
Launching GitHub Desktop
If nothing happens, download GitHub Desktop and try again.
Launching Xcode
If nothing happens, download Xcode and try again.
Launching Visual Studio Code
Your codespace will open once ready.
There was a problem preparing your codespace, please try again.
Latest commit
Git stats
Files
Failed to load latest commit information.
README.md
Socks5 client for linux with supporting of CONNECT and UDP_ASSOCIATE commands.
bool connectToProxy(std::string ip, uint16_t port, std::string user, std::string password, Socks5::PROXY_MODE proxyMode, std::string dstIP = "", uint16_t dstPort = 0);
Connect to proxy-server.
Parameters:
- ip — IP address of proxy server.
- port — port of proxy server.
- user — login of proxy server or empty string if proxy without auth
- password — password of proxy server or empty string if proxy without auth
- proxyMode — mode of proxy. Socks5::PROXY_MODE::CONNECTION (TCP connect) or Socks5::PROXY_MODE::UDP_ASSOCIATE (UDP connect).
- dstIP — destination IP address (for CONNECTION mode).
- dstPort — destination port (for CONNECTION mode).
Return: true if successful, false if connect was failed.
Close connection to proxy server.
int32_t send(char* packet, uint16_t dataLength, std::string ip, uint16_t port);
Send data to destination server through proxy server.
Parameters:
- packet — pointer to data array.
- dataLength — length of data array.
- ip — destination IP address (for UDP_ASSOCIATE mode).
- port — destination port (for UDP_ASSOCIATE mode).
Return: length of sent data or -1 if error.
int32_t send(char* packet, uint16_t dataLength, int32_t host = 0, uint16_t port = 0);
Send data to destination server through proxy server.
Parameters:
- packet — pointer to data array.
- dataLength — length of data array.
- host — destination host (binary format).
- port — destination port (for UDP_ASSOCIATE mode).
Return: length of sent data or -1 if error.
int32_t read(char* data, uint16_t bufferSize, uint32_t* binAddres = 0, uint16_t* port = 0);
Read data from destination server through proxy server.
Parameters:
- data — pointer to data array
- bufferSize — maximum size of data array
- binAddres — pointer to variable for write destination host address (binary format, for UDP_ASSOCIATE mode).
- port — pointer to variable for write destination host port (for UDP_ASSOCIATE mode).
Return: length of recevied data or -1 if error.
Note: Proxy socket is non blocking for UDP_ASSOCIATE mode.
int32_t udpSocketWait(uint32_t *waitMode, uint32_t timeout);
Waiting (with timeout) send or/and receive data. Only for UDP_ASSOCIATE mode.
Parameters:
Return: 0 if success, -1 if error.
Socks5::PROXY_ERROR lastErrorCode(); static std::string getErrorString(Socks5::PROXY_ERROR errorCode);
Gets error string by error code.
Parameters:
static inline void setForceMainAddress(bool _isForceMainAddress);
Some proxy-server don`t adhere to RFC and give invalid address for udp asscotiation.
Therefore we must use main address forced in this cases.
Использование HTTP proxy и SOCKS в Linux
В Linux существует много полезных консольных команд, которые при необходимости хотелось бы запустить через proxy. Некоторые приложения имеют встроенную поддержку proxy, а некоторые нет. Далее описано как пользоваться востребованными утилитами через proxy, даже теми, которые этой поддержки не имеют.
curl: передача данных через proxy
curl имеет полноценную поддержку как HTTP proxy так и SOCKS.
Для тестирования возможно использовать proxy сервера из бесплатных списков (socks — sockslist.net, и HTTP proxy — proxyhttp.net). Проверка IP адреса будет производиться с помощью ресурса check-host.net
# Проверить HTTP proxy
curl —proxy 11.22.33.44:5555 check-host.net/ip
# Тоже самое, но если для HTTP proxy требуется авторизация
curl —proxy 11.22.33.44:5555 -U username:password check-host.net/ip
# Проверить socks4
curl —socks4 11.22.33.44:5555 check-host.net/ip
# Проверить socks5
curl —socks5 11.22.33.44:5555 check-host.net/ip
# Тоже самое, только преобразование имен идет также через SOCKS
# (подробнее о преобразовании имен можно прочитать ниже в подразделе «DNS запросы через proxy»)
curl —socks5-hostname 11.22.33.44:5555 check-host.net/ip
Часть параметров curl можно записать в файл ~/.curlrc:
socks5 = 11.22.33.44:5555
proxy-user = username:password
user-agent = «Mozilla/5.0 (X11; Linux i686; rv:7.0.1) Gecko/20100101 Firefox/7.0.1»
С помощью time и curl также можно замерить время отклика сервера:
# Без proxy:
time curl check-host.net/ip
# С proxy:
time curl —socks5 11.22.33.44:5555 check-host.net/ip
# Или любого сайта:
time curl habrahabr.ru
Результат будет выглядеть так:
real 0m0.307s
user 0m0.000s
sys 0m0.004s
wget: закачка файлов через proxy
wget имеет встроенную поддержку proxy. Недостаток лишь в том, что только поддержку HTTP proxy. Для использования совместно с SOCKS рекомендуется использовать соксификатор dante.
# Скачать файл через proxy:
http_proxy=»http://33.22.44.44:8080″ wget http://www.google.com/favicon.ico
Тоже самое, но для HTTPS
https_proxy=»http://33.22.44.44:8080″ wget https://www.google.com/favicon.ico
# Использовать proxy с авторизацией
http_proxy=»http://33.22.44.44:8080″ wget —proxy-user=user —proxy-password=password http://www.google.com/favicon.ico
Чтобы все время не указывать —proxy-user и —proxy-password можно их прописать в файл ~/.wgetrc:
proxy-user = username
proxy-password = password
user-agent = Mozilla/5.0 (X11; Linux i686; rv:7.0.1) Gecko/20100101 Firefox/7.0.1
ssh: доступ к серверам
Для доступа к серверам через ssh и proxy также лучше использовать соксификатор dante.
apt-get install dante-client # пример для Debian-based систем
# Если требуется зайти по ssh на сервер
SOCKS_PASSWORD=»» SOCKS_SERVER=»11.22.33.44:1080″ socksify ssh myserver
# Тоже самое, только если для подключения к соксу требуется авторизация
SOCKS_USERNAME=»user» SOCKS_PASSWORD=»password» SOCKS_SERVER=»11.22.33.44:1080″ socksify ssh myserver
# Пример с использованием IRC клиента — irssi
SOCKS_PASSWORD=»» SOCKS_SERVER=»11.22.33.44:1080″ socksify irssi
# Тоже самое, только с использованием HTTP proxy с поддержкой метода CONNECT
HTTP_CONNECT_PROXY=»http://11.22.33.44:8080″ socksify irssi
С помощью socksify можно направить через proxy почти любое приложение, не только консольное.
Чтобы все время не вводить данные о proxy можно создать файл /etc/socks.conf
Пример для SOCKS:
route <
from: 0.0.0.0/0 to: 0.0.0.0/0 via: 11.22.33.44 port = 55555
protocol: tcp udp
proxyprotocol: socks_v4 socks_v5
method: none
>
Пример для HTTP proxy с авторизацией:
route <
from: 0.0.0.0/0 to: 0.0.0.0/0 via: 11.22.33.44 port = 8080
command: connect
proxyprotocol: http
method: username
>
А также экспортировать переменные SOCKS_USERNAME и SOCKS_PASSWORD, если для SOCKS или HTTP proxy требуется авторизация:
export SOCKS_USERNAME=»username»
export SOCKS_PASSWORD=»password»
DNS запросы через proxy
Часто требуется чтобы и преобразование имен происходило через proxy. Если использовать dante, то запрос на преобразование имен идет и через proxy, и через именной сервер указанный в /etc/resolv.conf . Понять почему же идет два одинаковых запроса вместо одного не удалось. Поэтому можно предложить два варианта:
1) Закомментировать именные сервера в файле /etc/resolv.conf, чтобы преобразование имен шло только через proxy. Это отразится на всей системе.
2) Изменить /etc/resolv.conf и выставить именные сервера необходимой страны, или просто отличные от серверов провайдера. Например установить сервера Google:
nameserver 8.8.8.8
nameserver 8.8.4.4
Чтобы данные не были перезаписаны именными серверами провайдера (при переподключении), можно запретить обновление списка именных серверов сетевому менеджеру (NetworkManager/wicd) или DHCP-клиенту (спасибо ergil за корректировку).
Или воспользоваться «грубым» методом — запрещением изменения файла /etc/resolv.conf:
sudo chattr +i /etc/resolv.conf
Если есть какие-то дополнения, пожалуйста, напишите, это будет полезно узнать и применить.
How Do I Set Up a SOCKS5 Proxy on Ubuntu with Dante?
![]()
Proxy servers have been there for many years and in computer networks, a proxy is a computer that is located between you and the server by acting as a gateway between a local network and a large scale network for example internet. Socks stands for Socket secure and is an internet protocol that has the function of routing packets between a server and the client by using a proxy server.
Dante is developed by Inferno Nettverk A/S which consists of a Socks server as well as a Socks client and implements RFC 1928 and related standards. Dante is used for providing secure and convenient network connectivity. Dante being an open-source Socks server is used with many popular network applications such as Bloomberg terminals, most web browsers, instant messaging programs, and many more that have Socks support built in them.
Now that we know what Socks and Dante are, let us take the next step of answering “how do I set up a Socks5 proxy on Ubuntu with Dante”.
Set up Socks5 proxy with Dante
Open a terminal in your Ubuntu system and follow the below steps to set up Socks5 proxy with Dante:
Step 1: Updating Cache Repository
The first step towards setting up a Socks5 proxy on Ubuntu with Dante is to update the cache repository packages for which we will use the below command:
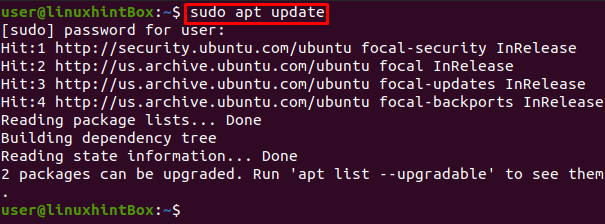
If all the packages are up to date then you don’t need to upgrade however if they are not then run the below-mentioned command to upgrade the packages:

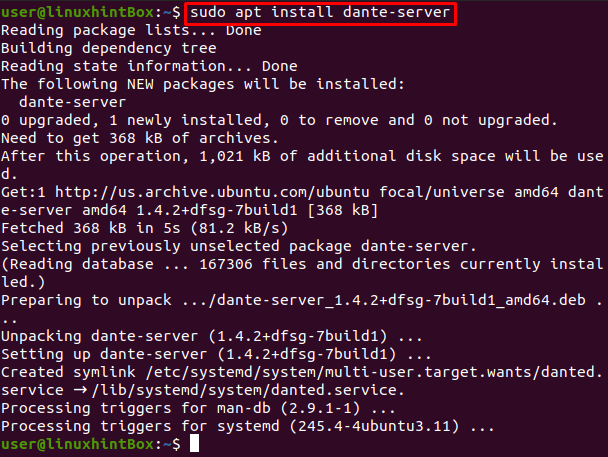
Step 2: Installing Dante
The default Ubuntu package repositories have Dante server package so we will install Dante by using the below command in our Ubuntu 20.04 terminal:
Step 3: Verifying installation
To verify the installation of Dante we will execute the below command:

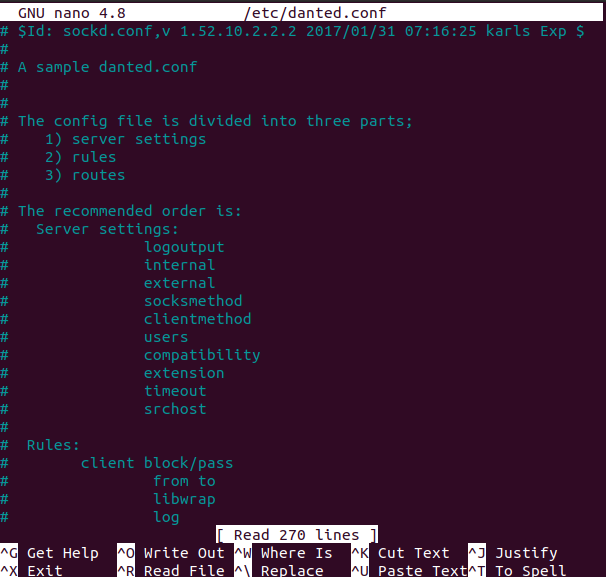
Step 4: Configuring Dante
Now that we are done with installing Dante let us now configure it by first opening the danted.conf file in the nano editor for which we have to execute the below command in our Ubuntu terminal:
When you execute the above command you will see something like the below:
Remove the settings set in the above file and paste the lines mentioned below in the file:
internal: eth0 port = 8128
external: eth0
user.unprivileged: nobody
user.privileged: root
client pass {
from: 0.0.0.0 / 0 to: 0.0.0.0 / 0
log: error
}
socks pass {
from: 0.0.0.0 / 0 to: 0.0.0.0 / 0
command: connect
log: error
socksmethod: username
}
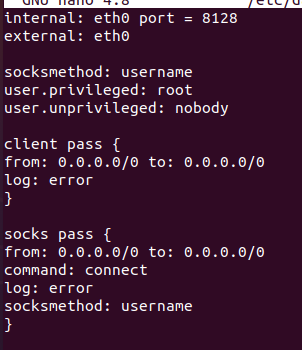
This config will let us establish a Socks proxy which will run on port 8128 as set in the above file and will require authentication. To save the above-edited file, press CTRL+S and then CTRL+X to exit.
Step 5: Starting Danted proxy
This step involves starting danted proxy which will be achieved with the following command:

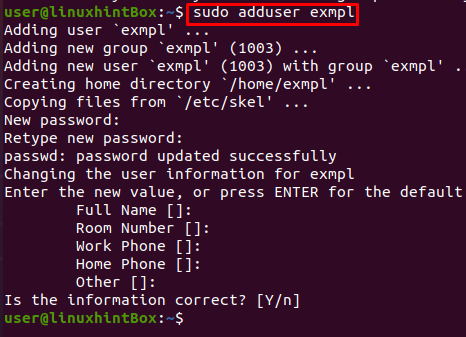
Step 6: Creating a user
We have successfully installed and configured Dante so let us continue to the next step where we will create a user which is an optional step but can secure access from everyone. To authenticate connecting clients Dante uses the system Unix user accounts hence we will create a new user. However, keep in mind that the password will be sent in plain text using the network when some client will request connecting to this proxy server.
Conclusion
Dante consists of a Socks5 server and is used as a proxy server. You can set up a Linux server online and then use it as a proxy server for accessing other websites. These proxy servers come very handy when we need to change our IP Address or access some website from a different geo-location.
In this article, we explained and delivered every step on how to set up a Socks5 proxy on Ubuntu with Dante.
About the author
Shehroz Azam
A Javascript Developer & Linux enthusiast with 4 years of industrial experience and proven know-how to combine creative and usability viewpoints resulting in world-class web applications. I have experience working with Vue, React & Node.js & currently working on article writing and video creation.