- Как создать зашифрованный zip файл на Linux
- Первый метод
- Второй метод
- Третий метод
- Четвёртый метод
- Россыпью
- Оставьте ответ Отменить ответ
- How to Create a Password Protected Zip File in Linux
- Create password protect zip file in Linux command line
- Create a password protected zip file in Linux using GUI
- Создаем zip-архивы в командной строке
- Создаем простой zip-архив
- Создаем zip-архив папки
- Создаем zip-архив с паролем
- Распаковка zip-архива
- How to Create an Encrypted (Password Protected) Tar or Zip Archive in Linux
- Use 7zip to create zip format archives with secure algorithms
- Use the zip command to create an encrypted archive
- Conclusion
- Resources
- HowTo: Create a Password Protected ZIP File in Linux
- Password Protected ZIP File in Linux
- Encrypt and Decrypt ZIP Archive in Linux
Как создать зашифрованный zip файл на Linux
Допустим вы хотите создать zip архив защищённый паролем, для того чтобы тот, кто пробует распаковать zip файл, должен был ввести правильный пароль. На Linux есть несколько способов для шифрования и защиты паролем zip файла.
В этом уроке я опишу, как создать зашифрованный zip файл на Linux.
Первый метод
Инструмент командной строки zip имеет опцию шифрования. Алгоритмом шифрования, который использует zip, является потоковый шифр PKZIP. Об алгоритме PKZIP известно, что он небезопасный. Также тот факт, что пароль набирается и отображается как обычный текст, делает его ещё уязвимие.
Для создания зашифрованного zip файла с помощью zip:
$ zip --password MY_SECRET secure.zip doc.pdf doc2.pdf doc3.pdf
Для распаковки zip файла, зашифрованного командой zip:
$ unzip secure.zip Archive: secure.zip [secure.zip] doc.pdf password:
Второй метод
Файловый архиватор 7z может создавать архивы в формате zip с более безопасной схемой шифрования. Согласно официальному описанию, 7z поддерживает алгоритм шифрования AES-256 с генерацией ключей основанным на хеш алгоритме SHA-256.
Возможно, вас заинтересует статья «Как установить 7zip на Linux».
Для создания зашифрованного zip с помощью архиватора 7z:
$ 7za a -tzip -pMY_SECRET -mem=AES256 secure.zip doc.pdf doc2.pdf doc3.pdf
Для распаковки zip файла, зашифрованного с помощью команды 7z:
$ 7za e secure.zip 7-Zip (A) [64] 9.20 Copyright (c) 1999-2010 Igor Pavlov 2010-11-18 p7zip Version 9.20 (locale=en_US.UTF-8,Utf16=on,HugeFiles=on,8 CPUs) Processing archive: secure.zip Extracting doc.pdf Enter password (не показывается) :
Третий метод
Другой метод создания безопасного zip архива — это использование симметричных ключей шифрования в программе GnuPG.
Для создания зашифрованного сжатого tar архива с помощью GnuPG:
$ tar czvpf - doc.pdf doc2.pdf doc3.pdf | gpg --symmetric --cipher-algo aes256 -o secure.tar.gz.gpg
Для распаковки файла архива, зашифрованного с GnuPG:
$ gpg -d secure.tar.gz.gpg | tar xzvf -
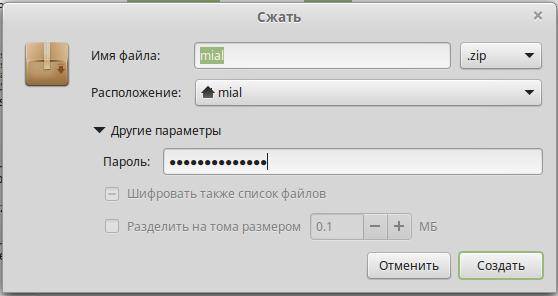
Четвёртый метод
Если вы используете файловый менеджер Nautilus (Ubuntu) или Nemo (Mint) на вашей машине, вы можете с лёгкостью применить их для создания защищённого паролем файла zip.
Сначала выделите файл (группу файлов) для включения в архив. Затем нажмите на них правой кнопкой и выберите в контекстном меню «Сжать…».
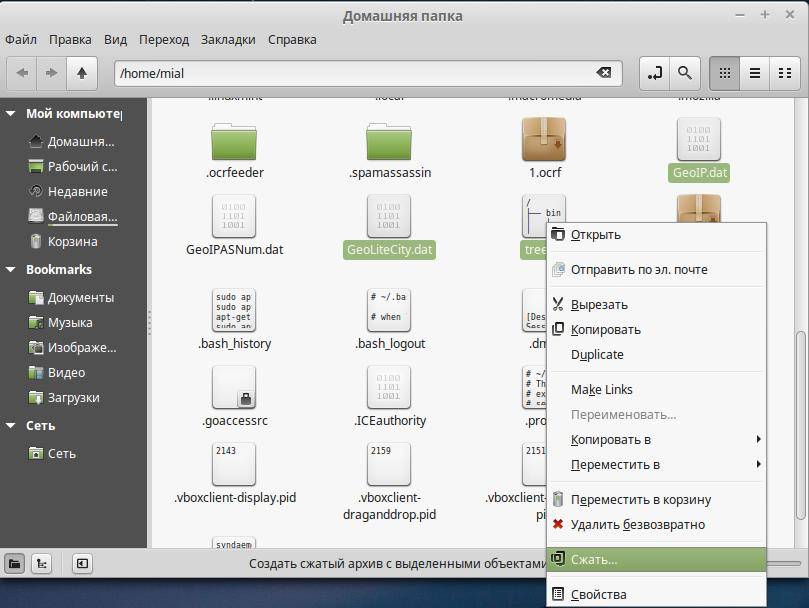
Заполните имя архивного файла и выберите формат файла «.zip» (или «.7z» если у вас установлен архиватор 7z).
Нажмите «Другие параметры» и введите ваш пароль. Под графической оболочкой будет использована команда zip для создания зашифрованного архива.
Россыпью
Статья была бы не полной, если бы мы не упомянули такие утилиты как: bcrypt (кроссплатформенная утилита шифрования, использует алгоритм blowfish), gzip (может использоваться в паре с openssl), pigz (многопоточный gzip, при этом значительно быстрее gzip), gpg-zip (шифрует и подписывает файлы и каталоги).
Оставьте ответ Отменить ответ
📅 С 20 по 22 апреля пройдут незабываемые битвы среди кибер-гладиаторов в мире информационной безопасности!
Открыта регистрация команд по ссылке .
How to Create a Password Protected Zip File in Linux
This simple tutorial shows you how to create a password protected zip file in Linux both in command line and graphical way.
- Create password protected zip file in Linux command line
- Create password protected zip file using Nautilus file manager [GUI method]
There are several ways you can encrypt zip file in Linux. There are dedicated command line tools for this task, but I am not going to talk about those. I will show you how to password protect a zip file without installing a dedicated tool.
Create password protect zip file in Linux command line
First thing first, make sure that you have zip support enabled in your Linux system. Use your distribution’s package manager and try to install it. If its not installed already, it will be installed.
In Debian/Ubuntu, you can use this command:
sudo apt install zip unzipNow, let’s see how to password protect a zip file in Linux. The method is almost the same as creating zip folder in Linux. The only difference is the use of option -e for encryption.
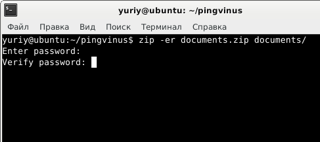
zip -re output_file.zip file1 folder1The -r option is used to recursively look into directories. The -e option is for encryption.
You’ll be asked to enter and verify the password. You won’t see the password being typed on the screen, that’s normal. Just type the password and press enter both times.
Here’s what the process looks like on the screen:
zip -re my_zip_folder.zip agatha.txt cpluplus.cpp test_dir Enter password: Verify password: adding: agatha.txt (deflated 41%) adding: cpluplus.cpp (deflated 4%) adding: test_dir/ (stored 0%) adding: test_dir/myzip1.zip (stored 0%) adding: test_dir/myzip2.zip (stored 0%) adding: test_dir/c.xyz (stored 0%)Do note that if someone tries to unzip this file, he/she can see the content of the folder such as which files are there in the zipped file. But the files cannot be read.
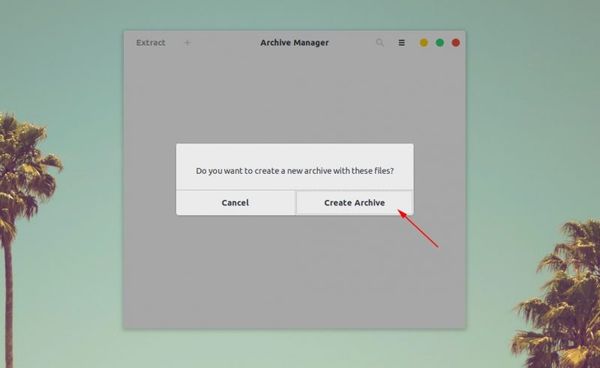
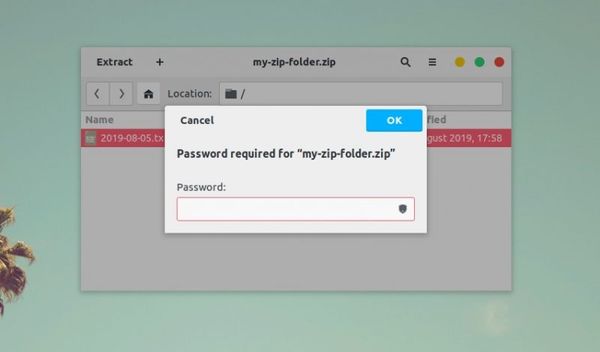
Create a password protected zip file in Linux using GUI
I have created a password-protected zip file in Ubuntu 18.04 here but you can use the same steps on any Linux distribution with GNOME desktop environment.
Search for Archive Manager and open it.

Drag and drop the file(s) you want to compress into a zip file. Select Create Archive option here.
In here, choose the type of compressed file. It will be .zip in my case. You’ll see the “Other Options”, click on it and you’ll see the password field. Enter the password you want and click on the Save button.
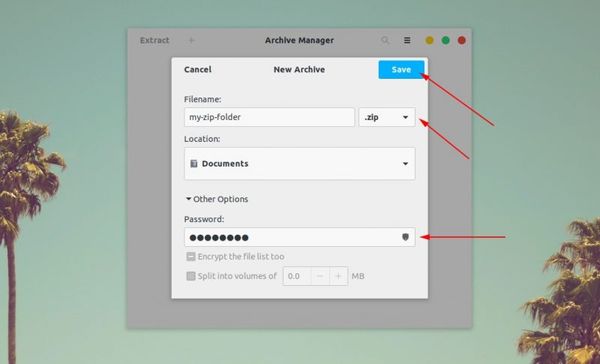
That’s it. You have successfully created a password protected zip file in Ubuntu Linux graphically. The next time you want to extract it, it will ask for a password.
As you can see, no one (in normal ways) can extract this file without the password. Congratulations, you just learned how to encrypt zip files in Ubuntu Linux.
Just for your information, double-clicking on the password-protected directory might give the impression that you may access the encrypted directory without a password, but you cannot actually read those files.
There are other ways to password protect folders in Linux. This tutorial shows how to do that.
I hope this quick tutorial helped you to create password-protected zip files in Linux.
Создаем zip-архивы в командной строке
Рассмотрим, как создавать и распаковывать zip архивы из командной строки.
Для создания архивов служит команда zip. У нее есть более 30 разных опций, но я рассмотрю простейшие примеры.
Создаем простой zip-архив
Для создания zip-архива просто выполняем команду zip, в первом аргументе указываем имя будущего архива, а во втором сам файл, который мы сжимаем:
Если нужно сжать несколько файлов то перечисляем их через пробел:
zip myarchive.zip myfile.txt yourfile.txt theirfile.txtСоздаем zip-архив папки
Чтобы заархивировать папку, используется ключ -r:
zip -r mydir.zip verygooddirСоздаем zip-архив с паролем
Очень важной функцией утилиты zip является возможность задания пароля на распаковку архива. Для этого применяется опция -P, после которой следует написать пароль:
zip -P мойпароль -r mysecretdir.zip mysecretdirЕсли вы не хотите вводить пароль в командной строке у всех на виду, то можно использовать опцию -e, чтобы вместо ввода пароля в открытую, вводить его в срытом виде:
zip -er mysecretdir.zip mysecretdirПосле выполнения данной команды, вам будет предложено дважды ввести пароль. Сам пароль виден при этом не будет:
Enter password: Verify password:Распаковка zip-архива
Для того, чтобы разархивировать zip-архив, используется команда unzip. Ее можно запускать без опций, только указывая имя архива:
По умолчанию распаковка происходит в текущей директории. Чтобы распаковать архив в другую директорию, используется опция -d, после которой нужно указать путь до директории:
How to Create an Encrypted (Password Protected) Tar or Zip Archive in Linux
There is often a need to encrypt and/or password protect archive files. Whether you are using them to backup data or share it across the internet, you should take the necessary steps to protect your data. In this quick tip we will examine three ways to create an encrypted and password protected archive in Linux. We will also briefly discuss some pros and cons of each method.
After entering the passphrase you will be asked to repeat it. Then the archive will be created as an encrypted archive, using a secure algorithm and protected by your custom passphrase.
gpg -d myarchive.tar.gz.gpg | tar xzvf -
You will be prompted for the passphrase before the archive is extracted.
I like to always name these types of archives .tar.gz.gpg so I know how they were created. For this example we used tar, gzip and gpg. Also, it is important that you DO NOT forget the passphrase. If you do, there is no way to recover the data.
Use 7zip to create zip format archives with secure algorithms
This is just as secure as the first option since it supports the same AES-256 encryption algorithm, although it does require you put the passphrase or “secret” on the command line, which I am not a fan of. It is also not as convenient because most systems do not come with the P7zip package installed.
To install P7zip on Red Hat, or RH variants like CentOS or Fedora:
On Debian based systems such as Ubuntu:
sudo apt-get install p7zip-full
To create the archive, use the command below, replace “PASSPHRASE” with your own secret passphrase.
7za a -tzip -pPASSPHRASE -mem=AES256 secure.zip file1.txt file2.pdf file3.jpg
$ 7za a -tzip -pPASSPHRASE -mem=AES256 myarchive.zip file1.txt file2.pdf file3.jpg7-Zip (A) [64] 9.20 Copyright (c) 1999-2010 Igor Pavlov 2010-11-18
p7zip Version 9.20 (locale=en_US.UTF-8,Utf16=on,HugeFiles=on,8 CPUs)
ScanningCreating archive myarchive.zip
Compressing file1.txt
Compressing file2.pdf
Compressing file3.jpg
Everything is Ok
To extract the zip archive use the following:
Use the zip command to create an encrypted archive
The zip command provides options to allow you to encrypt archives. It uses a known insecure PKZIP algorithm and also requires you to add your passphrase on the command line. The benefit of this method is both Linux and Windows folks can extract the archive without any additional software.
Simply add the —password option to the zip command like so:
zip --password PASSPHRASE myarchive.zip file1.txt file2.pdf file3.jpg
Remember to replace PASSPHRASE with your password.
$ zip --password PASSPHRASE myarchive.zip file1.txt file2.pdf file3.jpg
adding: file1.txt (deflated 75%)
adding: file2.pdf (deflated 7%)
adding: file3.jpg (deflated 4%)
To extract the archive, use the normal unzip utility. The only difference is you will be asked for a password.
$ unzip myarchive.zip
Archive: myarchive.zip
[myarchive.zip] password:
inflating: file1.txt
inflating: file2.pdf
inflating: file3.jpg
Conclusion
So there you have my three favorite ways to created encrypted archives. There are plenty more ways to accomplish this (openssl, gpg-zip, bcrypt) and some are better than others. If you data is really important, I suggest you read up on the different algorithms and signing methods that are out there and decide for yourself which is right.
Whatever method you use it is important to NOT forget your passphrase.
Resources
HowTo: Create a Password Protected ZIP File in Linux
This is a small note that describes how to encrypt and decrypt a ZIP file from the Linux command line.
I’ll show how to create a password protected ZIP archive from one or several unprotected files or folders.
Warning! The standard ZIP encryption is very weak and could be cracked easily.
Password Protected ZIP File in Linux
Create an encrypted ZIP file secure.zip from some file:
$ zip --encrypt secure.zip file Enter password: Verify password: adding: file (deflated 8%)
Create password protected ZIP archive secure.zip from the several files:
$ zip --encrypt secure.zip file1 file2 file3 Enter password: Verify password: adding: file1 (stored 15%) adding: file2 (deflated 30%) adding: file3 (deflated 45%)
Create an encrypted ZIP archive secure.zip from a folder /var/log/ :
$ zip --encrypt -r secure.zip /var/log/ Enter password: Verify password: adding: var/log/ (stored 0%) adding: var/log/dmesg.0 (deflated 74%) adding: var/log/dpkg.log.9.gz (deflated 0%) adding: var/log/samba/log.asc-nb (deflated 96%) ***
Use the following command to uncompress a ZIP file:
$ unzip secure.zip Enter password: ***
Encrypt and Decrypt ZIP Archive in Linux
You were interactively prompted for the password in the examples above.
If you want to create a password protected ZIP file from some shell script, you may want to do it non-interactively.
This method is more insecure, as the password is entered as plain text.
You can easily encrypt and decrypt ZIP files from the Linux command line without being prompted for the password.
$ zip -P passw0rd secure.zip file $ zip -P passw0rd secure.zip file1 file2 file3 $ zip -P passw0rd -r secure.zip /var/log/
Uncompress a password protected ZIP archive:
$ unzip -P passw0rd secure.zip