- Creating Virtual Disks Using Linux Command Line
- Tools Requirements
- Create The Image and Format Partitions
- Images With Multiple Partitions
- Finish partitions
- Conclusion
- How to Create a Virtual HardDisk Volume Using a File in Linux
- Create a New Image to Hold Virtual Drive Volume
- Removing Virtual Drive Volume
- Как создать ramdisk в Linux или виртуальный диск в RAM
Creating Virtual Disks Using Linux Command Line
Linux is indeed a great system with excellent tools at our disposal. There are lots of things that can be achieved using the terminal. One such activity is creating virtual hard drives. Your Linux system should already have the tools required to do this without the need for virtual machine software.
NOTE: This tutorial only covers creating fixed-size disk images whose partitions can be mounted using Linux. Virtual machine programs like VirtualBox allow you to create dynamically expanding virtual drives that increase in size whenever necessary. If your goal is to create disks for programs such as VirtualBox, you need to use its tools.
Tools Requirements
The following commands that you will need are:
- ‘dd’ for creating the file. You can also bximage (part of the Bochs PC Emulator) if you wish.
- ‘fdisk’ for creating partitions, or which ever partition program you like.
- ‘mkfs’ for formatting the partitions.
- ‘losetup’ for setting up the loop devices for each partition.
You may use whatever tool you are comfortable with to achieve the same goal, of course.
Create The Image and Format Partitions

Creating the image is simple using ‘dd’. All this will do is write zeros to a file of a specified size. For example, let’s create a 1GB image: $ dd if=/dev/zero of=1GB_HDD.img bs=1M count=1024 This will take a little time. You may choose a smaller or larger size if you wish.
Once completed, a partition should be created using fdisk. Because there is no partition table, one will be created. This is the DOS partition table. Let’s switch to a GPT table by entering ‘g’ into the prompt to create one. Now, create a partition by entering ‘n’. Accept all of the defaults. The partition created will be in a native Linux format that can be either ext2, ext3, or ext4. Then write the changes to the image by entering ‘w’.

After the changes are written and fdisk closes, all that is required to do is format the partition running ‘mkfs.ext4’ on the image file itself to create an ext4 partition. It may ask you if you wish to proceed anyway if a GPT partition is found. If so, say yes.


If all went well, you can then proceed to setup a loop device for your image. This requires the use of ‘losetup’ (that is, loop setup). The command we wish to run will assign an available loop device (-f parameter to find one) to the partition on the image, and show the name of said loop device (–show parameter): $ sudo losetup -Pf –show 1GB_HDD.img
If successful, you should be able to access the partition by either using ‘mount’ or through your file manager.
Images With Multiple Partitions
That was how you create virtual drives with a single partition. What about images with two or more partitions? There are a few extra steps necessary, but once you know what to do, it should still be quite simple.Begin by creating a 4GB image:
$ dd if=/dev/zero of=4GB_HDD.img bs=1M count=4096
Use fdisk to create three Linux partitions with a GPT partition table. I chose the size of my partitions randomly. Feel free to choose the size of each partition yourself.
Now we need to run ‘losetup’ to gain access to each partition by assigning loop devices to each one.
$ sudo losetup -Pf --show 4GB_HDD.img
![]()
As before, we wanted to see what loop device was chosen. However, this time, the ‘-P’ parameter was useful in this case because it tells ‘losetup’ to scan the image for any partitions to create loop devices for. When the loop interfaces are created, have a look at ‘lsblk’ to see the created devices.

After that, each partition needs to be formatted before use, so run ‘mkfs’ to create them. Try running ‘mkfs.ext2’ on the first partition to create an ext2 filesystem. Then run ‘mkfs.ext4’ on the other two to create ext4 filesystems on the image. Once they’re formatted, you should be able to mount them via the command line or a file manager.
Finish partitions

If you are finished with the partitions, simply run ‘losetup’ to remove the loop device you wish.
Conclusion
To create a virtual drive with partitions on Linux is a very simple process. If you run into any trouble, do let me know in the comment section below this article. I’ll to respond as soon as possible.
How to Create a Virtual HardDisk Volume Using a File in Linux
Virtual Hard Disk (VHD) is a disk image file format which represents a virtual hard disk drive, capable of storing the complete contents of a physical hard drive. It’s a container file that acts similar to a physical hard drive. The disk image replicates an existing hard drive and includes all data and structural features.
Just like a physical hard drive, a VHD can contains a file system, and you can use it to store and run an operating system, applications, as well as store data. One of the typical uses of VHDs in VirtualBox Virtual Machines (VMs) to store operating systems and application, and data.
In this article, we will demonstrate how to create a virtual hard disk volume using a file in Linux. This guide is useful for creating VHDs for testing purposes in your IT environment. For the purpose of this guide, we will create a VHD volume of size 1GB, and format it with EXT4 file system type.
Create a New Image to Hold Virtual Drive Volume
There are number of ways you can do this, but the most easiest way is using the following dd command. In this example, we will be creating a VHD volume of size 1GB image.
$ sudo dd if=/dev/zero of=VHD.img bs=1M count=1200

- if=/dev/zero: input file to provide a character stream for initializing data storage
- of=VHD.img: image file to be created as storage volume
- bs=1M: read and write up to 1M at a time
- count=1200: copy only 1200M (1GB) input blocks
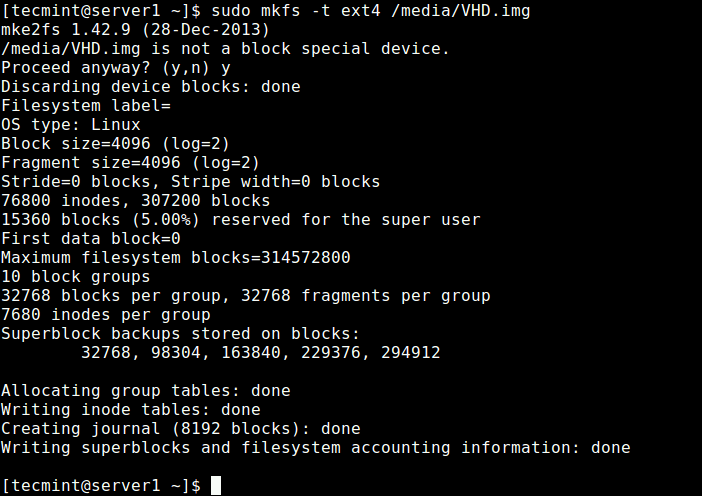
Next, we need to format the EXT4 file system type in the VHD image file with the mkfs utility. Answer y , when prompted that /media/VHD.img is not a block special device as shown in the following screenshot.
$ sudo mkfs -t ext4 /media/VHD.img
In order to access the VHD volume, we need to mount to a directory (mount point). Run these commands to create the mount point and mount the VHD volume, respectively. The -o is used to specify options for mounting, here, the option loop indicates the device node under the /dev/ directory.
$ sudo mkdir /mnt/VHD/ $ sudo mount -t auto -o loop /media/VHD.img /mnt/VHD/
Note: The VHD filesystem will only remain mounted until the next reboot, to mount it at system boot, add this entry in the /etc/fstab file.
/media/VHD.img /mnt/VHD/ ext4 defaults 0 0
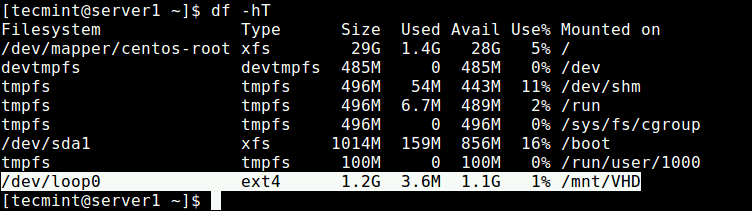
Now you can verify the newly created VHD filesystem with mount point using the following df command.
Removing Virtual Drive Volume
If you don’t need the VHD volume anymore, run the following commands to unmount the VHD filesystem, then delete the image file:
$ sudo umount /mnt/VHD/ $ sudo rm /media/VHD.img
Using the same idea, you can also create a swap area/space using a file in Linux.
That’s all! In this guide, we have demonstrated how to create a virtual hard disk volume using a file in Linux. If you have any thoughts to share or questions to ask, reach us via the comment form below.
Как создать ramdisk в Linux или виртуальный диск в RAM

Иногда попадаются задачи, когда нужно работать с большим количеством мелких файлов или некоторое небольшое время хранить объемные данные и делать это по возможности быстро, без завязок на медленную файловую подсистему и/или диски. Многие вспомнят, что есть такой виртуальный диск, он же – RAM-дисках (ramdisk), а сделать ramdisk в *nix системах можно очень быстро и просто.
Изначально, в ядре должна быть поддержка tmpfs.
Как создать диск:
В первую очередь создаем новую точку монтирования:
mkdir /cache chmod 777 /cache
и даём все права на использование.
После этого даём команду на монтирование, для примера, я создам диск на 1 Gb
# mount -t tmpfs -o size=1024M tmpfs /cache или $ sudo mount -t tmpfs -o size=1024M tmpfs /cache
где 1024M – это и есть размер RAMdisk в Мегабайтах.
Аккуратнее с размером и не размахивайтесь слишком широко: если вы попросите создать ramdisk больше, чем имеете оперативной памяти, система начнёт сгружать всё в swap-файл и дела пойдут очень медленно и грустно. Кстати, если ОЗУ в системе достаточно, swap можно и вовсе отключить, см. Как отключить SWAP
Если же вы хотите изменить размер ramdisk – это просто:
# mount -o remount -o size=2048M /cache или $ sudo mount -o remount -o size=2048M /cache
При этом содержимое RAM-диска не пропадёт, но и его размер тут же увеличится (при уменьшении также ничего не пропадёт, если только данных не больше, чем диск).
ВАЖНО.
RAM-диск это хранение в OЗУ, и это значит, что всё его содержимое после отключения питания машины будет безвозвратно потеряно. По возможности используйте резервное питание, что бы успеть сохранить важные данные.