- How do I force SSH to only allow users with a key to log in?
- Можно ли разрешить или запретить доступ по SSH определенному пользователю или группе?
- 1. Разрешить SSH-доступ пользователю или группе
- 2. Запретить доступ по SSH пользователю или группе
- 3. Отключить вход в систему через SSH-root
- sshd_config AllowUsers
- 4 Answers 4
- Allow/Deny Specific Users to Login via SSH on Ubuntu 18.04
- Allow/Deny Specific Users to Login via SSH on Ubuntu 18.04
- Allow Specific Users to Login via SSH on Ubuntu 18.04
- Deny Specific Users to Login via SSH on Ubuntu 18.04
- SUPPORT US VIA A VIRTUAL CUP OF COFFEE
How do I force SSH to only allow users with a key to log in?
I tried following the instructions here: http://lani78.wordpress.com/2008/08/08/generate-a-ssh-key-and-disable-password-authentication-on-ubuntu-server/ to only allow users with a public key on the server to authenticate, but I can’t get SSH to disallow logging in with only a username/password. Here is my sshd_config file — am I missing anything? I already tried restarting SSH and the computer itself.
# Package generated configuration file # See the sshd_config(5) manpage for details # What ports, IPs and protocols we listen for Port 22 # Use these options to restrict which interfaces/protocols sshd will bind to #ListenAddress :: #ListenAddress 0.0.0.0 Protocol 2 # HostKeys for protocol version 2 HostKey /etc/ssh/ssh_host_rsa_key HostKey /etc/ssh/ssh_host_dsa_key HostKey /etc/ssh/ssh_host_ecdsa_key #Privilege Separation is turned on for security UsePrivilegeSeparation yes # Lifetime and size of ephemeral version 1 server key KeyRegenerationInterval 3600 ServerKeyBits 768 # Logging SyslogFacility AUTH LogLevel INFO # Authentication: LoginGraceTime 120 PermitRootLogin yes StrictModes yes RSAAuthentication yes PubkeyAuthentication yes #AuthorizedKeysFile %h/.ssh/authorized_keys # Don't read the user's ~/.rhosts and ~/.shosts files IgnoreRhosts yes # For this to work you will also need host keys in /etc/ssh_known_hosts RhostsRSAAuthentication no # similar for protocol version 2 HostbasedAuthentication no # Uncomment if you don't trust ~/.ssh/known_hosts for RhostsRSAAuthentication #IgnoreUserKnownHosts yes # To enable empty passwords, change to yes (NOT RECOMMENDED) PermitEmptyPasswords no # Change to yes to enable challenge-response passwords (beware issues with # some PAM modules and threads) ChallengeResponseAuthentication no # Change to no to disable tunnelled clear text passwords #PasswordAuthentication no # Kerberos options #KerberosAuthentication no #KerberosGetAFSToken no #KerberosOrLocalPasswd yes #KerberosTicketCleanup yes # GSSAPI options #GSSAPIAuthentication no #GSSAPICleanupCredentials yes X11Forwarding yes X11DisplayOffset 10 PrintMotd no PrintLastLog yes TCPKeepAlive yes #UseLogin no #MaxStartups 10:30:60 #Banner /etc/issue.net # Allow client to pass locale environment variables AcceptEnv LANG LC_* Subsystem sftp /usr/lib/openssh/sftp-server # Set this to 'yes' to enable PAM authentication, account processing, # and session processing. If this is enabled, PAM authentication will # be allowed through the ChallengeResponseAuthentication and # PasswordAuthentication. Depending on your PAM configuration, # PAM authentication via ChallengeResponseAuthentication may bypass # the setting of "PermitRootLogin without-password". # If you just want the PAM account and session checks to run without # PAM authentication, then enable this but set PasswordAuthentication # and ChallengeResponseAuthentication to 'no'. UsePAM no Можно ли разрешить или запретить доступ по SSH определенному пользователю или группе?
Это краткое руководство проведет вас через шаги, чтобы разрешить или запретить SSH-доступ определенному пользователю или группе в Linux. Оно будет полезно, если вы хотите разрешить конкретному пользователю выполнять только определенный набор команд. В этой статье мы собираемся включить или отключить доступ по SSH для пользователя или группы, внеся несколько изменений в файл конфигурации SSH по умолчанию.
В конфигурационном файле openSSH по умолчанию есть две директивы для разрешения и запрета доступа по SSH определенным пользователям или группе. Во-первых, давайте посмотрим, как разрешить или включить SSH-доступ для пользователя и группы. Обратите внимание, что все приведенные ниже команды должны запускаться от имени пользователя root или sudo.
1. Разрешить SSH-доступ пользователю или группе
Чтобы разрешить доступ по SSH для определенного пользователя, например sk, отредактируйте файл sshd_config:
$ sudo vi /etc/ssh/sshd_config
Нажмите «i», чтобы войти в режим вставки и добавить или изменить следующую строку:
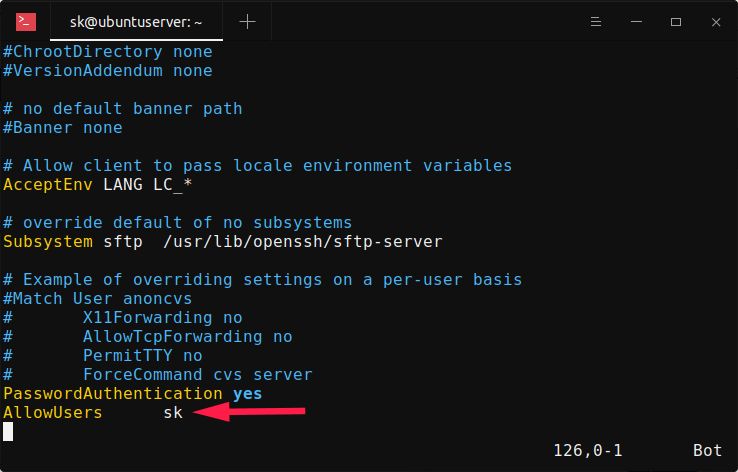
Замените «sk» своим именем пользователя. Обратите внимание на отступы между «AllowUsers» и «sk». Вы должны использовать Tab вместо пробела. Значение — добавьте слово «AllowUsers» и нажмите клавишу Tab, а затем укажите имя пользователя.
Вы также можете указать более одного пользователя, как показано ниже.
Чтобы разрешить всю группу, например, root , добавьте/отредактируйте следующую строку:
Этот параметр позволит всем членам «корневой» группы подключаться к серверу Linux по ssh.
Нажмите клавишу ESC, чтобы выйти из режима вставки, и введите : wq, чтобы сохранить и выйти из файла конфигурации SSH. Перезапустите службу SSH, чтобы изменения вступили в силу.
$ sudo systemctl restart sshd
Теперь пользователю sk и всем членам «корневой» группы разрешено подключаться к вашему Linux-серверу по ssh. Остальные пользователи (кроме sk и членов группы «root») не имеют доступа к системе через ssh.
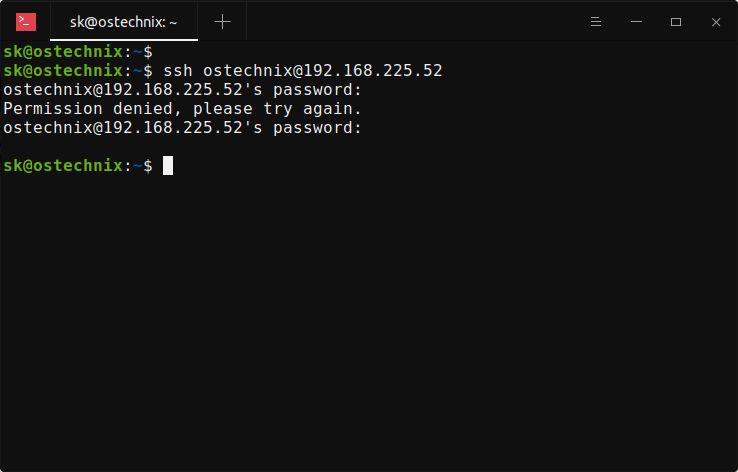
Чтобы проверить это, попробуйте подключиться к серверу Linux по ssh от имени любого из запрещенных пользователей:
Вы получите следующее сообщение об ошибке:
ostechnix@192.168.225.52's password: Permission denied, please try again.
2. Запретить доступ по SSH пользователю или группе
Чтобы отключить или запретить доступ по SSH для пользователя или группы, вам необходимо добавить/изменить следующие директивы в файле sshd_config вашего удаленного сервера.
Чтобы запретить доступ по SSH конкретному пользователю с именем «sk», отредактируйте файл sshd_config:
$ sudo vi /etc/ssh/sshd_config
Добавьте/отредактируйте следующую строку в файле sshd_config.
Убедитесь, что отступы правильные. Не используйте клавишу пробела. Нажмите клавишу Tab и добавьте имя пользователя.
Аналогичным образом, чтобы запретить доступ по SSH нескольким пользователям, укажите имена пользователей через пробел, как показано ниже.
Аналогичным образом, чтобы запретить доступ по SSH для всей группы, например root , добавьте:
Сохраните и выйдите из файла конфигурации ssh. Перезапустите службу ssh, чтобы изменения вступили в силу.
$ sudo systemctl restart sshd
Теперь попробуйте ssh на свой Linux-компьютер из заблокированной учетной записи пользователя, например sk:
Вы получите следующее сообщение:
sk@192.168.225.52's password: Permission denied, please try again. sk@192.168.225.52's password:
3. Отключить вход в систему через SSH-root
Доступ с root-доступом по ssh считается плохой практикой с точки зрения безопасности . Поэтому настоятельно рекомендуется отключить вход в систему SSH Root для защиты вашей системы.
Чтобы отключить вход в систему root ssh, отредактируйте файл sshd_config:
$ sudo vi /etc/ssh/sshd_config
Найдите следующую строку, раскомментируйте ее и установите значение no .
Перезапустите службу SSH, чтобы изменения вступили в силу немедленно:
$ sudo systemctl restart sshd
Теперь вы знаете, как предоставлять и ограничивать доступ по SSH для определенных пользователей или групп в Linux. Вы также узнали, как запретить или отключить вход root по SSH в Linux. Это одна из рекомендуемых мер безопасности, которую должен применять каждый администратор Linux при настройке сервера Linux.
Насколько публикация полезна?
Нажмите на звезду, чтобы оценить!
Средняя оценка / 5. Количество оценок:
Оценок пока нет. Поставьте оценку первым.
sshd_config AllowUsers
Unfortunately, when ever the @ is present, it negates the previous parameters and no matter what the order is.
I have two questions; is there an order to which the parameters within the AllowUsers directive are executed and is the logic above even possible?
4 Answers 4
sshd_config man says that the order of processing is:
The allow/deny directives are processed in the following order: DenyUsers, AllowUsers, DenyGroups, and finally AllowGroups.
So if the «user1» also has its own group «user1» you can use this configuration:
AllowUsers *@host1 DenyGroups user1 AllowGroups * Another option is to use negation:
DenyUsers user1@!host1 AllowUsers *@* One word of caution. Multiple entries on the AllowUsers statement that use the same user in user@host notation, can cause the subsequent entries to not be evaluated. It is more reliable to enter separate AllowUsers statements each with their own user@host entries. I specifically noticed this behavior in Ubuntu 16.04.
The logic above is not possible with just one instance of sshd. However it is possible if you run a second sshd instance (configured to listen on a different port).
Configure the first instance with:
Configure the second instance with:
Tell user1 to connect to the second instance (different port). Tell all other users to connect to the first instance (default port).
NOTE: You could also allow or deny ssh access by using SSH PAM CONFIG (recommended for a large number of users) or with TCP Wrappers but you would need to get the libwrap.a library to make it work with SSH.
If you want to restric access via SSHD CONFIG, you can use these four entries:
AllowUsers AllowGroups DenyUsers DenyGroups
The pattern matching occurs in the following order: DenyUsers,AllowUsers,DenyGroups,AllowGroups. Which means that, for example, if you add a user to both entries (AllowUsers and DenyUsers) this would result in the user being denied no matter the order in which the rules appear in the config script.
To accomplish the 3 restrictions you mention, you could try creating a group sshgroup and configure every user account, except for user1, to be included in the group. Finally you could create a script to add the users in sshgroup to a rule in your sshd_config file that always includes:
AllowUsers user1@host1 user2 user3.
To keep the sshd config file up to date, you could call the script every time a user is created/deleted. Don’t forget to restart the ssh daemon after every change to the config file.
Here you can find a script «pop_user_allow_ssh» that is also trying to generate a user list.
You don’t mention your OS but this is how I did it on AIX. I hope the idea helps.
Allow/Deny Specific Users to Login via SSH on Ubuntu 18.04

Hello there, today we are going to learn how to allow/deny specific users to login via SSH on Ubuntu 18.04 system.
Allow/Deny Specific Users to Login via SSH on Ubuntu 18.04
Allow Specific Users to Login via SSH on Ubuntu 18.04
In order to allow specific users or a specific group of users to login to an Ubuntu 18.04 system via SSH, AllowUsers or AllowGroups options can be used in SSH daemon configuration file, /etc/ssh/sshd_config .
For example, to allow users, amos and admin to login, edit the SSHd configuration file and add the line below;
. AllowUsers amos admin
Once changes are made, restart SSH.
Now, if you try to login as any other user apart from the two allowed above, you should get permission denied.
ssh [email protected] [email protected]'s password: Permission denied, please try again.
If you check authentication logs, it states clearly;
Mar 27 19:46:07 u18svr sshd[886]: User mibey from 192.168.0.101 not allowed because not listed in AllowUsers
To allow a specific group of users to login, you would add the following line to SSHd configuration file;
AllowGroups administrators
This will allow only the members of the administrators group login
getent group administrators administrators:x:1004:admin,mibey
If you try to login as a user who is not a member of the administrators group, you will get permission denied.
ssh [email protected] [email protected]'s password: Permission denied, please try again
Deny Specific Users to Login via SSH on Ubuntu 18.04
Similarly, to deny a specific user from logging in via SSH, you simply use the DenyUsers or DenyGroups option with a list of users or groups to deny access respectively.
If you try to login as any of the above users, you will get permission denied.
To deny a group of users, say the administrator group whose members are admin and mibey, you would add the following line to SSHd configuration file.
DenyGroups administrators
Remember to reload SSH whenever you make any changes.
Great, that is all about how to allow/deny specific users to login via SSH on Ubuntu 18.04 system. Enjoy
SUPPORT US VIA A VIRTUAL CUP OF COFFEE
We’re passionate about sharing our knowledge and experiences with you through our blog. If you appreciate our efforts, consider buying us a virtual coffee. Your support keeps us motivated and enables us to continually improve, ensuring that we can provide you with the best content possible. Thank you for being a coffee-fueled champion of our work!