- Where to Find sshd Logs in Linux?
- Method 1: Using the “auth.log” File
- Method 2: Using the “lastlog” Command
- Method 3: Using the “journalctl” Command
- Conclusion
- How to Find All Failed SSH login Attempts in Linux
- How to view authentication logs on Ubuntu 20.04
- BitLaunch
- BitLaunch
- How to check system logins
- View the most recent logins
- See when users last logged in
- What to look for in authentication logs
- How to fix the ssh permission denied (publickey) error
- How to install and use PostgreSQL on Ubuntu 20.04
Where to Find sshd Logs in Linux?
The “sshd” is an abbreviation of the “Secure Shell Daemon” of an OpenSSH server. It manages incoming connections utilizing the SSH protocol as a server. It also allows the user to access the details like encryption, file transfers, terminal connections, tunneling, and user authentication. The “sshd-logs” handles the user authentication details, i.e., authorized/unauthorized login attempts.
This post illustrates the sshd logs’ exact location and how the user can check them in Ubuntu.
Method 1: Using the “auth.log” File
The “sshd logs” are in the “auth.log” file which is located in the “/var/log/” directory. It stores the authorization attempts details of the system like user logins, used authorized mechanism, and sshd logs.
Run the “grep” to filter out the “sshd logs” details from the “/var/log/auth.log” file:
$ grep ‘sshd’ /var/log/secure #For Fedora/CentOS/RHEL $ grep ‘sshd’ /var/log/auth.log #For Ubuntu/Debian-Based
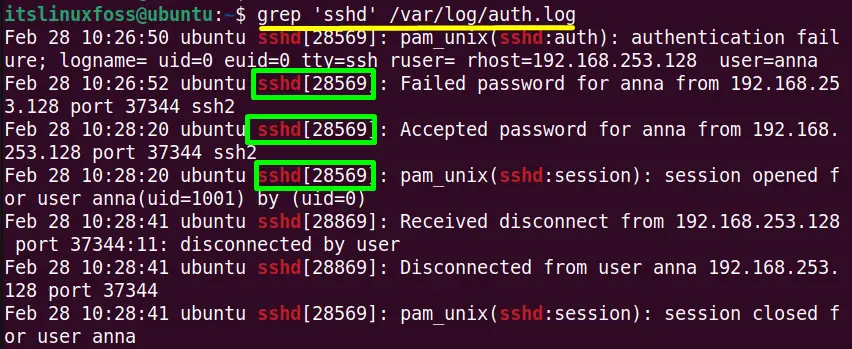
The output shows all the “sshd” sessions details such as date, hostname, logname, port no and many others with the process ID “28569”.
Method 2: Using the “lastlog” Command
The “lastlog” command line utility is a program that displays the last login attempts details of the system accounts. The login details include port, login name, last login, and also the sshd logs.
Execute the “lastlog” command without any of its supported flags to list down the “sshd logs” details:
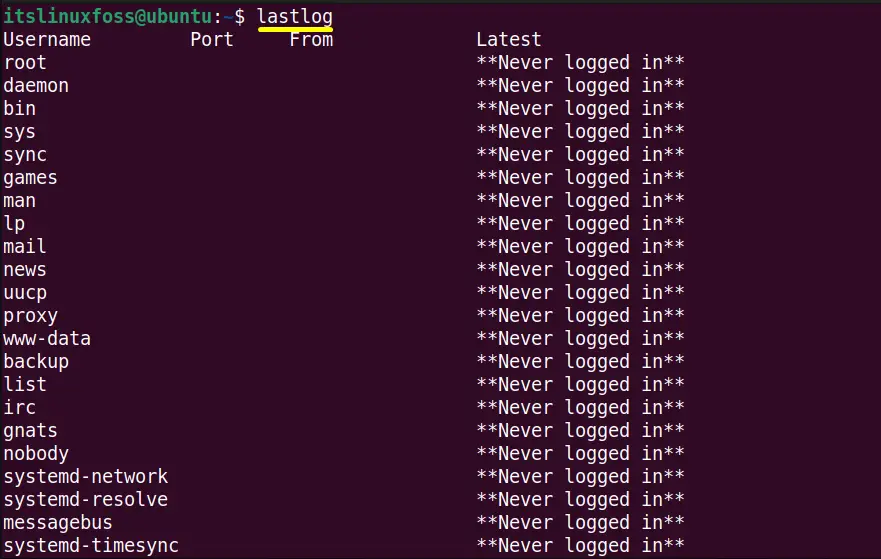

All the login attempts information has been displayed on the terminal.
To filter out only the “sshd logs” details, use the combination of “lastlog” and “grep” commands with the “|(Pipe)” character in this way:

The “sshd logs” contains no logged-in attempts.
Method 3: Using the “journalctl” Command
The “journalctl” is another command line tool that provides the log (including sshd logs) details of the systemd journaling system. It provides the systemd logs collection and systemd services and gets the messages from the kernel.
Use the “journalctl” command followed by the “-u(specifies unit “systemd”)” flag to show the “sshd logs” in the terminal:

The “sshd logs” contains “No entries” same as the “lastlog” output.
Conclusion
In Linux, the “sshd logs” are stored in the “/var/log/auth.log” file. These log details can be displayed using the “grep”, “lastlog”, and the “journalctl” command line utilities. All these utilities are pre-installed in the commonly used Linux distribution like “Fedora”, “CentOS”, “RHEL”, “Ubuntu/Debian”, and many others.
This post has listed down the sshd logs’ exact location and all possible methods to view them.
How to Find All Failed SSH login Attempts in Linux
Each attempt to login to SSH server is tracked and recorded into a log file by the rsyslog daemon in Linux. The most basic mechanism to list all failed SSH logins attempts in Linux is a combination of displaying and filtering the log files with the help of cat command or grep command.
In order to display a list of the failed SSH logins in Linux, issue some of the commands presented in this guide. Make sure that these commands are executed with root privileges.
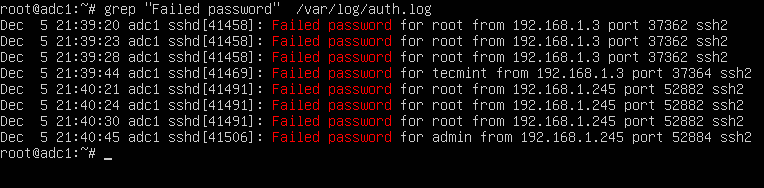
The most simple command to list all failed SSH logins is the one shown below.
# grep "Failed password" /var/log/auth.log
The same result can also be achieved by issuing the cat command.
# cat /var/log/auth.log | grep "Failed password"
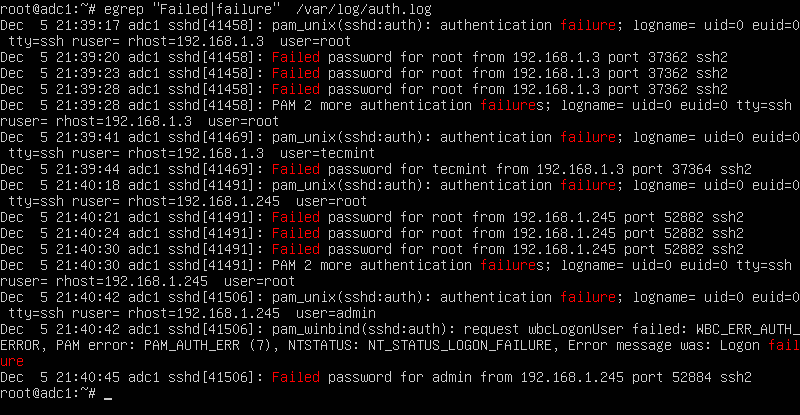
In order to display extra information about the failed SSH logins, issue the command as shown in the below example.
# egrep "Failed|Failure" /var/log/auth.log
In CentOS or RHEL, the failed SSH sessions are recorded in /var/log/secure file. Issue the above command against this log file to identify failed SSH logins.
# egrep "Failed|Failure" /var/log/secure
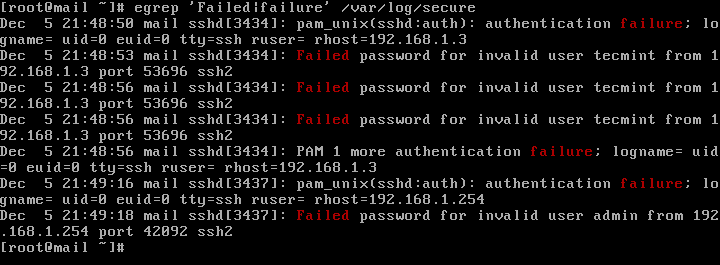
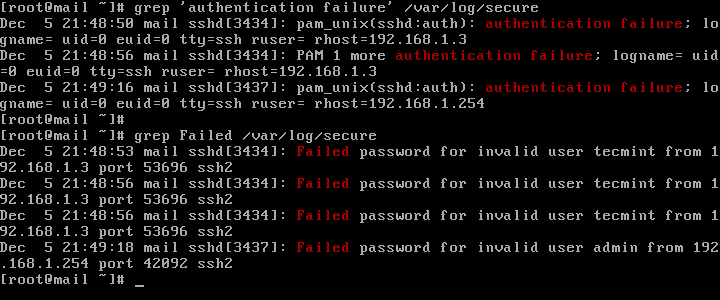
A slightly modified version of the above command to display failed SSH logins in CentOS or RHEL is as follows.
# grep "Failed" /var/log/secure # grep "authentication failure" /var/log/secure
To display a list of all IP addresses that tried and failed to log in to the SSH server alongside the number of failed attempts of each IP address, issue the below command.
# grep "Failed password" /var/log/auth.log | awk ‘’ | uniq -c | sort -nr

On newer Linux distributions you can query the runtime log file maintained by Systemd daemon via journalctl command. In order to display all failed SSH login attempts you should pipe the result via grep filter, as illustrated in the below command examples.
# journalctl _SYSTEMD_UNIT=ssh.service | egrep "Failed|Failure" # journalctl _SYSTEMD_UNIT=sshd.service | egrep "Failed|Failure" #In RHEL, CentOS
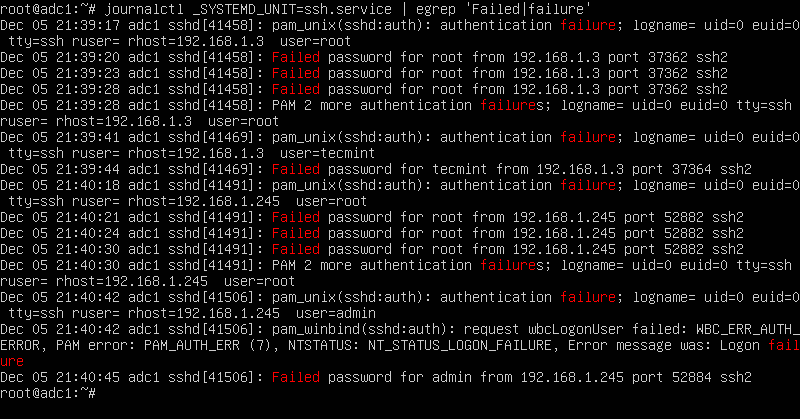
In CentOS or RHEL, replace the SSH daemon unit with sshd.service, as shown in the below command examples.
# journalctl _SYSTEMD_UNIT=sshd.service | grep "failure" # journalctl _SYSTEMD_UNIT=sshd.service | grep "Failed"
After you’ve identified the IP addresses that frequently hit your SSH server in order to log in to the system with suspicious user accounts or invalid user accounts, you should update your system firewall rules to block the failed SSH attempts IP addresses or use a specialized software, such as fail2ban to manage these attacks.
How to view authentication logs on Ubuntu 20.04
Authentication logs form a vital part of server security. If you suspect a breach, they can provide a full list of every remote login attempt on your server, alongside the account, date, and timestamp.
BitLaunch
BitLaunch

Authentication logs form a vital part of server security. If you suspect a breach, they can provide a full list of every remote login attempt on your server, alongside the account, date, and timestamp. They also list each prompt that asks for a user password, such as the sudo command, and whether or not the authentication was successful.
How to check system logins
The majority of Linux systems keep these logs at /var/log/auth.log or /var/log/secure . For Ubuntu, it’s the former. We can view these with nano or vim like we would any other text file, but the following command will give us faster load times and let us easily view the file page-by-page:
OUTPUT: Jan 8 15:07:22 5ff8750c7437d20001bb84c5 passwd[395]: password for 'root' changed by 'root' Jan 8 15:07:42 5ff8750c7437d20001bb84c5 sshd[546]: Received signal 15; terminating. Jan 8 15:07:42 5ff8750c7437d20001bb84c5 sshd[1321]: Server listening on 0.0.0.0 port 22. Jan 8 15:07:42 5ff8750c7437d20001bb84c5 sshd[1321]: Server listening on :: port 22. Jan 8 15:08:01 5ff8750c7437d20001bb84c5 sshd[1321]: Received signal 15; terminating. Jan 8 15:08:01 5ff8750c7437d20001bb84c5 sshd[1727]: Server listening on 0.0.0.0 port 22. Jan 8 15:08:01 5ff8750c7437d20001bb84c5 sshd[1727]: Server listening on :: port 22. Jan 8 15:09:41 5ff8750c7437d20001bb84c5 sshd[1738]: error: kex_exchange_identification: read: Connection reset by peer Jan 8 15:09:46 5ff8750c7437d20001bb84c5 sshd[1739]: pam_unix(sshd:auth): authentication failure; logname= uid=0 euid=0 tty=ssh ruser= rhost=81.161.63.100 user=root Jan 8 15:09:49 5ff8750c7437d20001bb84c5 sshd[1739]: Failed password for root from 81.161.63.100 port 54150 ssh2 Jan 8 15:14:36 5ff8750c7437d20001bb84c5 sshd[1896]: pam_unix(sshd:auth): authentication failure; logname= uid=0 euid=0 tty=ssh ruser= rhost=71.221.154.110 user=root Jan 8 15:14:37 5ff8750c7437d20001bb84c5 sudo: root : TTY=pts/0 ; PWD=/root ; USER=root ; COMMAND=/usr/bin/less /var/log/auth.log Jan 8 15:14:37 5ff8750c7437d20001bb84c5 sudo: pam_unix(sudo:session): session opened for user root by root(uid=0) (END) Above is a cut-down example from a server that was just created. You can see that it also lists the initial password change when the server was programmatically created.
Once you’re ready, press q to quit the document.
View the most recent logins
If you just want to check the most recent logins, it’s even simpler. Back in the command-line, type last and press Enter.
The output will look something like this:
root pts/0 12.34.567.89 Fri Jan 8 15:30 still logged in root pts/0 12.34.567.89 Fri Jan 8 15:13 - 15:29 (00:16) reboot system boot 5.4.0-1009-kvm Fri Jan 8 15:07 still running The last tool pulls its data from /var/log/wtmp , which is written to each time a user logs in. It’ll show username, tty, IP address, date and time, and session start/stop times.
If that’s too verbose, you can apply filters to the command with the following syntax:
Let’s look at an example. If we wanted to view all of the logins from the root user, we could run:
OUTPUT: root pts/0 12.345.678.90 Fri Jan 8 15:30 still logged in root pts/0 12.345.678.90 Fri Jan 8 15:13 - 15:29 (00:16)Or, if we want to restrict it to a specific user and TTY:
See when users last logged in
If you notice an unauthorized change to the system, it’s often useful to see when each user last logged in. This way, you can determine who made the adjustment. We can do this via the lastlog command, which pulls data from /etc/log/lastlog and sorts them by /etc/password entries:
Username Port From Latest root pts/0 12.345.678.90 Fri Jan 8 15:30:06 +0000 2021 daemon **Never logged in** bin **Never logged in** sys **Never logged in** sync **Never logged in** bitlaunch pts/1 83.253.230.46 Fri Jan 8 16:09:53 +0000 2021 hack0r pts/1 83.253.230.46 Fri Jan 8 16:10:20 +0000 2021 You’ll notice quite a few users with a **Never logged in** entry in the Latest column. This is normal on account of them being system users.
But what if you just found out about a historical incursion or are looking for more specific information? lastlog has several options that can be of use.
| Option | Description |
|---|---|
| -u, —user [LOGIN] | Print logs for a specific user with a specified login |
| -b, —before [DAYS] | Print records older than a specified number of days |
| -t, —time [DAYS] | Print records that are more recent than a specified number of days |
This is particularly useful if we want to get the last time a specific user logged in:
OUTPUT: root pts/0 12.345.678.90 Fri Jan 8 15:30:06 +0000 2021What to look for in authentication logs
Now you know how to view authentication logs, it’s important to develop a pro-active mindset. Don’t just run these commands if you notice something strange – make it a habit to check regularly.
When you do so, look out out for the following:
- Users who are requesting sudo privileges to perform tasks that are outside their scope of work
- Is one user attempting to access or modify the content of another? Was a password changed unexpectedly?
- Attackers often create a new account so that they can perform actions without as much oversight
Of course, there’s one issue with all this. If an attacker gains access to your root account, they will be able to modify or delete your authentication log. An absence of authentication logs can be very telling, but it also doesn’t leave you with much information about the incursion.
As a result, it’s vital that you keep your root account secure and make regular backups of your log files and full server. Though they can help in the case of a breach, authentication logs are far from a replacement for basic security.

How to fix the ssh permission denied (publickey) error
The SSH permission denied (publickey) error is a frustrating one. Here’s how to fix it in a few simple steps.
How to install and use PostgreSQL on Ubuntu 20.04
In today’s guide we’re going to focus on how to install PostgreSQL on Ubuntu 20.04 as quickly as possible. For those unfamiliar, PostgreSQL, or Postgres, is a free, open-source database management system with high extensibility and compliance.
