- 2 Simple Steps to Set up Passwordless SSH Login on Ubuntu
- 2 Simple Steps to Set Up Passwordless SSH Login
- Step 1: Generate a Public/Private Keypair on Your Ubuntu Desktop
- Step 2: Upload Your Public Key to Remote Linux Server
- Disabling Password Authentication
- Backing up Your Public/Private Keypair
- Storing Key Passphrase in SSH Agent
- Changing Private Key Passphrase
- Pro Tip: Use Screen to Keep Your Session Alive
- Pro Tip #2: Automatically Start Screen Session
- Next Step
- How to Pass Password to SSH Command in Linux
- Connecting to Linux Server Using SSH
- Install SSHPass in Linux – A SSH Password Provider
- How to Add Password to SSH Command in Linux
2 Simple Steps to Set up Passwordless SSH Login on Ubuntu
This tutorial explains how to set up passwordless SSH login on an Ubuntu desktop. There’re basically two ways of authenticating user login with OpenSSH server: password authentication and public key authentication. The latter is also known as passwordless SSH login because you don’t need to enter your password.
2 Simple Steps to Set Up Passwordless SSH Login
Step 1: Generate a Public/Private Keypair on Your Ubuntu Desktop
On your Ubuntu desktop (not your server), enter the following command in a terminal window.
- -t stands for type . The above command generates an RSA type keypair. RSA is the default type.
- -b stands for bits . By default the key is 3072 bits long. We use a 4096 bits key for stronger security.
When asked which file to save the key, you can simply press Enter to use the default file. Next, enter a good passphrase at least 20 characters long. The passphrase is used to encrypt the private key.
- The private key (your identification) will be save in the .ssh/id_rsa file under your home directory.
- The public key will be save in the .ssh/id_rsa.pub file.
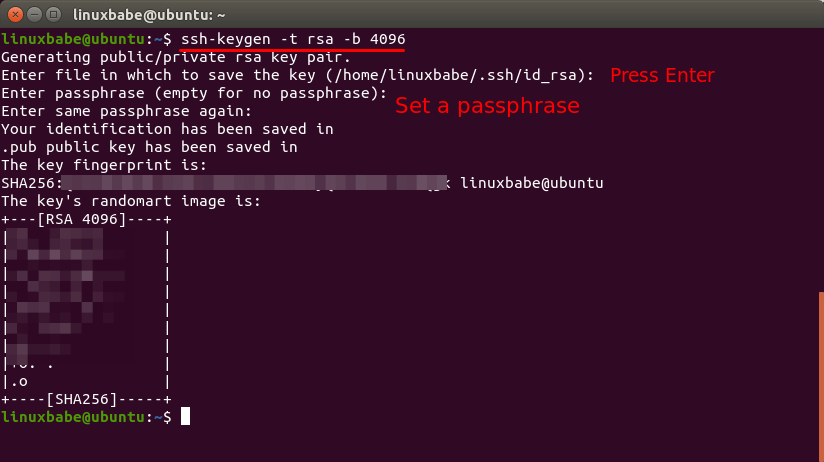
From the randomart image we can see the length of the key ( RSA 4096 ). Now run the following command.
You should see the following output:
/home/username/.ssh/id_rsa: OpenSSH private key
If you see the “No such file or directory” error, that means the SSH keypair isn’t created. Run the ssh-keygen -t rsa -b 4096 command to create it again.
Step 2: Upload Your Public Key to Remote Linux Server
Hint: The remote server can run any Linux distro: Debian, Ubuntu, RHEL, CentOS, whatever, as long as it runs OpenSSH server, you can use the following method.
This can be easily done with ssh-copy-id command, which is shipped with the openssh-client package.
ssh-copy-id remote-user@server-ip
Enter the remote user’s password.
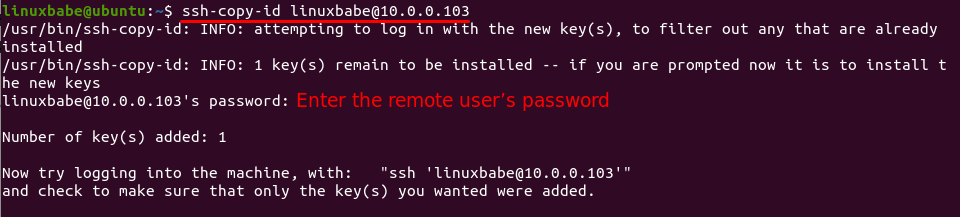
The public key will be stored in the .ssh/authorized_keys file under the remote user’s home directory. Now SSH into the remote server.
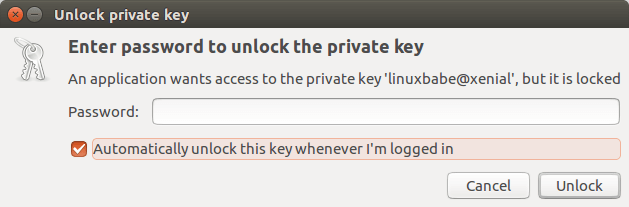
This time you need to enter your RSA key passphrase to unlock the private key. You can select automatic unlocking the key when logging in so you don’t have to enter the passphrase in the future.

Once you entered the correct key passphrase, you are logged into the remote Linux server. Now exit from the remote server.
And SSH into the remote server again:
This time you are automatically logged into the remote server, although you didn’t type password or key passphrase. Also, you don’t have to type password or key passphrase when using the scp command to transfer files. The scp command is also shipped by the openssh-client package, which is installed by default on Ubuntu desktop.
If your Ubuntu desktop doesn’t open up a dialog to remember your key passphrase, then you can manually add the key passphrase with the following command.
secret-tool store --label="Unlock password for: id_rsa" unique "ssh-store:/home/username/.ssh/id_rsa" Disabling Password Authentication
Although SSH key is now used by default to log into your server, you can still use normal password to log into the server on another computer. You don’t want hackers to launch brute force attack to hack into your server, so it’s a good practice to disable password authentication in OpenSSH server.
To disable password authentication, edit /etc/ssh/sshd_config file on the remote server.
sudo nano /etc/ssh/sshd_config
#PasswordAuthentication yes
PasswordAuthentication no
Then find the ChallengeResponseAuthentication line. Make sure it’s value is set to no like below. If it’s set to yes , you can still use password to login.
ChallengeResponseAuthentication no
Save the file and restart SSH service.
Debian/Ubuntu
sudo systemctl restart ssh
sudo systemctl restart sshd
Now if you don’t have the corresponding private key in ~/.ssh directory, you will see the following error when you try to SSH into your remote server.
Permission denied (publickey).
Read: Connection reset by peer
That means the remote server only allow SSH login using ssh keys and do not allow password authentication. Note that if you set PasswordAuthentication to no and ChallengeResponseAuthentication to yes , then you can still login using password. To disable password login, both of them must be set to no .
Backing up Your Public/Private Keypair
Once you disable SSH password authentication, it is very important to back up your SSH keys. If you lose the keys you will be locked out of your server. Back up your public/private keypair to a safe location such as your USB drive.
cp ~/.ssh/id_rsa* /path/to/safe/location/ You can also store your key pair in a folder, then compress the folder with encryption and send it to cloud storage like NextCloud.
You can also copy the key pair (both the private key and public key) to a new Linux computer and SSH into your server using SSH keys. Once you copied the key pair to a new computer, move them to the .ssh/ directory of the new user.
You need to change the owner of the key pair to the user on the new computer.
sudo chown new-user:new-user ~/.ssh/id_rsa*
Now you can use SSH keys to log into remote server on the new computer.
Sometimes, I would like to create two user accounts on my local Ubuntu computer to do different tasks. However, I still want to use the SSH key when I log into a different user account. Simply copy the SSH key pair (both the private key and public key) to the new users’ ~/.ssh/ folder. You need to enter your RSA key passphrase to unlock the private key. You can select automatic unlocking the key when logging in so you don’t have to enter the passphrase in the future.
Storing Key Passphrase in SSH Agent
Hint: Please don’t follow this section if your local computer has a graphical user interface.
If you are using a command line only Linux box, you may find that you need to enter the key passphrase every time you SSH into other Linux servers. That’s because your key passphrase is not stored by SSH agent.
Install and configure keychain on the SSH client box.
sudo apt install keychain
Then edit .bash_profile or .profile file. Append the following text into it so these two commands will be executed every time the user login.
/usr/bin/keychain $HOME/.ssh/id_rsa source $HOME/.keychain/$HOSTNAME-sh
Now logout and log back in. You will see something like:
Last login: Thu Dec 17 20:38:39 2015 from 74.125.128.103 * keychain 2.7.1 ~ http://www.funtoo.org * Found existing ssh-agent: 17651 * Adding 1 ssh key(s): /home//.ssh/id_rsa Enter passphrase for /home//.ssh/id_rsa: * ssh-add: Identities added: /home//.ssh/id_rsa When key chain starts, it checks for a running ssh-agent, otherwise it starts one. You need to enter the key passphrase this time. The key passphrase will be remembered across user logins, but when the system reboots, you have to enter it again.
Now as long as the ssh server has the public key and the ssh client you are working on right now has private/public keypair and keychain successfully configured, you can ssh into the ssh server without typing key passphrase.
Changing Private Key Passphrase
If you ever need to change your private key passphrase, you can do so with this command:
Enter your old passphrase and then enter a new passphrase.
Pro Tip: Use Screen to Keep Your Session Alive
Have you been doing work on the remote server and suddenly your computer is disconnected from Internet and you can no longer continue the running job on the server? You can use the wonderful screen utility to keep your session alive. Install screen on the Ubuntu server:
Upon first launch, you will see the startup message. Simply press Enter to end. Then you will be able to run commands as usual.
If you have a long-running job on the server and you don’t need to do other things on the server now, you can press Ctrl+A, release those keys, and then press D key to detach from the current Screen session. You will see a message like below.
[detached from 32113.pts-1.focal]
This tells you that the previous Screen session ID is 32113. You can log out from the SSH session and even shut down your local computer. Don’t worry, the job on the server is still running. When you need to come back and check the progress, SSH into your server and run the following command to get the previous Screen Session ID.
There is a screen on: 32113.pts-1.focal (05/19/2020 03:45:29 PM) (Detached) 1 Socket in /run/screen/S-linuxbabe.
Then you can re-attach to the previous Screen session.
If you are in a Screen session and suddenly your Internet connection drops, then you can run the following command on the server when you have Internet connection again.
This time we need the -d option because the previous Screen session wasn’t detached. We need to detach it first ( -d ) , then reattach to it ( -r ).
If you don’t like to see the Screen startup message every time, edit the Screen config file.
Find the following line. Remove the # character to uncomment it.
Pro Tip #2: Automatically Start Screen Session
Add the following line at the bottom of this file.
if [ -z "$STY" ]; then screen -RR; fi
Save and close the file. Next time when you SSH into the remote server, a Screen session will be automatically started.
Next Step
I hope this tutorial helped you to set up passwordless ssh login on Ubuntu. You may also want to set up automatic security update.
If you want FTP access to the Ubuntu server, you can set up pure-FTPd server.
As always, if you found this post useful, then subscribe to our free newsletter to get more tips and tricks. Take care.
How to Pass Password to SSH Command in Linux
The only way a user can accomplish a complete Linux operating system experience is if this user has had a partial or full glimpse of both sides of the Linux environment. Linux operating system exists both as a desktop environment and as a server environment.
For the desktop environment, users have the advantage of using GUI icons and applications to fulfill their operating system objectives. As for the server environment, an OS user needs some level of authentic familiarity with the Linux terminal commands to achieve an OS goal.
Most users stick to the desktop environment and others to the server environment. However, a multidimensional user will want to experience both sides of these environments. In this case, a Linux desktop user will need to flexibly access a Linux server environment and a Linux server user might also want to access other Linux server environments, routers, and firewalls.
Connecting to Linux Server Using SSH
There is no better-known tool for accessing Linux routers, firewalls, and servers than through the SSH cryptographic network protocol. The traditional approach of using the SSH protocol is summarized in by the following syntax:
$ ssh [email protected]_domain_name_or_server_ip_address
For example, I could access one of my servers in the following manner:
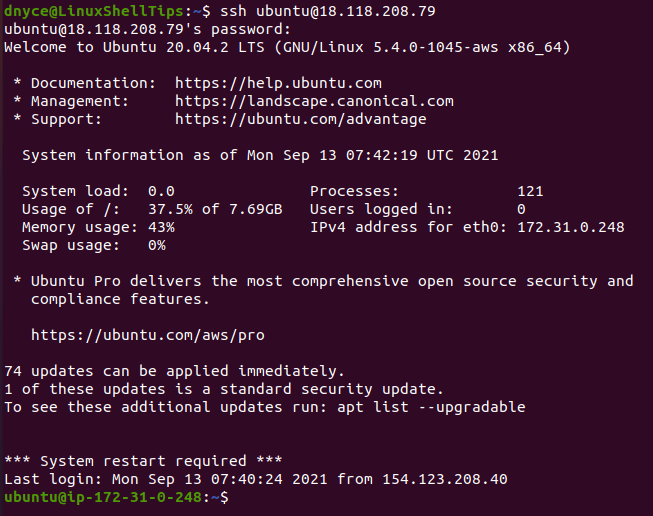
As per the above screen capture, the first access attempt to the Linux server was initiated by the command:
The execution of the above SSH command then later led to the prompt:
It is at this point that I keyed in the user-related (ubuntu) password and was successfully able to gain access to the Linux server.
For a novice Linux user or learner, this server-access approach is exciting and worth the pursuit. However, as you become an elite Linux user, you do not want to repeat yourself with a two-liner Linux command when you could only use one.
This article is here to fix this two-liner server access issue and provide an effective one-liner SSH access command for all your future Linux servers, routers, and firewalls access.
Install SSHPass in Linux – A SSH Password Provider
sshpass command-line tool will do the job for us. It facilitates a simplified approach to non-interactive ssh sign-in and supports one-liner ssh password input.
Firstly, you need to install the sshpass tool on your Linux operating system. Before the installation, ensure that you either have Sudo privileges or you are a Sudoer user of the Linux system.
$ sudo apt-get install sshpass [On Debian, Ubuntu and Mint] $ sudo yum install sshpass [On RHEL/CentOS/Fedora and Rocky Linux/AlmaLinux] $ sudo emerge -a sys-apps/sshpass [On Gentoo Linux] $ sudo pacman -S sshpass [On Arch Linux] $ sudo zypper install sshpass [On OpenSUSE]
How to Add Password to SSH Command in Linux
With the successful installation of SSHPASS, the one-liner SSH command syntax for accessing a remote Linux server, router, or firewall will look like the following:
In my case, I would implement SSHPASS usage in the following manner:
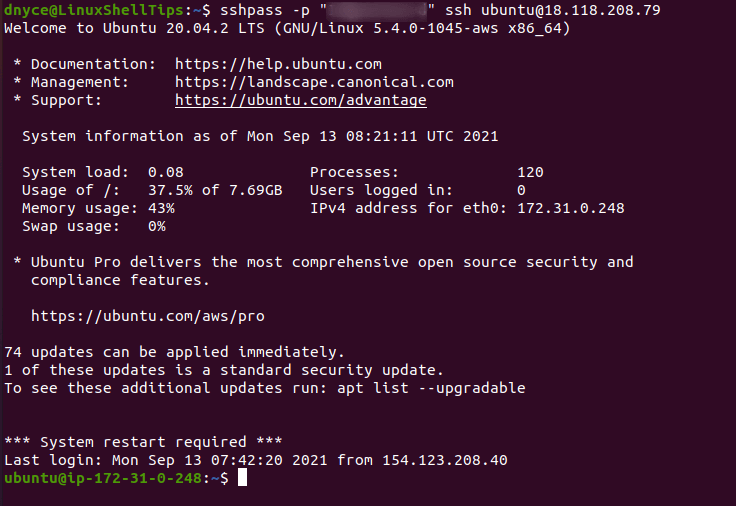
As expected, I have successfully accessed my Linux server with a one-liner command.
Combining the use of SSHPASS and SSH to access a remote server, router, or firewall gets rid of unnecessary two-liner commands that lead to an additional password entry prompt. It makes your remote access to other Linux environments faster and efficient.