- How to set a system-wide proxy on Ubuntu?
- 3 Answers 3
- Настройка proxy в Linux через терминал
- Рассмотрим настройку переменных для использования прокси
- Тестирование работы
- Отключение
- Упрощенное использование прокси
- Прокси для команды apt
- Прокси для команды wget
- Настройка proxy в Ubuntu
- RSS
- How to Configure Proxy Settings on Ubuntu 20.04
- Setting Up Proxy with Ubuntu Desktop GUI
- Setting up Proxy With Ubuntu Desktop Terminal
- Setting Up Temporary Proxy for a Single User
- Setting Up Permanent Proxy for a Single User
- Setting Up Permanent Proxy for All Users
- Setting Up Proxy for APT
How to set a system-wide proxy on Ubuntu?
I’m in a strange position where the apt-get update works and can connect to the internet although nothing else works in a Docker container. I’m not sure if I have put the proxies in the wrong place or I am missing something else. For the apt-get I add the following to the /etc/apt/apt.conf and it works.
Acquire::http::proxy "http://user:pass@172.18.*.*:80/"; Acquire::ftp::proxy "ftp://user:pass@172.18.*.*:80/"; Acquire::https::proxy "https://user:pass@172.18.*.*:80/"; Although since also placing the credentials in the correct (I think) pattern / format in /etc/profile I cannot get commands such as curl or ping to work. Is there something I might be missing?
3 Answers 3
Type env | grep proxy , if it returns nothing then exporting proxies might help:
export https_proxy=https://user:pass@172.18.*.*:80 export http_proxy=http://user:pass@172.18.*.*:80 export ftp_proxy=ftp://user:pass@172.18.*.*:80 @Line yes, you are correct. If you want this to work for all terminal sessions, you need to put these commands in your .bashrc file.
If your user’s default shell is bash or another Bourne compatible shell, then interactive login shells will read from the global /etc/profile and /etc/profile.d/*.sh and /etc/bash.bashrc files. Interactive non-login shells will also read from the global /etc/bash.bashrc file.
Creating a /etc/profile.d/proxy.sh file with the http_proxy, https_proxy, and ftp_proxy environment variables set should make those values available to most programs the next time you log in.
Here is an example proxy.sh file where the http, https, and ftp proxy is the same:
export http_proxy=http://my.local.proxy:port export https_proxy=$http_proxy export ftp_proxy=$http_proxy Some login methods might skip those files so if it doesn’t work, you could try putting them in /etc/bash.bashrc so that each new interactive shell you open has those values set.
Настройка proxy в Linux через терминал

В этой статье поговорим о том, как можно настроить прокси в системе Linux через терминал.
Проще всего для использования прокси в командной строке, определить переменные окружения http_proxy, https_proxy, socks_proxy или ftp_proxy.
Практически все утилиты командной строки, такие как curl, ssh, ftp и прочие, используют данные переменные.
Рассмотрим настройку переменных для использования прокси
Используйте следующий синтаксис для настройки таких типов трафика как http, https, socks и ftp из командной строки:
export ftp_proxy="http://proxy-server:port" export http_proxy="http://proxy-server:port" export https_proxy="https://proxy-server:port" export socks_proxy="socks://proxy-server:port"Используйте следующий синтаксис, если прокси-сервер требует аутентификацию:
export ftp_proxy="ftp://user:password@proxy-server:port" export http_proxy="http://user:password@proxy-server:port" export https_proxy="https://user:password@proxy-server:port" export socks_proxy="socks://user:password@proxy-server:port"Если Ваш пароль содержит спец. символы, Вы должны заменить их на ASCII коды.
Например символ собаки @, должен быть заменен на «%40».
Настроить прокси на системном уровне можно и через конфигурационные файлы (True UNIX-way). Для этого нужно открыть на редактирования с правами root файл /etc/environment
В конец файла добавим строки:
https_proxy="https://user:pass@proxy:port/" http_proxy="http://user:pass@proxy:port/" ftp_proxy="ftp://user:pass@proxy:port/" socks_proxy="socks://user:pass@proxy:port/"
Если прокси без авторизации, то строки должны быть вида:
ftp_proxy="http://proxy-server:port" http_proxy="http://proxy-server:port" https_proxy="https://proxy-server:port" socks_proxy="socks://proxy-server:port"
Для применения настроек придется перезагрузит систему, изменения в файле /etc/environment вступили в силу при запуске процесса init – родителя всех процессов в системе и именно от него все дочерние процессы унаследуют настройки прокси в переменных окружения.
Тестирование работы
Используйте следующую команду для проверки текущих переменных прокси:
Можно проверить работу прокси, узнав ваш внешний IP адрес из командной строки:
Отключение
Используйте следующие команды для отключения прокси:
unset http_proxy unset https_proxy unset ftp_proxyУпрощенное использование прокси
Если у Вас один и тот же прокси-сервер для http, https и ftp трафика, Вы можете использовать следующие команды для включения и отключения прокси:
export _proxy="http://proxy-server:port"
unset _proxy
Если Вам приходится очень часто пользоваться прокси, Вы можете создать следующие bash функции (добавьте в Ваш ~/.bashrc) :
# Включить прокси function setproxy() < export _proxy="http://proxy-server:port" > # Выключить прокси function unsetproxy() < unset _proxy >Примените настройки, перезагрузив ~/.bashrc.
Теперь, для включения и отключения прокси можно использовать команды setproxy и unsetproxy.
Как правила глобальной настройки прокси достаточно для того что бы все остальные приложения работали через прокси без необходимости настраивать прокси внутри приложения. Однако некоторые приложения не умеют работать с глобальными настройками или им нужны особенные настройки.
Прокси для команды apt
В новых версиях умеет работать с глобальными настройками, но в более старых мог работать только с персональными настройками. Для внесения нашего прокси открываем файл:
В нем указываем наш прокси и выключаем данную настройку последней строчкой:
Acquire::http::proxy "http://proxy-server:port/"; Acquire::https::proxy "https://proxy-server:port/"; Acquire::ftp::proxy "ftp://proxy-server:port/"; Acquire::socks::proxy "socks://proxy-server:port/"; Acquire. Proxy "true";
Если сервер с авторизацией, то необходимо добавить логин:пароль@ по аналогии с предыдущими примерами.
Прокси для команды wget
И в конце дописываем необходимый прокси:
proxy-user = username proxy-password = password http_proxy = http://xxx.xxx.xxx.xxx:8080/ ftp_proxy = http://xxx.xxx.xxx.xxx:8080/ use_proxy = onЕсли прокси без авторизации, то proxy-user и proxy-password нужно убрать
Настройка proxy в Ubuntu
Все настройки среды рабочего стола в Ubuntu хранятся в базе данных DConf, в том числе и настройки прокси сервера. Настройки записываются в виде пар ключ значение. Если изменить какой либо параметр из меню настроек системы все изменения сразу же запишутся в DConf. Из командной строки настройками DConf можно управлять с помощью команд gsettings и dconf. Дальше я покажу как настроить прокси в Ubuntu из терминала с помощью gsettings.
Базовое использование gsettings для работы с базой данных Dconf выглядит следующим образом. Для чтения данных используем:
gsettings set org.gnome.system.proxy.http host 'http://proxy-server' gsettings set org.gnome.system.proxy.http port 8080 gsettings set org.gnome.system.proxy mode 'manual'Если вы хотите использовать HTTPS прокси то вам нужно выполнить:
gsettings set org.gnome.system.proxy.https host 'http://proxy-server' gsettings set org.gnome.system.proxy.https port 8080 gsettings set org.gnome.system.proxy mode 'manual'Для других протоколов я думаю вы поняли что необходимо поменять в данных командах.
Если есть вопросы, то пишем в комментариях.
Также можете вступить в Телеграм канал, ВКонтакте или подписаться на Twitter. Ссылки в шапке страницы.
Заранее всем спасибо.
RSS
Добавление RSS-ленты на главную страницу этого сайта не поддерживается, так как это может привести к зацикливанию, замедляющему работу вашего сайта. Попробуйте использовать другой блок, например блок Последние записи, для отображения записей сайта.
Если вы нашли ошибку, пожалуйста, выделите фрагмент текста и нажмите Ctrl+Enter.

Начиная с сентября 2017 года удостоверяющим центрам предписано обязательно проверять CAA-записи в DNS перед генерацией сертификата
Сегодня установим и настроим наш файловый сервер Samba на Ubuntu Server 20.04. Расшарим директории для нашего сервера и установим на Читать
В этой статье я вам расскажу как изменить hostname в Debian/Ubuntu (обычно имя компьютера в сети). Существует два способа изменения Читать

В этой статье рассмотрим пример как можно переименовать сетевые интерфейсы в дистрибутивах Linux. После обновления systemd (частью которого является udev) Читать
How to Configure Proxy Settings on Ubuntu 20.04
Using a proxy server as an internet access intermediary is a common business scenario. However, personal users can also benefit from increased network security, privacy, and speed provided by proxies.
In this tutorial, you will learn how to set up your Ubuntu 20.04 system to work with a proxy server.

- Ubuntu 18.04 or later
- Access to terminal with sudo privileges
- Proxy info (web or IP address, username, and password)
Note: If you wish to set up one of your machines to act as a proxy, refer to How to Set Up & Install Squid Proxy Server on Ubuntu.
Setting Up Proxy with Ubuntu Desktop GUI
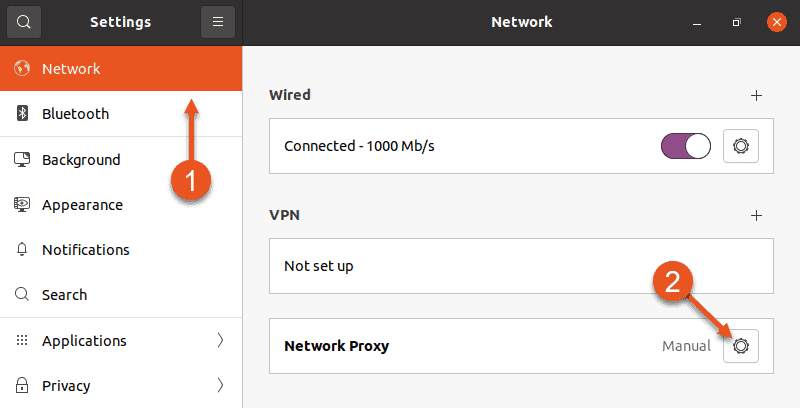
1. To access proxy settings using the Ubuntu GUI, open Ubuntu’s main Settings.
2. Select the Network setting in the menu on the left side of the window.
3. Then, click the cog in the Network Proxy section.
4. A Network Proxy dialogue appears. Choose Manual and enter your proxy info into the fields below.
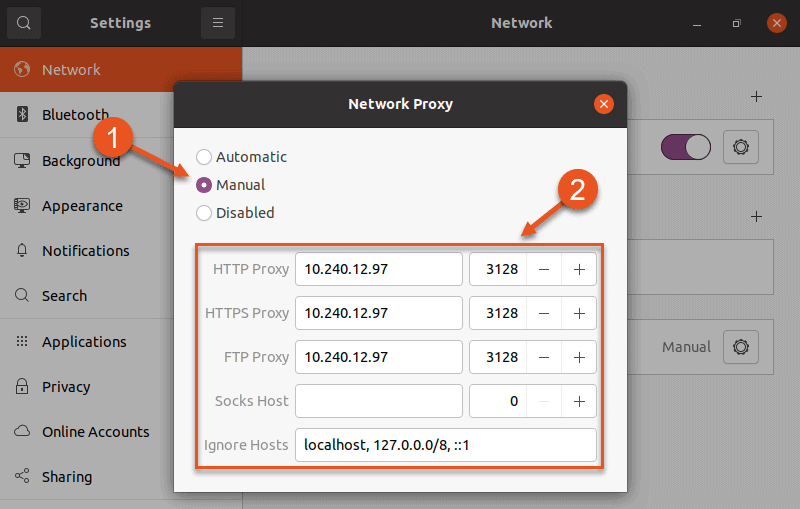
5. Exit the dialogue and Ubuntu will automatically apply the proxy settings.
Setting up Proxy With Ubuntu Desktop Terminal
Use the command line interface for more granular control of proxy settings. This allows you to:
- Make temporary or permanent changes to the configuration.
- Set up proxy for a single user or for all users.
Setting Up Temporary Proxy for a Single User
A temporary proxy connection resets after a system reboot. To establish such a connection for the current user, use the export command.
The syntax for establishing a temporary proxy connection is:
export HTTP_PROXY=[username]:[password]@[proxy-web-or-IP-address]:[port-number] export HTTPS_PROXY=[username]:[password]@[proxy-web-or-IP-address]:[port-number] export FTP_PROXY=[username]:[password]@ [proxy-web-or-IP-address]:[port-number] . export NO_PROXY=localhost,127.0.0.1. 1Provide the proxy address (web or IP), followed by the port number. If the proxy server requires authentication, add your proxy username and password as the initial values.
This is what the set of commands should look like in terminal:

The purpose of the NO_PROXY line is to tell the system that local traffic should ignore the proxy.
Setting Up Permanent Proxy for a Single User
As stated above, proxy settings configured through a terminal window reset after you reboot your system. To make permanent changes for a single user, edit the .bashrc file.
1. Open the file with a text editor of your choice:
2. Now add the following lines at the bottom of the .bashrc file:
export HTTP_PROXY="[username]:[password]@[proxy-web-or-IP-address]:[port-number]" export HTTPS_PROXY="[username]:[password]@[proxy-web-or-IP-address]:[port-number]" export FTP_PROXY="[username]:[password]@ [proxy-web-or-IP-address]:[port-number]" . export NO_PROXY="localhost,127.0.0.1. 1"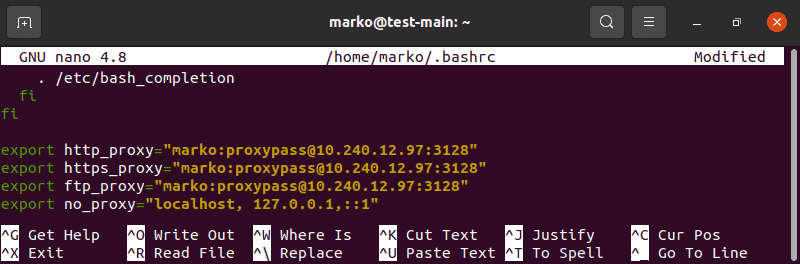
4. Then, run the following command in to apply the new settings to the current session:
Setting Up Permanent Proxy for All Users
To permanently set up proxy access for all users, you have to edit the /etc/environment file.
1. First, open the file in a text editor:
2. Next, update the file with the same information you added to the .bashrc file in the previous scenario:
export HTTP_PROXY="[username]:[password]@[proxy-web-or-IP-address]:[port-number]" export HTTPS_PROXY="[username]:[password]@[proxy-web-or-IP-address]:[port-number]" export FTP_PROXY="[username]:[password]@ [proxy-web-or-IP-address]:[port-number]" . export NO_PROXY="localhost,127.0.0.1. 1"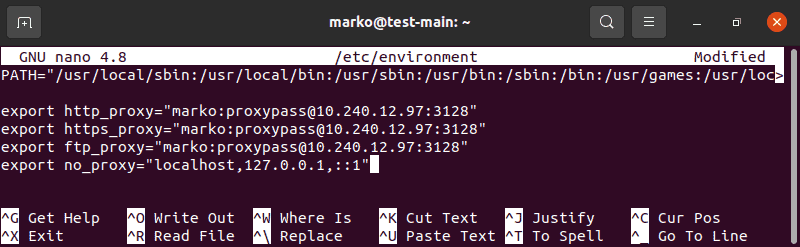
3. Save the file and exit. The changes will be applied the next time you log in.
Setting Up Proxy for APT
On some systems, the apt command-line utility needs a separate proxy configuration, because it does not use system environment variables.
1. To define proxy settings for apt, create or edit (if it already exists) a file named apt.conf in /etc/apt directory:
2. Add the following lines to the file:
Acquire::http::Proxy "http://[username]:[password]@ [proxy-web-or-IP-address]:[port-number]"; Acquire::https::Proxy "http://[username]:[password]@ [proxy-web-or-IP-address]:[port-number]";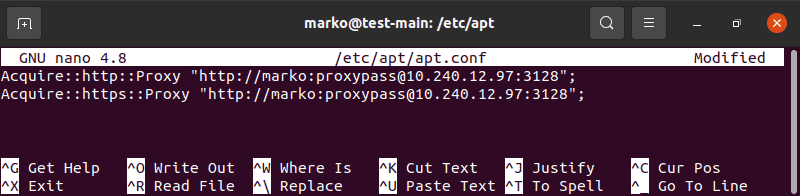
3. Save the file and exit. The configuration will be applied after a reboot.
This tutorial provided instructions on how to set up proxy settings on Ubuntu 20.04. You should now know how to make temporary and permanent changes to your system’s proxy configuration, for a single user or for the entire system.