- How to password protect gzip files on the command line?
- 7 Answers 7
- Как на tar архив пароль поставить?
- Как защитить паролем TAR-файл
- Использование gpg
- Использование ccrypt
- Заключение
- Похожие записи:
- How to Create an Encrypted (Password Protected) Tar or Zip Archive in Linux
- Use 7zip to create zip format archives with secure algorithms
- Use the zip command to create an encrypted archive
- Conclusion
- Resources
How to password protect gzip files on the command line?
I want to create some tar.gz (and possibly tar.bz2) files, using the tar command on Ubuntu 10.04. I want to password protect the file. What is the command to do this (I have Googled, but found nothing that shows how to create and extract compressed files using a password). Anyone knows how to do this?
7 Answers 7
You have to apply the Unix philosophy to this task: one tool for each task.
Tarring and compression is a job for tar and gzip or bzip2 . Crypto is a job for either gpg or openssl :
% tar cz folder_to_encrypt | \ openssl enc -aes-256-cbc -pbkdf2 -iter 100000 -e > out.tar.gz.enc % openssl enc -aes-256-cbc -d -in out.tar.gz.enc | tar xz Or using gpg
The openssl variant uses symmetric encryption, you would have to tell the receiving party about the used ‘password’ (aka ‘the key’). The gpg variant uses a combination of symmetric and asymmetric encryption, you use the key of the receiving party (which means that you do not have to tell any password involved to anyone) to create a session key and encrypt the content with that key.
If you go the zip (or 7z) route: essentially that is the same as the openssl variant, you have to tell the receiving party about the password.
For anyone wondering how to decrypt the file with openssl: openssl aes-256-cbc -d -in out.tar.gz.enc -out decrypted.tar.gz
@nathan.f77 that command also shows how to do things without piping them into openssl. openssl enc -aes-256-cbc -e -in foo.tar.gz -out bar.tar.gz.enc
@KeithSmiley if you have large archives and not a lot of space (like it could be on a VPS) it’s more space-efficient to pipe.
Please be aware that this solution is from 2010! A lot has changed since then. To create a proper encrypted file in 2023 you should add pbkdf2 and iter parameters to the command, e.g. openssl enc -aes-256-cbc -pbkdf2 -iter 100000 . See askubuntu.com/a/1126882/161435 for an explanation of these switches.
If your intent is to just password protect files, then use the hand zip utility through command line
-e asks the zip utility to encrypt the files mentioned in
$ touch file_.txt # creates blank files file_0 & file_1 $ zip -e file.zip file_* # ask zip to encrypt $ ENTER PASSWORD: $ VERIFY PASSWORD: $ ls file* @KristopherIves It requires «another ZIP-archive, containing at least one of the files from the encrypted archive in unencrypted form» to work.
«You need to know only a part of the plaintext (at least 13 bytes)». This makes it much more vulnerable than if an entire unencrypted file was required (which is already pretty bad). Also, zip encryption is not resistant to brute-force attacks (e.g. with Jack the Ripper). Nobody should be using it for anything serious.
Here’s a few ways to do this. One thing to note is that if you’re going to use separate compression and encryption tools you should always compress before encryption, since encrypted data is essentially non-compressible.
These examples compress and encrypt a file called clear_text .
$ gpg -c clear_text #Compress & Encrypt $ gpg -d clear_text.gpg #Decrypt & Decompress gpg will compress the input file before encryption by default, -c means to use symmetric encryption with a password. The output file will be clear_text.gpg . One benefit of using gpg is that is uses standard OpenPGP formats, so any encryption software that supports OpenPGP will be able to decrypt it.
$ mcrypt -z clear_text #Compress & Encrypt $ mdecrypt -z clear_text.gz.nc #Decrypt & Decompress The -z option compresses. By default this outputs a file called clear_text.gz.nc .
$ bcrypt -r clear_text #Compress & Encrypt $ bcrypt -r clear_text.bfe #Decrypt & Decompress bcrypt compresses before encrypting by default, the -r option is so that the input file isn’t deleted in the process. The output file is called clear_text.bfe by default.
$ cat clear_text | gzip | aespipe > clear_text.gz.aes #Compress & Encrypt $ cat clear_text.gz.aes | aespipe -d | gunzip > clear_text #Decrypt & Decompress aespipe is what it sounds like, a program that takes input on stdin and outputs aes encrypted data on stdout. It doesn’t support compression, so you can pipe the input through gzip first. Since the output goes to stdout you’ll have to redirect it to a file with a name of your own choosing. Probably not the most effective way to do what you’re asking but aespipe is a versatile tool so I thought it was worth mentioning.
Как на tar архив пароль поставить?
Если тебе захотелось зашифровать файл, то используй программы для шифрования файлов.
Пароль на архив мне захотелось..

tar таких средств, насколько я знаю, не имеет.
Пароль — подразумевает шифрование, а архиватор шифровать не умеет, а вот gpg не умеет архивировать, но умеет шифровать. Используй их вместе
zip -P password file.zip file
tar занимается архивированием, а не шифрованием. Для шифрования можно использовать openssl, gpg.
Вот тебе несколько способов на любой вкус.
пароль на архив это и есть шифрование. tar склеивает, gzip жмет, gpg шифрует.
Поставь виндовс, он кажется умеет пароли на архивы.
Создание tar -I 'gpg -c' -cf file.tar.gpg file1 file2 dir1 распаковка tar -I 'gpg -d' -xf file.tar.gpg sdio ★★★★★ ( 22.02.15 14:36:38 MSK )
Последнее исправление: sdio 22.02.15 14:40:43 MSK (всего исправлений: 2)
вопрос конкретно о tar был.
Прятный бонус, gpg сжимает автоматом данные.
Я и говорю, поставь виндовс.
А tar не умеет, тар умеет собирать из нескольких файлов один. Ещё есть gzip, который умеет сжимать файлы. Ещё есть openssl и gpg, которые умеют шифровать файлы. И для расшифровки тебе таки понадобится пароль. Но из твоих комментариев я так и не понял, нужно ли тебе что-то шифровать и что этот твой пароль вообще должен делать.
Для любителей понаставить левых тегов в аду есть специальные пытки. Ты готов к ним?
Как защитить паролем TAR-файл
В Linux есть несколько инструментов шифрования, которые позволяют нам защитить наши файлы. В этом руководстве мы узнаем, как защитить паролем файл tar в Linux, используя некоторые из этих инструментов шифрования.
Использование gpg
NU Privacy Guard, также известный как GPG, — это инструмент командной строки для шифрования и цифровой подписи. Он основан на стандарте OpenPGP.
Мы можем использовать команду gpg с различными опциями, чтобы указать тип операций. Например, —encrypt указывает на шифрование файлов. Для шифрования данных симметричным шифром используется опция symmetric. По умолчанию в gpg используется симметричный шифр CAST5. Однако мы можем выбрать другой алгоритм шифрования с помощью опции —cipher-algo.
Чтобы узнать о поддерживаемых алгоритмах шифрования, мы можем использовать опцию —version.
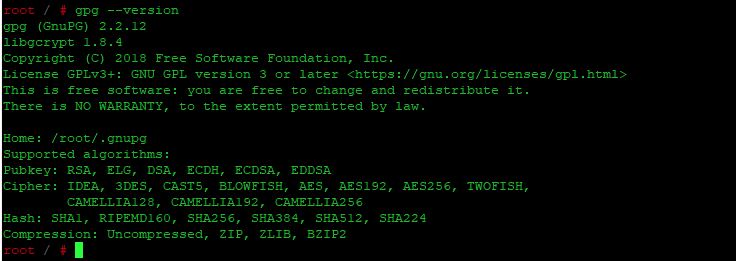
В качестве примера возьмем один tar-файл и зашифруем его с помощью gpg:

gpg --symmetric --cipher-algo aes256 archive_file.tar 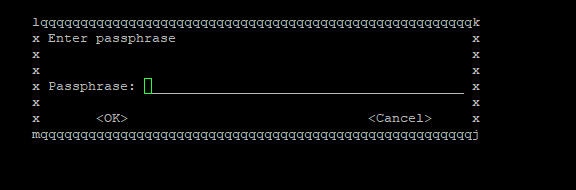
При выполнении приведенной выше команды нам предлагается ввести кодовую фразу (в данном случае через всплывающее окно графического интерфейса). После ввода снова появляется запрос на подтверждение. При успешном выполнении команды будет создан архивный файл с расширением ‘.gpg’. Этот выходной файл будет зашифрован и защищен вашей парольной фразой.
Для того чтобы получить tar-файл из зашифрованного файла, мы можем использовать опцию —decrypt:
gpg --output archive_file.tar --decrypt archive_file.tar.gpg Здесь мы можем использовать опцию —output, чтобы указать конкретное имя выходного файла. Та же парольная фраза должна быть введена при запросе на расшифровку файла.
Если нам необходимо зашифровать файлы или директории, без запроса пароля, в bash скрипте, то необходимо использовать следующую конструкцию.
tar zcfP - [путь] | gpg --batch --passphrase "[Пароль]" -c > [путь до архива]- [путь] — директория которую мы хотим упаковать, к примеру /home/user/secret_dir
- [Пароль] — пароль на архив
- [путь до архива] — путь до файла архива, к примеру /tmp/archive_file.tar.gz
Использование ccrypt
ccrypt — это инструмент командной строки для шифрования и расшифровки файлов и потоков. Он основан на блочном шифре Rijndael или Advanced Encryption Standard (AES).
Encrypt (—encrypt или -e) — это режим по умолчанию. Этот режим шифрует заданный файл и добавляет к нему расширение ‘.cpt’. В качестве альтернативы мы можем напрямую использовать команду ccencrypt с именем файла для его шифрования. Это эквивалентно команде ‘ccrypt -e’.
для установки, используем команду
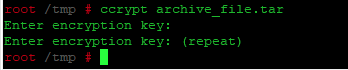
Например, когда мы выполняем команду ccrypt, она запрашивает ключ шифрования для шифрования нашего tar-файла:
В процессе расшифровки файла .cpt для получения исходного файла нам необходимо выполнить команду ccrypt с опцией —decrypt. При выполнении этой комбинации запрашивается ключ расшифровки. Для расшифровки нам нужно ввести тот же ключ, который мы использовали для шифрования.
ccrypt --decrypt archive_file.tar Заключение
В этой статье мы рассмотрели два инструмента командной строки, gpg и ccrypt. С их помощью мы можем зашифровать наш tar-файл с помощью парольной фразы. Более того, используя те же инструменты, мы можем получить оригинальный tar-файл, расшифровав его с помощью той же парольной фразы.
Похожие записи:
How to Create an Encrypted (Password Protected) Tar or Zip Archive in Linux
There is often a need to encrypt and/or password protect archive files. Whether you are using them to backup data or share it across the internet, you should take the necessary steps to protect your data. In this quick tip we will examine three ways to create an encrypted and password protected archive in Linux. We will also briefly discuss some pros and cons of each method.
After entering the passphrase you will be asked to repeat it. Then the archive will be created as an encrypted archive, using a secure algorithm and protected by your custom passphrase.
gpg -d myarchive.tar.gz.gpg | tar xzvf -
You will be prompted for the passphrase before the archive is extracted.
I like to always name these types of archives .tar.gz.gpg so I know how they were created. For this example we used tar, gzip and gpg. Also, it is important that you DO NOT forget the passphrase. If you do, there is no way to recover the data.
Use 7zip to create zip format archives with secure algorithms
This is just as secure as the first option since it supports the same AES-256 encryption algorithm, although it does require you put the passphrase or “secret” on the command line, which I am not a fan of. It is also not as convenient because most systems do not come with the P7zip package installed.
To install P7zip on Red Hat, or RH variants like CentOS or Fedora:
On Debian based systems such as Ubuntu:
sudo apt-get install p7zip-full
To create the archive, use the command below, replace “PASSPHRASE” with your own secret passphrase.
7za a -tzip -pPASSPHRASE -mem=AES256 secure.zip file1.txt file2.pdf file3.jpg
$ 7za a -tzip -pPASSPHRASE -mem=AES256 myarchive.zip file1.txt file2.pdf file3.jpg7-Zip (A) [64] 9.20 Copyright (c) 1999-2010 Igor Pavlov 2010-11-18
p7zip Version 9.20 (locale=en_US.UTF-8,Utf16=on,HugeFiles=on,8 CPUs)
ScanningCreating archive myarchive.zip
Compressing file1.txt
Compressing file2.pdf
Compressing file3.jpg
Everything is Ok
To extract the zip archive use the following:
Use the zip command to create an encrypted archive
The zip command provides options to allow you to encrypt archives. It uses a known insecure PKZIP algorithm and also requires you to add your passphrase on the command line. The benefit of this method is both Linux and Windows folks can extract the archive without any additional software.
Simply add the —password option to the zip command like so:
zip --password PASSPHRASE myarchive.zip file1.txt file2.pdf file3.jpg
Remember to replace PASSPHRASE with your password.
$ zip --password PASSPHRASE myarchive.zip file1.txt file2.pdf file3.jpg
adding: file1.txt (deflated 75%)
adding: file2.pdf (deflated 7%)
adding: file3.jpg (deflated 4%)
To extract the archive, use the normal unzip utility. The only difference is you will be asked for a password.
$ unzip myarchive.zip
Archive: myarchive.zip
[myarchive.zip] password:
inflating: file1.txt
inflating: file2.pdf
inflating: file3.jpg
Conclusion
So there you have my three favorite ways to created encrypted archives. There are plenty more ways to accomplish this (openssl, gpg-zip, bcrypt) and some are better than others. If you data is really important, I suggest you read up on the different algorithms and signing methods that are out there and decide for yourself which is right.
Whatever method you use it is important to NOT forget your passphrase.