- Timemachine to Linux Server
- Setup
- Installation
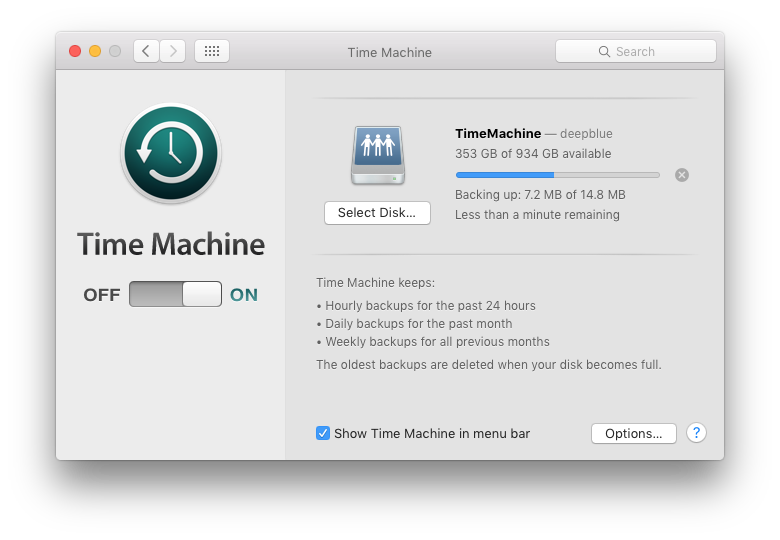
- Configuration on Mac
- If you accidentally delete the Time Machine destination
- Using a Linux Server for Time Machine Backups
- Downloading & Installing Netatalk
- Configuring Your Server
- 1. Choose a Data Folder
- 2. Setup a User Account
- 3. Configure Netatalk
- 4. Enable Netatalk & Avahi
- Mac OS Setup
- Recent Posts
- Backup a Mac to a Linux server over a network using Time Machine and Docker
- How it works
- Linux server configuration
- Mac configuration
- Bonus: altering the Time Machine schedule
- Summary
Timemachine to Linux Server
Here I document my setup of networked Time Machine backups to my linux server over Samba (SMB), which should be faster than AFS. The data is stored on a USB disk connected to the server formatted with zfs .
Ideally I would be able to backup over network, and unplug the disk from the server to directly restore from it, however the networked Time Machine backup is of different structure than a backup to a directly connected disk, so that’s still on the wishlist.
Setup
- ZFS to protect against bitrot (not sure if this works on encrypted disk images, but let’s try anyway) and because we can
- 2 MacOS clients, one will get 1.2TB quota (MacBook Pro, mbp), the other 0.3TB (MacBook Air, mba).
- 1 Ubuntu 20.04 LTS server
Installation
- Prepare disk
- Install ZFS on Ubuntu
- Partition disk – NB ensure you use static labels or else your pools might disappear! (If they did disappear, you debug sudo zdb , search sudo zpool import and import them again: zpool import -d /dev/disk/by-id )
blkid parted /dev/disk/by-id/ mklabel GPT qsudo zfs create pool0/timemachinembp sudo zfs set quota=1200G pool0/timemachinembp sudo zfs create pool0/timemachinemba sudo zfs set quota=300G pool0/timemachinemba zfs listsudo hd-idle -t disk/by-id/wwn-0x3e41415851524c4a # optionally test oncecat # TvW 20210313 Setting up hd-idle for USB disk HD_IDLE_OPTS="-i 0 -a disk/by-id/wwn-0x3e41415851524c4a -i 3600 -l /var/log/hd-idle.log" START_HD_IDLE=true EOF sudo service hd-idle start grep hd-idle /var/log/syslog(sudo crontab -l 2>/dev/null; echo "@reboot hd-idle -a disk/by-id/wwn-0x3e41415851524c4a -i 3600 -l /var/log/hd-idle.log";) | sudo crontab -cat /var/log/hd-idle.log missingok notifempty compress delaycompress > EOFsudo useradd --no-create-home --home-dir /pool0/timemachinembp --shell /usr/sbin/nologin backupmbp sudo useradd --no-create-home --home-dir /pool0/timemachinemba --shell /usr/sbin/nologin backupmbasudo chown backupmbp:backupmbp /pool0/timemachinembp sudo chown backupmba:backupmba /pool0/timemachinemba sudo chmod o-rx /pool0/timemachinembp,mba>openssl rand -base64 20 sudo smbpasswd -a backupmbp sudo smbpasswd -e backupmbp openssl rand -base64 20 sudo smbpasswd -a backupmba sudo smbpasswd -e backupmba[timemachinembp] comment = Time Machine MBP path = /pool0/timemachinembp valid users = backupmbp browseable = yes writeable = yes create mask = 0600 directory mask = 0700 spotlight = yes vfs objects = catia fruit streams_xattr fruit:aapl = yes fruit:time machine = yes [timemachinemba] comment = Time Machine MBA path = /pool0/timemachinemba valid users = backupmba browseable = yes writeable = yes create mask = 0600 directory mask = 0700 spotlight = yes vfs objects = catia fruit streams_xattr fruit:aapl = yes fruit:time machine = yesload printers = no printing = bsd printcap name = /dev/null disable spoolss = yessudo systemctl restart smbd tail -n 50 /var/log/samba/log.smbddaemon_ready: daemon 'smbd' finished starting up and ready to serve connectionszpool status sudo zpool import -c /etc/zfs/zpool.cache sudo zpool import sudo zpool import pool0 sudo zpool status sudo zfs umount pool0Configuration on Mac
- Create sparse encrypted disk image using Disk Utility on network (Samba) share, naming as NAME_MACADDRESS.sparsebundle (NAME from scutil —get ComputerName and MACADDRESS from ifconfig en0 | grep ether sans colons), with fixed size to constrain Time Machine disk use.
- Mount said disk image, store password in Keychain to allow MacOS Time Machine to mount/unmount by itself (maybe this is not necessary)
- Tell Time Machine to use the network volume: sudo tmutil setdestination -a /Volumes/
- Enter network share credentials & disk image password
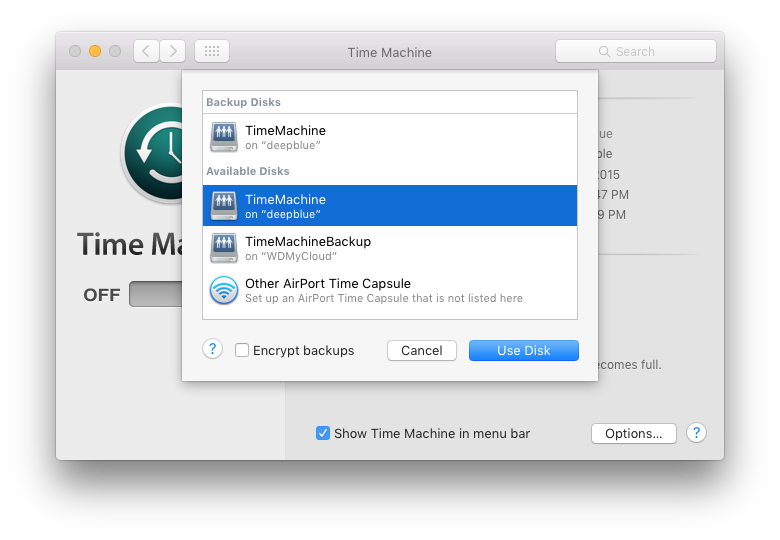
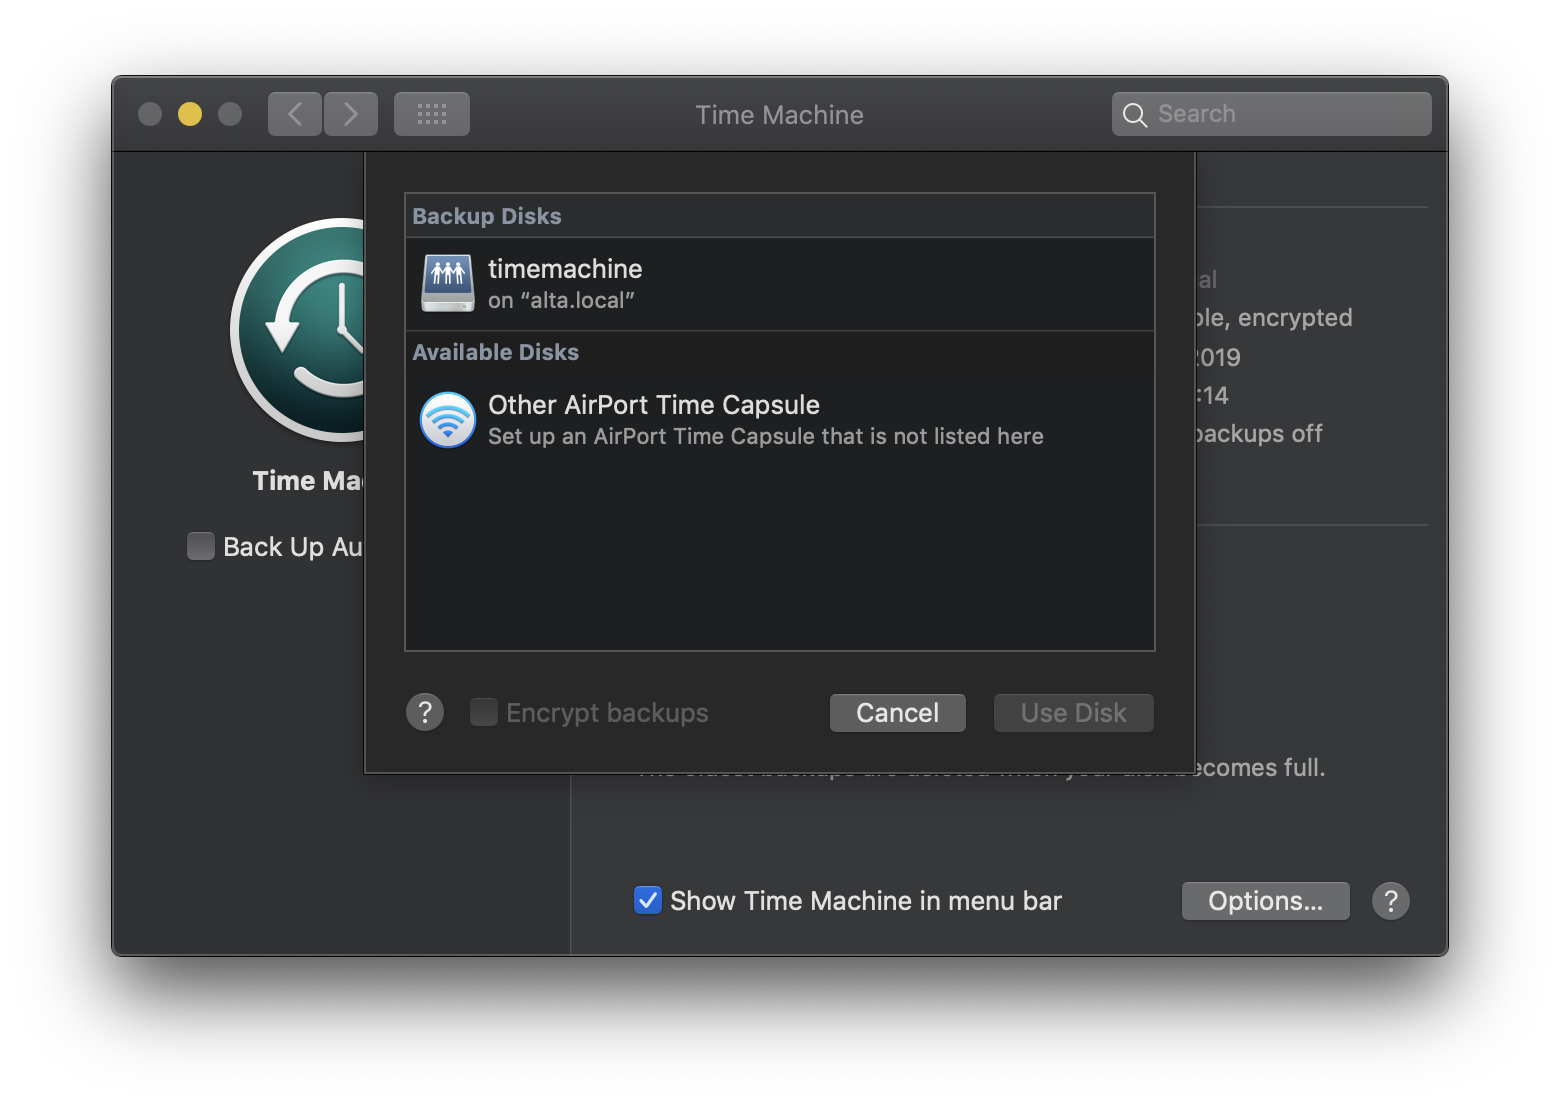
If you accidentally delete the Time Machine destination
- Tell Time Machine to use the network volume again: sudo tmutil setdestination -a /Volumes/
- Tell Time Machine to use the existing backup.
Using a Linux Server for Time Machine Backups
Since Mac OS is one of my daily operating systems, I use the in-built Time Machine software for backups, and since I have a server running Linux it seemed apt to make it Time Machine compatible.

To make a Linux server or old laptop or something a Time Machine, you can install Netatalk (plus some other stuff) on it. Netatalk is an open source implementation of Apple’s AFP file serving protocol, basically it allows a Linux computer talk to a Mac.
My Linux server is running Debian 8, so all of the following instructions will be for that. So if you do this and something breaks on your system (that isn’t Debian) don’t blame me. 😉
Be prepared for many commands to copy & paste.
Downloading & Installing Netatalk
Since Debian 8 (and therefore everything down the Debian-based tree) ships an incredibly outdated version of Netatalk, you’ll need to compile and build the latest version from source.
So you’re gonna need all the packages for building more packages plus all of Netatalk’s build dependencies, which you can install with the following command.
sudo apt-get install build-essential devscripts debhelper cdbs autotools-dev dh-buildinfo libdb-dev libwrap0-dev libpam0g-dev libcups2-dev libkrb5-dev libltdl3-dev libgcrypt11-dev libcrack2-dev libavahi-client-dev libldap2-dev libacl1-dev libevent-dev d-shlibs dh-systemdNext, download the latest netatalk from the git source code repository, provided you have git installed.
git clone https://github.com/adiknoth/netatalk-debianEnter the now-present source code directory & build the Debian packages from the source code with the following commands:
cd netatalk-debian debuild -b -uc -us cd ..If all goes well, this will create three packages: libatalk-dev_*_amd64.deb libatalk16_*_amd64.deb and netatalk_*_amd64.deb where * is the current version number. To proceed you only need to install two of them.
At the time of writing the version of netatalk was 3.1.7-1. This is likely no longer be the case.
sudo dpkg -i libatalk16_*_amd64.deb sudo dpkg -i netatalk_*_amd64.debThanks to Daniel Lange for instructions on building netatalk for Debian.
Along with Netatalk you’ll need a few other necessary packages, namely the Avahi daemon, for the Time Machine to work properly.
sudo apt-get install avahi-daemon libc6-dev libnss-mdnsNext, on to configuring your server and your Mac.
Configuring Your Server
1. Choose a Data Folder
First you need to pick a directory on your server for your Time Machine data and if it doesn’t already exist, create it
I’ll be using /data/timemachine/ for these instructions, if you prefer another location remember to change it in any of the following.
sudo mkdir -p /data/timemachine2. Setup a User Account
You’ll also need Time Machine user account on your server which you can log in with on your Mac. Create one and assign it the previously-created data folder as its home directory and assign ownership of that directory to this user.
I’ve chosen to create a user timemachine , but you can pick anything you like.
sudo adduser --home /data/timemachine timemachine sudo chown -R timemachine:timemachine /data/timemachineYou’ll also need to set the password for this user.
3. Configure Netatalk
Next, you’ll configure Netatalk. Open the existing afp.conf configuration file for editing that is stored in /etc/netatalk/ . You can do it in the command line with:
sudo nano /etc/netatalk/afp.confYou can copy my sample configuration exerpt below, editing it to suit your setup. You simply add it to the end of afp.conf when finished (and save).
[TimeMachine] # is this machine a time machine? time machine = yes # directory for time machine data on server path = /data/timemachine # the max size of the data folder (in Mb) vol size limit = 980000 # users with access to time machine valid users = timemachine4. Enable Netatalk & Avahi
Next, using the venerable systemd, you can enable the netatalk and avahi-daemon services:
sudo systemctl enable netatalk.service sudo systemctl start netatalk.service sudo systemctl enable avahi-daemon.service sudo systemctl start avahi-daemon.serviceOkay, now switch over to your Mac.
Mac OS Setup
By default Mac OS doesn’t show “unsupported” or non-Apple Time Machine network drives, but you can easily change that with one Terminal command:
defaults write com.apple.systempreferences TMShowUnsupportedNetworkVolumes 1If everything went well after all this, you should now be able to choose your server in the Time Machine preferences when selecting a disk.
You’ll also get a login prompt when attempting to access it, just use the username and password for the Time Machine account you created on your server.
If everything has worked thus far, and you are able to perform backups then congrats! You now have a Linux-powered Time Machine.
Recent Posts
Backup a Mac to a Linux server over a network using Time Machine and Docker
This is a quick guide on how to backup a Mac to a Linux machine over a network using Time Machine, a built-in backup tool for the Mac. This approach allows automatic backups to run without having to plug in an external disk. Backups can be configured to run overnight at a specific time, which is useful if you have a laptop that’s not on your home network during the day.
For this you’ll need a Linux computer to act as a storage server, with enough disk space available for the entire Mac hard disk. The Linux box will need to be kept switched on all the time for backups to be fully automatic.
How it works
Two services are needed on the Linux server:
- Samba, which hosts file shares on a network, and
- Avahi, which advertises the network shares on the network to allow automatic discovery
Since a recent version of Samba is required, we’ll use a tool called Docker, which allows you to get up and running quickly with a minimum of manual configuration. Docker runs pre-configured services in isolated environments called containers.
This guide uses the Avahi Docker container from solidnerd, and the Samba Docker container from dperson, the latter of which comes pre-configured with the Apple extensions for use with Time Machine.
This follows on from a previous tutorial where I covered how to convert an existing Samba server to Docker.
Linux server configuration
You’ll need to run a few commands on the command line on the Linux box to get it set up.
We’ll assume a user alex with password alexspasswd , and that the backups will be stored in /home/alex/tmbackup/data , but you can change those details as needed.
Some commands are prefixed here with sudo , but if you’re logged into the Linux box as the root user, the sudo prefix can be removed.
- Install docker and docker-compose using your package manager. For example, on Debian or Ubuntu:
sudo apt install docker.io docker-composecd /home/alex # Change this as needed mkdir tmbackup mkdir tmbackup/config mkdir tmbackup/dataversion: '3.4' services: avahi: container_name: avahi image: solidnerd/avahi:0.7 network_mode: host volumes: - ./avahi:/etc/avahi:ro restart: unless-stopped samba: container_name: samba image: dperson/samba environment: TZ: 'Europe/London' networks: - default ports: - "137:137/udp" - "138:138/udp" - "139:139/tcp" - "445:445/tcp" read_only: true tmpfs: - /tmp restart: unless-stopped stdin_open: true tty: true volumes: - /home/alex/tmbackup/data:/backup:z command: '-s "Time Machine Backup;/backup;yes;no" -u "alex;alexspasswd"'sudo docker create --name avahi-config solidnerd/avahi:0.7 sudo docker cp avahi-config:/etc/avahi . sudo docker rm avahi-configsed -i 's/#enable-dbus=yes/enable-dbus=no/' avahi/avahi-daemon.confcat > avahi/services/smb.conf%h _adisk._tcp sys=waMa=0,adVF=0x100 dk0=adVN=Time Capsule,adVF=0x82 _smb._tcp 445 _device-info._tcp 0 model=RackMac EOTMac configuration
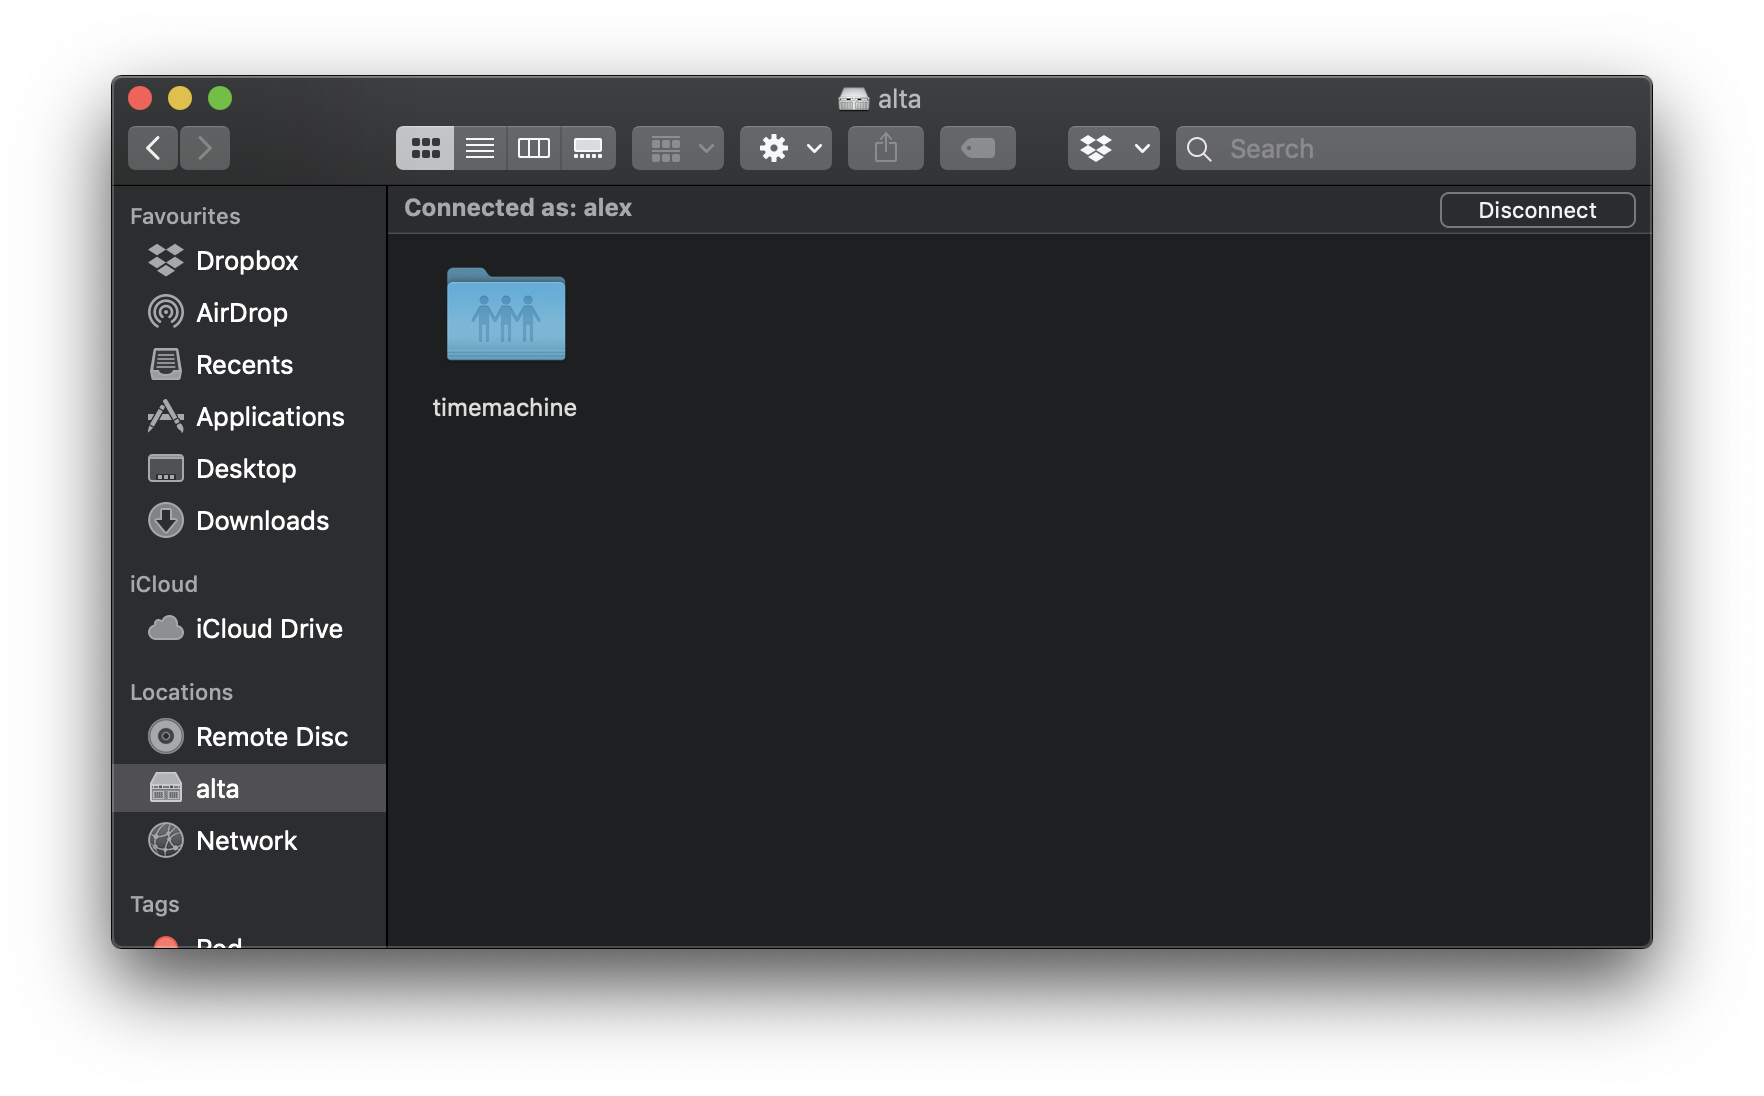
On the Mac, you should now see the Linux machine in the sidebar of Finder.
To configure the Mac to use the Time Machine backup, go to System Preferences, then Time Machine. Click Select Disk, and choose the name of the Linux machine.
Bonus: altering the Time Machine schedule
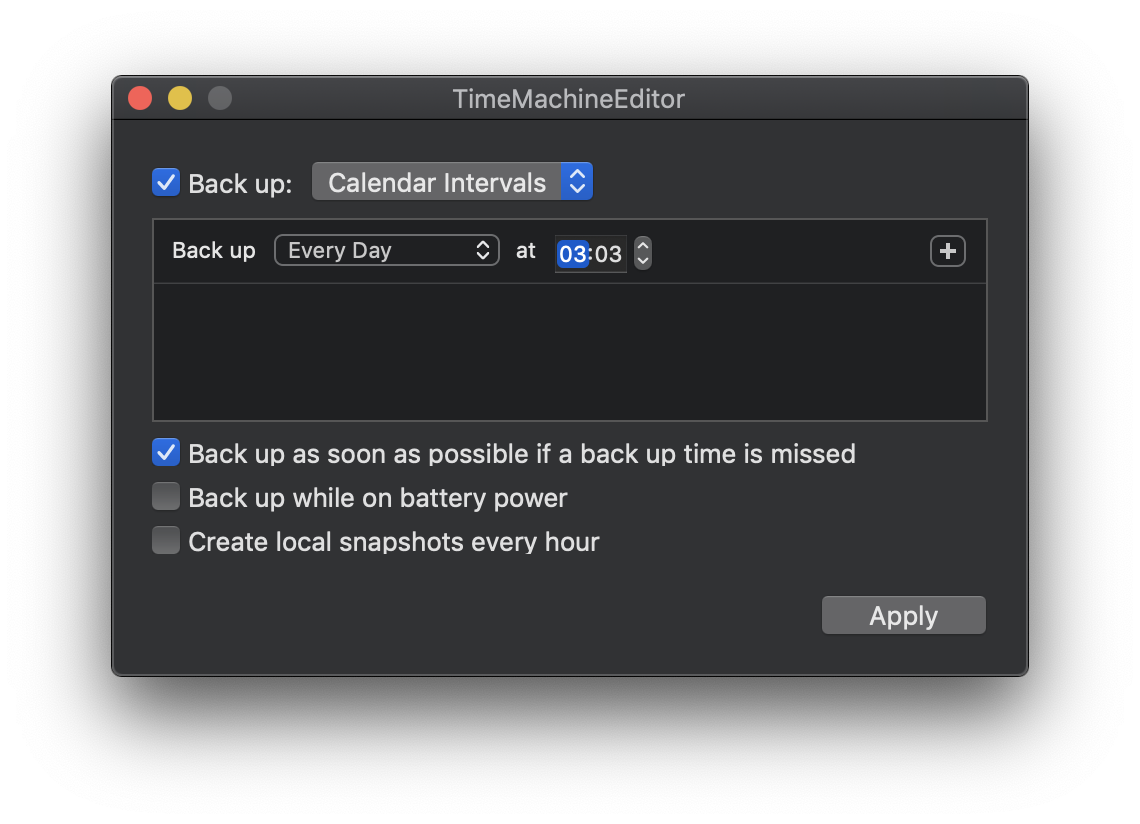
By default, Time Machine backs up hourly. This might be too frequent for your needs. Personally, I prefer to do a daily overnight backup. A free utility called Time Machine Editor can help you edit this configuration.
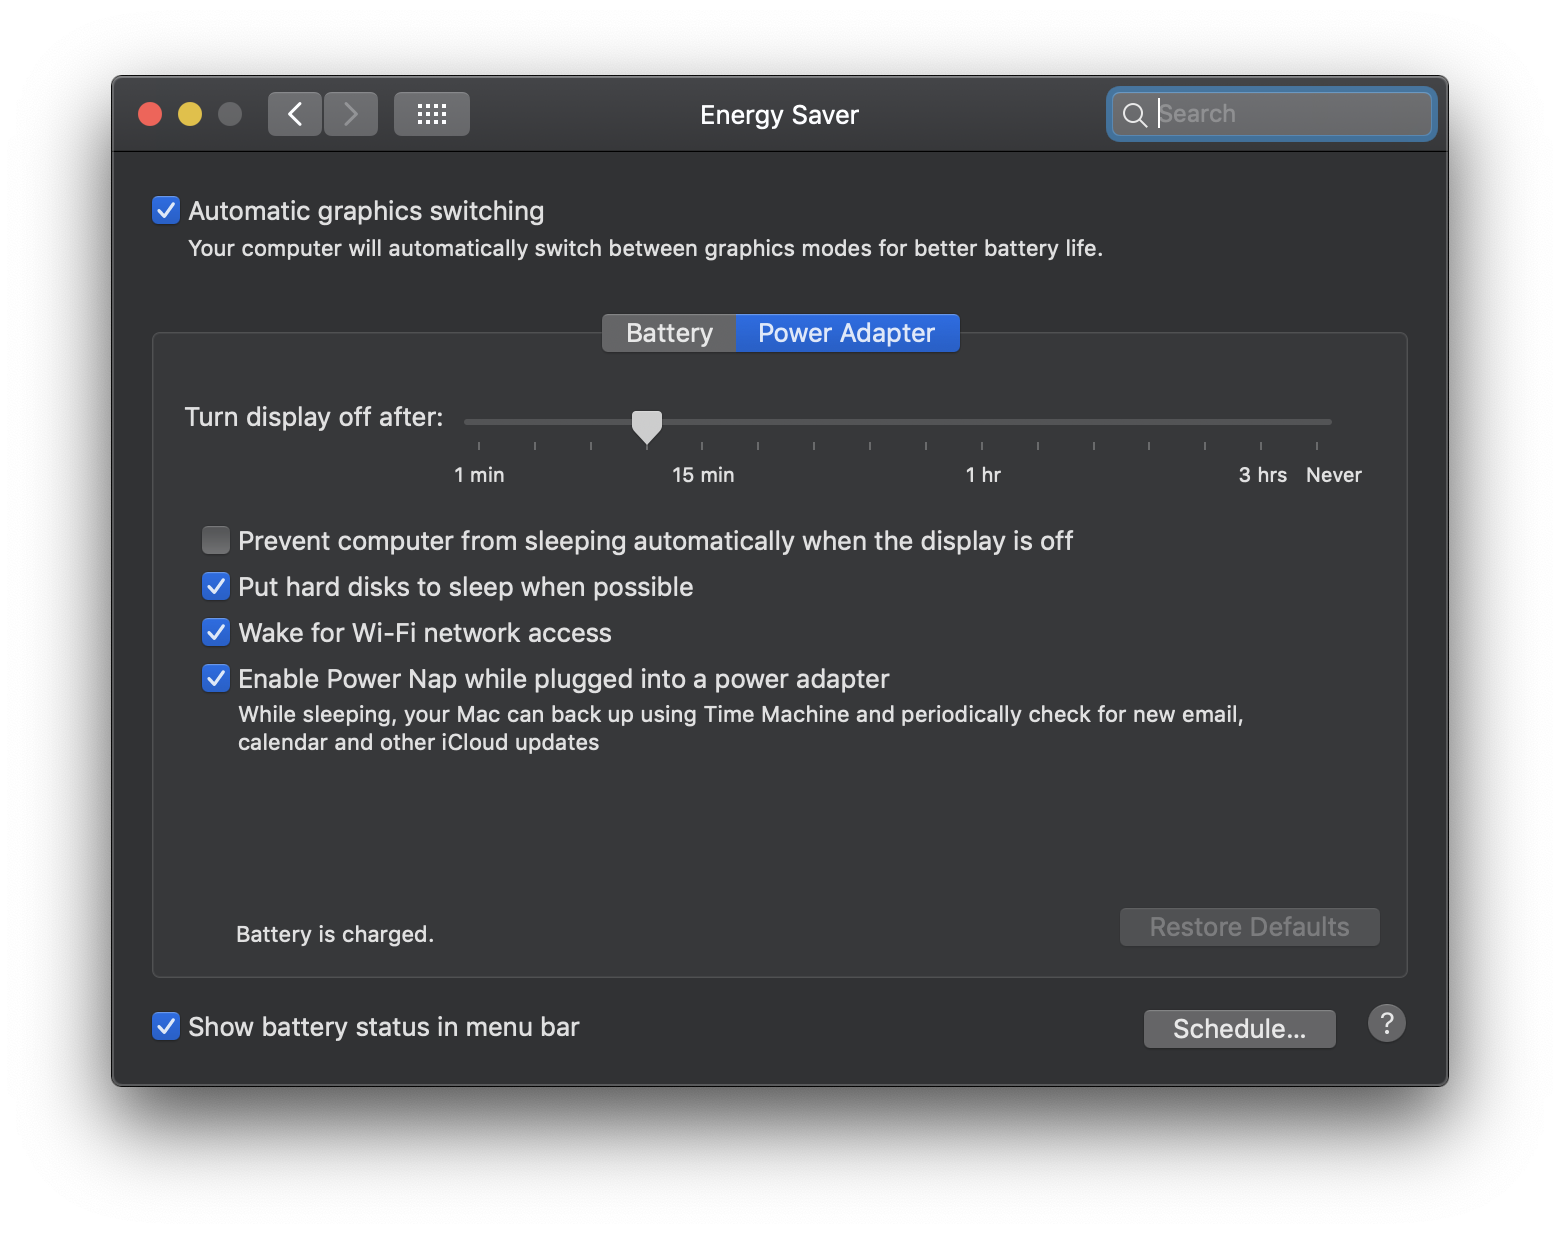
To enable the Mac to backup from sleep, you’ll have to make sure a feature called Power Nap is enabled. From System Preferences, select Energy Saver, then the Power Adapter tab. Ensure the Power Nap feature is enabled. This allows the Mac to backup overnight even when it’s asleep, provided it’s connected to mains power. You’ll have to make sure the Linux machine is awake, too.
Summary
This guide covered how to backup a Mac over a network to a Linux server. Docker is used to configure the Linux box as a file server using Samba, and Avahi is used to advertise the file share for automatic discovery.