- Introduction to porting
- What is Ubuntu Touch?
- Android and Halium versions
- How To Use the touch Command in Linux
- touch Command Syntax
- touch Command Options
- Linux touch Examples
- Create File
- Create Multiple Files
- Set Specific Timestamp
- Set File Timestamp Using Date String
- Change Access Time to Current
- Change Access Time Explicitly
- Change Modification Time to Current
- Change Modification Time Explicitly
- Change Both Modification and Access Time
- Avoid Creating a New File
- Set Timestamp Using a Reference File
- Set Timestamp Using a Symbolic Link
Introduction to porting
This first section will introduce you to the specifics of porting Ubuntu Touch to an Android device. Note that it is written with the general public in mind, not primarily the experienced porting developer. In subsequent sections we have made an effort to differentiate by keeping the main text more concise in order to meet the needs of the more experienced reader, while providing links to supplementary reading for the less experienced.
The guide as a whole is written as a sequence of steps describing how an ideal port might proceed. However, porting is unpredictable and messy. Every device is different and in reality you will likely iterate and revisit some steps, skip over other steps and uncover new and undocumented challenges.
What is Ubuntu Touch?
Ubuntu Touch is an open source operating system for mobile devices. It can be ported to devices that originally shipped with Android OS. Alas, the majority of these devices are dependent to some degree on proprietary software.
To be specific, device vendors tend to keep the code that speaks directly to the device hardware (the low level device drivers) proprietary. These components are commonly called the vendor ‘blobs’ (Binary Large OBjects). The vendor blobs need to be incorporated into an Ubuntu Touch port. Note that these components are specific not only to each device, but also to each Android version. It is therefore necessary to secure the correct version of these components when building a port.
This is why Ubuntu Touch cannot be built completely from source code for most commercial devices. Instead, porting the system to these devices involves integrating the previously mentioned vendor blobs into the rest of the system, which can be built from source.
The next component of Ubuntu Touch is a pre-compiled root filesystem which needs to be installed on the device. This component does not communicate directly with the device hardware. Instead, this communication is mediated by a Hardware Abstraction Layer (HAL) which needs to be built for each specific device, because each device has its specific hardware architecture. This component is called Halium and is available in different versions (5.1 which is largely obsolete, 7.1, 9, 10 and 11 as of writing) corresponding to different Android versions.
The Halium project enables Linux systems to run on Android hardware. It is a joint effort by multiple mobile operating systems, notably Lune OS and UBports.
UBports porting builds on top of Halium porting. Consequently, you will be using both the Halium porting guide and the UBports porting guide. At times it may also be helpful to test with one of the other operating systems to debug a problem from different angles.
Halium is an indispensible part of an Ubuntu Touch port and is available in the form of open source software. Developing a new version of Halium is a very considerable task which is why only a few versions of Halium are available. Each port of Ubuntu Touch has to be based on one of the available Halium versions and vendor blobs from the corresponding Android version. See the first two columns of the table below for details.
- The Ubuntu Touch (UT) root filesystem (rootfs)
- Halium (contained in the boot and system images)
- The vendor blobs
You, the porter, need to build Halium (in part or in whole, depending on porting method ) and install this together with the Ubuntu Touch rootfs in order to create a functioning Ubuntu Touch port.
Android and Halium versions
Halium is built using source code for a modified version of the Android operating system called LineageOS (see the LineageOS website and wiki). The required source code is available online and needs to be downloaded and configured to build the correct Halium version for each individual device port. The table below shows which versions are required for the different Halium versions.
How To Use the touch Command in Linux
The touch command’s primary function is to modify a timestamp. Commonly, the utility is used for file creation, although this is not its primary function. The terminal program can change the modification and access time for any given file. The touch command creates a file only if the file doesn’t already exist.
This tutorial explains how to use the touch command with basic and advanced options.

- A system running Linux.
- Access to the command line/terminal.
- Basic terminal commands, such as ls .
touch Command Syntax
The fundamental syntax for the touch command is:
The touch utility works without any options or with multiple options for advanced queries. Some options have a long and short format. If an option requires additional information, then the data is mandatory for both long and short forms.
touch Command Options
Below is a reference table for all available touch command options:
| Option | Description |
|---|---|
| -a | Changes the access time. |
| -c —no-create | Avoids creating a new file. |
| -d= —date= | Changes a timestamp using a date string. |
| -f | No effect. In older BSD’s the option forces changes. |
| -h —no-dereference | Changes a symbolic link’s timestamp. |
| -m | Changes the modification time. |
| -r= —reference= | Changes a timestamp to the referenced file’s timestamp. |
| -t | Modifies a timestamp, where the stamp is the date/time format. |
| —help | Opens the help menu. |
| -v —version | Prints the program version. |
Linux touch Examples
When working with files in Linux, there are three timestamps to be aware of:
1. Access time or atime changes when a command reads the file’s contents, such as grep or cat. The ls -lu command displays the atime for files.
2. Change time or ctime changes when a file’s property changes, such as renaming files, modifying file permission, or moving the file. The ls -lc command shows the ctime for files.
3. Modification time or mtime changes when a file’s contents change. The ls -l command shows the mtime for files.
The examples below are all run from the terminal and demonstrate how to use the Linux touch command with various options and what output to expect.
Create File
The simplest way to use the touch command is without any options:
If a file does not exist, touch creates the file. For example, to create a file called test, run:

List directory contents to see the file using the ls command.
If the file already exists, touch changes the timestamp to the current time.

The file contents and permissions stay unchanged.
Create Multiple Files
The touch command can create multiple files as well. To do so, list the filenames separated by spaces:

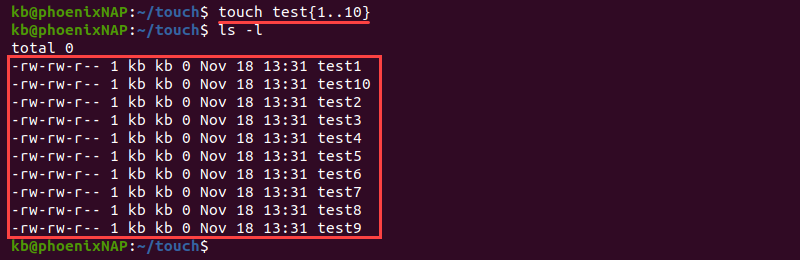
A useful way to apply touch is to create large batches of files. To do so, add curly braces and indicate the first and last element in addition to the filename:
For example, to create ten files with appended numbering, run:
The command also works with letters. For example:

Important: The command cannot combine numbers and letters.
Set Specific Timestamp
Use the touch command to set a specific timestamp for an existing file, for example:
The timestamp format follows a specific pattern:
The digits in the square brackets are optional. When using the two-digit year format, setting YY to any number between 0-68 automatically assumes CC is 20, whereas 69-99 assumes CC is 19.
For example, to change the timestamp for a file called test to midnight January 1 st , 1999, run:
touch -t 199901010000 test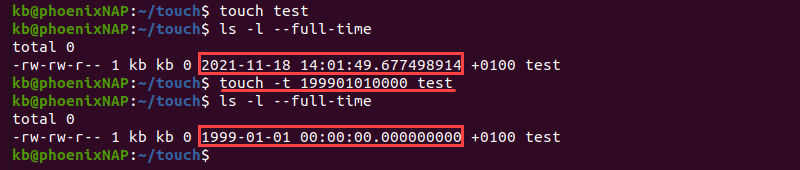
Use the —full-time option with ls to see timestamp details.
Set File Timestamp Using Date String
The touch command uses the -d option to set a timestamp using a date string. The syntax is:
The date string is a flexible time format and accepts many different human-readable textual forms. Some examples include:
- Calendar dates, such as 19 August 2020 .
- Time of day, such as 9:27pm or 8:02am .
- Days of the week, such as Sunday , Monday , etc.
- Relative time, such as 5 years ago , yesterday , next tuesday , etc.
For example, change the timestamp using the -d option to tomorrow :

To see a complete list of the possible string input options, visit the Date input formats GNU documentation.
Change Access Time to Current
Use the -a tag to change a file’s access time. The general syntax is:
For example, to show a file’s access time, run:
Next, change the access time for the file named test with:
Lastly, view the changed time by running:

The access time changes to the current timestamp.
Change Access Time Explicitly
Modify the access time to a specific timestamp by combining the -a and -t options:
Check the access time for files before changing it:
Change the access time for the file test to midnight January 1 st , 1999, by adding the timestamp:
Lastly, check the access time after the change:

After running the command, the access time changes to the value set with the -t tag.
Change Modification Time to Current
The touch command offers an option to change the modification time. The basic syntax is:
As an example, check the file’s mtime before changing the timestamp:
Next, change the modification time for the test file:
Lastly, check the mtime after the change:
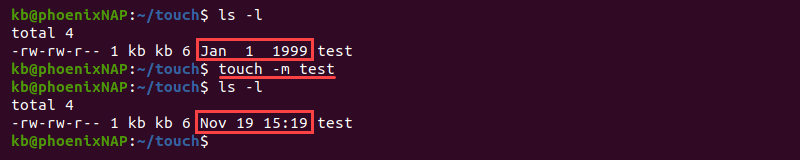
The -m option changes the modification time to the current timestamp by default.
Change Modification Time Explicitly
Combine the -m option with -t to explicitly state the modification timestamp. The general syntax is:
Check the file’s mtime before changing it:
Change the modification time to midnight January 1 st , 1999, by running:
Lastly, recheck the modification time:
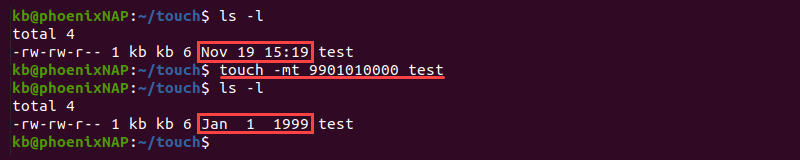
Adding the -t option updates the modification time to a specific value.
Change Both Modification and Access Time
The touch utility allows changing the modification and access time with a single command. To do so, run:
Before changing the atime and mtime, check it with:
Next, change both times for the test file to the current timestamp:
Check the atime and mtime after the change:
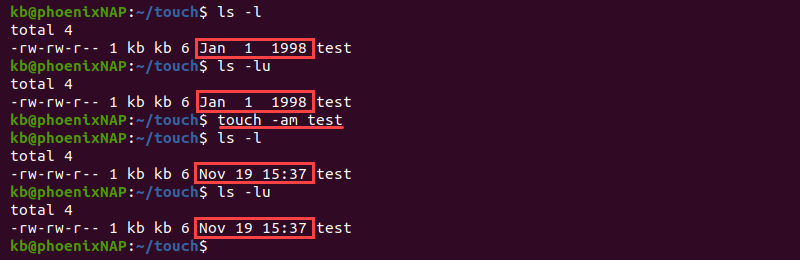
The combined options change both times in one go to the current time. Combine further with the -t tag to state an explicit timestamp.
Avoid Creating a New File
By default, touch generates a new file if it doesn’t exist. However, certain situations require overriding this functionality. Add the -c option to avoid creating a new file when invoking the touch command:
For example, try to run touch with the -c option with a non-existent file:
List directory contents to confirm the file is not there:

On the other hand, if the file does exist, the touch command performs supplied operations on the existing file as usual.
Set Timestamp Using a Reference File
The touch command offers a useful option to change a file’s timestamp based on another file’s timestamp.
To perform such a change, run:
For example, create a new file and reference the timestamp of an existing test file:
Check the timestamp for both files with:

The new_test file inherits the timestamp from the test file.
Set Timestamp Using a Symbolic Link
The touch command allows changing the timestamp for symbolic links without changing the referenced file’s timestamp. Use the -h option to modify the time for a symbolic link:
For example, check the time for an existing symbolic link before any changes:
Change the timestamp for the symbolic link to the current time:
Lastly, recheck the timestamp to confirm the change:
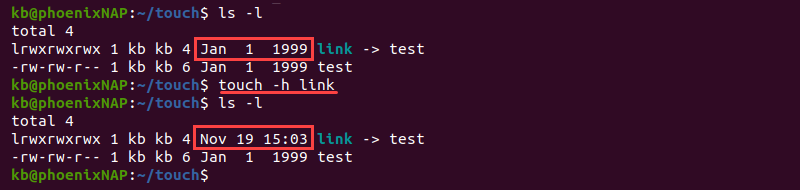
Without the -h option, the touch command only changes the test file’s timestamp.
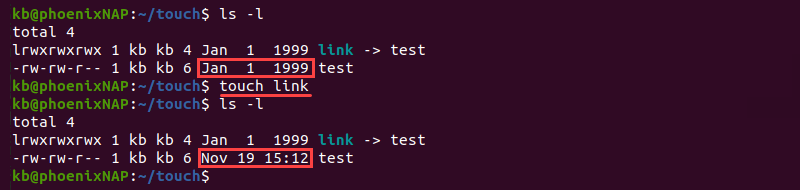
The symbolic link’s timestamp stays unchanged in this case.
The touch utility is one of the primary terminal programs when working with files in Linux. The tutorial outlined some typical use-cases for the touch command. Next, check out our Linux commands cheat sheet, which features the touch command.
Milica Dancuk is a technical writer at phoenixNAP who is passionate about programming. Her background in Electrical Engineering and Computing combined with her teaching experience give her the ability to easily explain complex technical concepts through her content.
It is always dangerous to run a Linux terminal command when you aren’t sure what it does. This article lists 14 Linux commands that can have adverse effects on your data or system.
Setting file and directory permission properly is important in multi-user systems such as Linux. You can set permission recursively using the chmod or find.
The dd is a command-line utility is used to convert and copy files on Unix and Unix-like operating systems. Learn how to use the dd command to.