How to Configure a Touchscreen on Linux
Ah the touchscreen ─ that piece of hardware that promises to finally strip humanity of an interface very much long in the tooth. I’m talking about the mouse. It’s that piece of technology that is being threatened with extinction, thanks to the touchscreen. And with good reason. Once you’ve used the touchscreen, you fully understand that they are, in fact, a much-needed breath of fresh air.
But in Linux-land, all isn’t exactly rosy. Once you get your hands on a supported device (such as the fantastic System76 Sable Touch running Ubuntu 14.10), you’ll find that not everything works as you’d expect. Sure there are some handy three and four finger multi-touch gestures that work out of the box, but the go-to gestures (such as right mouse click and Firefox scrolling) simply don’t work.
The good news, getting those very necessary gestures to work isn’t all that challenging. It does, however, require the installation of an app and a Firefox extension. The bad news is that not all distributions respond the same way to these workarounds. Ultimately, this falls into the hands of the Linux community to resolve, as touchscreens aren’t going away (and, in fact, will continue to rise in popularity). With that said, let’s take a look at what you can do to get that shiny new touchscreen device working in a way that actually makes sense.
What you will need
First we’re going to address the browser ─ since that is one of the most-used tools of the desktop trade. There’s a bit more bad news on that front ─ you’re going to have to scrap Google Chrome. Why? Because, at least as of this writing, Google Chrome and Linux touchscreens do not play well together. With that said, we’re going to focus our efforts on Firefox and a simple extension.
Second, you will need to install and use a handy app called Touchegg. This app will serve as a means to configure specific events for touchscreen interaction.
With that said, let’s begin.
Firefox
Out of the box, Firefox doesn’t much care for touchscreens. However, there is an extension you can install that will overcome that issue. The extension is called Grab and Drag. This extension will enable grab and drag scrolling as well as flick scrolling and momentum scrolling.
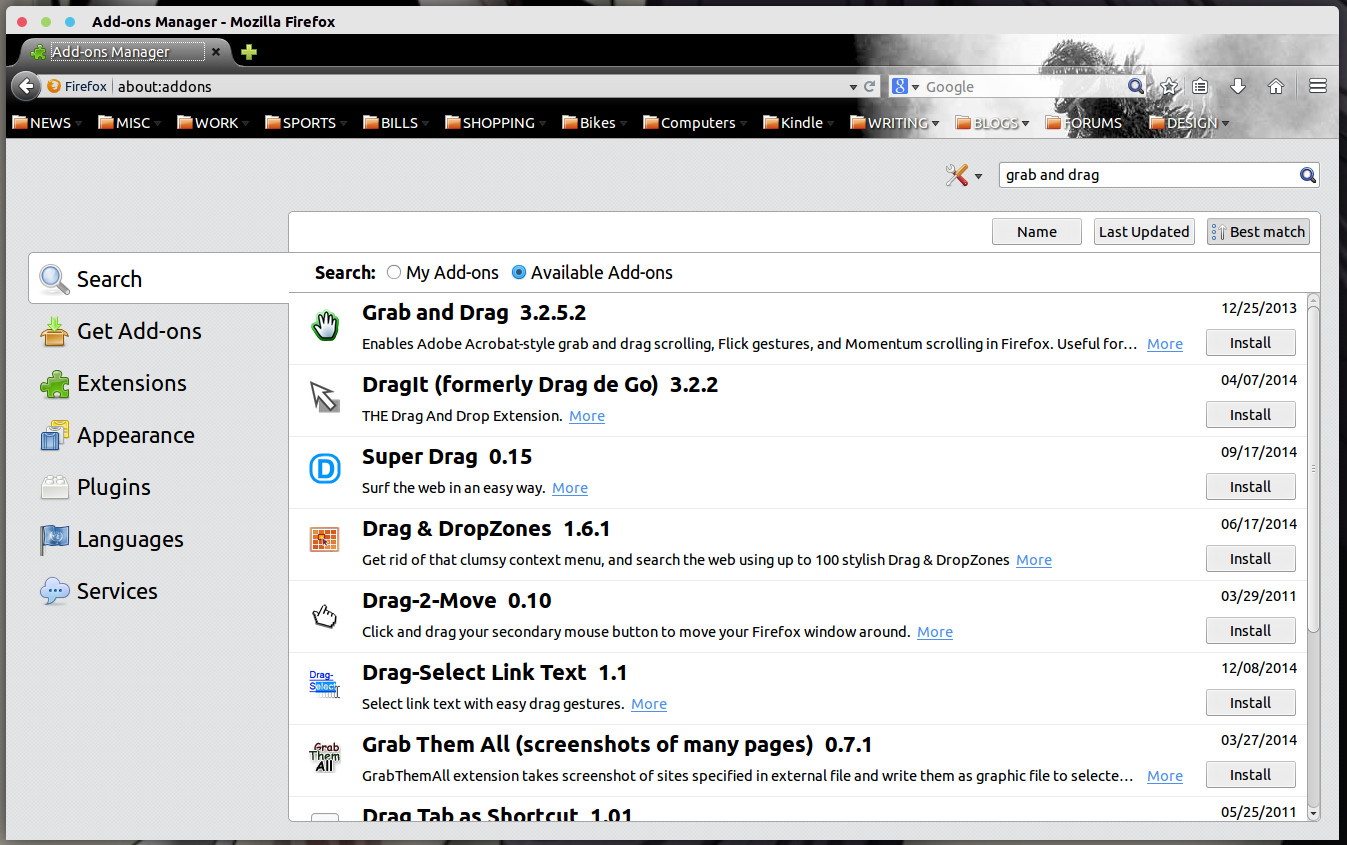
To install this extension click Tools > Add-ons and then click Get Add-ons. In the search bar of the new tab, enter “grab and drag.” When the results appear (Figure 1), click the Install button associated with the Grab and Drag extension.
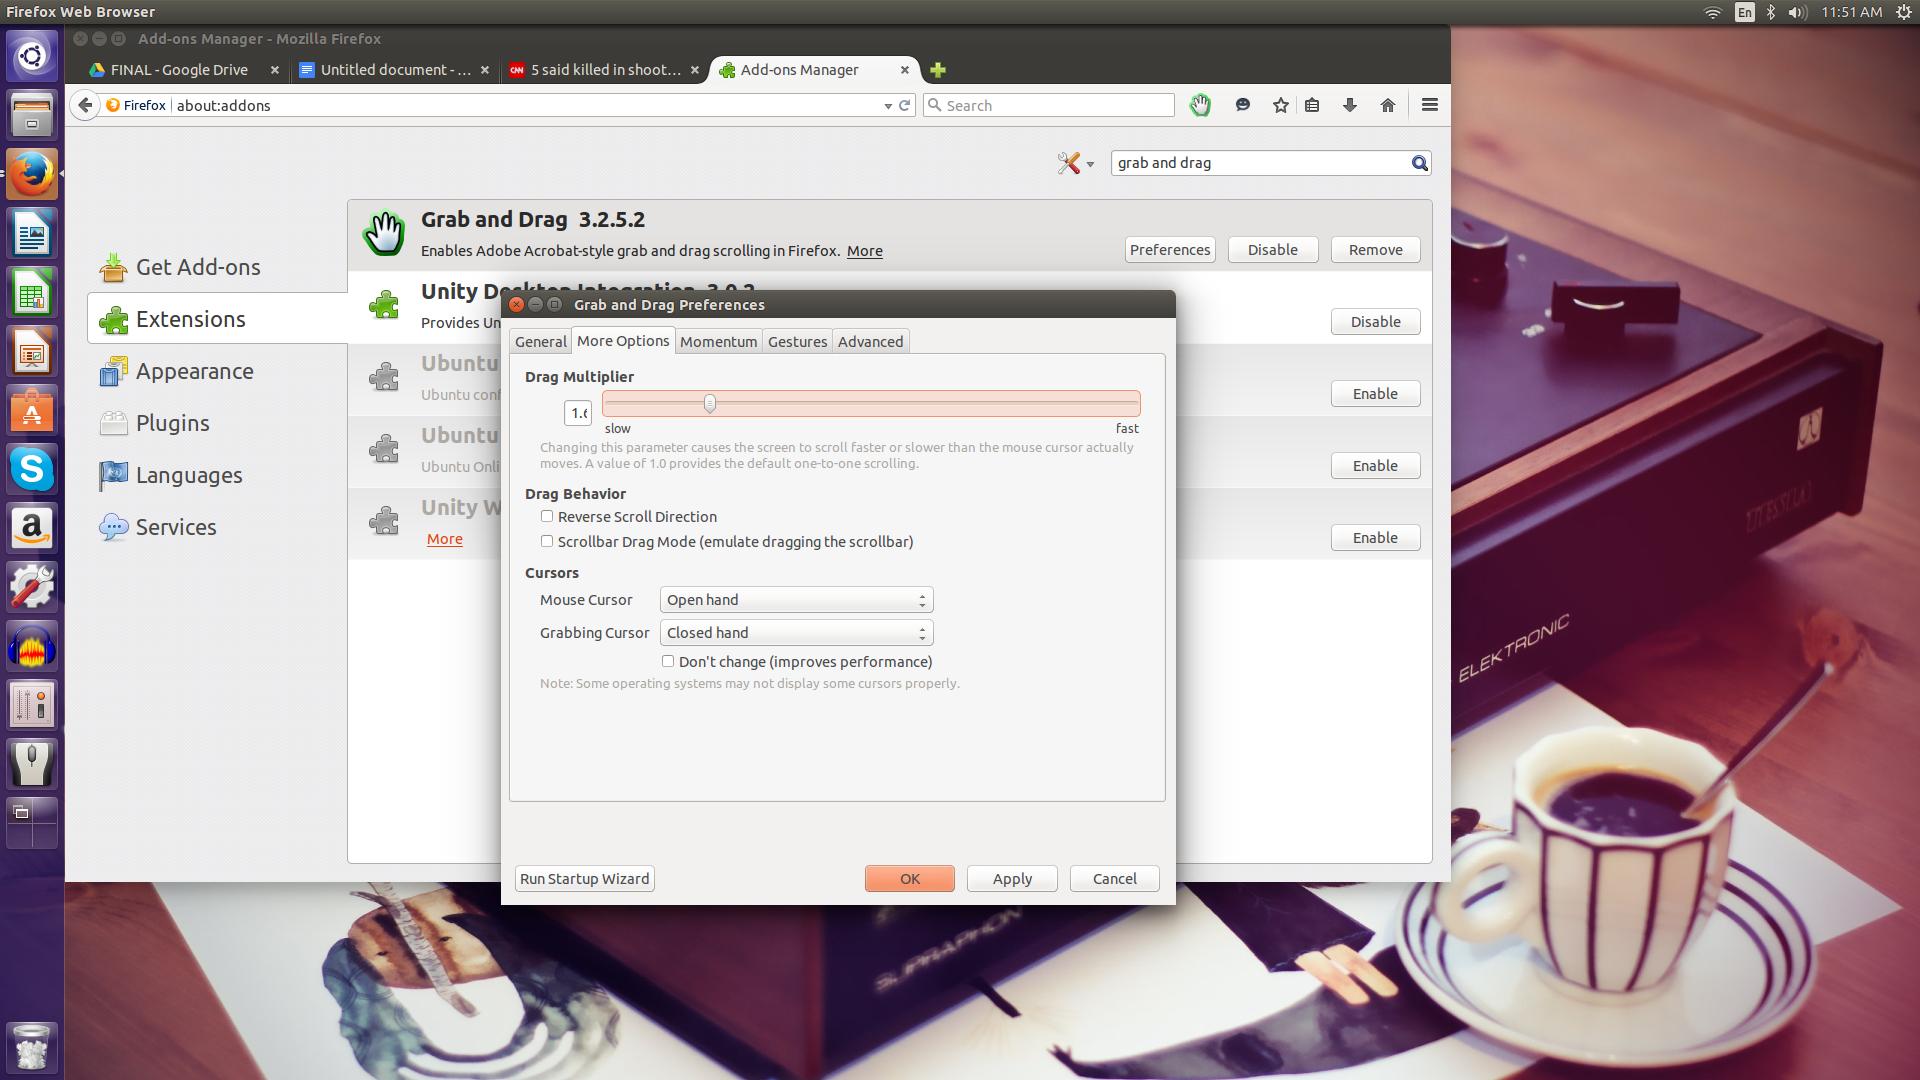
You will be prompted to restart Firefox. Do this and then, when it reopens go back into the Add-ons window, tap Extensions, select Grab and Drag, and then tap Preferences. In the Preferences screen, you can ignore the Momentum tab (as this feature doesn’t work with touchscreens). You will, most likely, want to open the More Options tab and play with the Drag Multiplier setting (Figure 2). By default, the scrolling is rather slow. I’ve found a Drag Multiplier of 1.6 to be ideal for using touchscreens and Firefox.
Now that you have Firefox enabled, let’s install an app that (in some instances) will allow you to control nearly every multi-touch gesture on Linux.
Touchegg
I’ll demonstrate how to install this app on Ubuntu 14.10. I will also add a GUI tool that allows easier control over the configuration of gestures. The GUI tool, touchegg-gce, does have a number of dependencies that must be first installed.
Before we install the GUI, let’s install the base tool. Touchegg can be found in the standard repositories, so a single command will install:
sudo apt-get install touchegg
Once that installation completes, let’s install the dependencies for the GUI tool. The command for this is:
sudo apt-get install build-essential libqt4-dev libx11-6
After the dependencies are installed, download the Touchegg-gce file and place it in a directory that gives you write access (such as ~/). Here are the steps to install this app:
- Change to the directory holding the .zip file.
- Issue the command unzip Touchegg-gce-master.zip to extract the file.
- Change into the Touchegg-gce-master folder.
- Issue the command qmake
- Issue the command make
- Copy the touchegg-gce file to /usr/bin
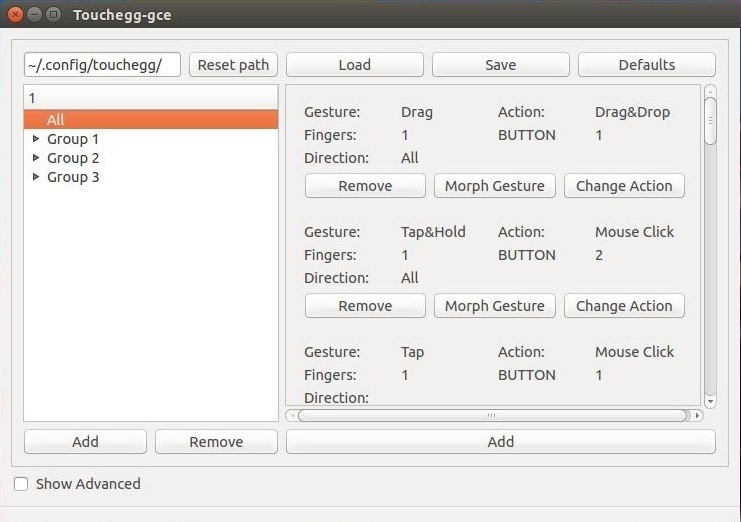
That’s it. You can now issue the command touchegg-gce from any directory and the app will run. When the app starts, you must first choose your language (this happens every time you run the app). From the app main window (Figure 3), tap the Load button to load your Touchegg configuration file (the default should be ~/.config/touchegg/).
At this point, you can either modify an existing gesture or add a new gesture. What you need to know about this process is the configuration options available. With each entry, there are four options:
- Fingers: How many fingers make up the entry
- Gesture: What is the actual gesture (tap, drag, pinch, rotate, Tap & Hold, Double Tap)
- Direction: The direction of the gesture (All, Up, Down, Left, Right)
- Action: What is the action associated with the gesture (i.e. Mouse Click, Scroll, Minimize, Maximize, Close, etc).
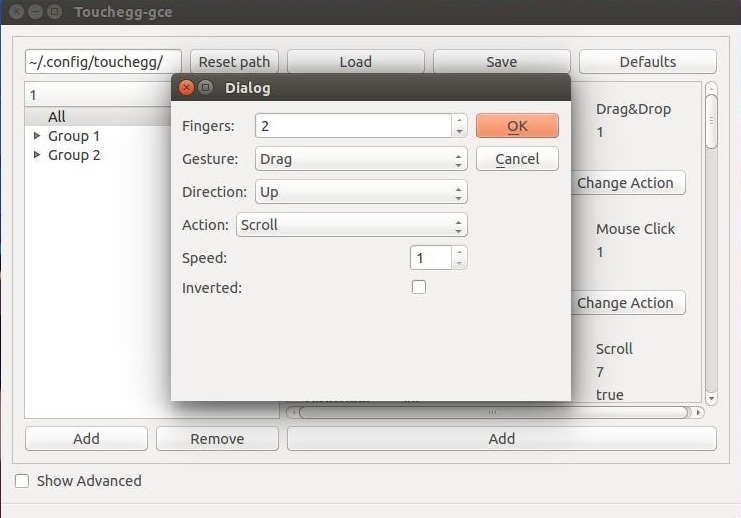
Tap (or click) the Add button to create a new gesture. For the purpose of example, we’ll create a two finger drag for scrolling up. We’ll create this gesture under the All Group (which means it will apply to all applications ─ more on this in a bit). From the popup window (Figure 4), configure the following:
When you’ve configured this, tap OK and the gesture is ready to try out.
Let’s say, however, you want to associate a specific gesture with a specific application (or group of applications). For that you must create a new Group. To do this, tap the Add button under the groups (on the left side of the window). In the popup (Figure 5), you have to configure three options:
- Applications: The applications this gesture will use
- Add to: Select to create a new group
- Take gestures from: You can import gestures from another group to serve as a template.
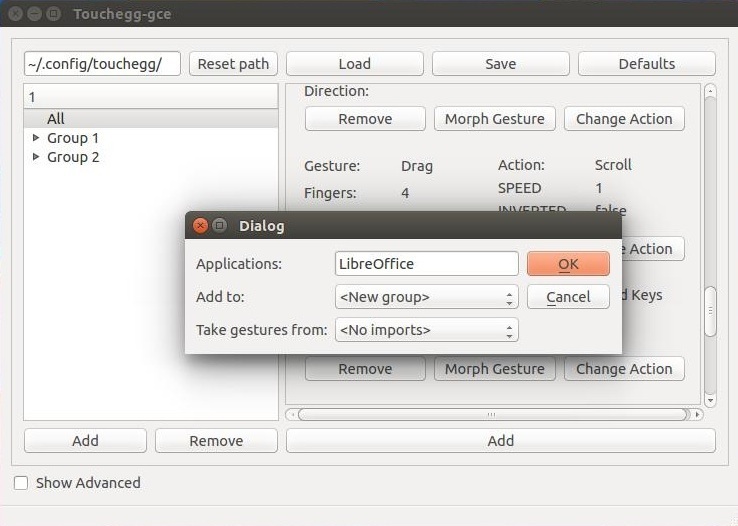
Once you’ve created the new group, you can create new gestures that will work only for that group.
After you’ve completed the process of creating gestures and groups, make sure to tap (or click) the Save button. If you do not do this final step, your configurations will be lost when you close the app. When you save the configuration, Touchegg will be restarted and your new gestures should work.
Even with the help of apps like Drag and Grab and Touchegg, Linux and the touchscreen have a long way to go. Not every gesture will work on every device and, in some cases, you might still find yourself grabbing a mouse more often than not. Hopefully, over the next year, we’ll see major improvement on this front ─ otherwise Linux will struggle as more and more touchscreen devices are adopted.
Калибровка тачскрина
Тачскрин работает, но неправильно, нужно откалибровать. Установил и запустил xinput_calibrator , ткнул 4 точки. Ничего не изменилось (хотя на этом этапе уже должно правильно работать!) Попробовал по указанию программы сохранить настройки в файлик /usr/share/X11/xorg.conf.d/99-calibration.conf :
Section "InputClass" Identifier "calibration" MatchProduct "Silead GSLx680 Touchscreen" Option "MinX" "67097" Option "MaxX" "401" Option "MinY" "-8966" Option "MaxY" "62759" Option "SwapXY" "0" # unless it was already set to 1 Option "InvertX" "0" # unless it was already set Option "InvertY" "0" # unless it was already set EndSection В этой директории и другие похожие файлы есть, вроде 70-wacom.conf и пр. После ребута так же ничего не изменилось. Попробовал и в /etc/X11/xorg.conf.d/ закинуть (директорию пришлось создать) – так же ничего не поменялось.
Вот еще информация, которая может помочь: xinput -list
⎡ Virtual core pointer [master pointer (3)] ⎜ ↳ Virtual core XTEST pointer [slave pointer (2)] ⎜ ↳ SteelSeries Rival Gaming Mouse [slave pointer (2)] ⎜ ↳ SteelSeries Rival Gaming Mouse [slave pointer (2)] ⎜ ↳ Silead GSLx680 Touchscreen [slave pointer (2)] ⎜ ↳ ImPS/2 Logitech Wheel Mouse [slave pointer (2)] ⎣ Virtual core keyboard [master keyboard (2)] ↳ Virtual core XTEST keyboard [slave keyboard (3)] ↳ Power Button [slave keyboard (3)] ↳ Video Bus [slave keyboard (3)] ↳ Power Button [slave keyboard (3)] ↳ SteelSeries Rival Gaming Mouse [slave keyboard (3)] ↳ PC Cam [slave keyboard (3)] ↳ AT Translated Set 2 keyboard [slave keyboard (3)] ↳ SteelSeries Rival Gaming Mouse [slave keyboard (3)] (Мой девайс под номером 13)
Device 'Silead GSLx680 Touchscreen': Device Enabled (155): 1 Coordinate Transformation Matrix (157): 1.000000, 0.000000, 0.000000, 0.000000, 1.000000, 0.000000, 0.000000, 0.000000, 1.000000 libinput Calibration Matrix (314): 1.000000, 0.000000, 0.000000, 0.000000, 1.000000, 0.000000, 0.000000, 0.000000, 1.000000 libinput Calibration Matrix Default (315): 1.000000, 0.000000, 0.000000, 0.000000, 1.000000, 0.000000, 0.000000, 0.000000, 1.000000 libinput Send Events Modes Available (279): 1, 0 libinput Send Events Mode Enabled (280): 0, 0 libinput Send Events Mode Enabled Default (281): 0, 0 Device Node (282): "/dev/input/event9" Device Product ID (283): 0, 0 Попробовал поиграться с set-prop – тоже безрезультатно. Свойство вроде применяется (?), но эффекта нет. xinput set-prop 13 —type=atom —format=32 InvertX 1 , xinput list-props 13 :
Device 'Silead GSLx680 Touchscreen': Device Enabled (155): 1 Coordinate Transformation Matrix (157): 1.000000, 0.000000, 0.000000, 0.000000, 1.000000, 0.000000, 0.000000, 0.000000, 1.000000 libinput Calibration Matrix (314): 1.000000, 0.000000, 0.000000, 0.000000, 1.000000, 0.000000, 0.000000, 0.000000, 1.000000 libinput Calibration Matrix Default (315): 1.000000, 0.000000, 0.000000, 0.000000, 1.000000, 0.000000, 0.000000, 0.000000, 1.000000 libinput Send Events Modes Available (279): 1, 0 libinput Send Events Mode Enabled (280): 0, 0 libinput Send Events Mode Enabled Default (281): 0, 0 Device Node (282): "/dev/input/event9" Device Product ID (283): 0, 0 InvertX (578): "PRIMARY" (1) Этот тред я читал, но не понял, как тамошний гуру всё разрулил, да и у того человека калибровка уже работала, а у меня ничего.
KurtJacobson / touchscreen_calibration.md
Unfortunately xinput-calibrator does not work at all for calibrating a touchscreen in Debian9. This is apparently because X server now uses libinput to handle input devices instead of evdev. I spent huge amount of trying to fiddling with xinput-calibrator and 99-calibration.conf files until I finely found this issue on GitHub that gave me some hints as how to proceed. This is mostly for my own reference, but I hope it might also help others in the same situation.
This not not seem to be installed by defaults on Debian9
$ sudo apt-get install xinput
Determine the screen size
You probably already know this, but if you have multiple screens they might be see as one big screen. So to determine the total size run
This will print out a good bit of information, but what you are interested in is the current vales in the first line, which will look something like this:
Screen 0: minimum 320 x 200, current 1440 x 900, maximum 8192 x 8192
Determine the name of the touch device
Next step it to find the touch device’s name
Look for the touch device in the Virtual core pointer section. In my case the device name is Elo TouchSystems 2700 IntelliTouch(r) .
⎡ Virtual core pointer [master pointer (3)] ⎜ ↳ Virtual core XTEST pointer [slave pointer (2)] ⎜ ↳ Elo TouchSystems 2700 IntelliTouch(r) [slave pointer (2)] ⎜ ↳ 2.4G Mouse [slave pointer (2)] ⎣ Virtual core keyboard [master keyboard (2)] ↳ Virtual core XTEST keyboard [slave keyboard (3)] . were is the name you determined in the last step.
Confirm that the list of properties includes near the top a property called Coordinate Transformation Matrix . If it does not, you probably have the wrong device name.
Set the Coordinate Transformation Matrix
The screen is calibrated using a Coordinate Transformation Matrix , which defaults to the identity matrix.
for convenient entry, the matrix is flatted into a single line like this
were the valuse seem to map like this
[hscale] [vskew] [hoffset] [hskew] [vscale] [voffset] 0 0 1
Here is a very nice interactive tool for visualizing the effect of the various values: https://codepen.io/GottZ/full/d73f2f844b52b91b7457febce2d1b18c/
Apply the calibration matrix by saying
xinput set-prop » ‘Coordinate Transformation Matrix’ 1.04 0 -0.02 0 1.04 -0.02 0 0 1
I just experimented with the values until I had the scree calibrated, it only took a few iterations to get so the pointer was exactly under were I touched.