- Включаем двухфакторную аутентификацию (2FA) для SSH входа в Linux
- How to Add Two Factor Authentication to Your Ubuntu Server
- Installing Google Authenticator on Ubuntu
- Installing Google Authenticator on Smartphone
- Configuring Authenticator on Ubuntu
- Testing Two Factor Authentication
- Recovering from Two Factor Authentication
- Conclusion
- About the author
- Usama Azad
Включаем двухфакторную аутентификацию (2FA) для SSH входа в Linux

21.12.2021

itpro

CentOS, Linux, Ubuntu

комментариев 8
В этой статье мы покажем, как настроить двухфакторную аутентификацию (2FA) для SSH входа на Linux сервер с помощью Google PAM (Pluggable Authentication Module) и мобильного приложения Microsoft Authenticator. 2FA позволяет добавить дополнительный слой безопасности при аутентификации на Linux хосте по SSH. Теперь для входа на сервер кроме имени и пароля пользователя (rsa ключа), вы должны будете ввести одноразовый цифровой пароль (Time-based One-time Password — TOTP), который генерируется в вашем смартфоне.
Установите на свой смартфон мобильное приложение Microsoft Authenticator (доступно как в Google Store, так и в App Store).
В этой статье я рассматриваю именно Microsoft Authenticator, т.к. я уже использую это приложение для MFA аутентификации в Azure. Если захотите, можно использовать вместо него Google Authenticator.
Теперь нужно установить и настроить пакет Google PAM на вашем Linux сервере:
- Подключитесь к вашему Linux хосту по SSH;
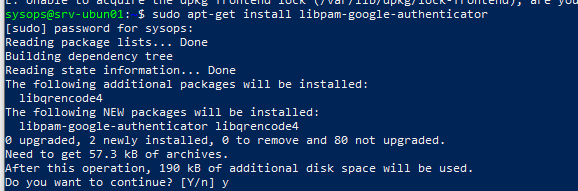
- Установите пакет Google PAM Authenticator с помощью пакетного менеджера:В Debian/Ubuntu: sudo apt-get install libpam-google-authenticator В RHEL/CentOS/Fedora: yum install google-authenticator

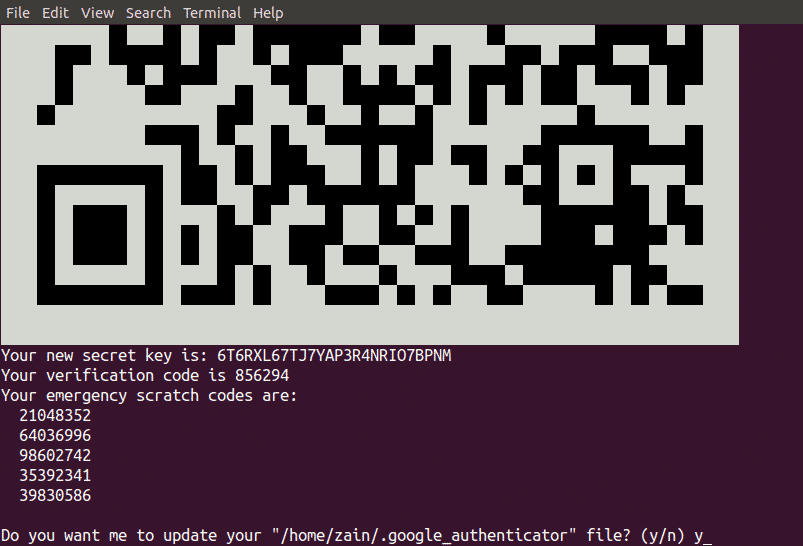
- Выполните команду: google-authenticator
- Утилита сгенерирует и отобразит в консоли QR код;
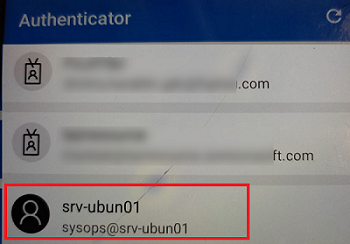
- Запустите приложение Microsoft Authenticator на своем смартфоне. Выберите Add account -> Personal account -> Scan a QR Code;
- Отсканируйте QR код через приложение. В результате в приложении Authenticator появится новая запись для вашего пользователя и сервера. В этой записи вы сможете получить одноразовый пароль для подключения к хосту;
- Обратите внимание, что в консоли Linux показаны секретный ключ и коды аварийного доступа;
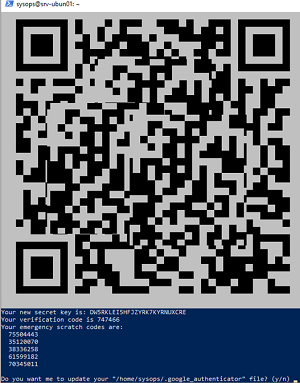
Эти коды нужны для подключения к вашей учетной записи на сервере, если вы потеряете/сломаете свой смартфон. Сохраните коды в безопасное место!
По умолчанию одноразовый токен меняется раз в 30 секунд. Этого как правило достаточно. Но здесь важно, чтобы ваш хост Linux и смартфон были синхронизированы по времени.
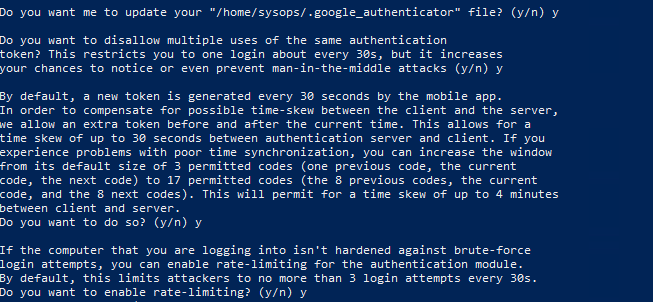
Do you want to enable rate-limiting? Y -> Enter
Можно задать сразу задать все настройки $ google-authenticator -t -f -d -w 3 -e 5 -r 3 -R 30
-t – включить вход по одноразовому паролю
-f – сохранить конфигурацию в файле ~/.google_authenticator
-d – запретить использовать предыдущие пароли
-w 3 – разрешить использовать один предудущий и один следующий токен (если время не синхронизировано)
-e 5 – сгенерировать 5 аварийных кодов
-r 3 -R 30 – разрешить не более 3 логинов каждые 30 секунд
auth required pam_google_authenticator.so nullok
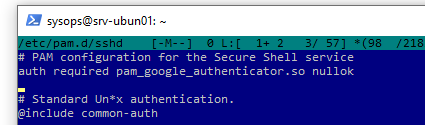
Опция nullok позволяет пользователю, для которого не настроена двухфакторная аутентификация, входить с помощью только имени и пароля. После настройки и тестирования 2FA рекомендует убрать этот параметр, чтобы требовать обязательное использование двухфакторной аутентификации.
ChallengeResponseAuthentication yes
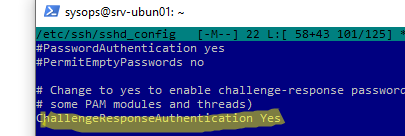
Сохраните изменения в файле sshd_config и перезапустите sshd: service ssh restart
Теперь попробуйте подключится к вашему хосту Linux по SSH. Перед вводом пароля у вас будет запрошено ввести код верификации (verification code).
Откройте приложение Authenticator на смартфоне, найдите пользователя вашего сервера. Введите в консоль 6-символьный одноразовый пароль (One-time password code), который сгенерировал для вас Authenticator.
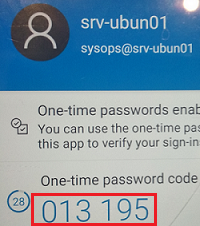
Обратите внимание, что этот одноразовый код ограничен по времени (по умолчанию 30 секунд). Если вы ввели правильный одноразовый код, появится предложение ввести пароль пользователя Linux.

При успешном входе в логе аутентификации появится строка:
Dec 21 09:01:22 srv-ubun01 sshd(pam_google_authenticator)[6242]: Accepted google_authenticator for sysops
Если указать неверный код, в логе будут ошибки:
Dec 21 09:02:38 srv-ubun01 sshd(pam_google_authenticator)[6436]: Invalid verification code for sysops Dec 21 09:02:40 srv-ubun01 sshd[6436]: pam_unix(sshd:auth): authentication failure; logname= uid=0 euid=0 tty=ssh ruser= rhost=192.168.14.1 user=sysops
Если вы хотите использовать 2FA вместе с SSH аутентификацией по ключам, добавьте следующие директивы в /etc/ssh/sshd_config:
PasswordAuthentication no PubkeyAuthentication yes AuthenticationMethods publickey,keyboard-interactive
![]() Предыдущая статья Следующая статья
Предыдущая статья Следующая статья ![]()
How to Add Two Factor Authentication to Your Ubuntu Server
![]()
Two factor authentication is an additional security layer that can be used to provide extra security to your server. Two factor authentication involves authentication from another source other than your username and password to access your server. Once we add two factor authentication, we will not be able to access our Ubuntu server without providing authentication from source. In this blog we will use Google Authenticator to provide dual authentication to the server.
Installing Google Authenticator on Ubuntu
First of all we will install Google Authenticator before we use it. Run the following command on terminal to install it
After installing Google Authenticator, now we can use it after configuring.
Installing Google Authenticator on Smartphone
So you have installed Google Authenticator on your machine, now install Google Authenticator app on your smartphone. Go to the following link to install this app.
Configuring Authenticator on Ubuntu
In order to configure the authenticator on Ubuntu server, follow the given procedure. First of all open the configuration file in nano editor. Following command will open the authenticator configuration file
Add the following line in the file as shown in the following figure.

Now type the following command in the terminal to get started with Google Authenticator
When you run the above command in the terminal of Ubuntu, it will ask for the authentication for the tokens to be time-based. Time based authentication tokens will expire after a specific amount of time and are more secure than not time based authentication tokens.. By default tokens will expire after every 30 seconds. Now select yes if you want to generate time based authentication tokens and hit enter. It has been shown in the following figure.

When you hit enter, it will generate the following credentials.
- QR Code which you need to scan on your smartphone. Once you scan code on your smartphone, it will immediately generate an authentication token which will expire after every 30 seconds.
- Secret Key is another way to configure your authenticator app on your smartphone. It is useful when your phone does not support QR Code scanning.
- Verification Code is the first verification code that QR Code generates
- Emergency Scratch Codes are the backup codes. If you lose your authenticator device then you can use these codes for authentication. You must save these cods in a safe place to use them in case of losing your authenticator device.
It also asks for updating the google_authenticator file as shown in the following figure.
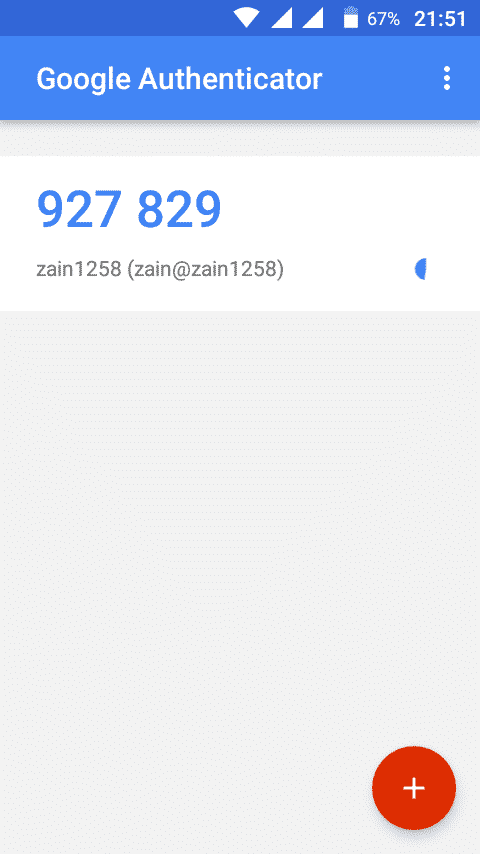
Now scan the QR code from your Google Authenticator app installed on your smartphone and create an account by tapping on “Add Account”. A code as shown in the following figure will be generated. This code goes on changing after every 30 seconds so you do not need to memorize it.
After you have created an account on your smartphone. Now select yes to update google_authenticator file on terminal of Ubuntu and hit enter to update google_authenticator file.
After updating the google authenticator file, it will ask for whether you want to disallow to use authentication code more than once or not, as shown in the following figure. By default you can not use each code twice and it is safe to disallow authentication code to be used more than once. It is safe as if someone gets your authentication code you used once, he can not get into your Ubuntu server.

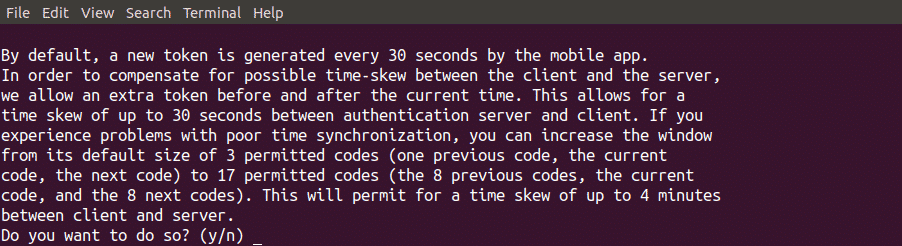
The next question which will be asked is to allow or disallow your authenticator to accept the authentication code a short time after or before specific expiry time of authentication token as shown in the following figure. Time based generated verification codes are very sensitive to time. If you select yes then your code will be accepted if you enter the authentication code a short time after the code expires. It will decrease the security of your server so answer no to this question.
The last question asked while configuring the authenticator on your server is to limit failed login attempts per 30 seconds as shown in the figure below. If you select yes then it will not allow you more than 3 failed login attempts per 30 seconds. By selecting yes you can enhance the security of your server further.

Now you have activated two factor authentication on your Ubuntu Server. Now your server requires further authentication from google authenticator other than password.
Testing Two Factor Authentication
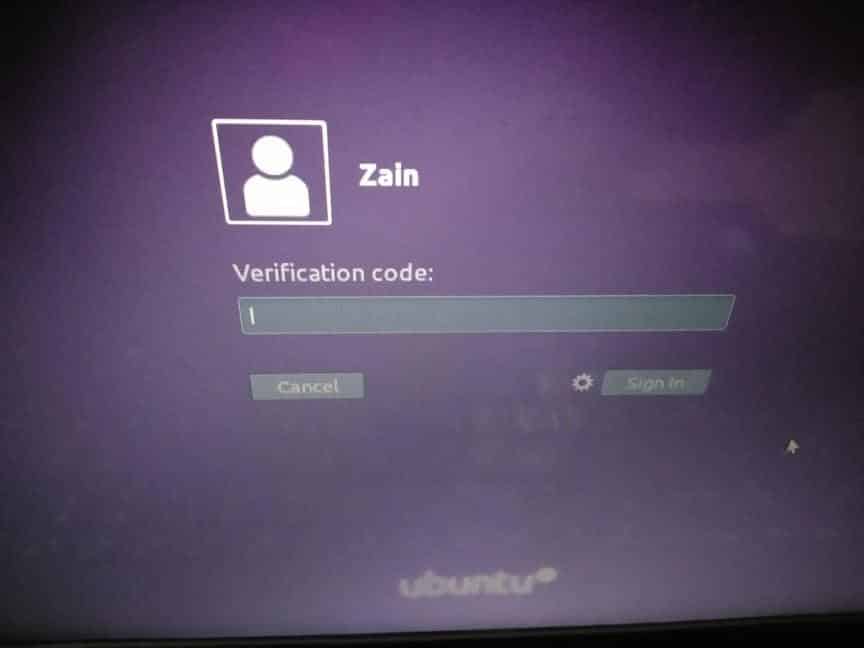
So far we have applied two factor authentication to our Ubuntu server. Now we are going to test the two factor authenticator whether it is working or not. Restart your system and if it asks for authentication, as shown in the following figure, then authenticator is working.
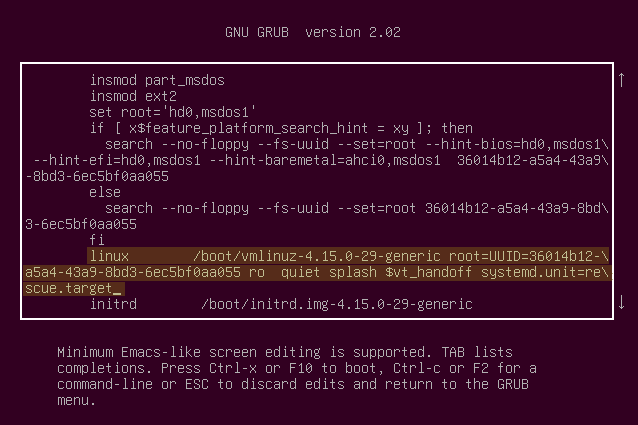
Recovering from Two Factor Authentication
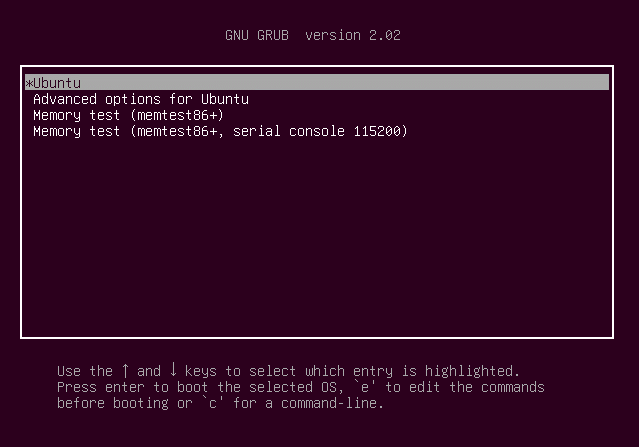
If you have lost your smartphone and secret key then you can recover your account by following procedure. First of all restart your system and when the GNU GRUB menu appears then press ‘e’ while making sure that Ubuntu entry is highlighted as shown in the following figure.
Now search for the line which starts from ‘linux’ and ends with ‘$vt_handoff’ and append the following words to this line as highlighted in the figure below.
Now press Ctrl+X to save changes. When you save this a command line appears and asks for root password. Enter your root password to get started.
Now run the following command after replacing ‘username’ with the username of your device to delete the ‘.google_authenticator’ file.
After this run the following command to edit configuration file
Now remove the following line in this file and save it.
Now reboot your system by running the following command in the command line
Now you can login to your server without requiring Google Authentication.
Conclusion
In this blog, two factor authentication has been explained. Two factor authentication adds extra layer of security to your server. In general you only need your username and password to login to your server but after applying two factor authentication you will also need an authentication code along with username and password. It provides extra security to your server. If someone manages to get your password, he would not be able to login to your server due to the authenticator.
About the author
Usama Azad
A security enthusiast who loves Terminal and Open Source. My area of expertise is Python, Linux (Debian), Bash, Penetration testing, and Firewalls. I’m born and raised in Wazirabad, Pakistan and currently doing Undergraduation from National University of Science and Technology (NUST). On Twitter i go by @UsamaAzad14