- Introduction
- Prerequisites
- Dummy headlines
- Create a bootable USB stick with Rufus on Windows
- 2. Requirements
- 3. USB selection
- 4. Select the Ubuntu ISO file
- 5. Write the ISO
- 6. Additional downloads
- 7. Write warnings
- 8. Writing the ISO
- 9. Installation complete
- Finding help
- Пошаговое руководство по установке Линукс с флешки
- Установка Линукс с флешки
- Шаг 1: Загрузка дистрибутива
- Шаг 2: Создание загрузочной флешки
- Шаг 3: Настройка BIOS
- Шаг 4: Подготовка к установке
- Шаг 5: Распределение места на диске
- Шаг 6: Завершение установки
Introduction
Ubuntu can be installed from a USB flash drive. This may be necessary for most new portable computers without DVD drives and is handy for others because a USB flash drive is so convenient. Also, you can configure Ubuntu on the USB flash drive to save changes you make, unlike a read-only CD/DVD disk.
Booting from a USB flash drive created with usb-creator alias Startup Disk Creator and mkusb will behave just as if you had booted from the install CD. It will show the language selection and then the install menu, from which you can install Ubuntu onto the computer’s hard drive or launch the LiveCD environment. Other utilities, e.g. UNetbootin, may create slightly different boot drives or if on UEFI might not work at all with Debian iso files due to a bug
Note: This article uses the term «USB flash drive» alongside USB stick, USB drive, USB device, USB pendrive and thumb drive.
Prerequisites
- a 4 GB USB flash device/drive/stick. If the iso file is smaller than 2 GB, it is possible to use a 2 GB USB device, at least with some of the methods. Files on this USB device will be erased, so backup the files you want to keep before making the device bootable. Some of the tools require that this USB device is properly formatted and mounted while other tools will overwrite whatever is on the target device. Please follow the instructions for each tool.
- an Ubuntu flavour ISO file downloaded from an official web page, ubuntu.com/download or http://releases.ubuntu.com, stored in your running computer (for example in the directory Downloads in the internal drive, not in the USB flash drive that you want to make into a USB boot drive).
- Check with md5sum (or another checksum tool) that the download was good. In Linux there is the tool ‘md5sum’. In Windows you can do it with Rufus: click on the circle with a tick mark (more about Rufus here.)
Dummy headlines
After a major remake of this help page the following headlines are kept here because they may be linked to from other web sites. Several other headlines further down in the page are also kept for this reason.
Create a bootable USB stick with Rufus on Windows
This tutorial will show you how to create a bootable USB stick on Microsoft Windows using Rufus.
For most users we recommend balenaEtcher instead of Rufus which is simpler to use and also available on MacOS and Ubuntu. Instructions are now included in the primary Install Ubuntu Desktop tutorial.
Creating a bootable Ubuntu USB stick from Microsoft Windows is very simple and we’re going to cover the process in the next few steps.
Alternatively, we also have tutorials to help you create a bootable USB stick from both Ubuntu and Apple macOS.

2. Requirements
- A 4GB or larger USB stick/flash drive
- Microsoft Windows XP or later
- Rufus, a free and open source USB stick writing tool
- An Ubuntu ISO file. See Get Ubuntu for download links

Take note of where your browser saves downloads: this is normally a directory called ‘Downloads’ on your Windows PC. Don’t download the ISO image directly to the USB stick! If using Windows XP or Vista, download version 2.18 of Rufus.
3. USB selection
Perform the following to configure your USB device in Rufus:
- Launch Rufus
- Insert your USB stick
- Rufus will update to set the device within the Device field
- If the Device selected is incorrect (perhaps you have multiple USB storage devices), select the correct one from the device field’s drop-down menu

You can avoid the hassle of selecting from a list of USB devices by ensuring no other devices are connected.
4. Select the Ubuntu ISO file
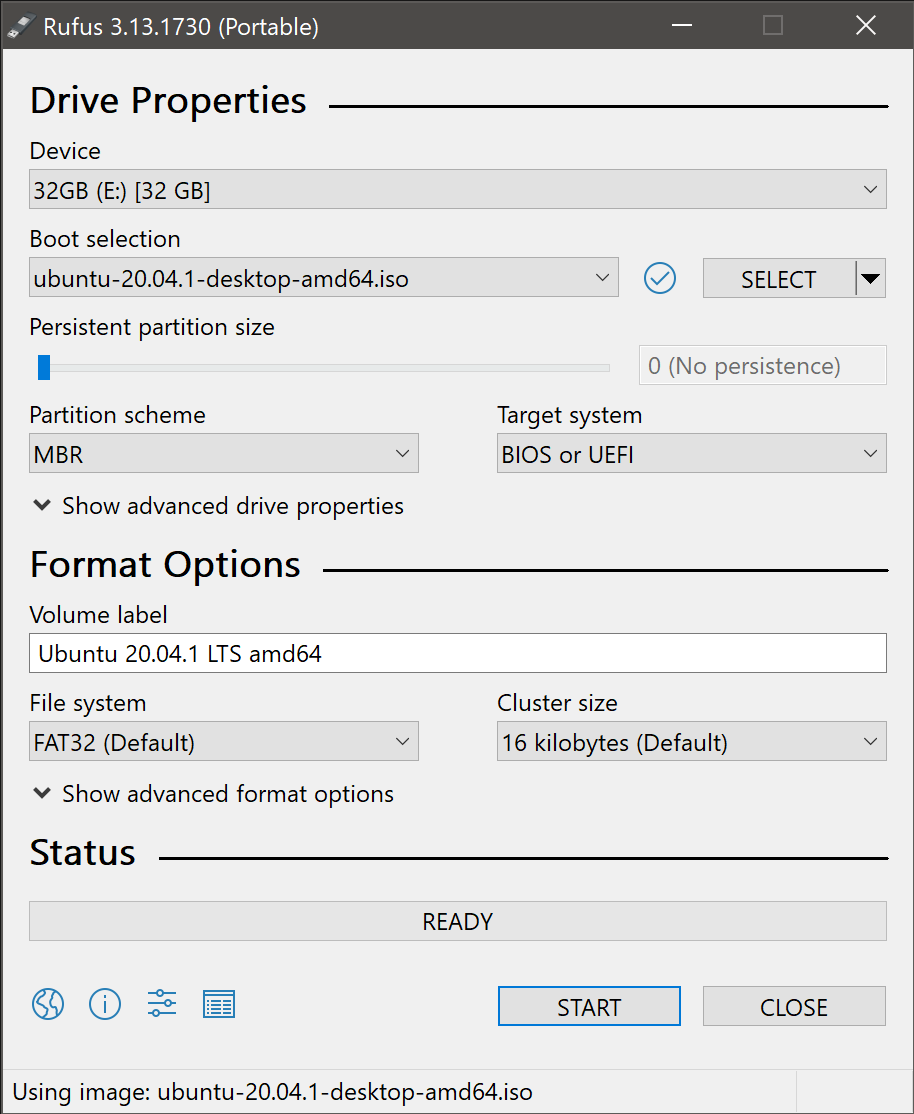
To select the Ubuntu ISO file you downloaded previously, click the SELECT to the right of “Boot selection”. If this is the only ISO file present in the Downloads folder you will only see one file listed.
Select the appropriate ISO file and click on Open.

5. Write the ISO
The Volume label will be updated to reflect the ISO selected.
Leave all other parameters with their default values and click START to initiate the write process.
6. Additional downloads
You may be alerted that Rufus requires additional files to complete writing the ISO. If this dialog box appears, select Yes to continue.

7. Write warnings
You will then be alerted that Rufus has detected that the Ubuntu ISO is an ISOHybrid image. This means the same image file can be used as the source for both a DVD and a USB stick without requiring conversion.
Keep Write in ISO Image mode selected and click on OK to continue.

Rufus will also warn you that all data on your selected USB device is about to be destroyed. This is a good moment to double check you’ve selected the correct device before clicking OK when you’re confident you have.
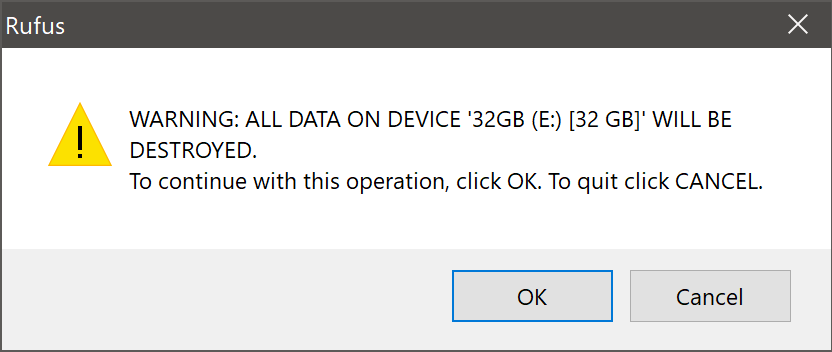
If your USB stick contains multiple partitions Rufus will warn you in a separate pane that these will also be destroyed.
8. Writing the ISO
The ISO will now be written to your USB stick, and the progress bar in Rufus will give you some indication of where you are in the process. With a reasonably modern machine, this should take around 10 minutes. Total elapsed time is shown in the lower right corner of the Rufus window.

9. Installation complete
When Rufus has finished writing the USB device, the Status bar will be filled green and the word READY will appear in the center. Select CLOSE to complete the write process.

Congratulations! You now have Ubuntu on a USB stick, bootable and ready to go.
To use it you need to insert the stick into your target PC or laptop and reboot the device. It should recognise the installation media automatically during startup but you may need to hold down a specific key (usually F12) to bring up the boot menu and choose to boot from USB.
For a full walkthrough of installing Ubuntu, take a look at our install Ubuntu desktop tutorial.
Finding help
If you get stuck, help is always at hand:
Пошаговое руководство по установке Линукс с флешки
Диски для установки Линукса на ПК или ноутбук уже практически никто не использует. Гораздо проще записать образ на флешку и быстро установить новую ОС. При этом не нужно возиться с дисководом, которого вообще может не быть, и насчет поцарапанного диска тоже беспокоиться не придется. Следуя простой инструкции, Вы без проблем установите Линукс со съемного накопителя.
Установка Линукс с флешки
Прежде всего, понадобится накопитель, отформатированный в FAT32. Его объем должен быть не менее 4 Гб. Также, если у вас еще нет образа Линукс, то будет кстати интернет с хорошей скоростью.
Отформатировать носитель в FAT32 Вам поможет наша инструкция. В ней речь идет о форматировании в NTFS, но процедуры будут те же самые, только везде нужно выбирать вариант «FAT32»
Обратите внимание, что при установке Линукс на ноутбук или планшет, это устройство должно быть подключено к питанию (в розетку).
Шаг 1: Загрузка дистрибутива
Скачивать образ с Ubuntu лучше с официального сайта. Там всегда можно найти актуальную версию ОС, не беспокоясь насчет вирусов. ISO-файл весит около 1,5 Гб.
Шаг 2: Создание загрузочной флешки
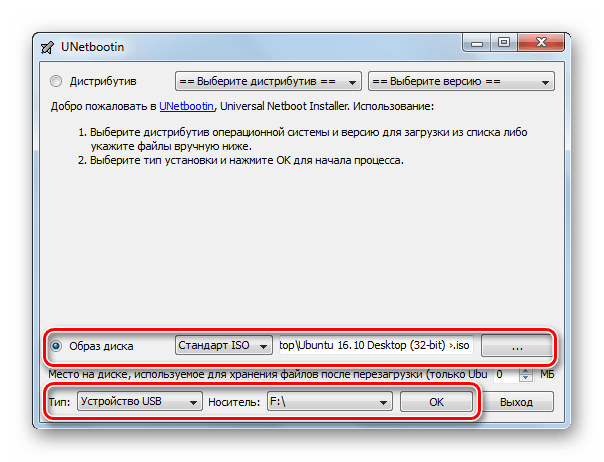
Недостаточно просто скинуть скачанный образ на флешку, его нужно правильно записать. Для этих целей можно использовать одну из специальных утилит. В качестве примера возьмем программу Unetbootin. Чтобы выполнить поставленную задачу, сделайте вот что:
- Вставьте флешку и запустите программу. Отметьте «Образ диска», выберите «Стандарт ISO» и найдите образ на компьютере. После этого укажите флешку и нажмите «Ок».

- Появится окно со статусом записи. По окончанию нажмите «Выход». Теперь на флешке появятся файлы дистрибутива.
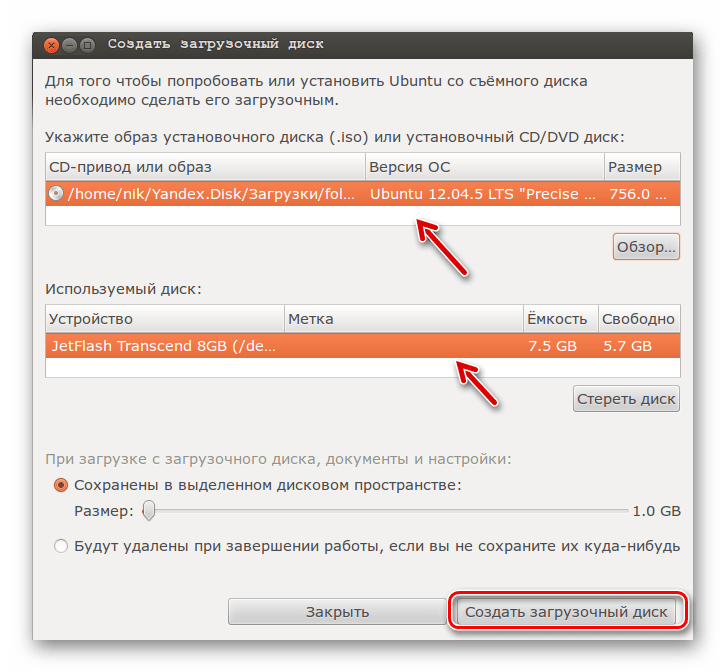
- Если загрузочная флешка создается на Линуксе, то можно воспользоваться встроенной утилитой. Для этого вбейте в поиск приложений запрос «Создание загрузочного диска» – в результатах будет нужная утилита.
- В ней нужно указать образ, используемую флешку и нажать кнопку «Создать загрузочный диск».
Более подробно о создании загрузочного носителя с Ubuntu читайте в нашей инструкции.
Шаг 3: Настройка BIOS
Чтобы компьютер при включении загружал флешку, понадобится кое-что настроить в BIOS. В него можно попасть, нажав «F2», «F10», «Delete» или «Esc». Дальше выполните ряд простых действий:
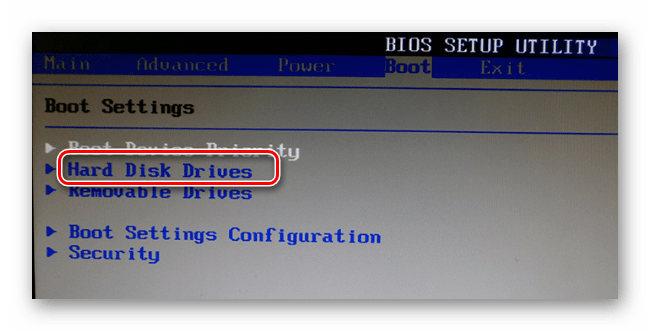
- Откройте вкладку «Boot» и перейдите в «Hard Disk Drives».

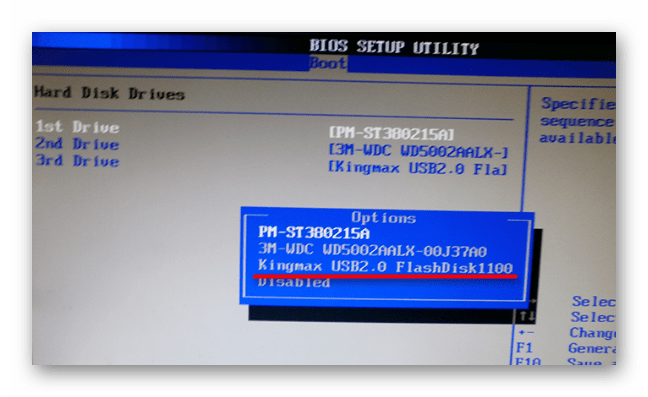
- Здесь установите флешку в качестве первого носителя.

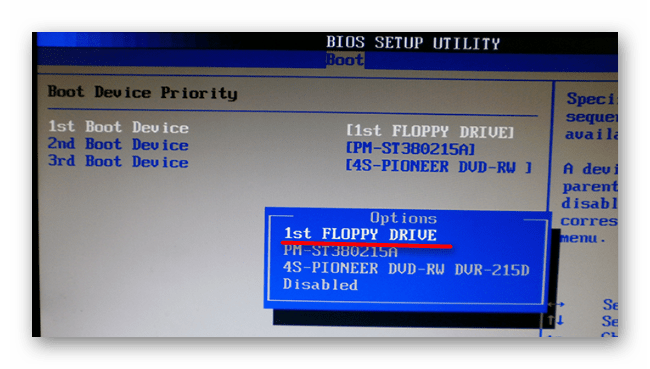
- Теперь перейдите в «Boot device priority» и назначьте приоритет первого носителя.

- Сохраните все изменения.
Этот порядок действий подходит для AMI BIOS, на других версиях он может отличаться, но принцип такой же. Более подробно о данной процедуре читайте в нашей статье по настройке БИОС.
Шаг 4: Подготовка к установке
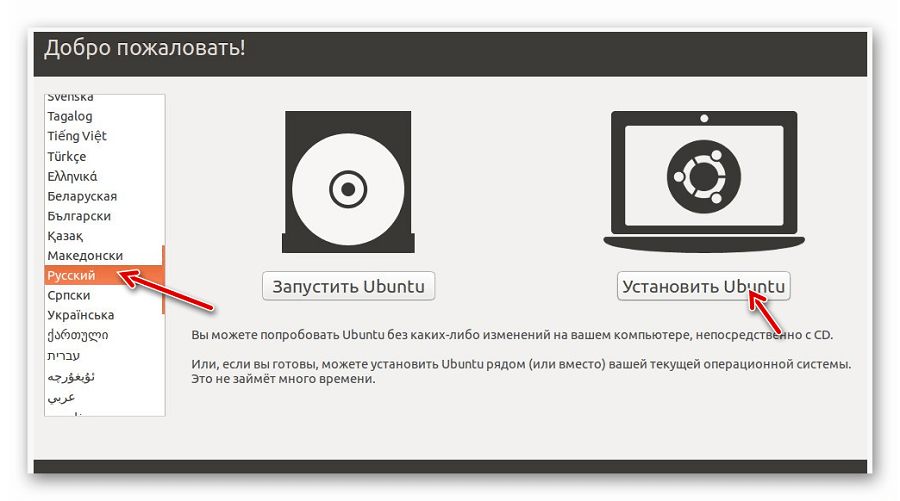
При следующей перезагрузке ПК запустится загрузочная флешка и Вы увидите окно с выбором языка и режима загрузки ОС. Дальше сделайте следующее:
- Выберите «Установка Ubuntu».

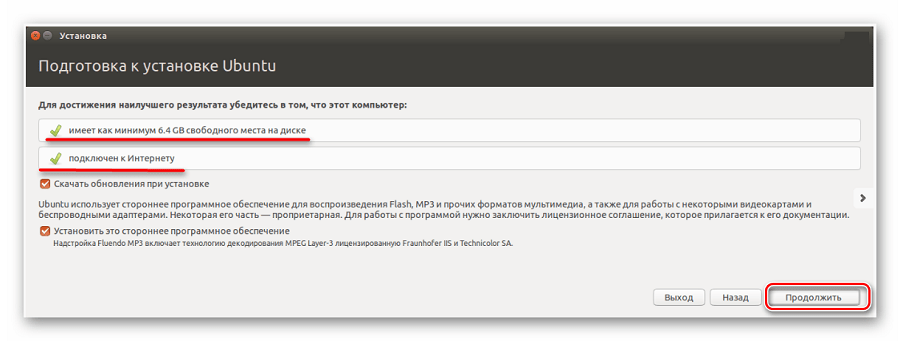
- В следующем окне отобразится оценка свободного места на диске и есть ли подключение к Интернету. Можно также отметить скачивание обновлений и установку программного обеспечения, но это можно сделать и после установки Ubuntu. Нажмите «Продолжить».

- Далее выбирается тип установки:
- установить новую ОС, оставив старую;
- установить новую ОС, заменив старую;
- произвести разметку жесткого диска вручную (для опытных).
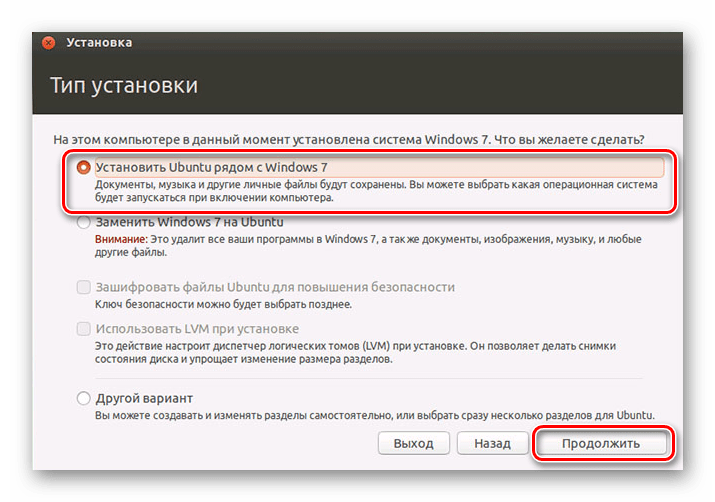
Отметьте приемлемый вариант. Мы же рассмотрим установку Ubuntu без удаления с Windows. Нажмите «Продолжить».
Шаг 5: Распределение места на диске
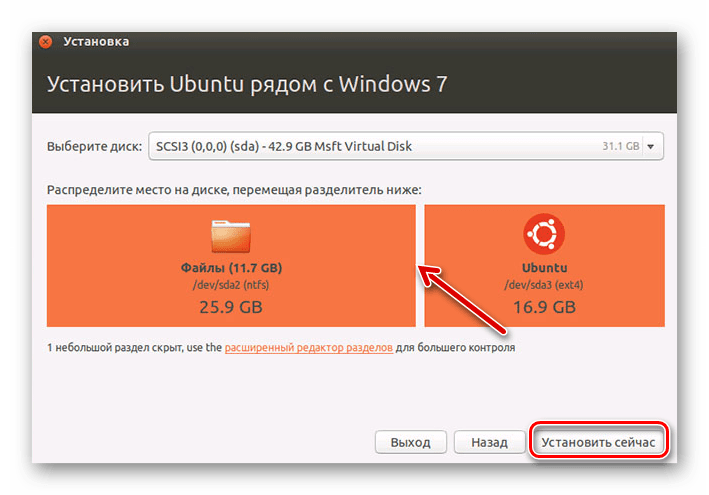
Появится окно, где необходимо распределить разделы жесткого диска. Делается это посредством передвижения разделителя. Слева находится пространство, отведенное под Windows, справа – Ubuntu. Нажмите «Установить сейчас».
Обратите внимание, для Ubuntu необходимо минимум 10 Гб дискового пространства.
Шаг 6: Завершение установки
Вам необходимо будет выбрать часовой пояс, раскладку клавиатуры и создать учетную запись пользователя. Также установщик может предложить импортировать данные учетных записей Windows.
По окончании установки потребуется перезагрузка системы. При этом появится предложение вытащить флешку, чтобы снова не запустилась автозагрузка (при необходимости верните прежние значения в BIOS).
В заключении хочется сказать, что придерживаясь этой инструкции, Вы без проблем запишете и установите Линукс Ubuntu с флешки.