- Как загрузиться в режим восстановления или аварийный режим в Ubuntu 18.04
- Что такое режим восстановления в системах Linux?
- Что такое аварийный режим?
- Загрузка в режим восстановления в Ubuntu 18.04 LTS
- Загрузка в аварийный режим
- Переключение между режимами восстановления и аварийный режимом и наоборот
- Режим восстановления Recovery mode в Linux
- Как восстановить операционную систему Ubuntu без переустановки
- How to Boot into Rescue Mode Or Emergency Mode In Ubuntu 20.04 / 18.04
- On this page
- Booting Ubuntu 20.04 in Rescue Mode
- Booting Ubuntu 20.04 in Emergency Mode
- How to Boot Ubuntu 22.04 into Rescue / Emergency Mode
- Boot Ubuntu 22.04 into Rescue or Single User Mode
- Alternate Way to Boot System into Rescue Mode
- Boot Ubuntu 22.04 into Emergency Mode
Как загрузиться в режим восстановления или аварийный режим в Ubuntu 18.04
В качестве примера будет использована система Ubuntu 18.04 LTS, но руководство актуально для любой системы, использующей Systemd как подсистему инициализации. Так же мы рассмотрим команды по восстановлению системы Ubuntu без ее переустановки.
Что такое режим восстановления в системах Linux?
Режим восстановления эквивалентен однопользовательскому режиму в дистрибутивах Linux, которые используют демон SysV в качестве диспетчера служб по умолчанию. В режиме восстановления все локальные файловые системы будут примонтированы, но только некоторые важные службы будут запущены. Например, сетевые сервисы не будут запущены. Режим восстановления Linux полезен в ситуациях, когда система не может нормально загрузиться. Кроме того, в данном режиме мы можем выполнить некоторые важные операции по восстановлению, например, такие как сброс root пароля.
Что такое аварийный режим?
В отличие от режима восстановления, в аварийном режиме не монтируются точки монтирования файловых систем, службы и сокеты не будут запущены. Аварийный режим подходит для отладки.
Загрузка в режим восстановления в Ubuntu 18.04 LTS
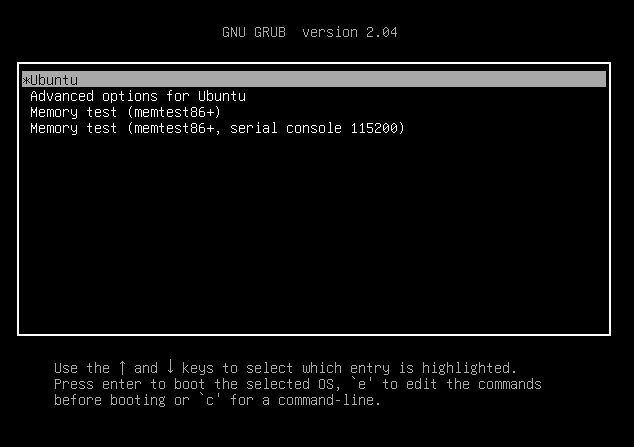
Запустите установленную систему Ubuntu. Когда появится меню Grub, выберите первую запись и нажмите e для редактирования.

Если у вас не отобразилось меню Grub, то нужно нажать клавишу ESC сразу после исчезновения логотипа BIOS.
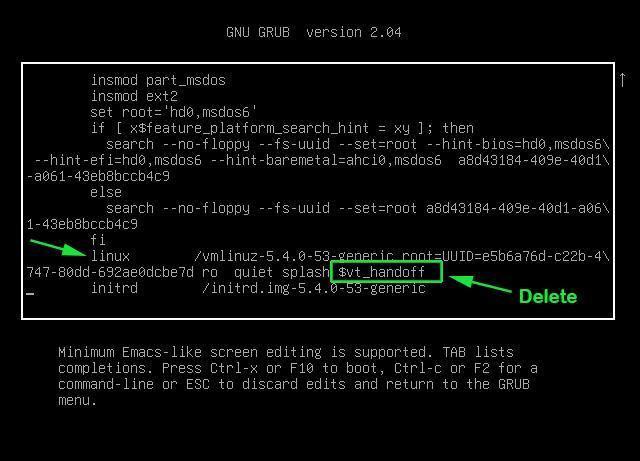
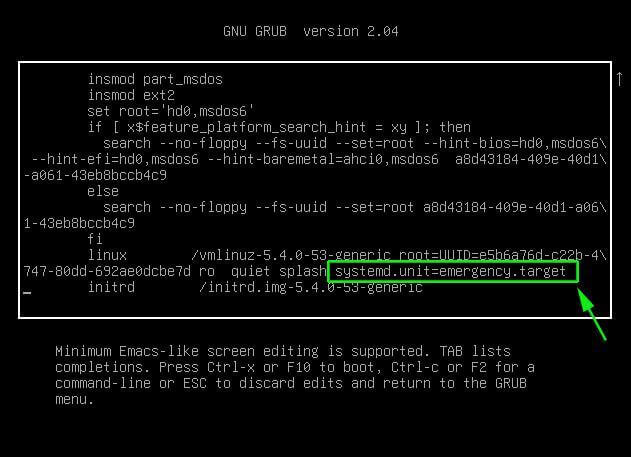
Найдите строку, начинающуюся со слова «linux», удалите значение «$vt_handoff» и в конце этой строки введите следующее значение (Чтобы быстрее достичь конца строки, просто нажмите CTRL + e или используйте клавишу END или стрелки LEFT / RIGHT на клавиатуре):

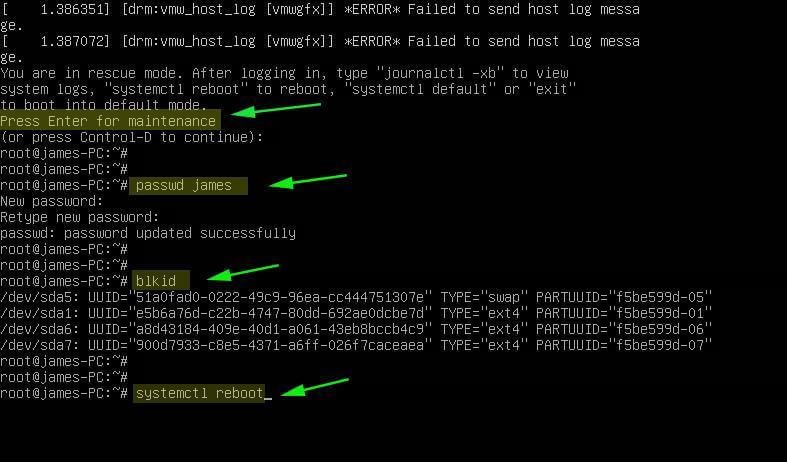
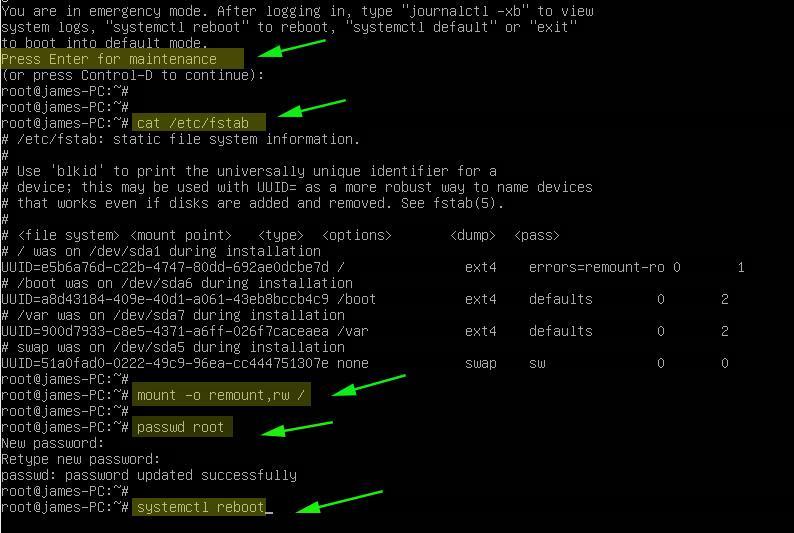
После того, как вы добавили вышеприведенное значение, нажмите сочетание клавиш CTRL + x или F10, чтобы загрузить систему в режим восстановления. Через несколько секунд вы попадете в режим восстановления (однопользовательский режим) в качестве пользователя root. Нажмите Enter.
Затем введите следующую команду для монтирования файловой системы root (/) в режим чтения / записи:

Загрузка в аварийный режим
Загрузка операционной системы Linux в аварийный режим аналогична описанному выше методу. Все, что вам нужно сделать, это заменить «systemd.unit= rescue.target» на «systemd.unit = emergency.target» при редактировании меню Grub.

После того, как вы добавили «systemd.unit=emergency.target», нажмите Ctrl + x или F10, чтобы продолжить загрузку в аварийный режим.
Вы можете подключить корневую файловую систему в режим чтения / записи с помощью команды:

Переключение между режимами восстановления и аварийный режимом и наоборот
Если вы загрузились в режим восстановления, то из него же можно переключиться в аварийный режим с помощью следующей команды:
Аналогично, чтобы переключиться с аварийного режима в режим восстановления, введите команду:

Режим восстановления Recovery mode в Linux
Еще одним режимом, которым можно воспользоваться для восстановления системы, является режим Recovery mode. Примечателен он тем, что содержит предустановленные утилиты для восстановления.
Для запуска режима восстановления необходимо загрузиться в меню Grub, выбрать Дополнительные параметры.
Затем из появившегося списка выбрать первое (верхнее) ядро с надписью (recovery mode).

Как вы можете видеть на рисунке ниже, как только система загрузится в режим восстановления, вам будет показано меню инструментов, которые решают различные общие проблемы с загрузкой системы. Стоит попробовать каждый из них, который как вам кажется, может решить вашу проблему.

Clean, например, удалит неиспользуемые файлы, если вы подозреваете, что проблема связана с полным диском. dpkg попытается исправить любые сломанные пакеты программного обеспечения. (Средство «dpkg»может потребовать, чтобы вы сначала включили сеть (network). Опция root запустит командную строку от имени суперпользователя.
Теперь вы знаете, что такое режим восстановления, аварийный режим и Recovery mode, а также как загрузиться в эти режимы в Ubuntu 18.04. Как я уже упоминал, приведенные здесь шаги будут работать во многих последних версиях Linux, в которых используется Systemd.
Как восстановить операционную систему Ubuntu без переустановки
Рассмотрим популярные и действенные методы восстановления операционной системы Ubuntu. Если вы столкнулись с тем, что ваша система не запускается после обновления, установки драйверов или по каким-нибудь другим причинам, то вам стоит воспользоваться данной инструкцией.
На экране входа в систему воспользуйтесь комбинацией клавиш CTRL + ALT + F1 для переключения в виртуальную консоль tty1, возможно вам придется переключится на другую виртуальную консоль, в таком случае воспользуйтесь этой же комбинацией клавиш, но с F2 или F3 и т.д. И затем выполните следующие команды:
sudo rm /var/lib/apt/lists/lock sudo rm /var/lib/dpkg/lock sudo rm /var/lib/dpkg/lock-frontend sudo dpkg --configure -a sudo apt clean sudo apt update --fix-missing sudo apt install -f sudo dpkg --configure -a sudo apt update sudo apt dist-upgrade 
Если причиной того, что система не загружается стала установка видеорайвера Nvidia, то для решения проблемы его нужно удалить:
sudo apt remove --purge nvidia*sudo apt update && sudo apt dist-upgradeТак же может помочь переустановка рабочего окружения. Для Ubuntu это будет следующая команда (не влияет на пользовательские данные):
sudo apt install --reinstall ubuntu-desktopРекомендую периодически делать резервные копии системы и домашнего каталога пользователя, соответствующими инструментами. Например, для резервного копирования в среде Linux можно воспользоваться утилитой QT5-FSArchiver.
How to Boot into Rescue Mode Or Emergency Mode In Ubuntu 20.04 / 18.04
It’s not uncommon for users to forget their login passwords or have their system suffer a corrupt filesystem. When that happens, the recommended solution is to boot into rescue or emergency mode and apply the required fixes.
The rescue mode is also referred to as the single-user mode. As the name suggests, the rescue mode is used when you want to salvage your system from a system failure, for example, boot failure or reset a password. In rescue mode, all the local filesystems are mounted. However, only salient services are started. Normal services such as network services will not be started.
Emergency mode provides a minimal bootable environment and enables you to repair your Linux system even when rescue mode is not available. In emergency mode, only the root file system is mounted, and in read-only mode. Just as with rescue mode, only the essential services are activated in emergency mode.
In this guide, you will learn how to boot into rescue mode or emergency mode in Ubuntu 20.04 / 18.04.
On this page
Booting Ubuntu 20.04 in Rescue Mode
To get started, boot, or reboot your system. You will get the grub menu with options listed as shown. If you are running Ubuntu as a VM in VirtualBox, press the ESC button.
By default, the first option is selected. With the first option selected, press the ‘e’ key on the keyboard to access the grub parameters.
Scroll and locate the line that starts with ‘linux’ . Go to the very end of the line by pressing ctrl + e and delete the string “$vt_handoff” .
Next, append ‘systemd.unit=rescue.target’ at the end of the line.
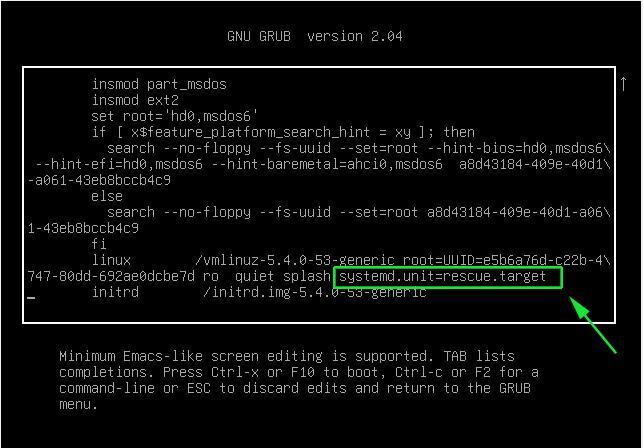
To boot the system into rescue mode, press ctrl + x . Proceed and press ENTER on your keyboard to gain access to the rescue mode. From there you can perform operations such as changing a user’s password. In the example below, I have managed to reset my password.
In rescue mode, all filesystems are mounted in read & write mode and you can run almost any commands just as you would in a normal session. Once you are done, reboot the system to save the changes using the command:
# passwd james # blkid # systemctl reboot
Booting Ubuntu 20.04 in Emergency Mode
As we mentioned earlier, in emergency mode, all files are mounted in read-only mode. The emergency mode comes in handy especially when it’s not possible to boot into rescue mode due to file system corruption.
To boot into emergency mode, reboot or boot your system. On the grub menu, ensure that the first option is highlighted and press the ‘e’ key on the keyboard to access the grub parameters.
Once again, navigate to the end of the line by pressing ctrl + e and delete the string “$vt_handoff” .
Next, append the ‘systemd.unit=emergency.target’ string at the end of the line.
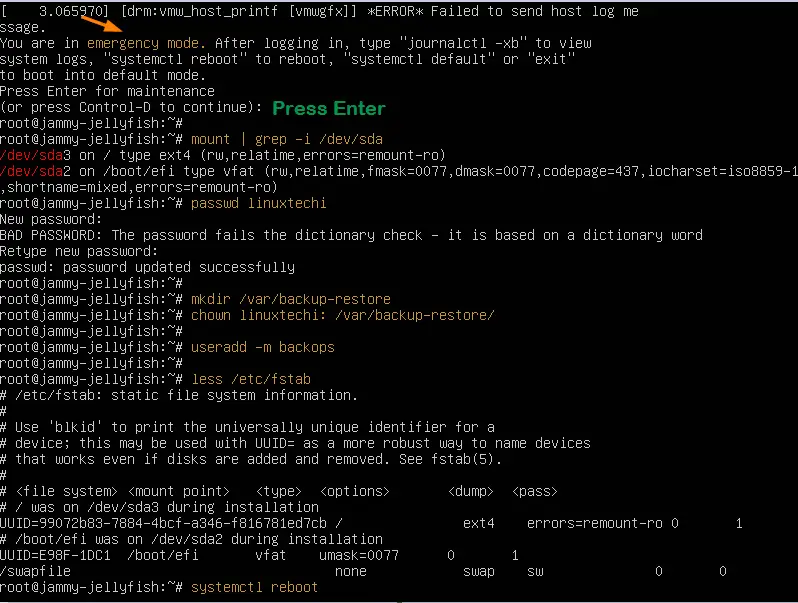
Thereafter, press ctrl + x to reboot into emergency mode. Hit ENTER to access the root filesystem. From here you can view various files on your Linux system. In this example, we are viewing the contents of the /etc/fstab to see the mount points that are defined.
# cat /etc/fstab # mount -o remount,rw / # passwd root # systemctl reboot
To make any changes to the system, you need to mount it in read and write mode as shown.
From here, you can perform any troubleshooting tasks such as changing the root password as shown. Once you are done, reboot for the changes to come into effect.
This draws the curtain on this article. Hopefully, you can now access both the rescue and emergency mode and fix system issues in the Ubuntu system.
How to Boot Ubuntu 22.04 into Rescue / Emergency Mode
Hello geeks, booting Ubuntu 22.04 (Jammy Jellyfish) into rescue and emergency mode helps to reset the forgotten user password, fix the file system errors and disabling or enabling systemd service during boot.
In this post, we will learn how to boot Ubuntu 22.04 LTS system into rescue and emergency mode. Rescue mode is similar to single user mode where are all troubleshooting steps are executed. Rescue mode loads the minimal environment and mount root file system.
Whereas in emergency mode, we get the single user shell without starting any system services. So emergency mode is required when we can’t boot the system into rescue mode.
Boot Ubuntu 22.04 into Rescue or Single User Mode
Head to target system which you want to boot into rescue or single user mode. At the boot press ‘ SHIFT & ESC ’ key to enter into grub bootloader screen.

Choose the first option Ubuntu and press ‘ e ’ to enter edit mode.
Go the end of line which starts with linux and delete the string ‘ $vt_handoff ’ and add the string ‘ systemd.unit=rescue.target ’
After making the changes, either press Ctrl+x or F10 to boot in rescue mode,
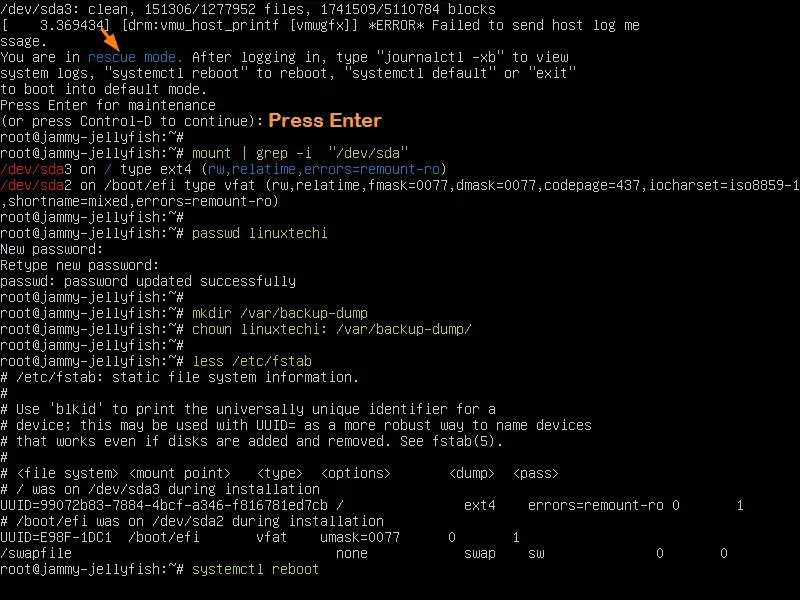
Once you enter into rescue mode, run all troubleshooting commands and to reboot the system run ‘ systemctl reboot ’ command
Alternate Way to Boot System into Rescue Mode
Reboot the system and press ‘ ESC & Shift’ Key to go to grub boot screen.
Choose the 2nd option ‘ Advanced Options for Ubuntu’ –> Choose recovery mode option and hit enter –> Choose Root (Drop to root shell prompt) .
Once you have root shell, run commands to recover and fix the system issues and finally use ‘ systemctl reboot ’ to reboot the system.
Boot Ubuntu 22.04 into Emergency Mode
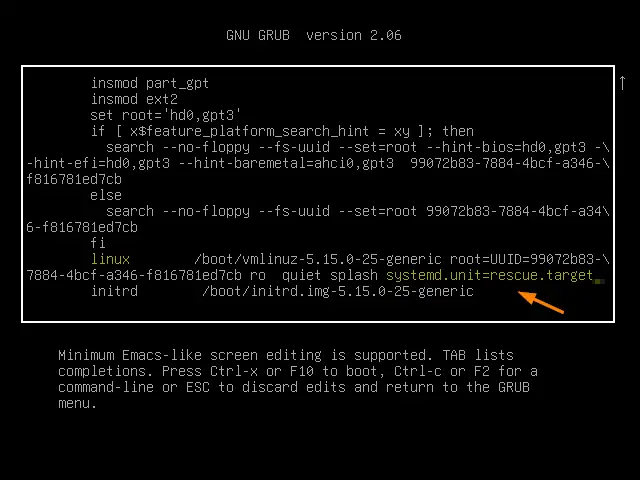
To boot the system into emergency mode, first go to grub screen.
Select the first option as ‘ Ubuntu ’ and press ‘ e ’ to edit. Look for the line which starts with linux word, go to the end of that line, remove the string $vt_handoff and add the string ‘ systemd.unit=emergency.target ’
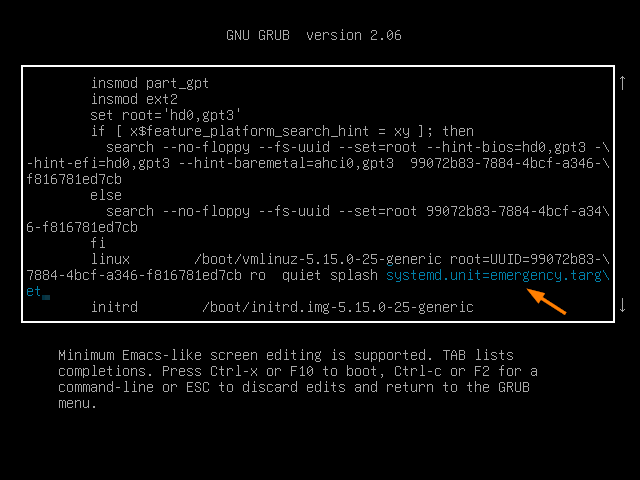
Press Ctrl+x or F10 to boot the system into emergency mode,
Similarly in rescue mode, you can perform all the troubleshooting in this mode and once done reboot the system with command ‘ systemctl reboot ’.
That’s all from this post. I found it informative and don’t hesitate to share this among your technical friends. Kindly post your queries and feedback in below comments section.