- Install Ubuntu Server
- 2. Requirements
- 3. Boot from install media
- 4. Choose your language
- 5. Choose the correct keyboard layout
- 6. Choose your install
- 7. Networking
- 8. Configure storage
- 9. Select a device
- 10. Confirm partitions
- 11. Confirm changes
- 12. Set up a Profile
- 13. Install software
- 14. Installation complete
- 15. What next?
- Finding help
- Ubuntu Server tutorials
- Core tutorial
- Next steps
- Ubuntu Server how-to guides
- Networking
- Mail services
- Backups
- Web servers
- Ubuntu Server documentation
- In this documentation
- Project and community
- PDFs and previous releases
Install Ubuntu Server
Ubuntu Server is a variant of the standard Ubuntu you already know, tailored for networks and services. It’s just as capable of running a simple file server as it is operating within a 50,000 node cloud.
Unlike the installation of Ubuntu Desktop, Ubuntu Server does not include a graphical installation program. Instead, it uses a text menu-based process. If you’d rather install the desktop version, take a look at our Install Ubuntu desktop tutorial.
This guide will provide an overview of the installation from either a DVD or a USB flash drive.
For a more detailed guide on Ubuntu Server’s capabilities and its configuration, take a look at our the Community Ubuntu Server documentation.
2. Requirements
You’ll need to consider the following before starting the installation:
- Ensure you have at least 2GB of free storage space.
- Have access to either a DVD or a USB flash drive containing the version of Ubuntu Server you want to install.
- If you’re going to install Ubuntu Server alongside data you wish to keep, ensure you have a recent backup.
See the server guide pages for more specific details on hardware requirements. We also have several tutorials that explain how to create an Ubuntu DVD or USB flash drive.
3. Boot from install media
To trigger the installation process, perform the following:
- Put the Ubuntu DVD into your DVD drive (or insert the USB stick or other install media).
- Restart your computer.
After a few moments, you should see messages like those shown below on the screen…

Most computers will automatically boot from USB or DVD, though in some cases this is disabled to improve boot times. If you don’t see the boot message and the “Welcome” screen which should appear after it, you will need to set your computer to boot from the install media.
There should be an on-screen message when the computer starts telling you what key to press for settings or a boot menu. Depending on the manufacturer, this could be Escape , F2 , F10 or F12 . Simply restart your computer and hold down this key until the boot menu appears, then select the drive with the Ubuntu install media.
4. Choose your language
After the boot messages appear, a ‘Language’ menu will be displayed.

As the message suggests, use the Up , Down and Enter keys to navigate through the menu and select the language you wish to use.
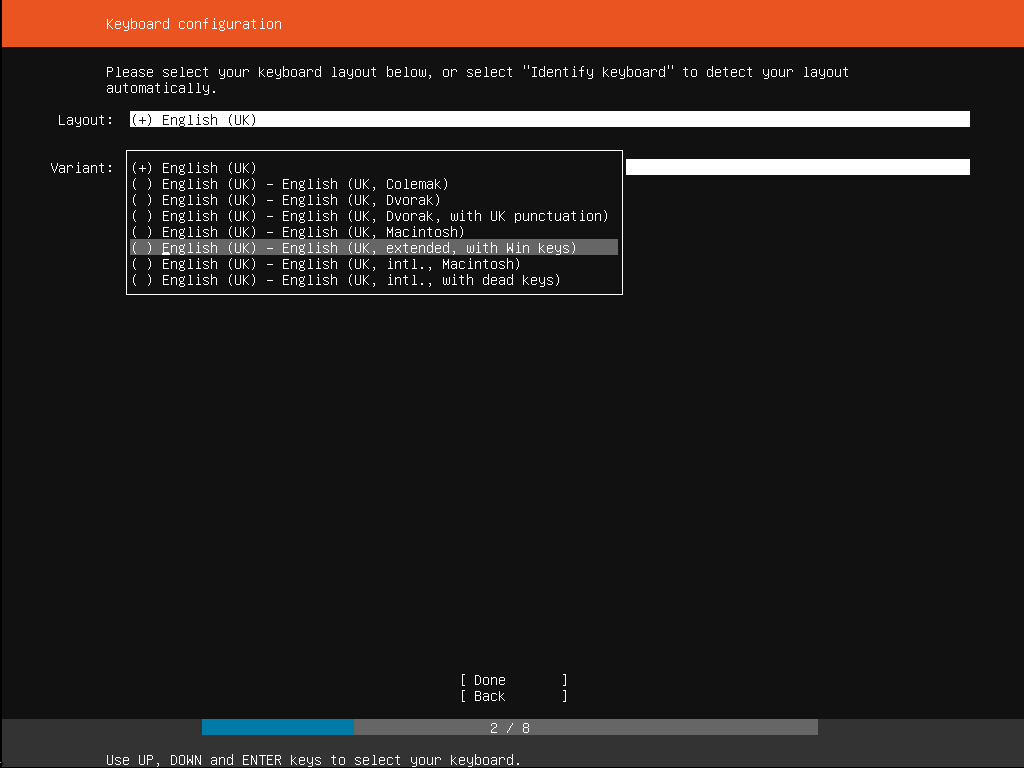
5. Choose the correct keyboard layout
Before you need to type anything in, the installer will next display a menu asking you to select your keyboard layout and, if applicable, the variant.

If you don’t know which particular variant you want, just go with the default — when Ubuntu Server has been installed you can test and change your preferences more easily if necessary.
6. Choose your install
Now we are ready to select what you want to install. There are three options in the menu:
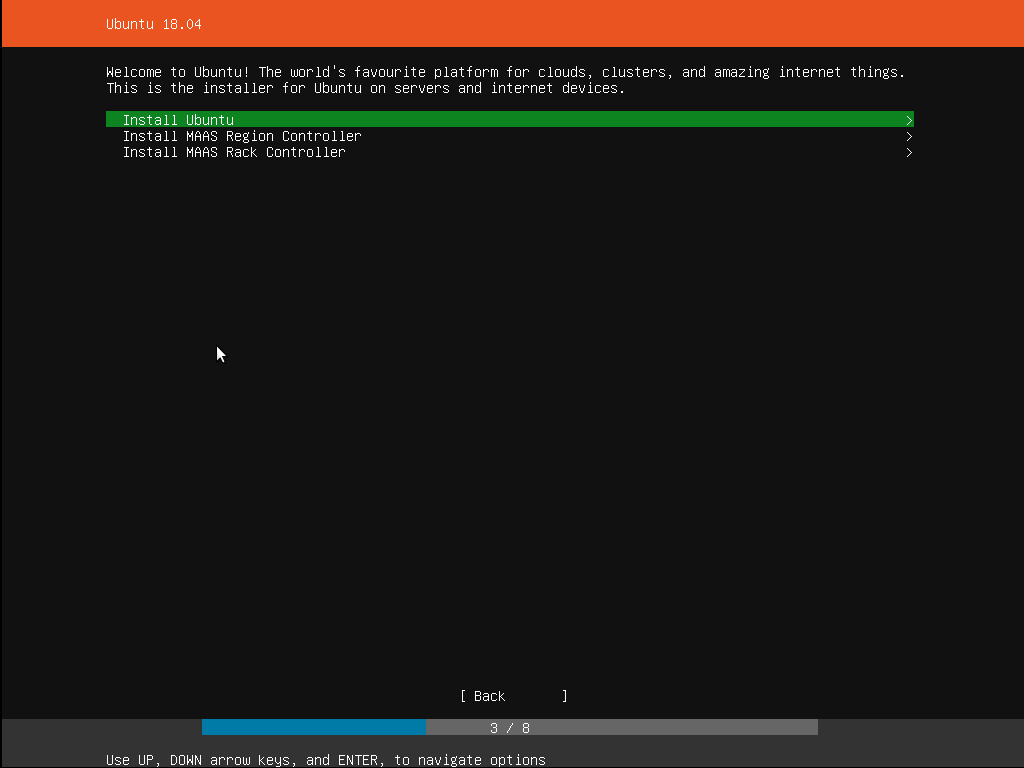
The bottom two options are used for installing specific components of a Metal As A Service (MAAS) install. If you are installing MAAS, you should check out the MAAS documentation for more information on this! The rest of this tutorial assumes you select the first option, Install Ubuntu .
7. Networking
The installer will automatically detect and try to configure any network connections via DHCP.

This is usually automatic and you will not have to enter anything on this screen, it is for information only.
If no network is found, the installer can continue anyway, it just won’t be able to check for updates. You can always configure networking after installation.
8. Configure storage
The next step is to configure storage. The recommended install is to have an entire disk or partition set aside for running Ubuntu.

If you need to set up a more complicated system, the manual option will allow you to select and reorganise partitions on any connected drives.
Note that Ubuntu no longer requires a separate partition for swap space, nor will the automated install create one.
9. Select a device
This menu will allow you to select a disk from the ones detected on the system.

To help identification, the drives will be listed using their system ID. Use the arrow keys and enter to select the disk you wish to use.
10. Confirm partitions
With the target drive selected, the installer will calculate what partitions to create and present this information…
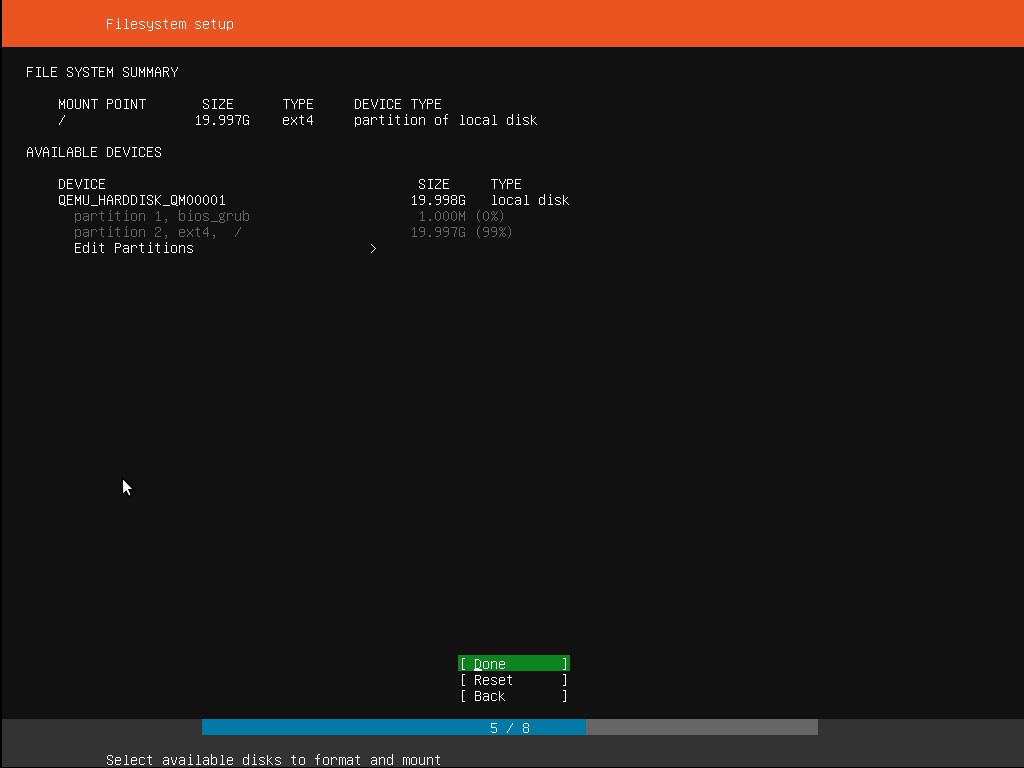
If this isn’t what you expected to see (e.g., you have selected the wrong drive), you should use the arrow keys and enter to select Back from the options at the bottom of the screen. This will take you back to the previous menu where you can select a different drive.
It is also possible to manually change the partitions here, by selecting Edit Partitions . Obviously you should only select this if you are familiar with how partitions work.
When you are happy with the disk layout displayed, select Done to continue.
11. Confirm changes
Before the installer makes any destructive changes, it will show this final confirmation step. Double check that everything looks good here and you aren’t about to reformat the wrong device!

There is no “Undo” for this step, once you confirm the changes, the indicated devices will be overwritten and any contents may be lost
12. Set up a Profile
The software is now being installed on the disk, but there is some more information the installer needs. Ubuntu Server needs to have at least one known user for the system, and a hostname. The user also needs a password.

There is also a field for importing SSH keys, either from Launchpad, Ubuntu One or Github. You simply need to enter the username and the installer will fetch the relevant keys and install them on the system ready for use (e.g. secure SSH login to the server).
13. Install software
Once you have finished entering the required information, the screen will now show the progress of the installer. Ubuntu Server now installs a concise set of useful software required for servers. This cuts down on the install and setup time dramatically. Of course, after the install is finished, you can install any additional software you may need.

14. Installation complete
When the install is complete, you will see a message like this on the screen.

Remember to remove the install media, and then press enter to reboot and start the server. Welcome to Ubuntu!
15. What next?
With Ubuntu Server installed, you can now carry on and build that file-server or multi-node cluster we mentioned!
If you are new to Ubuntu Server, we’d recommend reading the Server Guide.
You can also check out the latest on Ubuntu Server, and what others are using it for on the Ubuntu Server pages.
Finding help
The Ubuntu community, for both desktop and server, is one of the friendliest and most well populated you can find. That means if you get stuck, someone has probably already seen and solved the same problem.
Try asking for help in one of the following places:
Alternatively, if you need commercial support for your server deployments, take a look at Ubuntu Advantage.
Ubuntu Server tutorials
This section of our documentation contains step-by-step tutorials to help outline what Ubuntu Server is capable of while helping you achieve specific aims.
We hope our tutorials make as few assumptions as possible and are broadly accessible to anyone with an interest in Ubuntu Server. They should also be a good place to start learning about Ubuntu Server in general, how it works, and what it’s capable of.
Core tutorial
In our core tutorial, you will learn how to set up an Ubuntu Server; from installing using a bootable USB device, to navigating the Server installer menu.
Next steps
Once your Ubuntu Server is up and running, you may be interested in this collection of related tutorials and topics that will help you learn more about how it works and what’s available to you. These pages can be viewed in any order.
If you have a specific goal, but are already familiar with Ubuntu Server, take a look at our How-to guides. These have more in-depth detail and can be applied to a broader set of applications.
Take a look at our Reference section when you need to determine what commands are available, and how to interact with various tools.
Finally, for a better understanding of how Ubuntu Server works and how it can be used and configured, our Explanation section enables you to expand your knowledge of the operating system and additional software.
Ubuntu Server how-to guides
If you have a specific goal, but are already familiar with Ubuntu Server, our how-to guides have more in-depth detail than our tutorials and can be applied to a broader set of applications. They’ll help you achieve an end result but may require you to understand and adapt the steps to fit your specific requirements.
| Advanced installation |
| amd64 netboot install |
| arm64 netboot install |
| ppc64el netboot install |
| Virtual CDROM and Petitboot on ppc64el |
| s390x install via z/VM |
| s390x install via LPAR |
| Automatic installation |
| Introduction to Automated Server installer |
| Autoinstall quickstart |
| Autoinstall quickstart on s390x |
| Autoinstall config file reference |
| Autoinstall JSON schema |
| IBM z/VM autoinstall on s390x |
| IBM LPAR autoinstall on s390x |
| ROCK Images |
| Introduction |
| Container customization with Docker |
| Multi-node configuration with Docker-Compose |
| Software |
| Package management |
| Upgrade |
| Reporting bugs |
| Kernel crash dump |
| OpenLDAP |
| Introduction |
| Installation |
| Access control |
| Replication |
| Simple LDAP user and group management |
| SSL/TLS |
| Backup and restore |
| Kerberos |
| Introduction |
| Kerberos server |
| Service principals |
| Kerberos encryption types |
| Secondary KDC |
| Basic workstation authentication |
| Kerberos with OpenLDAP backend |
| Network user authentication with SSSD |
| Introduction |
| Active directory |
| LDAP |
| LDAP and Kerberos |
| Troubleshooting |
| WireGuard VPN |
| Introduction |
| Peer to site |
| Introduction |
| On router |
| Inside device |
| Site to site |
| Default gateway |
| Other tasks |
| Security tips |
| Troubleshooting |
Networking
Mail services
These guides will help you get started with the most common and popular mail services. If you aren’t sure which service to use, check out our overview of these options.
Backups
These guides focus on helping you set up backup systems. If you need guidance on these options, see our introduction to system backups.
Web servers
Ubuntu Server documentation
Ubuntu Server is a version of the Ubuntu operating system designed and engineered as a backbone for the internet.
Ubuntu Server brings economic and technical scalability to your datacentre, public or private. Whether you want to deploy an OpenStack cloud, a Kubernetes cluster or a 50,000-node render farm, Ubuntu Server delivers the best value scale-out performance available.
In this documentation
| Tutorials Get started — a hands-on introduction to Ubuntu Server for new users | How-to guides Step-by-step guides covering key operations and common tasks |
| Explanation Concepts — discussion and clarification of key topics | Reference Technical information — package specifications, APIs, architecture |
Project and community
Ubuntu Server is a member of the Ubuntu family. It’s an open source project that welcomes community projects, contributions, suggestions, fixes and constructive feedback.
If you find any errors or have suggestions for improvements to pages, please use the link at the bottom of each topic titled: “Help improve this document in the forum.” This link will take you to the Server Discourse forum for the specific page you are viewing. There you can share your comments or let us know about bugs with any page.
Thinking about using Ubuntu Server for your next project? Get in touch!
PDFs and previous releases
Below are links to the previous Ubuntu Server release server guides as well as an offline copy of the current version of this site:
Ubuntu 20.04 LTS (Focal Fossa) and later: PDF
Ubuntu 18.04 LTS (Bionic Beaver): Web and PDF