- Устанавливаем/сбрасываем ROOT пароль
- Сбрасываем пароль от root через GRUB
- How to Reset or Change the Root Password in Linux
- Changing Your Root Password in Ubuntu
- Step 1: Open a Terminal Window
- Step 2: Change Your Root Password
- Resetting a Root Password in Ubuntu
- Step 1: Boot to Recovery Mode
- Step 2: Drop Out to Root Shell
- Step 3: Remount the File System with Write-Permissions
- Step 4: Change the Password
- Changing the Root Password in CentOS
- Step 1: Access the Command Line (Terminal)
- Step 2: Change the Password
- Reset Root Password in CentOS
- Step 1: Access Boot Menu
- Step 2: Edit Boot Options
- Step 3: Remount the Drive
- Step 4: Changing the Password
- Step 5: Restart
- Как изменить пароль суперпользователя в Linux
- Если вы знаете пароль
- Если вы не знаете пароля
- Дополнительные статьи
- Об этой статье
Устанавливаем/сбрасываем ROOT пароль
Этот способ предполагает вход в систему Ubuntu под пользователем с sudo правами, а команда «su» разрешена как часть «sudo» привилегий.
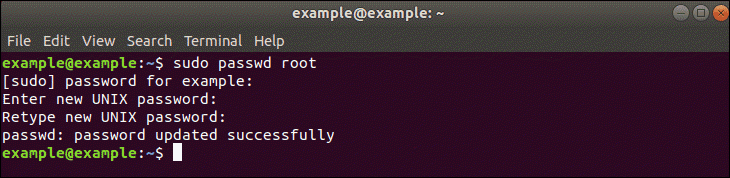
Вводим следующую команду, чтобы войти в систему с root-правами:
При появлении запроса «[sudo] password for *user*» вводим свой пароль, чтобы продолжить.
Глядя на скриншот выше, можно заметить смену пользователя на «root», таким образом, мы вошли в Ubuntu под root, используя свой пароль.
Теперь мы можем сменить пароль root-пользователя, для этого необходимо использовать следующую команду:
После ввода команды указываем новый пароль в запросе «New password» и повторяем новый пароль после запроса «Retype new password».
Пароль для root будет установлен при первом использовании команды или изменит его на новый пароль при дальнейших использованиях команды «passwd».
А работает ли новый пароль? Давайте это выясним, нажимаем сочетание клавиш «Ctrl+D», чтобы окончить текущий ввод данных в терминале, либо запускаем новый терминал и вводим новую команду:
Данной командой мы войдем в систему как root, после чего вводим новый пароль, который мы только что установили для root.
Таким образом мы успешно изменили пароль от root.
Сбрасываем пароль от root через GRUB
Существует еще один способ для изменения пароля от root или любого другого пользователя при загрузке Ubuntu.
Сначала перезагружаем наш ПК. Если меню GRUB не появляется автоматически, то удерживаем клавишу «Shift» во время загрузки. Это принудительно откроет меню GRUB.
Затем выбираем пункт «Ubuntu» в меню и нажмите клавишу «E», чтобы начать редактирование конфигурации загрузки.
Далее необходимо внести изменения в строку, заменяем значение:
Результат отображен на скриншоте ниже:
Изменения заключаются в том, чтобы из GUI перейти в оболочку Bash для внесения изменений — смена пароля. Нажимаем клавишу «F10», чтобы загрузиться с новой конфигурацией.
Загрузка с измененной конфигурацией сработает только один раз и сброситься при повторной загрузке.
Мы вошли в систему как root-пользователь в командной строке. Теперь используем команду для сброса пароля:
Указываем и повторяем новый пароль.
Затем перезагружаем систему в обычном режиме (без GRUB) и входим как root уже с новым паролем.
How to Reset or Change the Root Password in Linux
In Linux, root privileges (or root access) refers to a user account that has full access to all files, applications, and system functions.
Most basic Linux user accounts run with limited privileges. This keeps users from making mistakes or accidentally exposing the system to vulnerabilities.
To use protected operating system features, a Linux user has to temporarily elevate their privileges using a command like sudo . The sudo command tells the system to run a command as a superuser, or root user. When you run a function using sudo , you’ll usually have to enter your password.
Some versions of Linux will elevate your user privileges for a set amount of time around (15 minutes) before reverting. Other versions only perform a single task with elevated privileges.
It’s a good idea to change your passwords regularly and consider using enterprise password management software.
This guide will help you change your Linux root password in Ubuntu or CentOS, or reset the password.
Changing Your Root Password in Ubuntu
Step 1: Open a Terminal Window
Right-click the desktop, then left-click Open in terminal.
Alternately, you can click Menu > Applications > Accessories > Terminal.
Step 2: Change Your Root Password
In the terminal window, type the following:
The system will prompt you to enter your password – this is the same password you use to log in to the system.
Next, the system will prompt you to enter a new password. Do so, and then re-enter it exactly the same when the system prompts you to retype the password. This double-entry confirms that you have typed the password correctly.
Resetting a Root Password in Ubuntu
In some situations, you may need to access an account for which you’ve lost or forgotten a password.
Step 1: Boot to Recovery Mode
Restart your system. Once you see the splash screen for the computer manufacturer, hold down the shift key. The system should come up with a black and white GRUB, or boot menu, with different Linux kernel versions displayed.
Select the second one from the top – the highest revision, followed by (recovery mode). Press Enter.
Step 2: Drop Out to Root Shell
The system should display a menu with different boot options. Use the arrow keys to navigate to the option labeled root and press Enter.
The system should respond by giving you a command-line interface with a prompt.
Step 3: Remount the File System with Write-Permissions
Right now, your system only has read-only access to your system. That means it can look at the data, but cannot make any changes. But we need write-access to change the password, so we’ll need to remount the drive with the appropriate permissions.
Press Enter. This should allow you to make changes to the data on the hard drive.
Step 4: Change the Password
Substitute the name of the user for username, then press Enter. The system asks you to type a new UNIX password and then to retype it.
Once you’ve entered and confirmed the new password, reboot the system by entering the following:
Hit Enter, and your system should restart. Don’t press any keys, let the system come up to the login screen, and test to make sure the new password works.
Note: Learn how to use the chpasswd command. Chpasswd is helpful for managing multiple passwords and making multiple changes.
Changing the Root Password in CentOS
Changing a password in CentOS is almost identical to changing it in Ubuntu.
Step 1: Access the Command Line (Terminal)
Right-click the desktop, then left-click Open in Terminal. Or, click Menu > Applications > Utilities > Terminal.
Step 2: Change the Password
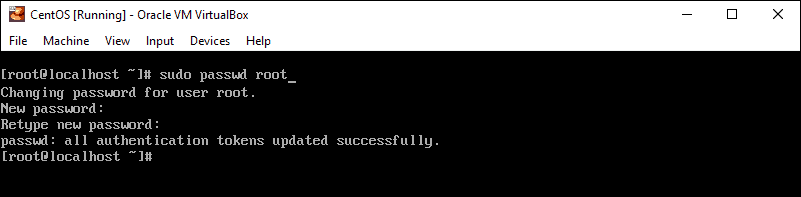
At the prompt, type the following, then press Enter:
The system should prompt you to enter your existing password. Do so, then follow the prompts to enter and confirm a new root password.
Reset Root Password in CentOS
This is a similar process as in Ubuntu, with a couple of variations.
Step 1: Access Boot Menu
Restart the system, then tap the Esc key about once per second to launch the GRUB menu.
Step 2: Edit Boot Options
Use the arrows to highlight the version of Linux you boot into, then press e.
Use the arrows to highlight the line that starts with kernel or Linux.
At the end of the line, add a space then type single. Press Enter, then boot into single-user mode by pressing Ctrl-X or B. (The system will display the command to use.)
Step 3: Remount the Drive
You should have a command line, and you’ll have root privileges. To enable read/write access on your hard drive, type the following:
Step 4: Changing the Password
Press Enter, and the system should prompt you to enter and confirm a new password.
Step 5: Restart
Type the following, pressing enter after each line:
Your system should restart. Confirm that your new password works by logging in.
Note: If you ever come across a Linux boot failure, be sure to save our guide on using GRUB rescue to troubleshoot it.
If you already have access to your user account, resetting or changing your password in Linux is simple.
It can be more challenging if you’ve lost or forgotten a password, but with a little creative restarting and editing, you shouldn’t find it too hard.
Sofija Simic is an experienced Technical Writer. Alongside her educational background in teaching and writing, she has had a lifelong passion for information technology. She is committed to unscrambling confusing IT concepts and streamlining intricate software installations.
In Linux, special tools were developed for managing applications. Application software for Linux typically.
The find command is a useful command-line tool in Linux. It allows you to use the terminal to search for a .
There’s a reason that tech support asks you if you’ve rebooted your Linux server. It’s cliched but true.
This guide is for users who have already configured a CentOS server and installed the Apache HTTP services.
Как изменить пароль суперпользователя в Linux
В создании этой статьи участвовала наша опытная команда редакторов и исследователей, которые проверили ее на точность и полноту.
Команда контент-менеджеров wikiHow тщательно следит за работой редакторов, чтобы гарантировать соответствие каждой статьи нашим высоким стандартам качества.
Количество просмотров этой статьи: 25 685.
Из этой статьи вы узнаете, как в Linux изменить пароль суперпользователя, если вы знаете текущий пароль, и если вы его не знаете .
Если вы знаете пароль

- Если вы не пользуетесь средой рабочего стола, вы уже находитесь в терминале, поэтому перейдите к следующему шагу.

Введите su в терминале и нажмите ↵ Enter . [2] X Источник информации На следующей строке появится слово Password: (Пароль).

- Если вы ввели неверный пароль, введите su и повторите попытку.
- Пароли чувствительны к регистру.

Введите passwd и нажмите ↵ Enter . На новой строке появится Enter new UNIX password: (Введите новый пароль).


Введите новый пароль еще раз и нажмите ↵ Enter . Вы увидите сообщение «Password updated successfully» (Пароль успешно обновлен).

Если вы не знаете пароля


- Если вы не успели нажать E , и меню Grub исчезло с экрана, перезагрузите компьютер и попробуйте снова.
- Этот метод работает в большинстве популярных дистрибутивов Linux (Ubuntu, CentOS 7, Debian). Существует много дистрибутивов Linux, и если у вас не получается перейти в однопользовательский режим с помощью этого метода, почитайте инструкции к своему дистрибутиву (на сайте его разработчиков).


Переместите курсор в конец строки. Используйте клавиши → , ← , ↑ и ↓ , чтобы поместить курсор сразу после ro .


Нажмите Ctrl + X . Это сообщит системе о том, что в однопользовательском режиме нужно сразу открыть терминал с правами суперпользователя.

Введите mount –o remount,rw / в терминале и нажмите ↵ Enter . Это приведет к монтированию файловой системы в режиме чтение/запись.

Введите passwd в терминале и нажмите ↵ Enter . Так как в однопользовательском режиме вы автоматически получаете права суперпользователя, нет необходимости добавлять в эту команду дополнительные параметры.

Введите новый пароль суперпользователя и нажмите ↵ Enter . Вводимый пароль не будет отображаться на экране.

Введите новый пароль еще раз и нажмите ↵ Enter . Когда система подтвердит, что оба пароля совпадают, вы увидите сообщение «Password updated successfully» (Пароль успешно обновлен).

- Пароль должен включать не менее 8 символов и содержать сочетание букв (прописных и строчных), цифр и символов.
- Чтобы изменить пароль для другого пользователя, введите su , чтобы получить права суперпользователя, а затем введите passwd .
Дополнительные статьи


Об этой статье
В создании этой статьи участвовала наша опытная команда редакторов и исследователей, которые проверили ее на точность и полноту.
Команда контент-менеджеров wikiHow тщательно следит за работой редакторов, чтобы гарантировать соответствие каждой статьи нашим высоким стандартам качества. Количество просмотров этой статьи: 25 685.